Transcription
Eltek Flatpack2 24 V / 48V Touchscreen Controller User Guide Adam Maurer VK4GHZRevision: 15 July 2021This touch-screen controller can be used to control & monitor a single Eltek Flatpack2 24 V or Flatpack2 48 Vrectifier being used as a general purpose Power Supply Unit.Skill level required: BASICAbility to solder connectors & wires to supplied connectors, connecting to your own Flatpack2 interface board.Tested with: Flatpack2 48/2000 HE24115.11524115.105105 vs 115 fan direction only difference Flatpack2 48/3000 HE24119.11524119.105105 vs 115 fan direction only difference Flatpack2 24V/200024115.200This product is not intended to simultaneously control multiple rectifiers, nor be an intelligent battery chargercontroller.This controller is powered directly by the Flatpack2 under supervision.A separate power supply is NOT required for this controller.Eltek Flatpack2 24V/48V Touchscreen Controller Kit NotesPage 1
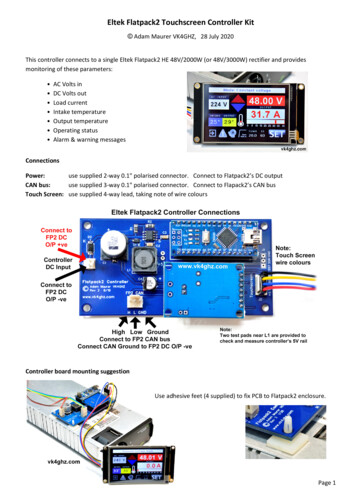
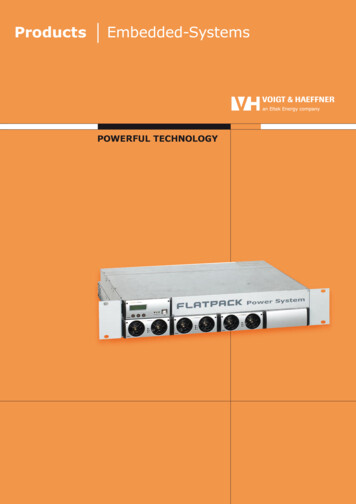
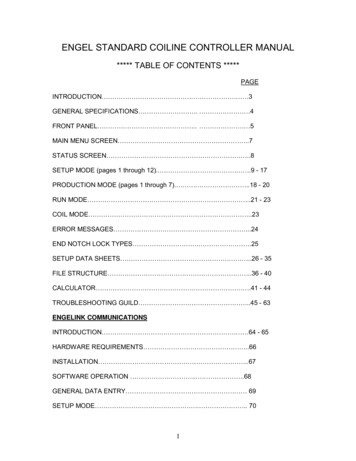
SummaryThis 3.5" touchscreen-based controller allows setting andmonitoring of parameters that Flatpack2 provides via it’sCAN-bus: AC Volts inDC Volts outLoad currentIntake temperatureOutput temperatureOperating statusAlarm & warning messagesConnectionsPower:use supplied 2-way 0.1" polarised connector.* Connect to Flatpack2’s DC output – do not power off a separate power sourceCAN bus:use supplied 3-way 0.1" polarised connector. Connect to Flapack2’s CAN bus* CAN-bus GND on this connector must be connected to rectifiers –VE outputTouch Screen: use supplied 4-way lead, taking note of wire coloursController board mounting suggestionUse adhesive feet (4 supplied) to fix PCB to Flatpack2 enclosure.Eltek Flatpack2 24V/48V Touchscreen Controller Kit NotesPage 2
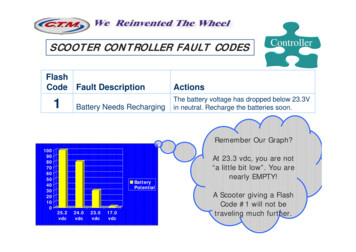
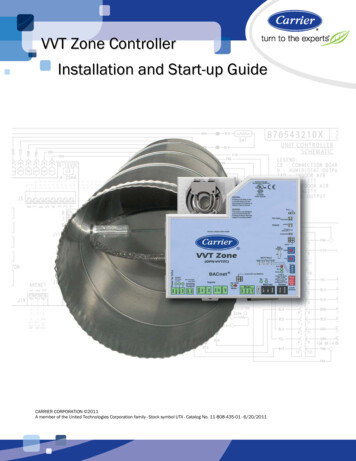
120 ohm CAN bus termination jumperAs supplied, the 120 ohm CAN bus termination resistor is enabled.To remove the 120 ohm termination on the CAN bus adapter board:Disconnect power. Lift off CAN adapter board, remove J1 jumper. Refit board.If the CAN bus lead is relatively short and J1 jumper is fitted, a 120 ohm resistor at the rear of the FP2 (ie; on thebreakout PCB) may not be required.Touch Screen Protective LayerTo prevent scratches, remove protective layer film AFTER the screen cut out and mountingholes have been prepared in the enclosure, and you are ready for final screen installation.Controller ScreensMain ScreenOutput voltage can be shifted up or down in 200mV steps by touching the UP/DOWN arrows.This does not affect the default start up voltage.Main Screen SET ButtonShort touch:resets screen saver (if Screen Saver is enabled)Long touch:takes you to the Set Menu pageWhen screen saver is enabled‘’SS’ appears as a reminder to touch this button to reset screen saver timerEltek Flatpack2 24V/48V Touchscreen Controller Kit NotesPage 3
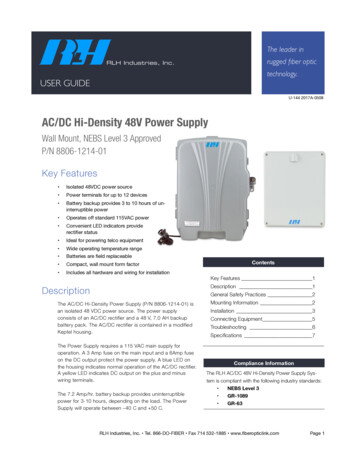
Parameter Font and ColoursForeground and background colours of each parameter (Status, ACV in, Intake Temp, Output Temp, DCV out, I out,Warning messages, Alarm messages) can be adjusted to your preference.Example: Set DC Volts Output Font:Simply touch the parameter to set the colour and font.Font/Colour Settings pageThere is a choice of two fonts.Touch the checkbox to toggle between fonts.Adjust R, G & B sliders to set the desired foregroundand background colour combination.Touch Exit to save and exit.Parameter Name ColoursTouch any one of the names to set the colours of all names Example: touch “AC Input”.Set MenuHelp Screens?(question mark), touch that text to seeWhere you see acontext sensitive help.To exit help screens wait 10 seconds for automaticreturn or touch Exit to exit help screen immediately.Eltek Flatpack2 24V/48V Touchscreen Controller Kit NotesPage 4
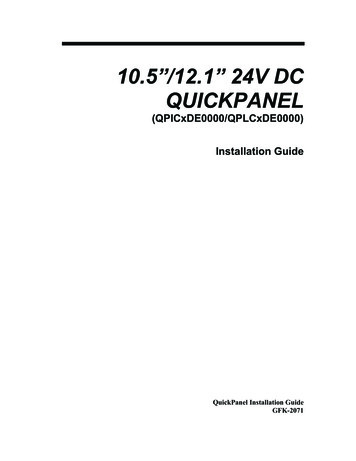
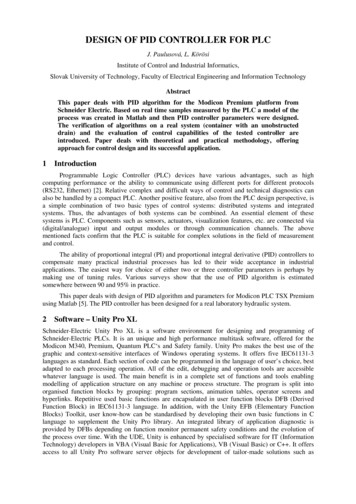
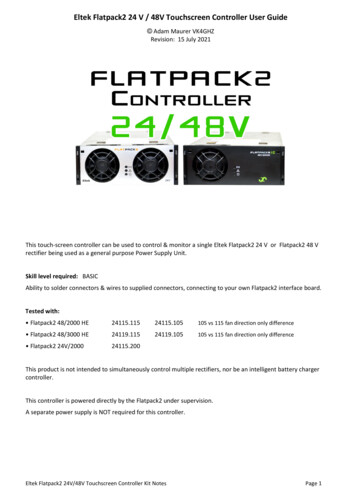
Screen Settings page Screen brightness5 - 100% Screen saver in minutesenter 0 to disable screen saverThis value is displayed on the main page Output voltage 2 decimal place checkboxunchecked 1 decimal placeGeneral Settings pageSettings on this page are from factory testing.You will need to set ALL of these for yourselfwhen you have connected to your own Flatpack2. Current Limit entered as deciAmps by keypadeg: 2 0 0 deciAmps 20.0 A Overvoltage Offset entered as centiVolts by keypadeg: 3 0 0 centiVolts 3.00 V Slow ‘walk-in’ checkboxunchecked fast walk-inchecked slow walk-inSetting walk-in & current limit – not what you expect!Touch Current Limit number entry box to enter desired current limit value in deciAmps.Touch OVP Offset number entry box to enter desired overvoltage offset value in dentiVolts.Toggle walk-in checkbox for desired preference.Exit General Settings.Current Limit, OVP Offset & Walk-in are only set when the outputvoltage is adjusted up or down with the arrow buttonsIf you have already set your default start-up volts, it’s ok to adjust volts down by 200mV, and then back up again.This will set current limit, OVP offset and walk-in to your preferences.A change of walk-in takes effect next time the Flatpack2 is powered up.Current Limit Keypad page Current Limit in deciAmpseg: 2 0 0 20.0 Ampseg: 0 5 0 5.0 AmpsShort touch – clears value to 0Long touch – Cancel entry and returnEltek Flatpack2 24V/48V Touchscreen Controller Kit NotesPage 5
Set Default Volts pageFlatpack2 48V variant48VFlatpack 2's default start-up voltage can be setbetween 43.50 - 57.60 V.Flatpack2 24V variant24VFlatpack 2's default start-up voltage can be setbetween 21.75 – 28.80 V.To set the desired start-up voltage touch number entry box for keypad pageDefault Voltage Keypad page Voltage entered as centiVolts on keypadeg:eg:eg:eg:4 5 5 0 45.50 V4 8 0 0 48.00 V2 4 0 0 24.00 V2 8 0 0 28.00 VShort touch – clears value to 0Long touch – Cancel entry and returnNote: This entry is not error trappedTouch OK to exit keypadTouchto set voltage orSet Default Volts: wait 15 seconds before voltage changesEltek Flatpack2 24V/48V Touchscreen Controller Kit Notesto exit.Exit: will cancel setting voltagePage 6
Warnings & AlarmsIf an alarm state or warning state (or both) is detected, the appropriate icons become red.Touching either of these icons will take you to the Warning/Alarms page.Warnings/Alarms pageFlatpack2’s serial number is displayed on this pageTouch Exit to return.www.vk4ghz.comEltek Flatpack2 24V/48V Touchscreen Controller Kit NotesVK4GHZPage 7
Eltek Flatpack2 24V/48V Touchscreen Controller Kit Notes Page 5 Screen Settings page Screen brightness 5 - 100% Screen saver in minutes enter 0 to disable screen saver This value is displayed on the main page Output voltage 2 decimal place checkbox unchecked 1 decimal place General Settings page Settings on this page are from factory testing. You will need to set ALL of these for .