Transcription
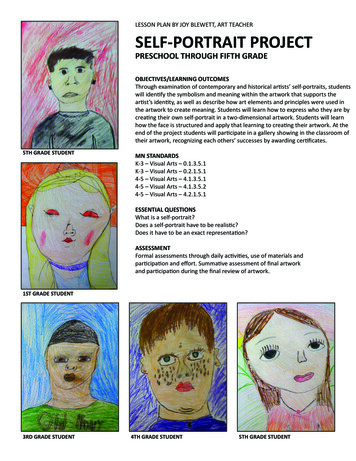
LESSON PLAN BY JOY BLEWETT, ART TEACHERSELF-PORTRAIT PROJECTPRESCHOOL THROUGH FIFTH GRADEOBJECTIVES/LEARNING OUTCOMESThrough examination of contemporary and historical artists’ self-portraits, studentswill identify the symbolism and meaning within the artwork that supports theartist’s identity, as well as describe how art elements and principles were used inthe artwork to create meaning. Students will learn how to express who they are bycreating their own self-portrait in a two-dimensional artwork. Students will learnhow the face is structured and apply that learning to creating their artwork. At theend of the project students will participate in a gallery showing in the classroom oftheir artwork, recognizing each others’ successes by awarding certificates.5TH GRADE STUDENTMN STANDARDSK-3 – Visual Arts – 0.1.3.5.1K-3 – Visual Arts – 0.2.1.5.14-5 – Visual Arts – 4.1.3.5.14-5 – Visual Arts – 4.1.3.5.24-5 – Visual Arts – 4.2.1.5.1ESSENTIAL QUESTIONSWhat is a self-portrait?Does a self-portrait have to be realistic?Does it have to be an exact representation?ASSESSMENTFormal assessments through daily activities, use of materials andparticipation and effort. Summative assessment of final artworkand participation during the final review of artwork.1ST GRADE STUDENT3RD GRADE STUDENT4TH GRADE STUDENT5TH GRADE STUDENT
DAY ONELesson Overview – Drawing is a skill that can be learned. With practicestudents can get better in their drawing skills, as well as in their confidencein drawing. This first day’s lesson is about how to draw eyes, lips, noses, andapply these features to a facial structure.Objectives Students will learn and understand what the different facial features areand how they are applied to the facial structure. Students will be able to draw the facial features and apply them to thestructure of a face.Preparation visual examples of eyes, lips, and noses powerpoint presentation and projection clipboards or drawing boards 8.5x11 drawing paper sharpened pencils and erasersVocabularyParts of the eye: iris, pupil, eyelash, eye lid, nose, nostril, lip, horizontal andvertical, oval, face, ear, neck, shirt, collar, hairline.DemonstrationDrawing and pointing out the specific parts of the eye, nose and lips, as wellas how to create the structure of the face using measurements.Student ActivityStudents will line up at the door and be instructed to take a clipboard, pencil,and piece of paper before taking a seat in the arranged lecture-style seating.Students will draw together along with the demonstration. 5-7 minutes willbe given for learning how to draw the facial features of eyes, lips and nosesand then applying them to the facial structure. Students will also be giventime to practice drawing what they’ve learned. One side of the paper will befor practicing drawing eyes, lips, and noses and the other side for drawinga complete portrait. Any time left will be given to completed their practiceportrait drawing.Anticipatory Set/MotivationStudents may find it difficult to sit through this demonstration, we could take breaks, get up and move around, stretch classtime will be broken up into closed/open studio timeStudents may wonder why care about this project or struggle with drawing, present the project as a skill-builder in drawing, similar to learning mathor how to read. Drawing is a skill that can be learned with practice.“What we are going to do today is learning to draw, learning how to seeto help improve drawing skills.” (Emphasize it’s a practice day).ClosureEncourage students by letting them know what a great job they did drawingtoday and take an informal assessment of whether this practice time washelpful to them, if they feel more confident about starting a self-portrait thenext time they are in art. Students will help collect pencils, erasers, clipboards, and work before lining up at the door to leave.Lesson Plan by Joy Blewett 2013
DAY TWOLesson OverviewStudents will review examples of artist self-portraits: Käthe Kollwitz’sgestural self-portrait, Picasso’s geometric self-portrait, symbolism fromFrank Big Bear’s self-portrait, and Frida Kahlo’s exaggeration of realism,and compare these artworks to the artists photos. Students will exploreidentity and what they’d like to express in their self-portrait.Objectives Students will learn about a variety of artists and the way they chose asartists to represent themselves in their self-portrait. Students will be able to apply the structure of the face that they learnedthe previous week with the self-portraits of artists. Students will be able to draw their own self-portrait, expressing whothey are visually.Preparation visual examples of eyes, lips, and noses and facial structure powerpoint presentation and projection 8.5x11 paper sharpen pencils, erasers mirrorsKÄTHE KOLLWITZPABLO PICASSOVocabularyself-portrait, gestural, geometric, realistic, symbolicDemonstrationReminder to students about the structure of the face that was learnedthe previous week. Demonstrate the size of portrait expectation on 8.5x11 –students need to make the portrait the focal point of the page.Student ActivityStudents will line up at the door and be welcomed into the art classroom.Students will start by sitting on the front floor rug for the lesson. Teacherwill present the self-portrait project, sharing artist self-portraits and askingstudents questions of what they see in the work, if self-portraits need to berealistic and what additional meaning students can incorporate into theirwork to communicate about themselves. (10-15 min)After the lesson, students will move to their assigned seats and begindrawing their self-portraits with pencil. Students will be encouraged to usethe mirrors to look at themselves, seeing their eyes, their nose, their lips andrefer to the posters of the features and facial structure that they learned theprevious week for drawing their portraits. (30-35 min)Anticipatory Set/MotivationStudents may get anxiety-ridden and perfectionistic with drawing theirself-portraits, highlight that artist’s have choices and options for how they approachdrawing their self-portraits. They are representational, not an exactmatch. Encourage the studio habit of engage and persist. Share personal struggles with students – ie. self-portrait paintingClosureClean up time and watch a short video on the work of Frank Big Bear.Lesson Plan by Joy Blewett 2013FRIDA KAHLOFRANK BIG BEAR
DAY THREELesson OverviewStudents will review work by three different artists that included significantbackgrounds in their self-portraits and discuss what things they could add intheir artwork to communicate more about themselves in their self-portrait.Students will spend majority of the time adding color to their self-portraitsand pushing them to completion. Students will learn how to use watercolorpencils but be given their choice of materials they’d like to use.JACOB LAWRENCEObjectivesStudents will learn about three more artists self-portraits and how environment and details can add additional meaning to a self-portrait.Students will know that they can express themselves freely in their artwork(as long as it is school appropriate).Students will be able to express themselves in their artwork.Preparationvisual examples of eyes, lips, and noses and facial structurepowerpoint presentationstudent work from last weekcolored pencil and crayonschoice paperVocabularyself-portrait, space, environment, backgroundDemonstrationHow to shade and tint with color pencils and crayons, and picking the rightcolor crayon for skin tone. Reminder to students to start adding more detailand backgrounds to their self-portraits.YASUO KUNIYOSHIStudent ActivityStudents will enter the room and take a seat on the front floor. The lessonwill include a presentation on artists and their self-portraits, a discussion ofideas students might add to their self-portraits to communicate more aboutthemselves and a demonstration on using watercolor pencils. Students willchoose a station of either watercolor pencils, colored pencils, or crayons tocomplete their self-portraits. Their artwork from last week will be passedback to students to start working.Anticipatory Set/Motivationstudents may or may not have trouble deciding which material to use - theability to move from one station to another will be dependent on whetherthere are seats available at the table.ClosureTable clean up procedures and possibly watching a video. And passing backwork if need be.ZINAIDA SEREBRIAKOVALesson Plan by Joy Blewett 2013
DAY FOURLesson OverviewSome classes may need extra time to complete their self-portraits. Studentswill choose a color of construction paper to staple their self-portrait on tocomplete the presentation of the work. Students will then get the opportunity to see everyone’s work and respond to it by placing a certificate with it.I can share my artwork with others (both a kindergarten and third grade Ican statement).ObjectivesStudents will learn how to present their work in a finished format.Students will learn how to look critically at work and assess work.PreparationConstruction paperGlue/tapePencils and materials from last week in caseKINDERGARTEN STUDENTVocabularycritique, gallery, art museumStudent Activitystudents will line up at the door and be welcomed into the art classroom.Students will start by sitting on the front floor rug for information on theday’s activities. Students will complete self-portraits and then choose a colorof construction paper to staple their self-portrait to. Students will showcasetheir self-portraits at their tables and we will walk through them as if theyare in an art gallery. Students will receive a certificate and will place it at oneof the portraits they feel represents the best eyes, nose, face.etc that thecertificate says.Anticipatory Set/MotivationStudents may not want anyone to look at their self-portraits“As we go around the gallery, looking at the artwork, we are looking for whateach person drew well. For example, some portraits have really well drawneyes, or noses, or really cool hair. Maybe someone did a good job puttingdetail on the clothing, or a great idea for a background. We are looking forthe positives in each artwork. We are looking, not talking, not giggling – weare each looking for what we see as the good parts of each artwork.”3RD GRADE STUDENTDifferentiationHi-5 and SPEN certificates will be handled differently. Hi-5 will be a groupcritique and SPEN will be individual as a reward for good behavior.DemonstrationShare with students how to respond positively to others’ work by sharingwhat we like about it, what was successful.ClosureWatching a video about making art as a Thank You and keep on making artmessage. Pass back other artwork and ask a few students if I can put up theirartwork in the hallway.2ND GRADE STUDENTLesson Plan by Joy Blewett 2013
drawing their self-portraits with pencil. Students will be encouraged to use the mirrors to look at themselves, seeing their eyes, their nose, their lips and refer to the posters of the features and facial structure that they learned the previous week for drawing their portraits. (30-35 min) Anticipatory Set/Motivation Students may get anxiety-ridden and perfectionistic with drawing their self .