Transcription
Using Technology to Work Remotely Accessing Purdue resources from home or a remote location Brightspace - https://purdue.brightspace.com Email & Calendar - m MyPurdue / Banner - https://wl.mypurdue.purdue.edu/ OneCampus - https://one.purdue.edu/ (locate other Purdue resources)Hosting WebEx sessions to substitute for local class attendance Purdue WebEx - https://purdue.webex.com/[Detailed instructions below] All faculty and staff are currently licensed to host WebEx sessions. Students can join WebExsessions created by faculty and staff.General tips for everyone Prepare your laptop or home computer with the latest patches and security updates Ensure that your home network is working and reliable (contact your service provider if you areexperiencing problems) Install Purdue VPN software if accessing restricted resourceshttps://webvpn.purdue.edu[Detailed instructions below] Sync important and/or frequently used files to OneDrive[Detailed instructions below] Copy important and/or frequently used files to Box [Detailed instructions below]HHS IT SupportPhone: 765-496-2896E-mail: hhshelp@purdue.edu
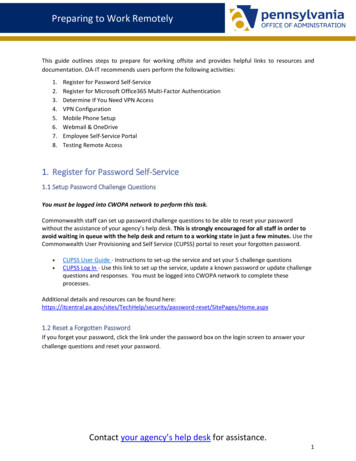
How to set up WEBEXEmployee of Purdue University (Host Account)1. Open a browser such as Internet Explorer, Safari, Google Chrome or Firefox.2. In the address bar, type purdue.webex.com and press enter.3. At the page that appears, press the "Log in" button in the top right corner of the interface.4. A Purdue BoilerKey login dialogue will appear. Enter your Purdue career account username and your BoilerKeypassword ([pin]push OR [pin][Duo code]).5. You will be redirected to a page that will ask you to verify your Purdue email, ********@purdue.edu. To do this,click the button for them to send you the link and a confirmation will be sent to your Purdue email shortly whichwill verify your email.6. After verifying your email, you will be redirected to your personal room and Cisco WebEx Meetings will be readyto use.Using Cisco WebEx Meetings - Installing the Desktop Client1. From your homepage after you've logged into your Purdue career account, to the left there is a box that offers todownload the Cisco WebEx Meetings app. Click the "Download" button.HHS IT SupportPhone: 765-496-2896E-mail: hhshelp@purdue.edu
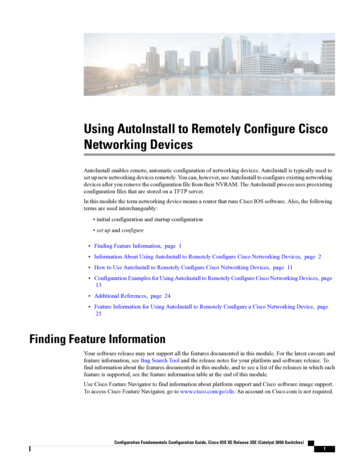
2. After the installer finishes downloading, start it and enter your Purdue email into the sign-in dialog and press "SignIn."3. A Purdue BoilerKey log-in dialogue will appear. Enter your career account username and your BoilerKey password([pin]push OR [pin][Duo code]) to log in.4. The installation will then complete and bring you to your Cisco WebEx Meetings dashboard.a. If, at this point, the application requests to update, press "Update Now" and the application will be brieflyupdated.Using Cisco WebEx Meetings – Starting a meeting from the app1. From your Cisco WebEx Meetings application dashboard, press the "Start Meeting" button at the top of theinterface.HHS IT SupportPhone: 765-496-2896E-mail: hhshelp@purdue.edu
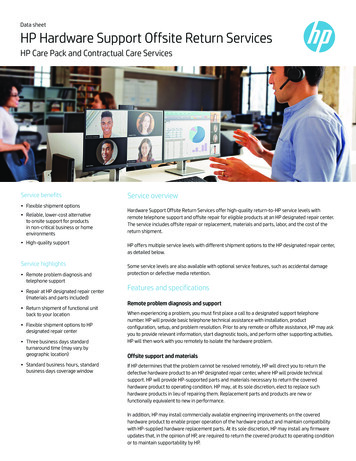
2. A separate meeting dialogue will appear to offer you a chance to set any configurations/settings for your meetingbefore you start ita. Here you can choose whether or not to enable audio, video and set audio/video devices prior to startingyour meeting.3. When you've configured your meeting according to your need, press the "Start Meeting" button.HHS IT SupportPhone: 765-496-2896E-mail: hhshelp@purdue.edu
4. Congratulations, you've started your first Cisco WebEx Meeting! To invite participants, use the ellipsis (.) buttonat the bottom toolbar for your meeting.5. You can invite meeting participants either by emailing them or sending them a link by pressing the correspondingbuttons in the ellipsis (.) dialog.HHS IT SupportPhone: 765-496-2896E-mail: hhshelp@purdue.edu
6. Press the red X button in the bottom toolbar to end the meeting you're hosting.HHS IT SupportPhone: 765-496-2896E-mail: hhshelp@purdue.edu
Instructions for VPNITaP manages a Virtual Private Network, which allows users who are off-campus to connect to Purdueresources as if they were on campus. The client installation can be found: https://webvpn.purdue.edu/Installing Cisco AnyConnect1.2.3.4.After the download is finished from https://webvpn.purdue.edu, open the downloaded application.On the setup client welcome screen, select NextOn the End-User agreement page, accept the terms and select Next.On the ready to install page, select Install.Connecting from the AnyConnect VPN1. Open Cisco AnyConnect by navigating to the start menu and searching 'anyconnect'.2. In blank slot, type webvpn.purdue.edu, select 'connect'HHS IT SupportPhone: 765-496-2896E-mail: hhshelp@purdue.edu
3. A window will open, sign in using your career account username and BoilerKey password (2-factor [password,push OR password,code OR PIN,push OR PIN,code]). This will need to be done each time aconnection is created.Disconnecting from the AnyConnect VPN1. Locate the AnyConnect icon on your System Tray (Windows) or Menu Bar (Mac) and right-click (inthe Windows environment, or click if you are using a Mac) on the icon. Select 'Disconnect'.HHS IT SupportPhone: 765-496-2896E-mail: hhshelp@purdue.edu
How to map network drives Open File Explorer.Click "This PC" from the left-hand sidebar.If an incorrect T: drive appears under Network Location, right click the drive and select disconnect.In the top-left of the toolbar at the top of the window, select "Computer"Select "Map network drive" For Drive drop down, select T: or U:, depending on the user's need.1. For a T: Drive, the folder text box address will depend on what department you are ina. For SLHS use the address \\storage.hhs.purdue.edu\SLHS\Deptb.For NUTR use the address \\storage.hhs.purdue.edu\NUTR\Deptc. For HK use the address \\storage.hhs.purdue.edu\HK\Deptd. For NURS use the address \\storage.hhs.purdue.edu\NURS\Depte. For HSCI use the address \\storage.hhs.purdue.edu\HSCI\Deptf. For CSR use the address \\storage.hhs.purdue.edu\CSR\Deptg. For HDFS use the address \\storage.hhs.purdue.edu\HDFS\Depth. For Admin use the address \\storage.hhs.purdue.edu\Admin\Depti. For HTM use the address \\storage.hhs.purdue.edu\HTM\Deptj. For MFRI use the address \\storage.hhs.purdue.edu\HDFS\MFRIk. For Public Health use the address \\storage.hhs.purdue.edu\PUBH\Dept2. For a U: Drive, the folder text box address will depend on the userHHS IT SupportPhone: 765-496-2896E-mail: hhshelp@purdue.edu
Use the address \\storage.hhs.purdue.edu\HHS\User\ username where username is replaced withthe user's Purdue career account username. Select the Reconnect at logon boxClick Finish1.2.3.Enter your Purdue username and password when promptedNOTE: For personal devices or remote connection: Enter "boilerad\" directly before your usernameHit enter, and you will connect to the drive HHS IT SupportPhone: 765-496-2896E-mail: hhshelp@purdue.edu
How to set up OneDrive Start OneDrive setup. When OneDrive Setup starts, enter your Purdue Career Account email address, then select Sign in to set up youraccount.Select Work or School.Enter Purdue Career Account password.Select the location for OneDrive folder (Default location will work fine).Choose the folders you want to sync with this device. This will take the space indicated next to the folder (pictured below).HHS IT SupportPhone: 765-496-2896E-mail: hhshelp@purdue.edu
OneDrive is now set up. In order to launch the app, search for OneDrive. Do NOT select the OneDrive for Business app. HHS IT SupportPhone: 765-496-2896E-mail: hhshelp@purdue.edu
How to set up BOXTo connect to Box's online web client for file storage and sharing, follow these instructions:1. Open a web browser such as Google Chrome, Safari, Firefox or Internet Explorer.2. In the address bar, type box.com.3. When prompted for your email, enter your Purdue career account email (email ending in @purdue.edu).4. Click "Next."5. A Purdue University BoilerKey login prompt will appear. Enter your career account username andBoilerKey password ([pin]push OR [pin][Duo code]) to log in.HHS IT SupportPhone: 765-496-2896E-mail: hhshelp@purdue.edu
6. After logging in, you will have acccess to your Box account for storage and file sharing and you will beredirected to your cloud storage dashboard.In addition to using the Box website, you can also use Box Sync to manage content. Box Sync is a productivitytool that allows you to mirror data stored on Box to your desktop. You can then navigate and modify contentstored on the Box website through your computer’s native file browsing interface, without using a webbrowser. Content that syncs down to your computer is available for offline access, and if you make changes tothe synced files locally, these changes automatically sync back up to your Box account.To install Box Sync, follow these instructions:1. Open a web browser such as Google Chrome, Safari, FireFox, or Internet Explorer.2. In the address bar, enter 7194-Installing-Box-Sync3. Locate the proper download based on your Operating System (Windows or Mac) and download theinstaller and launch the file once downloaded.4. Click through the setup, leaving all options to default and install the software.5. After the software has been installed, launch the Box Sync application.6. In the login information, enter your Purdue career account email (Email ending in @Purdue.edu) and hitenter, leaving the password box blank.7. A Purdue University BoilerKey login prompt will appear. Enter your career account username andBoilerKey password ([pin]push OR [pin][Duo code]) to log in.8. Once logged in, a Box Sync folder will appear on your desktop. This is where you will access the files youhave stored in Box on this computer.HHS IT SupportPhone: 765-496-2896E-mail: hhshelp@purdue.edu
Using Cisco WebEx Meetings - Installing the Desktop Client 1. From your homepage after you've logged into your Purdue career account, to the left there is a box that offers to download the Cisco WebEx Meetings app. Click the "Download" button. HHS IT Support Phone: 765-496-2896 E-mail: hhshelp@purdue.edu 2. After the installer finishes downloading, start it and enter your Purdue email into the .