Transcription
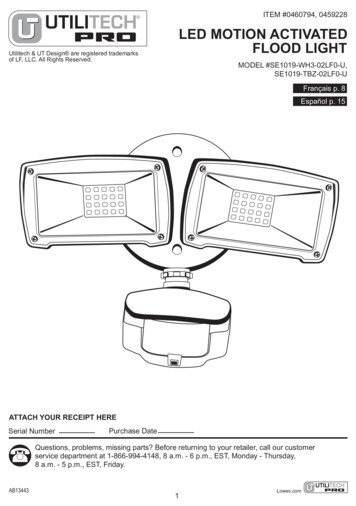
ITEM #0460794, 0459228Utilitech & UT Design are registered trademarksof LF, LLC. All Rights Reserved.LED MOTION ACTIVATEDFLOOD LIGHTMODEL #SE1019-WH3-02LF0-U,SE1019-TBZ-02LF0-UFrançais p. 8Español p. 15ATTACH YOUR RECEIPT HERESerial NumberPurchase DateQuestions, problems, missing parts? Before returning to your retailer, call our customerservice department at 1-866-994-4148, 8 a.m. - 6 p.m., EST, Monday - Thursday,8 a.m. - 5 p.m., EST, Friday.AB134431Lowes.com
PACKAGE CONTENTSPARTSABDESCRIPTIONFixtureDusk-to-Dawn SensorQUANTITY11PARTSCDDESCRIPTIONMotion SensorWall PlateQUANTITY11HARDWARE CONTENTSNote: Hardware shown actual size.AABBCCDDEEFFGrounding ScrewMachine ScrewMachine ScrewQty. 4Qty. 2Mounting Bracket(Not shownto size)Wire NutQty. 1Silicone CapQty. 2Qty. 3Qty. 1SAFETY INFORMATIONPlease read and understand this entire manual before attemting to assemble, operate or install theproduct. SAVE THESE INSTRUCTIONS IN A LOCATION CLOSE TO YOUR LIGHT FIXTURE SOYOU CAN REFER TO THEM AT A LATER TIME.WARNINGthe new one.CAUTION DO NOT USE THIS FIXTURE WITH A DIMMING CIRCUIT. If you currently have dimmer controls, youwill need to remove them and replace them with regular electrical switches. If you have a three-waydimmer, you will have to replace it with a regular three-way switch. If you are unfamiliar with electrical2Lowes.com
SAFETY INFORMATIONIMPORTANT SAFETY INSTRUCTIONS1. Turn power OFF before installing or servicing.3.4.5.6.7.Do NOT remove the protective LED lens.Do NOT look directly at lighted LEDs for any length of time.Do NOT leave bare wires exposed outside the wall canopy enclosure.Electrical requirements: 120 V AC, 60 Hz. Minimum 90 supply conductors.Suitable for wall or eave mounting onto recessed electrical boxes rated for wet locations. Notsuitable for ground mount installations or surface mounted electrical boxes.8. Do NOT allow the sensor head to touch the LED light head housing. Maintain at least a 1 in.spacing between the LED heads and the sensor head.9. For proper operation and protection against water damage, the motion sensor adjustment controlsMUST be facing downward.10. Do NOT mount below 5 ft.11. Do not mount near other light sources that can compromise the dusk to dawn sensor.12. This device complies with Part 15 of the FCC rules. Operation is subject to the following twoconditions: (1) This device may not cause harmful interference, and (2) this device must accept anyinterference received, including interference that may cause undesired operation.pools or bodies of water, or trees/bushes that move in the wind. All of these will trigger the motionsensor security light and may be disruptive to the intended operation of the light. Do NOT install nearother sources of light. The other light sources can fool the dusk to dawn sensor into thinking it is daylight.PREPARATIONBefore beginning installation of product, make sure all parts are present. Compare parts with packagecontents list and hardware contents list. If any part is missing or damaged, do not attempt to install theproduct.Estimated Assembly Time: 45 minutes.Tools Required for Assembly (not included): Phillips screwdriver and silicone caulking.ASSEMBLY AND INSTALLATION INSTRUCTIONSelectrical box that has more than two wire leads, mark the wires to keep track of the correct ones to use.1. Trace the supply wires through the large centeropening of the mounting bracket (CC). Place themounting bracket over the electrical box, making surethat the threaded mounting hole offsets are at the 12and 6 o’clock position. Using the machine screws (AAbracket to the electrical box.AAHardware UsedAABBCCCCMachine Screwsx2Mounting Bracketx13Lowes.com
ASSEMBLY AND INSTALLATION INSTRUCTIONSproperly grounded. If unfamiliar with the methods forEEmade of metal and is already grounded, secure thethe mounting bracket using the green groundingscrew (EE). If the electrical box is a non-groundedgreen/copper ground wire AND the green/copperground wire inside the electrical box to the mountingbracket using the green grounding screw. Onceproperly grounded, connect the supply leads from theDDAAconnects to the white supply lead. Tighten the wirenuts properly to prevent the wires from coming loose.If unsure of the tightness, secure the wire nuts usingelectrical tape.Hardware UsedDDWire Nutx3EEGrounding Screwx145 bracket. Use the machine screws (AA) to secure the45 sensor head with the adjustment controls and drainholes facing downward to prevent water damage.The position of the sensor head should not exceed45 degrees from horizontal.Hardware UsedAAMachine Screws45 x24. Each light head can be adjusted at the arm and5. Restore power to the electrical box at the circuitbreaker or fuse panel. Make sure the wall switchthat controls the electrical box is still in thechecked for operation.4Lowes.com45
OPERATING INSTRUCTIONSto-dawn sensor. The dusk-to-dawnsensor disables the motion detector during daylight hours and only allows the motion sensor to activatethe light after dark. The security light will not activate during daylight hours regardless of whether it seesmotion or not.1. The slide switch on the bottom surface of the motionsensor has four settings:TEST-1-5-10In the “TEST” position, the motion sensor will turnthe lights on for 40 seconds after power is applied toThe lights will come on for 40 seconds regardlessof whether there is motion or not, and regardless ofwhether it is day or night. Leave the slide switch in the“TEST” setting and adjust the sensitivity by crossing inthe path of the sensor. The light will come on only if itsenses movement. Once movement stops, it will turnoff in 5 seconds.2. There is also a rotary knob on the bottom of themotion sensor labeled:SENSITIVITYRotating this knob clockwise raises the sensitivity ofthe motion sensor for up to 60 ft. of distance.Rotating the knob counterclockwise lowers thesensitivity down to as close as 5 ft. It may benecessary to adjust the “SENSITIVITY” knob severalparticular installation. NOTE: The higher sensitivitylevel for longer distances (up to 60 ft.) increases thelikelihood of false triggering. For maximum range(with power) for at least 48 hours.3. The 180 coverage of the motion sensor ismeasured side to side. Therefore, the sensor will betterrather than motion coming straight at the sensor(in-and-out). Adjust the motion sensor head so that itsees motion moving across the coverage area. Makesure the sensor head is positioned with the front lensfacing slightly downward (5 -15 angle) to preventwater accumulation on the sensor head. Do not aimthe motion sensor at a body of water, bushes or plantscars, etc., as this will trigger the motion sensor.operation and sensitivity, move the switch to the “1,5, or 10” position. Each of these positions allows thethese settings indicates the time frame that the lightwill remain on after detecting motion. If set for the “1”setting, the lights will come on for 1 minute afterdetecting motion, and then will go off and return to theAUTO motion sensor mode. When set for “5”, the lightswill remain on for 5 minutes after detecting motion. Ifset for “10”, the lights will remain on for 10 minutesafter detecting motion. If motion is continuouslydetected during the lights’ “ON” cycle, the lights willremain on until the motion ceases.5
OPERATING INSTRUCTIONS5. To be able to manually turn on the security light frominside your home, toggle the wall light switch OFF andON within 2 seconds. The security light will turn on andstay on for approximately 8 hours, or until the duskto-dawn sensor detects light in the morning. Once thedusk-to-dawn sensor detects light, the manual “ON”mode will automatically go back to its original settingsof the AUTO motion sensor mode. At any point while inmanual “ON” mode, return to the AUTO motion sensormode by toggling the wall light switch OFF and ONagain within 2 seconds.working properly, apply a small bead of siliconecaulking (not included) around the perimeter of therear housing cover to prevent water seepage into theelectrical compartment.screw openings to prevent water seepage into thehousing.Hardware UsedFFSilicone Capsx2FFCARE AND MAINTENANCENOTuse solvents or cleaners containing abrasive agents. When cleanSECURITY LIGHT OPERATIONMODESLIDE SWITCHWALL SWITCHSENSITIVITY ATest ModeTestTurn onAny settingAUTO Motion SensorMode1, 5, or 10 MinutesONAny settingManual “ON” Mode1, 5, or 10 MinutesAny settingReturn to AUTO MotionSensor Mode1, 5, or 10 MinutesToggle OFF and ONwithin 2 secondsToggle OFF and ONwithin 2 secondsAny settingTROUBLESHOOTINGPROBLEMPOSSIBLE CAUSECORRECTIVE ACTIONLight does not come onat night when motionis detected.1. No power is being1. Check that circuit breaker and/or wallswitch power is on.2. Another light source iscausing the security lightto think it is daylight.2. Turn off surrounding lights and/or re-aimthe sensor head.3. Wiring inside electricalcame loose.Areconnect any loose wiring.6
TROUBLESHOOTINGPROBLEMPOSSIBLE CAUSESecurity light comeson during the day.1. Dusk-to-dawn sensor isa shaded area and isfooled into thinking itis nighttime.Security light cycles ONand OFF continuously.CORRECTIVE ACTIONAmounted in an area that does not allow enoughlight to enter the sensor. Relocate security light.2. Dusk-to-dawn sensoris faulty.2. If under warranty, contact Customer Service.1. Dusk-to-dawn sensor is1. Change position of light head aim lightfrom the security light.2. Put a small piece of black electrical tape overthe Dusk-to-dawn sensor control.3. Relocate security light to a different locationSecurity light comeson for no apparentreason at night.1. Light is sensing motionin the detection zone.1. Make sure the sensor is not picking up moving2. Test the motion sensor by covering up the frontcurved lens with cardboard to block the view. Ifthe light turns off then something in thedetection zone is triggering the sensor.Reposition the motion sensor or change thesensitivity (distance) of the sensor.WARRANTYof (3) years from the date of original purchase by the consumer. We will repair or replace (at our option) the unitin the original color and style if available, or in a similar color and style if the original item has been discontinued,application where it is on 24 hours per day, but is used in a residential environment for 3 - 5 hours per day.Defective units must be properly packed and returned to the manufacturer with a letter of explanation and youroriginal purchase receipt showing date of purchase. Call 1-866-994-4148 to obtain a return authorization numberand an address where to ship your defective product. Note: No C.O.D. shipments will be accepted. The liability ofThe manufacturer willnot be liable for any other loss, damage, or injury which is caused by the product. This limitation upon the liabilityof the manufacturer includes any loss, damage, or injury which is (I) to person or property or otherwise; (II)incidental or consequential in nature; (III) based upon theories of warranty, contract, negligence, strict liability,tort, or otherwise; or (IV) directly, or indirectly related to the sale, use, or repair of the product. This warrantyPrinted in ChinaUtilitech & UT Design are registeredtrademarks of LF, LLC. All Rights Reserved.7Lowes.com
Security light comes 1. Dusk-to-dawn sensor is on during the day. a shaded area and is fooled into thinking it mounted in an area that does not allow enough is nighttime. light to enter the sensor. Relocate security light. 2. Dusk-to-dawn sensor 2. If under warranty, contact Customer Service. is faulty. Security light cycles ON 1.