Transcription
USER GUIDEGeneArt Seamless Cloning and Assembly KitFor highly-efficient, simultaneous and seamless in vitro assembly of up to4 DNA fragments plus a vector in a pre-determined orderCatalog Number A13288Document Part Number A13333Publication Number MAN0003222Revision A.0For Research Use Only. Not for use in diagnostic procedures.
Information in this document is subject to change without notice.DISCLAIMERLIFE TECHNOLOGIES CORPORATION AND/OR ITS AFFILIATE(S) DISCLAIM ALL WARRANTIES WITH RESPECT TO THIS DOCUMENT,EXPRESSED OR IMPLIED, INCLUDING BUT NOT LIMITED TO THOSE OF MERCHANTABILITY, FITNESS FOR A PARTICULAR PURPOSE,OR NON-INFRINGEMENT. TO THE EXTENT ALLOWED BY LAW, IN NO EVENT SHALL LIFE TECHNOLOGIES AND/OR ITS AFFILIATE(S)BE LIABLE, WHETHER IN CONTRACT, TORT, WARRANTY, OR UNDER ANY STATUTE OR ON ANY OTHER BASIS FOR SPECIAL,INCIDENTAL, INDIRECT, PUNITIVE, MULTIPLE OR CONSEQUENTIAL DAMAGES IN CONNECTION WITH OR ARISING FROM THISDOCUMENT, INCLUDING BUT NOT LIMITED TO THE USE THEREOF.Important Licensing Information: This product may be covered by one or more Limited Use Label Licenses. By use of this product, youaccept the terms and conditions of all applicable Limited Use Label Licenses.TRADEMARKSAll trademarks are the property of Thermo Fisher Scientific and its subsidiaries unless otherwise specified. 2014 Thermo Fisher Scientific Inc. All rights reserved.GeneArt Seamless Cloning and Assembly Kit User Guide
ContentsAbout this guide. 4Revision history . 4Product information . 5Product description . 5Kit contents and storage . 7Methods . 8Workflow . 8Generate a linearized E. coli cloning vector . 10Prepare DNA inserts by PCR . 11Seamless cloning and assembly reaction. 15Transform One Shot TOP10 Chemically Competent E. coli . 17Control experiment . 18Analyze transformants . 19Troubleshooting . 21Appendix . 23Recipes . 23pUC19L . 24Accessory products . 25Documentation and support. 26Customer and technical support . 26Limited product warranty . 26References . 27GeneArt Seamless Cloning and Assembly Kit User Guide3
About this guideIMPORTANT! Before using this product, read and understand the information in the “Safety” appendix inthis document.Revision historyRevisionA.04DateNovember 2014Description Updated link to web-based oligo designer tool. Updated user guide template with associatedupdates to covers, legal, document support, andsafety sections.GeneArt Seamless Cloning and Assembly Kit User Guide
Product informationProduct descriptionGeneArt SeamlessCloning andAssemblyTechnologyThe GeneArt Seamless Cloning and Assembly Technology is a highly efficient,vector-independent system for the simultaneous and seamless assembly of up to4 DNA fragments and a vector, totaling up to 13 kb in length. The system allows thecloning of the DNA fragments into virtually any linearized E. coli vector, requiresno pre-existing recombination sites or extra DNA sequences, and eliminates theneed for extensive enzymatic treatments of the DNA such as restriction andligation. The enzyme mix provided with the GeneArt Seamless Cloning andAssembly Kit recognizes and precisely assembles the DNA fragments sharing a15-base pair (bp) end homology that you can create by PCR-amplification.Note: Although we recommend using the GeneArt Seamless Cloning and Assembly Kit forassembling up to 4 DNA fragments plus a vector, you can use it to assemble a larger numberof fragments; however, the cloning efficiency will be lower. We have successfully assembledup to 6 DNA fragments and a vector. The web tool, GeneArt Primer and Construct DesignTool, only supports the seamless assembly of up to 4 fragments.How the GeneArt Seamless Cloningand Assembly KitworksEngineering DNA molecules by homologous recombination presents an alternativeto traditional methods using restriction endonucleases and ligases. The GeneArt Seamless Cloning and Assembly Kit takes advantage of a proprietary enzyme mixto fuse together DNA fragments that share terminal end-homology in an in vitrocloning reaction. This kit can be used for seamlessly assembling up to 4 DNAfragments and a vector simultaneously and in a precise and pre-determined order.To seamlessly assemble up to 4 DNA fragments into a single recombinant DNAmolecule using GeneArt Seamless Cloning and Assembly Kit:1.Combine the linear cloning vector (pUC19L or your own linear E. coli vector)and the DNA fragments to assemble in a microcentrifuge tube.Note: We recommend that you use GeneArt Primer and Construct Design Tool,available at www.lifetechnologies.com/order/oligoDesigner, to design PCRprimers to create end-terminal homology between your adjacent DNA fragments.2.Add appropriate amounts of the 5X Reaction Buffer and 10X Enzyme Mix andincubate the tube for 30 minutes at room temperature.Note: The 10X Enzyme Mix must be added to the reaction mix as the last component.3.GeneArt Primerand ConstructDesign ToolTransform the assembled DNA molecule into One Shot TOP10 ChemicallyCompetent E. coli.The GeneArt Primer and Construct Design Tool is an intuitive, web-based tool toguide you when you are designing your cloning construct and DNA fragments. Thetool minimizes the planning time required for designing the PCR primers to amplifyyour DNA fragments and to create the end-terminal homology required forseamless assembly, identifies potential pitfalls linked to your specific sequences,and performs in silico cloning using your sequences. The GeneArt Primer andConstruct Design Tool also provides you with a graphic representation of the finalassembled molecule as well as a downloadable GenBank file compatible withGeneArt Seamless Cloning and Assembly Kit User Guide5
VectorNTI and other software for molecular biology workflows.The GeneArt Primer and Construct Design Tool is available vantages of theGeneArt SeamlessCloning andAssembly Kit6 Speed – Facilitates the simultaneous assembly of up to 4 DNA fragments,totaling up to 13 kb in length (including the cloning vector). Simplicity – Greatly reduces in vitro handling of DNA and eliminates the needfor enzymatic treatments of DNA such as restriction and ligation. Precision – Enables seamless assembly of DNA fragments in a precise and predetermined order without extra sequences. Flexibility – Facilitates the assembly of multiple DNA fragments from anysource using any linearized E. coli cloning vector as long as adjacent fragmentsshare 15-nucleotide end-terminal homology and allows site-specific insertionand deletion of desired sequences through fragment editing. Efficiency – Generates up to 90% positive clones depending on the number ofDNA fragments assembled.GeneArt Seamless Cloning and Assembly Kit User Guide
Kit contents and storageComponent10X Enzyme Mix45 µL5X Enzyme Buffer90 µLLinear pUC19L Vector (50 ng/µL), sufficient for4 control reactions8 µLControl insert (50 ng/µL)5 µLOne Shot TOP10 Chemically Competent E. coliKit componentsAmount(20 reactions)Storage–80 C21 50 µLpUC19 Control (10 pg/µL)10 µLS.O.C. media6 mLThe GeneArt Seamless Cloning and Assembly Kit contains the followingcomponents, which are sufficient for 20 cloning reactions and one control reaction. 10X Enzyme Mix and 5X Enzyme Buffer sufficient for 20 in vitro assemblyreactions. Linear pUC19L Vector, a 2,659 bp linearized E. coli plasmid, as a cloningcontrol vector for the assembly of DNA fragments. The vector pUC19L canbe used as a cloning vector, if desired. Control insert, a 1,268 bp DNA fragment sharing a 15 bp homology withthe linear pUC19L vector at both ends, for use as a control in the assemblyreaction. One Shot TOP10 Chemically Competent E. coli and S.O.C. medium forlarge-scale plasmid preps of the assembled DNA construct for downstreamapplications. pUC19 control DNA for assessing the transformation efficiency of the OneShot TOP10 Chemically Competent E. coli.TranformationefficiencyOne Shot TOP10 Chemically Competent E. coli, included in the GeneArt SeamlessCloning and Assembly Kit, have a transformation efficiency of 1 109transformants per µg plasmid DNA.GenotypeThe genotype of One Shot TOP10 Chemically Competent E. coli is: F– mcrA (mrrhsdRMS-mcrBC) φ80lacZ M15 lacΧ74 recA1 araD139 (ara-leu) 7697 galU galK rpsL(StrR) endA1 nupG λ–GeneArt Seamless Cloning and Assembly Kit User Guide7
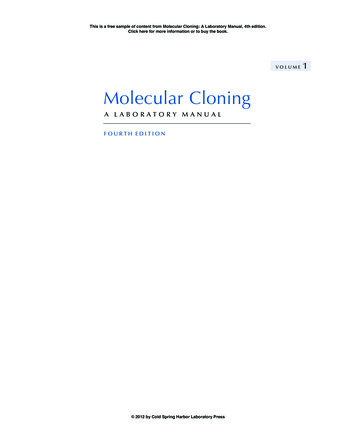
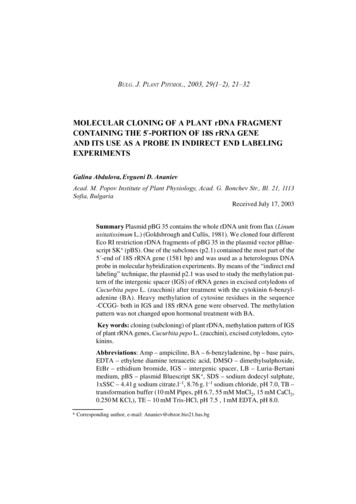
MethodsWorkflow8GeneArt Seamless Cloning and Assembly Kit User Guide
ExperimentaloutlineThe table below describes the major steps required to assemble your recombinantDNA molecule using the GeneArt Seamless Cloning and Assembly Kit. Refer tothe specified pages for details to perform each step.ActionStep Page1Use the GeneArt Primer and Construct Design Tool webtool, to develop your DNA assembly strategy52Generate your linearized cloning vector (optional)103PCR amplify or synthesize your DNA fragments114Perform the in vitro cloning and assembly reaction15 5Transform One Shot TOP10 Chemically Competent E. coli176Analyze positive colonies by restriction analysis and/orsequencing19GeneArt Seamless Cloning and Assembly Kit User Guide9
Generate a linearized E. coli cloning vectorIntroductionThe GeneArt Seamless Cloning and Assembly technology relies on homologousrecombination to assemble adjacent DNA fragments sharing end-terminalhomology. Because of the mechanism of action of the enzyme mix, the cloningvector and DNA fragments used with the GeneArt Seamless Cloning andAssembly Kit must be linear.This section provides guidelines for generating a linearized E. coli cloning vector foruse in the GeneArt Seamless Cloning and Assembly reaction.Guidelines forgenerating alinearized E. colicloning vector You can prepare the linearized E. coli cloning vector using restriction enzymes(single or double digest) or using PCR amplification. When generating the linearized vector by restriction digest, we recommend thatyou digest the vector with two restriction enzymes rather than a single enzymeto reduce the amount of background. You can use restriction enzymes that leave 3’ protruding, 5’ protruding, orblunt ends to linearize your cloning vector. However, we recommend that youuse a restriction enzyme that produces blunt or 3’ protruding ends whenpossible for achieving maximum cloning efficiency. It is very important to have a complete digest (i.e., very low background ofuncut vector). Therefore, we recommend that you increase the enzymedigestion time (2–3 hours to overnight) and the reaction volume. Double digestion with two restriction enzymes is the most efficient way oflinearizing your cloning vector (see guidelines above). A double digestfollowed by PCR amplification of your linear vector virtually eliminates anybackground. Analyze your restriction digestion products using agarose gel electrophoresis toverify that the digest is complete and then purify the digested vector usingPureLink PCR Purification Kit (see page 25 for ordering information) orequivalent. For a small scale digest, we recommend that you digest 2–5 µg of vector using30–50 units of enzyme in a reaction volume of 100–200 µL. If you are planning on using the same linearized vector in multiple reactions,we recommend that you digest 20–50 µg of vector using 150–300 units of eachrestriction enzyme in a reaction volume of 400–800 µL.Note: You can also use the Linear pUC19L Vector, included as a cloning controlvector in the GeneArt Seamless Cloning and Assembly Kit, for your in vitro cloningand assembly reaction. This ready-to-use cloning vector is also available separatelyas the GeneArt Linear pUC19L Vector for Seamless Cloning (Cat. no. A13289); theready-to-use vector provides sufficient linear vector for 20 in vitro seamless cloningreactions. For ordering information, see page 25.10GeneArt Seamless Cloning and Assembly Kit User Guide
Prepare DNA inserts by PCRGuidelines for PCRprimersGeneArt Seamless Cloning and Assembly reaction requires that each DNAfragment share a 15-bp (base pair) end-terminal homology with the adjacentfragment (including the cloning vector). Therefore, PCR primers used forgenerating your inserts must have 15-nucleotide overhangs on their 5’ ends toprovide this homology with the adjacent fragments; however, this homology maybe split between the primers used for adjacent PCR-amplified DNA fragments (seebelow).Follow the guidelines below when designing your PCR primers: Design your PCR primers such that each DNA fragment to be assembled isbetween 100 bp and 5 kb (kilo base pairs) in length.Note: Large fragments ( 5 kb) are more susceptible to damage in a gel extractionprocedure. Furthermore, many PCR enzymes are not processive enough to amplifyfragments 5 kb. Therefore, we recommend that you assemble multiple fragments of 5 kb in one reaction rather than a single large fragment. The 5’ ends of each primer pair (forward and reverse) must contain a15-nucleotide sequence (i.e., an overhang) that is homologous to the 15 bases atone end of the adjacent DNA fragment (i.e., the vector or another insert) whilethe 3’ end of each primer must be specific to your DNA element you want toassemble. If you are recombining the insert to the linearized vector, all 15 nucleotidesproviding the requisite homology must be on the 5' end of the primer. Torecombine two adjacent inserts, you may split the 15-bp homology between thefragments (e.g., 7 bp on the reverse primer of fragment 1 and 8 bp on theforward primer of fragment 2).Note: You can split the 15-bp homology between adjacent fragments in any combination(e.g., 7 8 as in the example above or 12 3, 11 4 etc.). PCR primers should be up to 40 nucleotides in length (15 nucleotides toprovide the requisite homology at the 5’ end and 18–25 nucleotides specific toyour DNA element).Note: If you are splitting the required 15-bp homology between adjacent fragments, onePCR primer may have as few as 18 nucleotides and no overhang whatsoever. Forexample, in a 0 15 homology split, reverse primer of fragment 1 would not contribute tothe homology and will consist of only 18–25 gene specific nucleotides for fragment 1,while the forward primer of fragment 2 would contribute the entire 15 bp for thehomology in addition to having 18–25 gene specific nucleotides for fragment 2 (for atotal length of 33–40 nucleotides). You may also design your PCR primers to provide specific restriction enzymesites or to re-construct the restriction sites used for linearizing your cloningvector. Note that these sites will not be a part of the 15-nucleotide homology. Prepare each primer pair at a concentration of 100 µM in DNase- and RNasefree water.GeneArt Seamless Cloning and Assembly Kit User Guide11
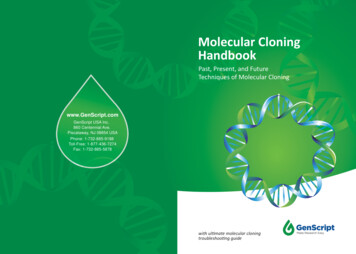
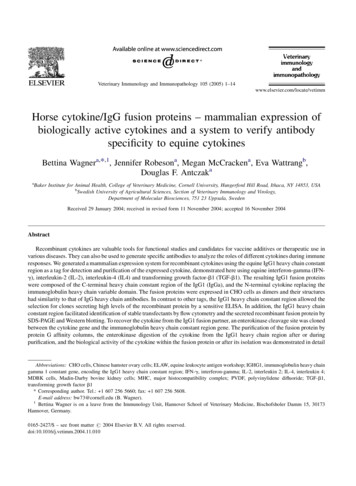
Examples for PCRprimersThe requisite 15-bp end-terminal homology between the vector and the insert (orbetween two adjacent inserts) is generated by the PCR primers used for amplifyingthe inserts. To determine the 15-nucleotide sequence providing the homology, startat the 3’ end of each DNA strand in the linearized vector or the adjacent insert.PCR primers for attaching the DNA fragment to the vectorThe figure below shows examples of PCR primers used for preparing the DNAinserts for assembly in linear vectors with 5’ overhangs, blunt ends, and 3’overhangs. The primer sequences providing the 15-bp homology are shown in bold;the remaining sequences of each primer (i.e., the 3’ end) are specific to the DNAelement to assemble.12GeneArt Seamless Cloning and Assembly Kit User Guide
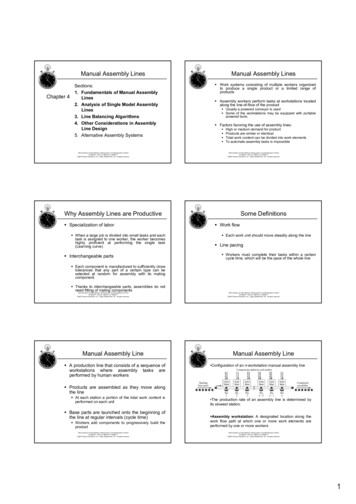
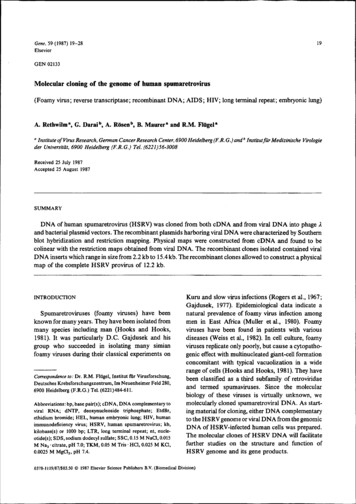
PCR primers for attaching adjacent DNA fragmentsThe figure below shows examples of PCR primers used for preparing adjacentDNA inserts for assembly. When connecting two adjacent inserts, you may split the15-bp homology between the fragments in any combination.In the example below, the reverse primer of fragment 1 and the forward primer offragment 2 respectively provide 6 bp and 9 bp of the 15-bp homology required forrecombination. The primer sequences providing the homology are shown in bold;the remaining sequences of each primer (i.e., the 3’ end) are specific to the DNAelement to assemble.Note: We highly recommend that you use the GeneArt Primer and ConstructDesign Tool to verify the sequence of your DNA fragments (i.e., inserts) and yourassembly strategy, and to design your PCR primers that generate the requiredoverlap for each DNA fragment. The GeneArt Primer and Construct Design Tool isavailable at: rt Seamless Cloning and Assembly Kit User Guide13
Guidelines for PCR When using plasmid DNA, 5–20 ng of plasmid DNA is usually sufficient as aPCR template in a reaction volume of 100 µL. When using E. coli or humangenomic DNA, you can increase the amount of template DNA to 20–200 ng. We recommend using AccuPrime Pfx SuperMix (see page 25 for orderinginformation) for achieving the best results during PCR amplification of yourDNA fragments of interest.Note: The processivity of the polymerase is crucial for obtaining full-length PCRproducts. Use PCR cycling parameters that are appropriate for your primers andtemplate. Make sure to optimize PCR conditions to produce a single, discretePCR product. If you are using DNA fragments prepared by PCR, you must purify the DNAfragments through a PCR cleanup kit. We recommend that you use thePureLink PCR Purification Kit (see page 25 for ordering information). After preparing your DNA fragments by PCR, verify the PCR products by gelelectrophoresis. If you obtain multiple bands, you must gel purify your DNAfragments. We recommend using the PureLink Quick Gel Extraction Kit forbest results (see page 25 for ordering information). Elute the DNA fragmentsfrom the PureLink column using water. When gel purifying your DNA fragments, employ extra caution to minimizeany potential damage to the ends of the DNA fragments by leaving the gel onthe gel tray when exposing it to UV light, using low UV power, and minimizingthe time the gel is exposed to UV light. Note that an additional isopropanolprecipitation after gel solubilization might be required to obtain the best results.Note: Gel purifying DNA fragments will result in somewhat lower cloning efficiency.14 Large fragments ( 5 kb) are more susceptible to damage in a gel extractionprocedure. Therefore, we recommend that you assemble multiple fragments of 5 kb in one reaction rather than a single large fragment. You can skip the PCR purification step and use an unpurified insert in a singlefragment assembly (i.e., cloning a single insert into the cloning vector) withoutsignificant decrease in cloning efficiency; however, we recommend usingpurified PCR inserts in a multifragment assembly.GeneArt Seamless Cloning and Assembly Kit User Guide
Seamless cloning and assembly reactionBefore you beginBefore you set up your seamless cloning and assembly reaction, make sure that youhave: Devised your DNA assembly strategy and verified it by performing in silicocloning using the GeneArt Primer and Construct Design Tool, available at:www.lifetechnologies.com/order/oligoDesigner. Generated your linear cloning vector according to the guidelines on page 8.Note: You can also use the linear pUC19L Vector for your seamless cloning andassembly reaction. The linear pUC19L allows you to perform blue-white screening forthe presence of the insert; the white colonies should contain the inserts, while the blueones should be mostly empty vector.Materials neededCalculate molarratios Prepared your DNA fragments (i.e., inserts) according to the guidelines onpages 11–14. DNA fragments to assemble (up to 4 DNA fragments for final construct of13 kb in length, including the cloning vector) Linear pUC19L vector or your own linearized E. coli cloning vector Control insert (for assessing the efficiency of the assembly reaction) 5X Reaction Buffer 10X Enzyme mix Deionized, sterile waterFor maximum cloning efficiency, use 2:1 insert:vector molar ratio. Determine theconcentration of your DNA insert solutions by OD260 or fluorescence and use theconcentrations to calculate the volume required to achieve the 2:1 molar ratio ofinsert to vector.1.Determine the concentration of your insert in µg/mL.2.Use the following formula to calculate the amount of insert needed to give amolar ratio of 2:1 between insert and linearized pUC19L. Note that the amountof pUC19L is 100 ng.x ng insert (2) (bp insert) (100 ng linearized pUC19L)(2,659 bp pUC19L)Note: If you are using your own linearized cloning vector, replace the divisor in theabove equation with the number of base pairs in your vector.3.Based on the calculation above, calculate the volumes needed for the seamlesscloning and assembly reaction.Note: In the case of very small inserts ( 200 bp), we recommend that you use atleast 20 ng of insert DNA in the seamless cloning and assembly reaction.GeneArt Seamless Cloning and Assembly Kit User Guide15
IMPORTANT! Do not leave the 10X Enzyme Mix at room temperature, on ice, or at–20 C for extended periods of time. The enzyme mix quickly loses activity at theseconditions.Seamless cloningand assemblyreaction It is crucial to add the 10X Enzyme Mix to the seamless assembly and cloningreaction separately at the end after you have mixed all the other reactioncomponents. After adding the 10X Enzyme Mix to the reaction mixture, promptly return it to–80 C.1.In a microcentrifuge tube, set up the seamless cloning and assembly reaction.IMPORTANT! It is crucial that you add the 10X Enzyme Mix as the lastcomponent (see Step 2).Insert(s) (20–200 ng each)x µL*Linear pUC19L vector (100 ng)†2 µL*5X Reaction Buffer4 µLDeionized waterto 18 µL*For maximum cloning efficiency, use a 2:1 molar ratio of insert:vector (see previouspage). The volume of the vector and insert(s) used depends on their concentrations.†You can also use 100 ng your own linearized cloning vector.2.Quickly thaw the 10X Enzyme Mix on ice, add 2 µL to the reaction mix, andimmediately return it back to –80 C.IMPORTANT! Do not leave the 10X Enzyme Mix at room temperature, on ice, or at–20 C for extended periods of time.3.Mix the reaction components by gently tapping the sides of the centrifuge tubeand incubate at room temperature for 30 minutes.4.After 30 minutes of incubation, place the reaction mix on ice and immediatelyproceed to the transformation step.Note: Do not let the samples stay on ice for more than 5 minutes before transformation.16GeneArt Seamless Cloning and Assembly Kit User Guide
Transform One Shot TOP10 Chemically Competent E. coliMaterials needed Seamless cloning and assembly reaction mix (from step 4, previous page) One Shot TOP10 Chemically Competent E. coliNote: Do not use electrocompetent E. coli for transformation. Only chemically competentcells result in successful seamless cloning and assembly of DNA fragments. S.O.C. medium 42 C water bath LB plates containing the appropriate selection antibiotic. If you have used thelinear pUC19L vector for cloning, use LB plates containing 50–100 µg/mLampicillin and X-Gal (see Recipes, page 23).Note: The linear pUC19L allows you to perform blue-white screening for the presence ofthe insert; most of the white colonies should contain the vector inserts, while the blueones should mostly have the empty vector.PreparationOne Shot TOP10Chemicaltransformation 37 C shaking and non-shaking incubator Optional: pUC19 Control DNA for the transformation control reactionEach transformation requires one vial of competent cells and two selective plates.1.Equilibrate a water bath to 42 C.2.Warm the vial of SOC medium to room temperature.3.Warm selective plates at 37 C for 30 minutes.4.Thaw on ice 1 vial of One Shot Chemically Competent E. coli for eachtransformation.1.Add 6–8 µL of the seamless cloning and assembly reaction from step 4, page 16,into a vial of One Shot TOP10 Chemically Competent E. coli and mix gently.IMPORTANT! Do not mix by pipetting up and down.Note: If you are performing transformation control, add 2.5 µL of pUC19 Control DNAinto a separate vial of One Shot TOP10 Chemically Competent E. coli and follow thetransformation procedure.2.Incubate the transformation mix on ice for 20 to 30 minutes.3.Heat-shock the cells for 30 seconds at 42 C without shaking.4.Immediately transfer the tubes to ice and incubate on ice for 2 minutes.5.Add 250 µL of room temperature S.O.C. medium to the transformation mix.6.Cap the tube tightly and shake it horizontally (200 rpm) at 37 C for 1 hour.7.After incubation, dilute the transformations 1:10 in S.O.C. medium and spread10–50 µL from each transformation on a pre-warmed selective plate. If you haveperformed a 4-fragment assembly, plate the transformations undiluted. Werecommend that you plate two different volumes to ensure that at least oneplate has well-spaced colonies.8.Incubate the plates overnight at 37 C.9.The next day, pick individual colonies (pick white colonies if you have used thelinear pUC19L vector) and isolate the plasmid DNA or screen for the presenceof the insert(s) by colony PCR.GeneArt Seamless Cloning and Assembly Kit User Guide17
Control experimentControl reactionsWhen using the GeneArt Seamless Cloning and Assembly Kit for the first time, westrongly recommend that you perform the positive and negative control reactions inparallel with your seamless cloning and assembly reaction to verify that the kitcomponents are performing properly.The Linear pUC19L Vector, a 2.7 kb linearized E. coli plasmid, and the ControlInsert, a 1,268 bp DNA fragment sharing a 15 bp homology with the linear pUC19Lvector at both ends, are included in the GeneArt Seamless Cloning and AssemblyKit for use in the control reactions.Note: The GeneArt Seamless Cloning and Assembly Kit contains sufficient reagents(5X Enzyme Buffer, 10X Enzyme Mix, and One Shot TOP10 competent cells) for 20 cloningand assembly reactions plus one control reaction. If you wish to perform both the positiveand negative control reactions, the remaining reagents are sufficient for only 18 cloning andassembly reactions.1.Set up the positive and negative control reactions as described below.IMPORTANT! It is crucial that you add the 10X Enzyme Mix last.ComponentPositive controlNegative controlDeionized water10 µL12 µLLinear pUC19L Vector (50 ng/µL)2 µL2 µLControl insert (50 ng/µL)2 µL2 µL5X Enzyme Buffer4 µL4 µL10X Enzyme Mix2 µL–Total volume20 µL20 µL2.Mix the reaction components by gently tapping the sides of the centrifuge tubeand incubate at room temperature for 30 minutes.3.After 30 minutes of incubation, place the reaction mix on ice and immediatelyproceed to the transformation step (page 17).Note: Do not let the samples stay on ice for more than 5 minutes before transformation.4.Expected results18Plate the control transformations on LB plates containing 50–100 µg/mLampicillin and 30–100 µg/mL X-Gal for blue-white screening.You can expect 90% white colonies on your positive control and mostly bluecolonies on your negative control plates. Note that you may still get white (i.e.,positive) colonies on your negative control plates at a very low frequency. Thetransformation efficiency of One Shot TOP10 Chemically Competent E. coli shouldbe 2 108 transformants per µg pUC19 control plasmid.GeneArt Seamless Cloning and Assembly Kit User Guide
Analyze transformantsIntroductionOnce you have performed the seamless cloning and assembly reaction and thetransformation procedure, screen for “positive” colonies containing your assembledrecombinant DNA molecule by isolating the plasmid DNA and sequencing or byperforming restriction analysis followed by agarose gel electrophoresis. You canalso screen for the presence of the insert(s) by colony PCR.Analyze positiveclones1.Pick 4–10 colonies and culture them overnight in LB medium containing theappropriate selection antibiotic for your cloning vector (100 µg/mL ampicillin ifyou have used the linear pUC19L vector for clonin
GeneArt Seamless Cloning and Assembly Kit For highly-efficient, simultaneous and seamless in vitro assembly of up to 4 DNA fragments plus a vector in a pre-determined order Catalog Number A13288 Document Part Number A13333 Publication Number MAN0003222 Revision A.0 For Research Use Only. Not for use in diagnostic procedures.