Transcription
MUL-HDENC-C-200 (-NA, -MX, -CO, -LA)With AC-3High Definition Digital Encoder – Deluxe, KitUser ManualMulticom, Inc.1076 Florida Central Parkway, Longwood, FL 32750www.multicominc.comAugust 2020 (Version 2a)This manual is intended solely for use by purchasers of Multicom, Inc. HD Digital Encoders and their qualified servicetechnicians. This document is the property of Multicom, Inc. and incorporates proprietary subject material and information. Theuse of all design, manufacture, reproduction, and all other rights regarding these contents in whole or part without Multicom, Inc.written consent is expressly prohibited. Multicom and the Multicom logo are registered trademarks of Multicom, Inc.1www.multicominc.comAll Rights Reserved 2020 Multicom, Inc.(800) 423-2594(407) 331-7779
Multicom MUL-HDENC-C-200 User Manuali. Safety PrecautionsThe presence of this symbol is to alert the installer and user to the presence of uninsulated potentiallydangerous voltages within the product’s enclosure that may be of sufficient magnitude to produce a risk ofelectric shock.TO REDUCE THE RISK OF FIRE OR ELECTRIC SHOCK, DO NOT EXPOSE THIS DEVICETO RAIN OR MOISTURE. DO NOT OPEN THE UNIT. REFER SERVICING TO QUALIFIEDAUTHORIZED PERSONNEL ONLY. DO NOT terminate, change or uninstall any wiring without first disconnecting the unit’s poweradapter from the device. This device is supplied with the appropriately rated power supply. The use of any other power supplycould cause damage and invalidate the manufacturer’s warranty. DO NOT connect the power cord to the device if the power cord or unit is damaged. DO NOT cut the power cord. DO NOT plug the power cord into an AC outlet until all cables and connections to the device havebeen properly connected. The device should be installed in an environment consistent with its operating temperaturespecifications. Placement next to heating devices and ducts is to be avoided as doing so may causedamage. The device should not be placed in areas of high humidity. DO NOT cover any of the device’s ventilation openings. If the device has been in a cold environment allow it to warm to room temperature for at least 2 hoursbefore connecting to an AC outlet.IMPORTANT ALWAYS remove any network/ethernet connection from the HD Encoder after configuring it toinsure its security and highest performance Use high quality cables and connectors and insure all connections are tight Test the coaxial cable RF output at the TV to insure the levels are well within the TV input range Use Google Chrome, Microsoft Edge, or Mozilla Firefox as the web browser when configuring theHD Encoder. Google Chrome is preferred. During the web browser Admin Reboot process, use a new Google Chrome “Incognito Window” toeliminate caching-related confusion and issues. The factory Default is shown on the outside of the shipping box for RF output. Any unit can besetup as J.83, or ATSC, or DVB-T, or ISDB-Tb. Example, if DVB-T output is desired(example: for Colombia installation) then the RF Setup Menu Channel Type must bechanged to DVB-T. The factory DEFAULT is set on a country by country basis for ease ofeach country’s customer. The hardware and software product trademarks are the property of their respective owners, includingGoogle Chrome, Microsoft Edge, and Mozilla Firefox.2www.multicominc.comAll Rights Reserved 2020 Multicom, Inc.(800) 423-2594(407) 331-7779
Multicom MUL-HDENC-C-200 User Manualii. EAS Support StatementThis equipment is equipped with EAS terminals / connections and CVBS (Composite Video Input) and L/Raudio input connections on the rear panel.If applicable, connect your EAS Alert Device System outputs to the Encoder. If the encoder receives theproper Event signal from your EAS device, the normal input audio/video program will be replaced by theaudio and video from the EAS system device. Once the encoder has received the proper signal from yourEAS device the normal input video and audio will return to a normal operating mode.****THIS DEVICE IS NOT AN EAS RECEIVER****Note: It is the responsibility of the Installer/User to properly connect, verify, and test the EASfunctionality of this device with the EAS receiver.Note: It is the responsibility of the Installer/User to properly perform the required EAS tests asrequired by the FCC or your specific Government Agency.If the EAS functions on this device fail for any reason it is the responsibility of the Installer/User toreplace this device as required by the FCC or your specific Government Agency.iii. Kit Contents MUL-HDENC-C-200 HD Encoder Deluxe AC Adapter, US Plug, 12VDC 1.5A, 100240VAC, 50/60Hz 6’ HDMI cable 4’ RCA L/R to Mini-Jack Audio cable (qty 2) Wall/shelf mounting angles, small (qty 4) 19”, 1 RU Rack Mounting brackets (qty 2) Bracket/angles mounting screws3www.multicominc.comAll Rights Reserved 2020 Multicom, Inc.(800) 423-2594(407) 331-7779
Multicom MUL-HDENC-C-200 User Manualiv. English and Spanish MenusThe web interface/GUI supports both English and Spanish. Select the desired language at the bottom ofany admin page after logging in (see below). Note that the LCD display does NOT display Spanish.4www.multicominc.comAll Rights Reserved 2020 Multicom, Inc.(800) 423-2594(407) 331-7779
Multicom MUL-HDENC-C-200 User ManualTable of Contentsi. Safety Precautions . 2ii. EAS Support Statement . 3iii. Kit Contents . 3iv. English and Spanish Menus . 41.0 HD Encoder Introduction . 61.1 Front Panel View .61.2 Rear View .62.0 Specifications . 73.0 STEP A: HARDWARE INSTALL & CONNECTIONS . 104.0 HD Encoder Programming/Setup . 104.1 HD Encoder Front Panel Display .104.2 Using the HD Encoder Front Panel for Setup . 114.2.1 LCD Setup Menu Map. 114.2.2 VCN Related Notes: J.83B, ATSC.144.3 Using the HD Encoder Web Interface .154.3.1 Overview of the Process .154.3.2 Login .155.0 STEP B: RF OUTPUT SETUP . 185.1 RF Output Setup – QAM / ATSC .185.2 RF Output Setup - DVB-T .205.3 RF Output Setup - ISDB-Tb .226.0 STEP C: ENCODER SETUP . 246.1 Encoder Setup – QAM / ATSC.246.1.1 Closed Captioning: Enable/Disable .266.1.2 EAS Connections .276.2 Encoder Setup – DVB-T .286.3 Encoder Setup – ISDB-Tb .307.0 STEP D: USE TV AUTOSCAN . 318.0 Network Setup Tab . 319.0 Administration Tab . 329.1 Reboot .329.2 Reset to Default .329.3 Saving your configuration files .329.4 Restore/Upload saved file configurations .339.5 Change Password .3310.0 Frequencies/Channels provided . 3410.1 J.83B .3410.2 ATSC .3510.3 DVB-T .3610.4 ISDB-Tb .3911.0 Frequently Asked Questions (FAQ)/Troubleshooting . 4012.0 After-Sales Service . 4213.0 Disclaimer . 425www.multicominc.comAll Rights Reserved 2020 Multicom, Inc.(800) 423-2594(407) 331-7779
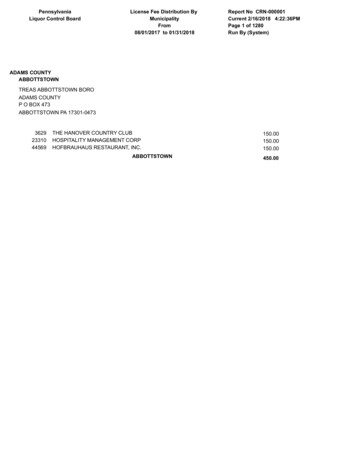
Multicom MUL-HDENC-C-200 User Manual1.0 HD Encoder IntroductionThe Multicom MUL-HDENC-C-200 is a Multi-Standard Format, single input, High Definition AgileDigital Encoder/Modulator used to convert a single HDMI, component, or composite video-audio input ofup to 1080i/1080p into a J.83B QAM 64/QAM 256 RF, ATSC (8VSB), DVB-T QAM64 or IDSB-TbQAM 64 coaxial output. Its feature rich, high quality, multi-standard format makes it suitable forCommercial and Residential use in a wide variety of countries.The Multicom MUL-HDENC-C-200 supports Closed Captions in the J.83 and ATSC output formats,only. It also supports EAS input with local and remote control. It is feature rich, very flexible andpowerful, while being user friendly and easy to use for both Residential and Commercial applications.The high quality HD performance allows action packed movies and sports channels on any number ofconnected HDTVs and now includes AC-3 audio as default.1.1 Front Panel ViewLCD DisplayPower LEDReboot (use pin/paperclip)UP ArrowDOWN Arrow OK/Enter1.2 Rear ViewHDMI InputClosedCaption InputComponent/CompositeVideo InputsAudioInputsRF OutputEAS EASEASVideo Audio ControlInputs Inputs InputsLAN Port(Web Management Port)Gain(Attenuation)FEATURES: QAM 64 /256 / ATSC (8VSB) / DVB-T / ISDB-Tb output (user selectable, only one at a time) High Resolution up to 1080i/1080p 3 VCN Modes for QAM output GUI for easy setup and control: English or Spanish (user selectable) HDMI, Component, or Composite input MPEG-2 VBR for Video Output & AC-3 / MPEG-1 / MPEG-4 for Audio Output Supports Closed Captioning (QAM/ATSC) EAS Supported (QAM) 40dB MER (QAM) output Rack, shelf, wall mounting – brackets included6www.multicominc.comAll Rights Reserved 2020 Multicom, Inc.(800) 423-2594(407) 331-7779AC Adapter
Multicom MUL-HDENC-C-200 User Manual2.0 SpecificationsGeneralLocal MonitoringWeb GUI SupportedPassword ProtectedPower SupplyConsumptionOperationalTemperatureStorage TemperatureDimensionsWeightLanguageFirmware VersionNet VersionVideo / Audio InputHDMI 1.4LCDFirefox, Chrome, Safari, EdgeGUI: User Settable12 VDC 1.5A, 100-240VAC 50/60Hz,US Plug5 Watts0c - oResolution OutputConnectorAudioTrigger MechanismMPEG-2 VBRJ.83 Annex B:HD: 12.0 – 24.0 MbpsSD: 4.0 – 9.0 MbpsATSC-8VSB:HD: 12.0 - 18.0 MbpsSD: 4.0 – 9.0 MbpsDVB-T:HD: 12.0 – 24.0 MbpsSD: 4.0 – 9.0 MbpsISDB-Tb:HD: 12.0 – 18.0 MbpsSD: 4.0 – 9.0 MbpsSame as input except:1080p30 in, 1080p25 out1080i60 in, 1080i50 out720p60 in, 720p50 out576p in, 480p out576i in, 480i outAudioAudio CodecsAC-3 / MPEG1 Layer II / MPEG4 AACClosed CaptioningCompositeRCA x 1 Set forEachAnalog 3.5mmEAS-20c - 70c236mm x 145mm x 34mm0.92 kg, 1.88kg packagedEnglish20190925, or later1.2.6, or laterVideo / Audio Encoding ProfileVideoVideo CodecsBitrate (Adjustable)SingleEmbedded PCMEIA-608; 1 x RCA (CC)7www.multicominc.comAll Rights Reserved 2020 Multicom, Inc.(800) 423-2594(407) 331-7779RCA x 1 SetAnalog 3.5mm5-12VDC and DryContact Closure(Terminal Strip)
Multicom MUL-HDENC-C-200 User ManualOutputStandardConnectorOutput LevelFlatness Across Full BandMEROutput ImpedanceRF Output Return LossModulator STD I / IIJ.83 Annex B / ATSC-8VSB / DVB-T / ISDB-Tb1 x “F” Female35 dBmV Typical(With 20dB Range Manually Adjustable) 2dB Typical38 dB Typical@ 663.0000 MHz under J.83 Annex B STD Mode75 ohm10 dB TypicalJ.83 Annex BRF ModeChannel TypeFrequency Range (Under STD Mode)InterleaverConstellation (Output Bitrate, Max)VCNATSC-8VSBNormal/InvertedJ.83: STD / HRC / IRCATSC-8VSB57.000 MHz to 861.000MHz(Channel 2 to Channel 135)I 128, J 157.000 MHz to 803.000 MHz(Channel 2 to Channel 69)N/A64-QAM (26.970Mbps) /256-QAM (38.810Mbps)Auto (Major & Minor) /Manual (Major & Minor) /Manual (One Part)8VSB (19.393Mbps)Modulator STD III / IVAuto (Major & Minor) /Manual (Major & Minor)DVB-TRF ModeFrequency RangeConstellation (Output Bitrate, Max)FECLCN Mode (Default)OFDM ModeISDB-TbNormal/Inverted50.500 MHz to 858.000 MHz177.143 MHz to 803.143 MHz(Channel 2 to Channel 69 for 6MHz)(Channel 7 to Channel 69)(Channel 6 to Channel 69 for 7MHz)(Channel E2 to Channel E69 for 8MHz)16-QAM (15.834Mbps) /16-QAM (15.490Mbps) /64-QAM (23.751Mbps)64-QAM (23.235Mbps)1/2, 2/3, 3/4, 5/6, 7/8ColombiaN/A2k, 8k2k, 4k, 8kGuard Interval1/32, 1/16, 1/8, 1/4Information in this document is subject to change without notice.8www.multicominc.comAll Rights Reserved 2020 Multicom, Inc.(800) 423-2594(407) 331-7779
Multicom MUL-HDENC-C-200 User ManualFactory Defaults for MUL-HDENC-C-200 (-NA, -MX, -CO, -LA)ImageLanguageModulationCountry / BandwidthOriginal Network IDNetwork IDTS IDRegional NameNetwork NameRF OutputChannel TypeChannelArea CodeRemote Key IDConstellationFECGuard IntervalOFDM ModeTime Interleaved ModeVCNVCN ModeLCN(Channel Number)LCN ModeShort NameLong NameChannel NameProvider NameSource IDHD BitrateSD BitrateProgram NumberTest ModeClosed CaptionDefault IPDHCPUSA/CA (-NA)EnglishMexico (-MX)Colombia (-CO)Spanish (GUI)Spanish (GUI)RF Output : STDATSC: 8VSBn/a2214n/an/an/an/an/an/a256 QAM8VSB64 QAMn/an/a7/8n/an/a1/32n/an/a8Kn/an/an/aEncoder nabledEnabledEnabledEnabledEnabledNetwork Setup192.168.1.9DisabledDisabledDisabledLATAM (-LA)Spanish (GUI)ISDB-Tb6186018601n/aLATAMNormaln/a144080764 mAll Rights Reserved 2020 Multicom, Inc.(800) 423-2594(407) 331-7779
Multicom MUL-HDENC-C-200 User Manual3.0 STEP A: HARDWARE INSTALL & CONNECTIONSUnpacking and InspectionEach unit is shipped factory tested. Ensure all items are removed from the container prior to discardingany packing material.Thoroughly inspect the unit for shipping damage with particular attention to connectors and controls. Ifthere is any sign of damage to the unit or damaged or loose connectors contact your distributorimmediately. Do not put the equipment into service if there is any indication of defect or damage.Making the Connections OverviewIt is highly recommended that the highest quality cables and connectors be used for all video and audiosource connections.1. Ensure the video Source has output.2. Connect the HDMI cable/Component cables/Composite cables to the HD Encoder from the Source.3. Connect the included Audio cable from the source to the 3.5mm Audio L/R connector on the HDEncoder if analog audio is needed4. Connect the composite cable to the CVBS input for Closed Caption5. Connect the included AC power adapter cord to the HD Encoder’s 12VDC Power receptacle at therear.6. Connect the AC adapter to an appropriately rated AC power outlet.7. Test the RF output with a CATV meter to ensure that it is within the input range of the connectedTV’s8. Connect to the coaxial distribution using the “F” connector at the rear of the HD Encoder. Use ahigh quality 75Ω coaxial cable with compression-type “F” connectors from the HD Encoder’sRF Output. Ensure that all connections are tight.9. When the HD Encoder configuration is complete – disconnect the HD Encoder from thenetwork/Ethernet to insure its security and highest performance4.0 HD Encoder Programming/SetupTo setup and program the MULTICOM HD ENCODER DELUXE you can use either the device’s LCDFront Panel and buttons or the Web/GUI Interface. The programming of the settings is easiest by usingthe Web Interface in Section 4.3.4.1 HD Encoder Front Panel DisplayPress UP/DOWN ARROW buttons to scroll through the display information. Main Menu: Input information and Output Name Short name, and Bitrate Main Menu: VCN information VCN, Channel, and Frequency Main Menu: Management IP IP Address10www.multicominc.comAll Rights Reserved 2020 Multicom, Inc.(800) 423-2594(407) 331-7779
Multicom MUL-HDENC-C-200 User Manual4.2 Using the HD Encoder Front Panel for SetupWhen the unit is powered up it will first go through an internal booting and short self-test and then beready for operation or initial setup. The USA factory default is for J.83B RF output. If a differentvideo output is desired (example: for Mexico installation) then the RF Setup Menu Channel Typemust be changed to ATSC. The FACTORY DEFAULT is shown on the label.NOTE: Factory default for Colombia is DVB-T. Factory default for Mexico is ATSC. The rest ofLatin America factory default is ISDB-Tb. ALL VERSIONS ARE USER-SELECTABLE: J.83QAM, ATSC, DVB-T, or ISDB-Tb – just the factory defaults change depending on the “ship to”country.Press “OK” Button to enter the setup MAIN MENU system.The front panel LCD password is: 0000Enter the password by adjusting each digit by using the UP/DOWN ARROW buttons – then press “OK”when the digit is correct. Press “OK” to enter Main Menu. For security purposes the HD Encoder willtimeout and return to a password protected mode if no buttons are pressed for about 10 seconds.FRONT PANEL:Login: Press “OK” buttonEnter Password Use UP/DOWN arrows to change digit, Press OK to set it and go to next until all 4 digits areentered – the unit will now be in setup MAIN MENU. Pressing the UP/DOWN ARROWS will scrollthrough the menus/settings. Pressing the OK will select/execute the Menu Item or Setting.4.2.1 LCD Setup Menu MapMain Menu – J.83B/ATSC-8VSBRF SetupChannelMod ModeCountry BWTSIDRegional NameRFChannel TypeConstellationExitEncoder SetupVCNVCN ModeShort NameLong NameSource IDVideo InputHD BitrateSD BitrateProgram NumberTest ModeClosed CaptionAudio InputAudio OutputExitNetwork SetupHost NameIP SetupExitChange PasswordReset to Default11www.multicominc.comAll Rights Reserved 2020 Multicom, Inc.(800) 423-2594(407) 331-7779Exit
Multicom MUL-HDENC-C-200 User ManualMain Menu – DVB-TRF SetupChannelMod ModeCountry BWONIDNIDTSIDNetwork NameRFConstellationFECGIOFDM ModeCELL IDExitEncoder SetupLCNVCN ModeChannel NameProvider NameVideo InputHD BitrateSD BitrateProgram NumberTest ModeClosed CaptionAudio InputAudio OutputExitNetwork SetupHost NameIP SetupExitChange PasswordReset to DefaultExitNetwork SetupHost NameIP SetupExitChange PasswordReset to DefaultExitMain Menu – ISDB-TbRF SetupChannelMod ModeCountry BWONIDNIDTSIDNetwork NameRFArea CodeRemote Key IDConstellationFECGIOFDM ModeTime IL ModeExitEncoder SetupChannel NameProvider NameVideo InputHD BitrateSD BitrateProgram NumberTest ModeClosed CaptionAudio InputAudio OutputExit12www.multicominc.comAll Rights Reserved 2020 Multicom, Inc.(800) 423-2594(407) 331-7779
Multicom MUL-HDENC-C-200 User ManualPress UP/DOWN ARROW to scroll through MAIN MENU and use OK to select a Menu: Main Menu: RF Setup Main Menu: Encoder Setup Main Menu: Network Setup Main Menu: Change Password Main Menu: Reset to Default Main Menu: Exit#1. Press UP ARROW to scroll through RF SETUP MENU: RF Setup Menu: ChannelFactory Default: CH 2 RF Setup Menu: Mod ModeFactory Default: J.83B/ATSC RF Setup Menu: Country BWFactory Default: 6M RF Setup Menu: TSIDFactory Default: 1 RF Setup Menu: Regional NameFactory Default: USA RF Setup Menu: RFFactory Default: Normal RF Setup Menu: Channel TypeFactory Default: J.83B:STD RF Setup Menu: ConstellationFactory Default: 256 QAM RF Setup Menu: Exit#2. Press UP ARROW to scroll through ENCODER SETUP MENU: Encoder Setup Menu: VCNFactory Default: 2.1 Encoder Setup Menu: VCN ModeFactory Default: Auto(two-part) Encoder Setup Menu: Short NameFactory Default: DTV1 Encoder Setup Menu: Long NameFactory Default: J83-DTV1 Encoder Setup Menu: Source IDFactory Default: 00101 Encoder Setup Menu: Video InputFactory Default: Auto Detect Encoder Setup Menu: HD BitrateFactory Default: 24MbpsEncoder Setup Menu: SD BitrateFactory Default: 4MbpsEncoder Setup Menu: ProgramNumberFactory Default: 101Encoder Setup Menu: Test ModeFactory Default: DisableEncoder Setup Menu: Closed Caption Factory Default: EnableCLOSED CAPTION ONLY AVAILABLE IN J.83 or ATSC MODESEncoder Setup Menu: Audio InputFactory Default: Auto DetectEncoder Setup Menu: Audio Output Factory Default: AC-3 Range 2 – 135 DVB-T or ISDB-Tb Inverted ATSC or J.83B 64 QAM VCN Notes below Up to 7 Char Up to 16 Char Up to 5 Char HDMI/Component/Composite Range 12 – 24 Mbps Range 1 – 9 Mbps Range 1 – 65534 Enable Disable Or Analog MPEG1 Layer 2, orMPEG4 AAC Encoder Setup Menu: Exit#3. Press UP ARROW to scroll through NETWORK SETUP MENU: Network Setup Menu: Host NameFactory Default (Based on the S/N): HDENC-xyzXYZ Network Setup Menu: IP SetupFactory Default: DHCP Disable Enable Factory Default: IP Address: 192.168.1.9 Factory Default: Subnet Mask: 255.255.255.0 Factory Default: Default Gateway: 000.000.000.000 Network Setup Menu: ExitNote that the HD Encoder will reboot after using the NETWORK SETUP MENU.13www.multicominc.comAll Rights Reserved 2020 Multicom, Inc.(800) 423-2594(407) 331-7779
Multicom MUL-HDENC-C-200 User Manual#4. Press UP ARROW to MAIN MENU: CHANGE PASSWORD#5. Press UP ARROW to MAIN MENU: RESET TO DEFAULTNote that the HD Encoder will reboot after using the RESET TO DEFAULT MENU.#6. Press UP ARROW to MAIN MENU: EXITNote that the HD Encoder will lock after selecting the EXIT optionAfter Selecting the desired Menu – Change Parameter Settings Use UP/DOWN arrows to move and select the desired parameter, Press OK to start editing theparameter using the UP/DOWN arrows. After changing the setting, pressing the OK will set theparameter.4.2.2 VCN Related Notes: J.83B, ATSCVCN is the Channel number to be shown by the TV. The VCN Modes which will be available depend onwhether the output is selected as J.83B or as ATSC.VCN Mode: Auto (two-part) - VCN will be set based on the Channel output selected in “RF OutputMenu: RF”.Example: Output Channel set to 2. VCN for device will be set at 2.1This is automatically set by the CH output set in the RF Setup section.VCN Mode (Manual two-part) - VCN Manual 2-part- will allow the installer to control VCN channelregardless of the CH/freq. selected on the RF Output Setup page of the device.Examples:RF CHVCN Channel5755.1101101.2VCN Mode: Manual (one-part) - Use ‘VCN (one part) Menu’ to set VCN channel.Example: VCN can be set to a range 1-999.VCN Mode (Manual one-part) -VCN Manual 1-part- will allow the installer to control VCN channelregardless of the CH/freq. selected on the Output Setup page of the device.Examples:RF CHVCN Channel57210110513413314www.multicominc.comAll Rights Reserved 2020 Multicom, Inc.(800) 423-2594(407) 331-7779
Multicom MUL-HDENC-C-200 User Manual4.3 Using the HD Encoder Web Interface4.3.1 Overview of the ProcessProduct Factory Default IP: 192.168.1.9 and with DHCP - Disabled1. Connect an Ethernet cable directly (no Cross Over cable required) to the Web ManagementPort on the rear panel of the HD Digital Encoder or connect the device’s Ethernet cable to anEthernet switch. Connect Ethernet Cable to your PC/Laptop.2. Modify your PC/Laptop IP address to static address 192.168.1.103. Turn off the WIFI on your PC/Laptop if applicable4. Enter ‘192.168.1.9’ into your web browser to access the Web Interface of the HD Encoder.5. Enter the Web Interface and make any required device changes.6. Save all changes as required and then reboot the device.7. Verify parameters have changed and then end your web session.As an alternative, the HD ENCODER static IP Address may be configured (or DHCP enabled) on thefront panel and then the Web Browser can be used for all other configuration changes by using the IPAddress which will be displayed on the LCD. BE VERY CAREFUL WHEN USING THE DEFAULT IPADDRESS AND CONNECTING TO AN EXISTING NETWORK – THERE MAY BE CONFLICTWITH EXISTING INSTALLED HARDWARE – THIS MUST ALWAYS BE AVOIDED.4.3.2 Login Use Google Chrome, Microsoft Edge, or Mozilla Firefox as the web browser when configuring theHD Encoder. Google Chrome is preferred. During the web browser Admin Reboot process, use a new Google Chrome “Incognito Window” toeliminate caching-related confusion and issues.Open Your Internet Browser:Use the PC web browser - type in the HD Encoder Deluxe’s IP Address. The current IP Address can beviewed on the front panel LCD by pressing the UP ARROW twice to see “Management IP”.Web Interface Login and Password:Default User Name: adminDefault Password: Admin12315www.multicominc.comAll Rights Reserved 2020 Multicom, Inc.(800) 423-2594(407) 331-7779
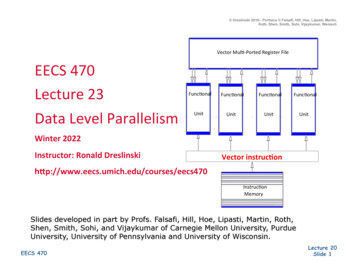
Multicom MUL-HDENC-C-200 User ManualIMPORTANT NOTE: Save all changes before leaving each setup pageReview the Overview TabView the current settings, MAC address, Firmware version, etc.The other tabs (Encoder Setup, RF Output Setup, Network Setup, and Administration) are used to changethe HD Encoder settings and operating parameters.It is HIGHLY recommended that after all other tabs have been configured that the HD Encoder berebooted using the REBOOT button on the ADMINISTRATION tab.Above: Overview Tab – QAMAbove: Overview Tab – ATSC16www.multicominc.comAll Rights Reserved 2020 Multicom, Inc.(800) 423-2594(407) 331-7779
Multicom MUL-HDENC-C-200 User ManualAbove: Overview Tab – DVB-TAbove: Overview Tab – ISDB-Tb17www.multicominc.comAll Rights Reserved 2020 Multicom, Inc.(800) 423-2594(407) 331-7779
Multicom MUL-HDENC-C-200 User Manual5.0 STEP B: RF OUTPUT SETUPThe MUL-HDENC-C-200 is a Multi-Standard Output HD encoder allowing the installer to select fromQAM, ATSC, DVB-T, or ISDB-Tb standards. Select any desired changes, including type of RF output.This needs to be done before making changes on the “Encoder Setup” tab.1. Select the “RF Output Setup” tab from the top menu.2. Use the drop down to select the proper RF standard required for your installation.3. Modify all parameters as needed.4. Click on the “Save and Confirm” button at the bottom of the “RF Output Setup” tab5.1 RF Output Setup – QAM / ATSCUse the RF Output Setup page to set the RF output type, RF Output CH/frequency, and Constellation.1.Select and set the Modulation MUST also make selection in Channel TypeModulation: J.83B / ATSC-8VSBNote: Country / Bandwidth will automatically be changed to 6MHz and that is the only option2.Modify and set TS ID & Regional NameTS ID: (Factory Default is 1)Regional Name: (Factory Default is USA)* If installing multiple units in
QAM 64 /256 / ATSC (8VSB) / DVB-T / ISDB-Tb output (user selectable, only one at a time) High Resolution up to 1080i/1080p 3 VCN Modes for QAM output GUI for easy setup and control: English or Spanish (user selectable) . STD / HRC / IRC ATSC-8VSB Frequency Range (Under STD Mode) 57.000 MHz to 861.000MHz (Channel 2 to Channel 135) 57.000 MHz .