Transcription
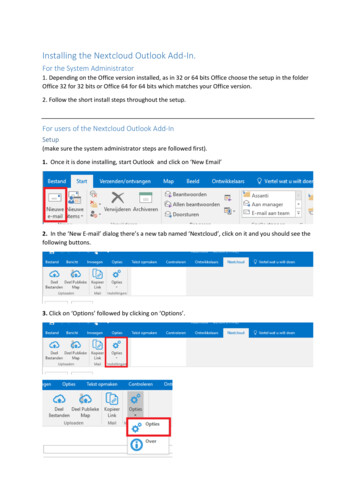
Installing the Nextcloud Outlook Add-In.For the System Administrator1. Depending on the Office version installed, as in 32 or 64 bits Office choose the setup in the folderOffice 32 for 32 bits or Office 64 for 64 bits which matches your Office version.2. Follow the short install steps throughout the setup.For users of the Nextcloud Outlook Add-InSetup(make sure the system administrator steps are followed first).1. Once it is done installing, start Outlook and click on ‘New Email’2. In the ‘New E-mail’ dialog there’s a new tab named ‘Nextcloud’, click on it and you should see thefollowing buttons.3. Click on ‘Options’ followed by clicking on ‘Options’.
4. In the Settings dialog, please enter your Nextcloud server details.1. Is the hyperlink towards the location of your Nextcloud environment.2. Nextcloud Username3. Nextcloud Password4. Once 1, 2 and 3 are filled in with the correct details click on ‘Validate’ (4).5. If the Nextcloud login details are correct it should be ‘Validated’ (see 1). If it is validated click on‘Save’ (2).Uploading Files1. In the ‘New E-mail’ dialog go to the ‘Nextcloud’ tab.2. To share some files click on ‘Share Files (1). This will prompt the user with a file selection dialog.3. The file selection dialog speaks for itself, select the file(s) you’d like to share. Once you done thatclick on ‘Open’.
4. The following dialog is open now, the dialog shows you the current file(s) selected to upload andthe means to set the password, set expiration date or add additional files before the upload starts.4.1. If you click on this button, more files can be added to upload.4.2. Click here to clear the current selection of files to be uploaded.4.3. Click here to delete the individual file.4.4. In this field you will find all the files which are selected to be uploaded to Nextcloud.4.5. If you click here the upload process will start.4.6. Clicking here you can auto-generate or manually set a password. If you manually set apassword please don’t use a weak password as ‘qwerty’ (as default Nextcloud server weakpassword-rule).Either auto-generate or type manually a password, when you make up a password yourselfplease make it at least 6 characters long and don’t make it something easy as “qwerty”.If you don’t set the password in this dialog it will automatically prompt you with the questionif you’d like to set a password for the share once the upload starts.
4.7. Clicking here will allowed you to set the expiration date for the share.4.7.1. Clicking on the calendar icon will allowed you to select manually the expirationdate;4.7.2. Remove the expiration date.4.7.3. This is the default expiration date in days taken over from the Nextcloud servershare settings;4.7.4. Share will expire tomorrow from now;4.7.5. Share will expire next week from now;4.7.6. Share will expire next month from now.5. If you’ve clicked ‘x File(s) Upload’ the dialog will show you the individual file (spinning icon orcheck mark) and global file upload progress.6. Once the uploading is done it will automatically insert the link, password and expiration date in thetop of your e-mail body. When the receiver of the e-mail goes to the given URL with given password,they may find your files there to download.
Sharing a Public Folder1. For sharing a public folder with the receiver of this e-mail, where they may upload their files toyour Nextcloud environment click on ‘Share Public Folder’ (2).2. Clicking on ‘Share Public Folder’ will open the following dialog.3. The ‘Password’ and ‘Expiration Date’ buttons work exactly the same as in the dialog to upload files.Please see 4.6 and 4.7 from ‘Uploading Files’.4. When you click on ‘Upload’ it will create the necessary share and the URL, password andexpiration date will automatically be inserted in your email.
For users of the Nextcloud Outlook Add-In Setup (make sure the system administrator steps are followed first). 1. Once it is done installing, start Outlook and click on 'New Email' 2. In the 'New E-mail' dialog there's a new tab named 'Nextcloud', click on it and you should see the following buttons. 3.