Transcription
P&HIG3JUNE 2017Polypipe Plumbing & HeatingInstallation Guide
Contents03IntroductionPlumbing & HeatingPipes & Fittings05 Fittings06 Plumbing & heating pipe07 Pipe stiffenersPolyPlumb09 Jointing and dismantlingUnderfloor Heating35 Introduction36 Guide to typicalapplications38 Selecting the right pipe38 Metal CompositePipe installation40 Underfloor Heatingusage pipe tableUnderfloor Heating90 Guide to floor coverings forUnderfloor Heating systemsManifolds & WaterTemperature Controls92 IntroductionSolid Floor Systems42 Introduction45 Panel system48 Clip Rail system50 Staple systemRoom Temperature Controls98 Introduction PolyMax13PolyFit15 Jointing and demounting16 Flexible HosesPolySure19 JointingSystem Installation22 Introduction22 Service conditions23 Application information25 Connections toother materials28 Installation of pipeworkin floors and voids31 Pipe and fitting blankingPlumbing & HeatingSystem Testing33 Introduction2Single Room Applications112 Introduction113 Wiring detailsJointing and demountingwww.polypipe.comFloating Floor Systems54 Introduction56 Installation instructionsSuspended Floor Systems62 Introduction64 Double HeatSpreader Plates66 Overlay Lite 15 Suspended floorapplication68 Fit from below Double Heat SpreaderPlates70 Batten systems (DHSP only)72 Modular Heating PanelsExisting Floors& Low Profile Systems76 Introduction78 Overlay 78 Overlay Lite84 Overlay Lite 15Underfloor Heating Testing,Filling & Commissioning116 IntroductionSystem Performance Tables120 Heat output tables122 Fault finding chartsStandards & Approvals124 Standards and Polypipeguarantee informationFurther TechnicalInformation127 Technical support
Plumbing & HeatingInstallation GuideWelcome to the new Polypipe Plumbing & HeatingInstallation Guide. This installation guide combines allof our plumbing and heating related products into onesingle catalogue of product information.Alongside all of our best known product ranges, you will also find several exciting newadditions, continuing our reputation for product innovation and great value. Together theymean Polypipe has the most comprehensive range of plumbing and heating systems availablefor a single UK manufacturer.This publication is provided as a comprehensive guide on how to install Polypipe Plumbingand Heating Systems. It is an important document as we cannot accept any liability, or honourany guarantee, for products and systems that have not been installed in accordance with ourpublished instructions.From time to time our installation advice may be updated at which time previous printed copieswill become out of date. The latest version of our installation advice, including a downloadableversion of the current Plumbing & Heating Installation Guide, can be found com3
Plumbing & HeatingPipes & FittingsEach range is available in a wide selection of fitting types, plus valves, connectors,brassware and accessories. Use with the appropriate pipe from our comprehensiverange of piping systems.4www.polypipe.com
Plumbing & Heating Pipes & FittingsPolypipe recognises that no two jobs are the same and hasdeveloped an application-based range of plumbing solutions withfour fittings ranges, backed by a range of pipe options.Original robust, grey system,suitable for a range of applicationsTraditional push-fit plumbingHand demountable,ideal for first fix applicationsQuickfix push-fit plumbingSlim and sleek,ideal for surface mounted applicationsStreamline push-fit plumbingSlim profile fittings,ideal when security is paramountPermanent press-fit plumbingPolypipe Fitting SolutionsSize (mm)Fitting Solutions101522Pipe Colour28GreyJointing MethodWhiteü ü ü ü üPush-fitPress-fitüü ü ü üüüü ü ü üüüü ü ü ü üüüNOTE:Grey pipe and white fittings can be used together and vice versa, however, please note the ‘K’ insertiondepth mark on the pipe will not be correct, therefore the insertion depth should be measured andmarked on the pipe.www.polypipe.com5
Plumbing & Heating Pipes & FittingsPlumbing and heating pipeAt the heart of the Polypipe Plumbingand Heating Systems product range isour commitment to polybutylene pipe.We choose polybutylene to create the mostflexible and efficient pipes and jointing systemsavailable. Polybutylene pipe is ideal for bothdomestic hot and cold water plumbing andheating systems, offering exceptional durabilityand long-term performance, which has seen itbecome the preferred material choice for today’sbuilding projects.The most important characteristic of polybutyleneis its natural flexibility, allowing you to bend thepipe into even the tightest of spaces. Polybutyleneis the most malleable plastic used in themanufacture of piping systems.Another key advantage of polybutylene pipe isthat it is extremely light in weight, particularlywhen compared with copper piping systems.For example, 15mm copper tube will weighapproximately 0.28kg/m, compared to just0.074kg/m for polybutylene. This significantweight reduction is invaluable when transportingmaterials to site.Polybutylene pipe has good resistance to freezingtemperatures, maintaining long-term durability inheating and water applications.This, combined with the pipe’s elasticity, meansthat if water is subjected to freezing temperatures,a burst pipe is less likely.Our plumbing systems also give improvedperformance over rigid pipe systems in terms of lownoise transmission and low water hammer effect.Underfloor Heating pipe systemsWe have supplemented our pipe offers with tworanges of underfloor specific pipe. Our ultraflexible underfloor heating pipe aids installationand handleability whilst our formable MCP pipesprovide alternative for installers familiar withthis pipe characteristic.6www.polypipe.comPIPE AND RANGE APPLICATIONSPipeFlexiblePlumbing& HeatingPipeGREYFlexiblePlumbing& HeatingPipeWHITEMCPUnderfloorHeatingPipe WHITEUltraFlexibleUnderfloorHeatingPipe ng/HeatingPlumbing/Heating& UFHPlumbing/Heating& ing
Plumbing & Heating Pipes & FittingsPipe stiffenersAll our push-fit plumbing fittings ranges, PolyPlumb,PolyFit and PolyMax, require a pipe stiffener to beinserted into our plastic pipe prior to jointing.We offer 3 different types of pipe stiffenersdependant on fitting type or installer preference:Plastic pipe stiffeners can be used with all pushfit ranges – PolyPlumb, PolyFit and PolyMax.Stainless steel pipe stiffeners can also be used withall push-fit ranges – PolyPlumb, PolyFit and PolyMax.Sealed pipe stiffeners, which provide enhancedsealing can be used with PolyFit and PolyMax only.Plastic Pipe StiffenerPipe can be remounted over the stiffener whilstin this position. Should the stiffener need to beretrieved the fitting can be disassembled in orderto do this.Sealed stiffenersThe Polypipe sealed pipe stiffeners have beendesigned to provide enhanced sealing and canbe used with PolyFit and PolyMax fittings.The sealed stiffener incorporates two rubber‘O’ rings to give additional security; the seals arepositioned at the head of the stiffener and onthe outside of the spigot to seal on the pipe bore.Polypipe sealed stiffeners are suppliedpre-lubricated. If any further lubrication is requiredonly Polypipe silicone lubricant should be used.Substances such as solder flux must not be used.To aid the insertion of the sealed stiffener into thepipe, the pipe should be internally chamfered.The chamfer provides an internal lead on the pipeso the square edge of the pipe does not damagethe ‘O’ ring seal.Polypipe offer specific chamfering tools for thispurpose. The chamfering tools are available as eitherindividual tools or as a block of four, dependent oninstaller preference.Stainless Steel Pipe StiffenerSealed Pipe StiffenerNOTE:When using sealed pipe stiffeners with PolyFit orPolyMax fittings, the stiffener will normally beretained in the fitting when the pipe is demounted.When using PolyPlumb, PolyFit or PolyMax fittingswith copper pipe, pipe stiffeners are not required.When using our plastic pipe with compressiontype fittings, only plastic and stainless steel pipestiffeners can be used.The pipe stiffener function is provided withinthe body of the PolySure fitting and is thereforeintegral – stiffeners are consequently not required.www.polypipe.com7
PolyPlumbTraditional push-fit plumbingPolyPlumb is our original, triedand tested, grey plumbing system.Robust and reliable, PolyPlumbhas stood the test of time.PolyPlumb fittings feature a one step jointingprocess and a high performance stainless steelgrab ring within the fitting, ensuring superbjoint integrity.Use PolyPlumb with Polypipe grey polybutyleneflexible pipe, or you can combine PolyPlumbfittings and copper pipe. We recommend theuse of a Polypipe metal or plastic pipe stiffenerwhen used with plastic pipe.PolyPlumb is suitable for use in most plumbingand heating installations, including hot and coldwater and underfloor heating applications.8www.polypipe.comThe system offers a number of benefits: Our original grey plumbing system, usingtried and tested technology for many years PolyPlumb provides a superb combinationof fast fitting with a permanent, reliable fix PolyPlumb offers a one-step jointing process,with joint integrity assured by a highperformance stainless steel grab ring Demountable by disassembly only Use for most hot and cold water supplyor heating applications, includingunderfloor heating Use with Polypipe grey polybutylene pipesystems or copper pipe Use Polypipe metal or plastic pipe stiffeners
PolyPlumbJointingThere are five vital steps to successfully jointing the PolyPlumb system.Step 1a: Cutting PolyPlumb pipeCheck the pipe is not scored or scratched inany way and if it is, cut back to a point wherethere is no damage. Using a Polypipe pipe cutter,cut the pipe squarely using the “K” marks on thepipe as a guide. These marks indicate when thepipe has been inserted into the fitting correctly.Step 3: Visually check fitting andfitting componentsVisually check that all components are present,undamaged and free from contamination.LubricantsAll Polypipe fittings are supplied withpre-lubricated EPDM ‘O’ rings. If any furtherlubrication is required only Polypipe siliconelubricant should be used. Substances such assolder flux must not be used.Step 4: Insert pipe fully into fittingInsert pipe into the fitting, ensuring it is insertedto the full socket depth denoted by the next “K”mark on the pipe.Step 1b: Cutting copper pipe for insertionin a PolyPlumb fittingWherever possible, use a rotational pipe cutterwhen cutting copper pipe. Ensure that all cutends have a rounded lead in, with burrs removed.Never use a hacksaw. You will need to mark theinsertion depth on the pipe as below.Pipe Diameter (mm)10152228Insertion Depth (mm)22273035Step 2: Use of pipe stiffenerInsert a pipe stiffener into the pipe (not requiredon copper pipe). Pipe stiffeners are an integral partof the joint when using Polypipe grey pipe witheither PolyPlumb fittings or compression fittingsand need to be fully inserted into the pipe end.Polypipe offer two types of pipe stiffener to beused with PolyPlumb fittings - metal and plastic.When using a pipe stiffener, ensure it is fullyinserted before applying the fitting.Step 5: Check joint securityA quick tug on the pipe will confirm that thepipe is inserted past the grab ring and that agrab ring was present in the fitting. It does nothowever ensure that the pipe is fully insertedas this can only be confirmed by using the depthinsertion mark.IMPORTANT NOTE: Do not re-jointOn no account should a pipe be removed froma jointed PolyPlumb fitting by dismantling. If thesame fitting is then re-jointed, there is real riskthat the outer edge of the grab ring will havebecome damaged and this will reduce thepull-out performance of the joint when subjectedto pressure. The joint will almost certainly failprematurely and potentially cause serious injury.www.polypipe.com9
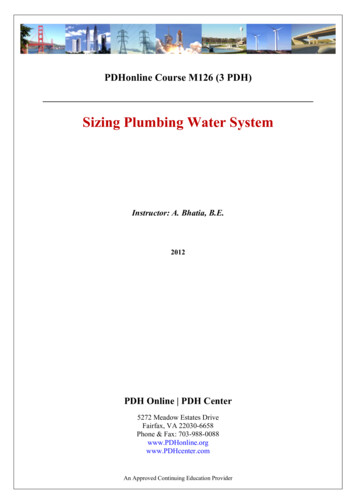
PolyPlumbDismantling a PolyPlumb jointReduced component fittingsPolyPlumb fittings must not be dismantledfor any reason prior to jointing.Changes have been made to 15mmPolyPlumb couplers, elbows and teesand 22mm PolyPlumb elbows, tees andcouplers (or connectors), which needto be considered when using PolyPlumbspares kits with these fittings, as follows:Step 1: Procedure for using the component packof spares. Dismantling the jointIf it is necessary to remove a joint pipe froma fitting, the cap-nut should be unscrewed andthe pipe with all the socket components presenton the pipe end should be pulled out of the socketof the fitting. The pipe end complete with all thesocket components should be cut off and discarded.A complete component pack of socket spares shouldbe fitted to the socket as described below and pipejointing should be carried out as described.Step 2: Replacement componentsThe component pack (Code: PB95XX) is suppliedas a cap-nut with all the socket componentspresent in the correct order and retained bya retaining cap.Step 3: Preparing componentsCompletely remove the retaining cap, ensuring thatthe socket components remain within the cap-nut.Step 4: Replacing the componentsWithout removing any of the socket componentsfrom the cap-nut, introduce the cap-nut and socketcomponents to the socket of the fitting and tightenup the cap-nut by hand, ensuring that thecomponents enter the socket without snagging.Step 1: Original PolyPlumb fittingsIf the bottom white washer is present in the fittingbelow the grab-ring, then the spares kit can beused as supplied without making any changes.Step 2: New PolyPlumb fittingsIf there is no bottom white washer presentbelow the grab ring with one of the five listedfittings, then this is one of the fittings which hasbeen modified.Before the spares kit is used, the carrier mouldingshould be carefully removed from the cap-nut andthe bottom white washer should be removed anddiscarded without changing the order of any ofthe other components. After this has been done,the spares kit should be offered up to the socketof the fitting, inserting the components into thesocket in the order they are within the kit andthen screwing down the cap-nut onto the outsideof the socket.Retaining CapGrab ringSpacerStep 5: Checking the fittingCarry out a visual check to ensure that all socketcomponents are present in the correct order asshown in the diagram and that the rubber ’O’ ringis lubricated. If in doubt, the ‘O’ ring should bere-lubricated using PolyPlumb silicone lubricant.Step 6: Fitting the jointCarry out pipe jointing as described previously.Retaining Cap Spacer (28mm only)Grab ring“O” ringPipe StiffenerSpacerSpacer WasherPolyPlumb fittings general arrangement10www.polypipe.comPipe Stiffener“O” ring15mm couplers, elbows and tees and 22mm elbows,tees and couplers (or connectors)
www.polypipe.com11
PolyMaxStreamline push-fit plumbingPolyMax is our newest plumbingfitting range, introduced afterextensive research, to meet consumerand installer demand.PolyMax fittings are slim, sleek and attractive,making PolyMax the perfect choice for surfacemounted installations. PolyMax is easilydemounted using our handy release tool. UsePolyMax with Polypipe white polybutyleneflexible pipe, using a Polypipe metal or plasticpipe stiffener. For extra security, choose the newPolypipe sealed stiffener.PolyMax can be used on a wide range of homeimprovement and refit projects, including hotand cold water systems.12www.polypipe.comThe system offers a number of benefits: New white push-fit system, ideal for homeimprovement and refit projects PolyMax fittings are slim, sleek and attractive:ideal for surface mounted applications PolyMax is secure in use but tool demountable Use for most hot and cold water supply orheating applications Use with Polypipe white polybutylene pipesystems or with copper pipe Use Polypipe metal, plastic or sealed stiffeners(15mm and 22mm only)
PolyMaxJointingThere are five vital steps to successfully jointing the PolyMax system.Step 1a: Cutting Polypipe pipeStep 3: Visually check fitting and fitting componentsCheck the pipe is not scored or scratched in anyway and if it is, cut back to a point where there isno damage. Using a Polypipe pipe cutter, cut thepipe squarely using the “K” marks on the pipe asa guide. These marks indicate when the pipe hasbeen inserted into the fitting correctly.Visually check that all components are present,undamaged and free from contamination.LubricantsAll Polypipe fittings are supplied with pre-lubricatedEPDM ‘O’ rings. If any further lubrication is required,only Polypipe silicone lubricant should be used.Substances such as solder flux must not be used.Step 4: Insert pipe fully into fittingInsert pipe into the fitting, ensuring it is insertedto the full socket depth denoted by the next “K”mark on the pipe.Step 1b: Cutting copper pipe for insertionin a PolyMax fittingWherever possible, use a rotational pipe cutterwhen cutting copper pipe. Ensure that all cutends have a rounded lead in, with burrs removed.Never use a hacksaw. You will need to mark theinsertion depth on the pipe as below.Pipe Diameter (mm)10152228Insertion Depth (mm)22354244Step 2: Use of pipe stiffenerInsert a pipe stiffener into the pipe (not requiredwith copper pipe). Polypipe offer three types ofstiffeners for use with PolyMax fittings: metal,plastic and for extra security - a sealed stiffener(15mm and 22mm only). When using a sealedstiffener, the stiffener will be retained in the fittingwhen demounted.Step 5: Check joint securityA quick tug on the pipe will confirm that the pipe isinserted past the grab ring and that a grab ring waspresent in the fitting. It does not however, ensurethat the pipe is fully inserted as this can only beconfirmed by using the depth insertion mark.Demounting a PolyMax jointPolyMax fittings are fully demountable andre-usable. To demount a PolyMax fitting use theraised edge of the demounting tool (FITAID) anddepress the collet squarely towards the fitting andpull the pipe out of the fitting. Care should be takenthat the collet is pushed all the way back to thefitting squarely to avoid scratching or scoring thepipe when it is pulled from the fitting.www.polypipe.com13
PolyFitQuickfix push-fit plumbingPolyFit is our hand demountablewhite, push-fit plumbing system,offering maximum flexibilityand adjustability.PolyFit features a one step jointing operationfor quick and easy installation. PolyFit leadsthe market in speed to fit. If you need to adjusta fitting joint during the installation process,PolyFit fittings can be quickly demounted byhand, or by using our release tool.Use PolyFit with Polypipe white polybutyleneflexible pipe, using a Polypipe metal or plasticpipe stiffener. For extra security, choose the newPolypipe sealed stiffener. PolyFit can be used ona wide range of contract and retrofit projects,including hot and cold water systems, and isparticularly suitable for first fix installations.14www.polypipe.comThe system offers a number of benefits: One step operation for quick and easyinstallation PolyFit is ideal for first fix applicationsor when demountability is important PolyFit is hand or tool demountable formaximum flexibility Use for most hot and cold water supplyor heating applications Use with Polypipe white polybutylenepipe systems or with copper pipe Use Polypipe metal, plastic and sealedstiffeners (15mm and 22mm only)
PolyFitJointingThere are five vital steps to successfully jointing the PolyFit system.Step 1a: Cutting Polypipe pipeCheck the pipe is not scored or scratched in anyway and if it is, cut back to a point where there isno damage. Using a Polypipe pipe cutter, cut thepipe squarely using the “K” marks on the pipe asa guide. These marks indicate when the pipe hasbeen inserted into the fitting correctly.place by a cap nut. All cap-nuts are torqued toensure they cannot unscrew easily. There is noneed to undo cap-nuts and remove any componentsprior to jointing PolyFit fittings.LubricantsAll Polypipe fittings are supplied with pre-lubricatedEPDM ‘O’ rings. If any further lubrication is requiredonly Polypipe silicone lubricant should be used.Substances such as solder flux must not be used.Step 4: Insert pipe fully into fittingInsert pipe into the fitting, ensuring it is insertedto the full socket depth denoted by the next “K”mark on the pipe.Step 1b: Cutting copper pipe for insertionin a PolyFit fittingWherever possible, use a rotational pipe cutterwhen cutting copper pipe. Ensure that all cutends have a rounded lead in, with burrs removed.Never use a hacksaw. You will need to mark theinsertion depth on the pipe as below.Pipe Diameter (mm)10152228Insertion Depth (mm)25354244Step 2: Use of pipe stiffenerInsert a pipe stiffener into the pipe (not requiredwith copper pipe). Polypipe offer three typesof stiffeners for use with PolyFit fittings: metal,plastic and for extra security - a sealed stiffener(15mm and 22mm only). When using a sealedstiffener, the stiffener will be retained in thefitting when demounted.Step 5: Check joint securityA quick tug on the pipe will confirm that the pipeis inserted past the grab ring and that a grab ringwas present in the fitting. It does not howeverensure that the pipe is fully inserted as this can onlybe confirmed by using the depth insertion mark.Demounting a PolyFit jointPolyFit fittings are fully demountable and re-usable.To demount a PolyFit fitting simply depress the colletsquarely towards the fitting and pull the pipe outof the fitting. Care should be taken that the colletis pushed all the way back to the fitting squarelyto avoid scratching or scoring the pipe when it ispulled from the fitting. When systems have beenpressurised the collet is designed to grip into thepipe therefore using a fitting release aid (ProductCode: FITAID) will assist in demounting fittings.Step 3: Visually check fitting and fitting componentsVisually check that all components are present,undamaged and free from contamination. PolyFitfittings contain; a blue bottom washer; an EPDM‘O’ ring; a blue top washer and a collet all held inwww.polypipe.com15
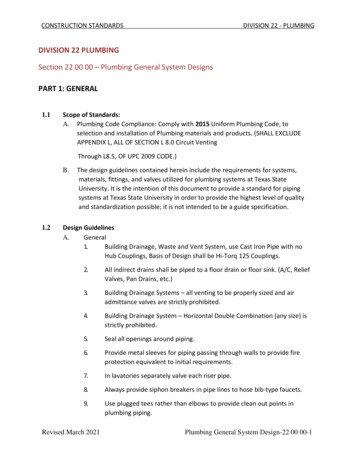
PolyFitSelect your Flexible HosesFlexible hoses are a great addition tothe PolyFit product range. This versatilecollection comes in a wide range of lengthand connection end combinations tosuit every need.Many of our flexible hoses include the PolyFitone step joint feature and are quick and easyto install - ideal for use in tricky to reach ortight locations.1 All PolyFit flexible hoses are listed underthe Water Regulations Advisory Scheme Look out for the black thread that is woundinto each hose, which denotes a WRAS qualityproduct. Each EPDM hose is suitable for usein domestic hot and cold water applications All PolyFit flexible hoses which have a tapconnector nut now contain captive rubberseals ensuring that seals are not lost ordamaged on-site2 PolyFit flexible hoses come in a packagingdesign which aids quick and easy productselection and all hoses come in pairs1PolyFit Fitting 15mm and 22mmPolyFit push-fit connections. PolyFit endsare secure in use but also fully demountableand re-usable.23Tap Connection Nut 1/2” and 3/4” These ‘wing nut’ style tap connector nutswill only require hand tightening.3PolyFit Chrome Plated Valve 15mm and 22mmOur compression end connectors use thesame high quality components as the restof the PolyFit push-fit range.4Compression Fitting 15mm and 22mmConnectors incorporating service valves toreduce the number of joints within a system.Incorporates the PolyFit push-fit feature.16www.polypipe.com4
www.polypipe.comwww.polypipe.com17
PolySurePermanent press-fit plumbingPolySure is our radial press-fit system,available in UK sizes, and installedusing specialist crimping tools.PolySure features secure, tamperproof jointingtechnology for a permanent fit.The slim profile fittings are ideal for use in visibleinstallations. An inbuilt location washer ensuresthe crimping tool jaws are correctly positionedfor accurate fitting and a visual socket depthindicator and double ‘O’ ring seal providesenhanced jointing.Use PolySure with Polypipe white or greypolybutylene flexible pipe.PolySure can be used in any hot and cold waterinstallation but is particularly suited to buildingswith high levels of public access traffic, wheresecurity and joint integrity are paramount.The system offers a number of benefits: Supplied in both metal and plastic bodiedsolutions, and offering the same high security The first radial press-fit system in standardUK sizes PolySure is ideal for applications wheresecurity is paramount PolySure offers a permanent, tamper prooffit and the slim profile fittings are ideal forvisible applications Fitted location washer ensures jaws arecorrectly positioned for crimping Visual socket depth indicator and double‘O’ ring seal provide enhanced jointing Use for most hot and cold water supply orheating applications Use with Polypipe white or grey pipe systems18www.polypipe.com
PolySureJointingThere are seven steps to completing a joint which uses PolySure fittings.Each step is covered in detail here.Unlike the other plumbing systems, the PolySuresystem requires some specialist pressing toolswhich can be purchased directly from Polypipeor via the manufacturer’s stockists. Polypiperecommends using REMS’ pressing equipmentwho have a reputation for manufacturingdurable products that can stand up to today’ssite conditions. For full details of products,instructions, servicing requirements andwarranties please visit: www.rems.deThe chamfering tools are available in eitherindividual tools or as a block of four dependenton the installers preference, however all workin the same way.The chamfer tool spigot should be inserted downthe bore of the pipe until contact is made withthe blades.Step 1: Cutting Polypipe pipeCheck the pipe is not scored or scratched in anyway and if it is, cut back to a point where thereis no damage. Using a Polypipe pipe cutter, cut thepipe squarely using the “K” marks on the pipe asa guide. These marks indicate when the pipe hasbeen inserted into the fitting correctly. It isessential that pipes are cut squarely as this mayaffect chamfering (see step 2).Step 2: Chamfering the pipe s PolySure fittings use press-fit technology whichAseals on the pipe bore, it is necessary to provide aninternal lead on the pipe end so the square edgeof the pipe does not damage the ‘O’ ring seals.The chamfer tool should be twisted gently toprovide a lead in. Any debris should be removedfrom the pipe end and the chamfer tool. Check thatthe pipe has been cleanly chamfered around thefull diameter of the pipe.If not repeat step 2, if so proceed to step 3.Step 3: Visually check fitting and fitting componentsVisually check that all components are present,undamaged and free from contamination.On push-fit fittings this lead in is provided bythe pipe stiffener. Polypipe offer specific pipechamfering tools for our pipes and these mustalways be used.www.polypipe.com19
PolySureLubricantsManual pressing toolAll Polypipe fittings are supplied withpre-lubricated EPDM ‘O’ rings. If any furtherlubrication is required only Polypipe siliconelubricant should be used. Substances such assolder flux must not be used.Secure the jaw in the tool by firstly removingthe locking pins from the Eco Press, lining upthe holes in the Eco Press with those in the jawand re-inserting the locking pins.Step 4: Insert pipe into fittingPolypipe pipes have a visual indicator to assistthe installer in jointing pipes and fittings together.The chamfered Polypipe pipe should be insertedinto the PolySure fitting and pushed in until pipecan be seen through the hole in the stainless steelpressing sleeve. When this has been done thejoint is ready for pressing.Battery operated pressing toolStep 5: Preparing the pressing toolsThere are three types of pressing toolrecommended for jointing PolySure fittings.The REMS Eco Press is a manual pressing toolwhich can be used on 10mm, 15mm and 22mmjoints only but provides the installer with alightweight, low cost entry pressing tool whichcan be used in most situations.Alternatively the battery operated tools (minior standard versions) can be used where a highvolume of joints needs to be made in a shortspace of time. The battery operated tools mustbe used for 28mm fittings.The 10mm, 15mm and 22mm Polypipe THpressing jaws have been designed to fit boththe manual and standard battery operatedpressing tools. The mini pressing jaws are onlycompatible with mini pressing gun and can notbe used with the manual or standard batteryoperated guns. All jaws are specifically designedto press PolySure press-fit fittings and shouldonly be used for these fittings. Likewise no otherpressing jaws should be used for PolySure fittings.20www.polypipe.comTo insert a Polypipe TH jaw into the batteryoperated gun, press the release catch on thelocking pin on the gun. Slide the jaw into thegun, aligning the centre hole in the jaw with thelocking pin, and push the locking pin back intoposition until locked. Once the jaws are lockedin the respective machine the pressing tools arenow ready to complete the joint process.
PolySureStep 6: Securing the jointBattery operated pressing toolWhether using the manual or battery operatedpress gun, the jaws are located onto the fittingin exactly the same manner. Do a final check toensure that the pipe is still inserted fully into thefitting, then using the white washer as a locationpoint fix the jaws over the fitting in theun-pressed condition.The trigger can now be pressed on the tool tostart the pressing process. Keep the triggerdepressed until the jaws have closed completelyand the pressing machine clicks to denote theend of the process.NOTE: Once the process is underway it must becompleted before the s
2 www.polypipe.com 03 Introduction Plumbing & Heating Pipes & Fittings 05 Fittings 06 Plumbing & heating pipe 07 Pipe stiffeners PolyPlumb 09 Jointing and dismantling PolyMax 13 Jointing and demounting PolyFit 15 Jointing and demounting 16 Flexible Hoses PolySure 19 Jointing System Installation 22 Introduction 22 Service conditions 23 Application information 25 Connections to