Transcription
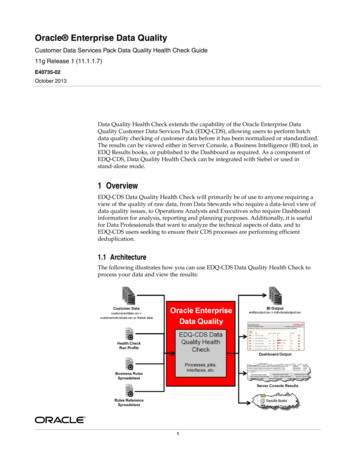
Oracle Enterprise Data QualityCustomer Data Services Pack Data Quality Health Check Guide11g Release 1 (11.1.1.7)E40735-02October 2013Data Quality Health Check extends the capability of the Oracle Enterprise DataQuality Customer Data Services Pack (EDQ-CDS), allowing users to perform batchdata quality checking of customer data before it has been normalized or standardized.The results can be viewed either in Server Console, a Business Intelligence (BI) tool, inEDQ Results books, or published to the Dashboard as required. As a component ofEDQ-CDS, Data Quality Health Check can be integrated with Siebel or used instand-alone mode.1 OverviewEDQ-CDS Data Quality Health Check will primarily be of use to anyone requiring aview of the quality of raw data, from Data Stewards who require a data-level view ofdata quality issues, to Operations Analysts and Executives who require Dashboardinformation for analysis, reporting and planning purposes. Additionally, it is usefulfor Data Professionals that want to analyze the technical aspects of data, and toEDQ-CDS users seeking to ensure their CDS processes are performing efficientdeduplication.1.1 ArchitectureThe following illustrates how you can use EDQ-CDS Data Quality Health Check toprocess your data and view the results:1
2 Multiple Child EntitiesSome data will feature multiple child entities, for example, more than one addressmight be assigned to each record. When such records are processed and passed toEDQ, one record per child is created.Therefore, the Data Quality Health Check results often list a greater number of recordsthan are initially taken in. It is important to remember this when viewing results inServer Console or Dashboard.3 InstallationThe section explains how to install EDQ-CDS Health Check3.1 PrerequisitesEDQ Health Check has the same prerequisites as the EDQ-CDS: EDQ version 11g (11.1.1.7) or later, running a 64-bit JVM on a system with at least8GB RAM with 4GB allocated to EDQ.For Siebel integrations, Siebel CRM or UCM version 8.1 or later.If the EDQ Address Verification capability is required, EDQ-AV Server release12.4.0.0.0 or later.Siebel integrations will also require the installation of theSiebel Connector release 11.1.1.7.3. For more information, see OracleEnterprise Data Quality Customer Data Services Installation Guide, OracleEnterprise Data Quality Customer Data Services Siebel Integration Guide,and Oracle Enterprise Data Quality Siebel Connector Installation Guide.Note:3.2 ComponentsThe components necessary to install EDQ-CDS Health Check are all contained withinthe EDQ-CDS distribution, and are therefore installed by unzipping the config.zipfolder in the distribution over the oedq.local.home folder of the EDQ installation.While Data Quality Health Check is part of the EDQ-CDSdistribution, it is not necessary to fully configure EDQ-CDS in orderto use Data Quality Health Check.Note :The EDQ-CDS Health Check components are: edq-cds-data-quality-health-check-n.n.n.(nnn).dxi - the packaged EDQproject containing the EDQ-CDS data quality .xls - Individual Business Rulesspreadsheet, which defines the data quality checks performed for xls - Entity Business Rulesspreadsheet, which defines the data quality checks performed for entities. edq-cds-data-quality-health-check.properties - the default Run Profile. customerentities.csv - Sample Entity data.2
customerindividuals.csv - Sample Individual datarulesreference.xls - Spreadsheet categorizing the error codes present in theBusiness Rules spreadsheets.3.3 Installation ProcedureIf you have installed EDQ-CDS, then Health Check is installed and no furtherinstallation tasks are necessary.To install Health Check without the presence of EDQ-CDS, use the followingprocedure.If the EDQ-CDS server uses a different landing area path fromthat set during installation (by default,oedq.local.home/landingarea), the landingarea folder createdwhen the config.zip is extracted must be copied over the existinglandingarea folder.Note:1.Extract the config.zip file over the oedq.local.home folder of the EDQinstallation.2.Restart the EDQ Server.3.Start the EDQ Director client, and log on as a user with the permission to createprojects (Administrator or Project Owner).4.Open the edq-cds-data-quality-health-check-n.n.n.(nnn).dxi package file byeither: selecting Open Package File. on the File menu and browsing to the .dxi file;right-clicking on an empty part of the Project Browser, selecting OpenPackage File., and browsing to the .dxi file; ordragging and dropping the file onto the Project Browser.5.Drag the whole EDQ-CDS - Data Quality Health Check project onto the Projectsnode.6.Right-click on the .dxi file, and select Close Package File.3.4 Verifying The InstallationHealth Check comes with two sample .csv files in the landingarea/dqhealthcheckfolder. These files can be used to test the installation is working correctly.The sample files are: customerentities.csv - Sample Entity data. customerindividuals.csv - Sample Individual data.The default jobs provided with Health Check are configured to run against these files.To verify the installation, run either (or both) of the Run Entity Data Quality HealthCheck or Run Individual Data Quality Health Check jobs in Server Console,remembering to select the edq-cds-data-quality-health-check.properties RunProfile.3
Note:Health Check uses its own internal reference data, and therefore doesnot need the CDS Initialize project to be run before it is used.Do not attempt to run any of the Siebel jobs manually; these jobs aredesigned to be invoked automatically by the Siebel Connector.Check the Event Log and Results in Server Console to ascertain whether the job (orjobs) have completed correctly. If so, then the installation has been successful.Finally, purge the results of the job or jobs in the Server Console and Dashboard: Server Console:Select the Results view, right click the job in the Job History area, select the Purgedata for run label [Name of Run Label] option. Dashboard:Open Dashboard Administration, expand the Audit tree in the Audits & Indexesarea, right click on the Data Quality Health Check audit and select Purge.4 ConfigurationThis section explains how to configure EDQ-CDS.4.1 Business RulesThe Business Rules are set in two .xls files supplied with Health Check, located in theoedq local home/business rules folder. dq-health-check-business-rules-individual.xls - Individual Business tity.xls - Entity Business Rulesspreadsheet.There is an additional spreadsheet - rulesreference.xls - in the oedq localhome/landingarea/dqhealthcheck folder which has two main functions: it is used tocontrol which rules in the Business Rules spreadsheets are used when running DataQuality processes, and also to construct rules statistics.By default, the Individual and Entity rules that are used byEDQ-AV are enabled in the rulesreference.xls spreadsheet. IfEDQ-AV is not installed these rules must be disabled to preventinaccurate reporting in the Dashboard.Note :The Enabled column in the rulesreference.xls spreadsheet controls which rules areenabled and which are disabled, the two possible values being yes and no. Therefore,if any existing rules are edited or new rules added to the Business Rules spreadsheets,the changes must be reflected in the rulesreference.xls sheet. Any changes mademust preserve the separation of rule types, which object (Individual or Entity) theyrelate to, and their associated rule and error codes.The rules fall into the following categories:4
Population checks – Check that a field is not blank. For example, ER205 - Checkif Name is missing.List checks - Check that the data contains only values from a specified list. Forexample, IR202 - Check if Upper Case gender is a valid value.Length checks - Check that the data is of a specified length,. For example, IR203 Check first name is 1 char.Format checks - Check that the data conforms to a pattern or regular expression.For example, IR212 - Check if email is valid format.Contains checks - Check that the data contains a value from a list; for exampleIR428 - Check if full name is clear of entity hints.Suspect data checks - Check that the data exhibits any common data entry"cheats". For example, ER411 - Check if unusual characters in name.Value checks – Check that the field value is in the correct range. For example,IR430 - Check if DOB is very old ( 1900).Dependent attribute checks – Check that two attribute values are consistent, forexample, if the value in one attribute is dependent on the value in anotherattribute. For example, IR302 - Check if gender and title are consistent.Duplicate checks - Compare combinations of data attributes to estimate potentiallevels of record duplication. This is not full EDQ-CDS matching, and therefore isdesigned to run in a fraction of the time. Examples of comparisons include: IR401 - Check if fname address1 are flagged dupe IR403 - Check if fname email are flagged dupe IR408 - Check if lname tax no are flagged dupeFor information on customizing existing and creating new Business Rules using thesespreadsheets, see the "Defining Business Rules" topic in the Oracle Enterprise DataQuality Director Online Help.4.2 Run ProfileThe edq-cds-data-quality-health-check.properties Run Profile is divided into thefollowing sections:4.2.1 Publish to Dashboard SettingThis setting controls whether the results of the Health Check jobs are published to theDashboard:phase.Publish\ to\ Dashboard.enabled yesThe default value is yes. Change to no to prevent the results being published.Note :The value must always be in lower case, yes or no.4.2.2 Input Source Location, Separator and Encoding SettingsThese settings specify the source of the input files for individual and entity data, thefield separator used, and the encoding employed. The default settings are included asin the following:5
phase.*.snapshot.*.Entity Input CSV File Location hot.*.Entity Input CSV File Field Separator \,phase.*.snapshot.*.Entity Input CSV File Encoding UTF-8phase.*.snapshot.*.Individual Input CSV File Location apshot.*.Individual Input CSV File Field Separator \,phase.*.snapshot.*.Individual Input CSV File Encoding UTF-8The file and folder location specified must be in the landingarea folder.The encoding of the input file must be a valid encoding for EDQ delimited text DataStores. The escape character - backslash "\" - must be used if the desired separator is areserved character, for example, a comma. A list of valid encoding formats can befound in the Edit Data Store dialog in EDQ.4.2.3 Publish Results as CSV SettingThis setting controls whether the results of the Health Check jobs are published in theform of a .csv file for use in a BI tool:phase.Export\ BI\ Data.enabled noThe default value is no. Set to yes to publish the data to the .csv file.Note :The value must always be in lower case, yes or no.4.2.4 Export File Location, Separator and Encoding SettingsIf export is enabled, these settings specify the destination of the exported file, the fieldseparator and encoding. The default settings are included as in the following:phase.*.Export.*.Entity Output CSV File Location Entity Output CSV File Field Separator \,phase.*.Export.*.Entity Output CSV File Encoding UTF-8phase.*.Export.*.Individual Output CSV File Location t.*.Individual Output CSV File Field Separator \,phase.*.Export.*.Individual Output CSV File Encoding UTF-8The encoding of the export file must be valid for EDQdelimited text Data Stores. A list of valid encoding formats can befound in the Edit Data Store dialog in EDQ.Note :4.2.5 Default Country Code for AVIf EDQ-AV is installed, this setting should be assigned the ISO two-character countrycode to be used by default. For example, if the country code is not specified in the datasupplied:phase.*.process.*.Default\ AV\ Country\ CodeThe default value is US. Any codes that are entered here are expected to comply withthe ISO-3166-1-alpha-2 specification.6
4.2.6 Results Book SettingsTo create EDQ Results Books populated with Individual and/or Entity profiling data,uncomment the following settings.The first six lines are for the Individual Profiling Resultsbook, and the last two are for the Individual Rules Results book. Itis possible to populate one or both of these books as required.Note :For Individual data, these settings will populate the Individual Profiling Results Bookwith drillable results of all profilers and the Individual Rules Results Book with adrillable view of rule rocess\phase.Process\Individual\ Misc\ Data.enabled noIndividual\ Misc\ Data\ With\ Results\ Book.enabled yesIndividual\ Address\ Data.enabled noIndividual\ Address\ Data\ With\ Results\ Book.enabled yesIndividual\ Alt\ Phone Data.enabled noIndividual\ Alt\ Phone\ Data\ With\ Results\ Book.enabled yesRule\ Failures\ to\ Outputs.enabled noRule\ Failures\ to\ Outputs\ With\ Results\ Book.enabled yesFor Entity data, these settings will populate the Entity Profiling Results Book withdrillable results of all profilers and the Entity Rules Results Book with a drillable viewof the rule failures:phase.Profile\ Entity\ Misc\ Data.enabled nophase.Profile\ Entity\ Misc\ Data\ With\ Results\ Book.enabled yesphase.Profile\ Entity\ Address\ Data.enabled nophase.Profile\ Entity\ Address\ Data\ With\ Results\ Book.enabled yesphase.Profile\ Entity\ Alt\ Phone\ Data.enabled nophase.Profile\ Entity\ Alt\ Phone\ Data\ With\ Results\ Book.enabled yesphase.Make\ Analysis\ and\ Server\ Console\ Output.enabled nophase.Make\ Analysis\ and\ Server\ Console\ Output\ With\ Results\ Book.enabled yes4.2.7 Staged Data Visibility Settings Within Server ConsoleThese settings control which Staged Data items are visible in Server Console.The first setting - stageddata.*.visible no - makes all Staged Data items invisibleby default. The remaining settings then make specific Staged Data items visible.By default, detailed data in the DQ Health Check Analysis Output tab in the ServerConsole Results screen is hidden. This is because the level of detail is seldom requiredfor most purposes. To view this data, set the following properties in the Run Profile toyes: stageddata.Individual\ DQ\ Health\ Check\ Analysis\ Output.visible stageddata.Entity\ DQ\ Health\ Check\ Analysis\ Output.visible 5 Configuring the DashboardBy default, the Health Check results are published to the Dashboard.The Dashboard is accessed from the EDQ Launchpad:7
To configure Health Check results on the Dashboard, use the following procedure:1.Open the Dashboard.2.On the main Dashboard, click Administration.The Dashboard Administration is displayed:3.Create the Summaries and Indexes as required.Any rules added to the Summaries should correspond withthose enabled in the rulesreference.xls spreadsheet. If a disabledrule is included in a Summary or Index it will always bered-flagged, regardless of the results of enabled rules.Note :4.Return to the Dashboard and click Customize.8
5.Select the Data Quality results to view in the Add New drop-down field. Forexample:6.Click Add. The selected item is added to the Home view.Once this configuration procedure is complete, it is possible to choose whichSummaries and Indexes to add to the Initial view, to drill down into the results. Forfull details of how to do this, see Oracle Enterprise Data Quality Dashboard Online Help.5.1 Example: Dashboard By SeverityThis is an example of a Dashboard configuration that groups rules into Summaries byseverity, and then into Indexes.The first letter of the Health Check rule audit codes indicates the record type ("I" forIndividual and "E" for Entity), and the first number indicates the severity level (1, 2, 3or 4). For example, code E203 is an Entity rule with a severity level of 2.Create eight summaries to contain the Individual and Entity rule results for severitylevels 1 to 4: Severity 1 Issues Individual Severity 2 Issues Individual Severity 3 Issues Individual Severity 4 Issues Individual Severity 1 Issues Entity Severity 2 Issues Entity Severity 3 Issues Entity Severity 4 Issues EntityThen create the following Indexes:NameContentsOverall Health Individuals Contains all the Individual Summaries.Overall Health EntitiesContains all the Entity Summaries.Overall HealthContains the Individual and Entity Summaries.5.1.1 Creating the Summaries1.Open EDQ Dashboard, and click Administration to open the DashboardAdministration window.9
2.Click New Summary.3.Enter Severity 1 Issues Individual in the Add Summary pop-up.4.Click OK. The new Summary is displayed in the Summaries node of theDashboard Elements area.5.In the Audits and Indexes area, expand the Audits branch, then expand theEDQ-CDS – Data Quality Health Check/[I8A] Individual Misc Failures Publishto Dashboard branch.6.Click and drag I101 and I102 from the [I8A] Individual Misc Failures Publish toDashboard audits list to the Severity 1 Issues Individual Summary.7.Click and drag the Severity 1 Issues Individual Summary to the Administratorsnode in the User Group area.8.Click Save.9.Repeat for the remaining summaries.5.1.2 Creating the IndexesThis example assumes all the Summaries detailed in the previous sections have beenconfigured.1.Open EDQ Dashboard, and click Administration to open the DashboardAdministration window.2.Click New Index.3.Name the new Index "Overall Health Individuals".4.Click and drag the following Summaries into the new Index: Severity 1 Issues Individual Severity 2 Issues Individual Severity 3 Issues Individual Severity 4 Issues Individual5.Click Save.6.Repeat for the remaining Indexes.5.2 Example - Dashboard By Business FunctionThis is an example of a Dashboard configuration that groups rules into Summaries byBusiness Function.1.Create the following Summaries:10
NameContentsAccount Name Details Identifiers Identifier outliers Address details Address detail outliers Potential duplicatesContact Name details Identifiers Identifier outliers Address details Address detail outliers Potential duplicatesThe rules to be included in each Summary are detailed in Appendix 1: DashboardExample Summaries. Ensure that all these rules are enabled.2.Create the following Indexes:NameContentsOverall Health AccountContaining all the Account-based Summaries.Overall Health ContactsContaining all the Contact-based Summaries.Overall System HealthContaining all the Summaries you created.6 Using Health CheckThis section describes how to run Health Check jobs and review the results.6.1 Running a Health CheckHealth Check jobs can be run either from Siebel, in stand-alone mode from ServerConsole, or in EDQ-CDS.If running from Server Console, it may be necessary to prepare the data first.There are six Health Check jobs: Perform Entity Technical Analysis Perform Individual Technical Analysis Run Entity Data Quality Health Check Run Individual Data Quality Health Check Siebel Batch Account Health Check Siebel Batch Contact Health Check11
6.1.1 Siebel-Attached ModeBefore Health Check can be used with Siebel, the Siebel Connector must be installedand Siebel must be configured accordingly. For more information, see Oracle EnterpriseData Quality Siebel Connector Installation Guide and Oracle Enterprise Data QualityCustomer Data Services Siebel Integration Guide.To run a Health Check job in Siebel, open Server Manager and access the Data QualityManager component. The two jobs that should be run from Siebel are: Siebel Batch Account Health Check Siebel Batch Contact Health CheckThe other Health Check jobs should not be configured torun from Siebel. It is possible to do this, but they will not return anyresults. They must always be run from Server Console or EDQ.Note :Additionally, any settings changed in the Run Profile must also be changed in thednd.properties file to ensure that the changes are accurately reflected in a Siebelbatch run.6.1.2 Stand-Alone ModeThe Technical Analysis and Run Entity/Individual Quality Health Check jobs aredesigned to be run from EDQ or Server Console.If the data to be checked can be provided in exactly the same format as the sampledata files (for example, .csv files with column headings as described in Section 8,"Data Interfaces"), simply save these files to thelandingarea\dqhealthcheck folderusing the same file names as (overwriting) the sample data files.However, if the data is provided in a different format EDQ should be configured to usethis data by mapping the available fields to the Health Check input interface. To dothis, use the following procedure:1.Open Director.2.Create a new Data Store that points at the data.3.Create a new snapshot using this Data Store as the source.4.Add and configure a new mapping to the relevant Data Interface (Entity Data orIndividual Data).5.Edit the relevant job (Run Entity or Run Individual Data Quality Health Check),adding the new Snapshot and selecting the new Data Interface mapping.For full details on how to prepare data, see the following topics in the Oracle EnterpriseData Quality Director Online Help: "Connecting to a Data Store" "Adding a Snapshot " "Managing Data Interfaces" "Running Jobs using Data Interfaces"6.2 Viewing Health Check ResultsHealth Check results can be produced as four output types:12
Business Intelligence (BI) output; EDQ Dashboard results; Server Console results; and Results Books in EDQ.6.2.1 BI OutputHealth Check can produce two comma-separated files containing Individual andEntity results data. This output is intended for detailed analysis using an externalBusiness Intelligence application.The files are: entityoutput.csv individualoutput.csvRecords passed into Health Check will cause one or more rows to be generated,depending on the content of each record and how many errors are discovered withineach record.The separators, and file names and locations within thelanding area can be configured in the Run Profile.Note :The most important metadata attributes in the .csv files are as follows:ColumnDescriptionentityid / individualidThe id of the original record.Data StreamThis field identifies the origin of the row:Misc Data - A recordfields.AddressData - An address.AltPhoneData - An altphonefield.Rule IDThe ID of the rule triggered, if applicable.Rule LabelThe label of the rule triggered, if applicable.Error CodeThe code of the error, if applicable.Error SeverityThe severity level of the error, if applicable.Error MessageThe error message returned, if applicable.The logic is as follows: Each record passed into Health Check returns at least one row in thecorresponding .csv file.At least one row is generated per record. If there is an error in the record data, thisis indicated in the Error Code, Error Severity and Error Message columns.An additional row is generated per address or altphone field within each record.Again, if there is a single error in an address or altphone field, this is indicated inthe Error columns.However, if a record, address or altphone field contains more than one error, thena row is generated for each additional error above one.For example, if an individual record has:13
no address or altphone value and no errors: 1 row. no address or altphone value, and one error: 1 row. no address or altphone value, and two errors: 2 rows. an address, but no altphone: 2 rows. an address and an altphone: 3 rows. an address containing a single error, and an altphone: 3 rows. an address containing two errors, and an altphone: 4 rows.The following is a complex example. The record with individualid 1293 has returned12 rows:It has: One altphone field, free of errors. Five errors associated with one address. Six errors associated with other fields in the record (for example, Misc Data.)In the example file, the addressid in each row is identical,which shows that only one address is associated with the record.The illustration does not show this because of the limit of the screensize.Note :6.2.2 EDQ DashboardThe results published to the Dashboard are dependent on the enabled Business Rules,see Section 4.1, "Business Rules". The following Dashboard example illustrates thevariations of results and statuses:14
The results from attributes associated with the Individual or Entity record (such as,name, title, email and so on) are based on distinct Individual and Entity recordsidentified by a unique record ID.Checks on the altphone attribute and address-related attributes are performedseparately so that the number of results produced correctly reflects the number ofchild entities processed.Similarly, results from the altphone field are based on distinct alternate phonenumbers in Individual and Entity records, as it is possible to have multiple altphonevalues per record.The results from attributes associated with addresses (such as, city, postalcode,country and so on) are based on distinct address records identified by a uniqueaddress id because it is possible to process multiple addresses for a given Individual orEntity.The number of checks for a given published rule in the Dashboard may varydepending on the type of data being checked, and will always relate to the totalpopulation of the type of data. So the "total" figures displayed may vary according todata type.For example, if 500,000 records were passed from the customer system, with a total of650,000 addresses attached, and a total of 550,000 alternate phone numbers associatedwith them, then all results will show: all address-related rule failures/passes as a percentage of 650,000; all alternate-phone-related rule failures/passes as a percentage of 550,000; and all remaining rule failure/passes as a percentage of 500,000.6.2.3 Server ConsoleWhen run in Server Console, the Technical Analysis jobs profile the data by data type,maximum and minimum values and quick stats:15
The Health Check jobs perform audit checks on the data and populate the EDQDashboard and BI .csv files depending on your run profile configuration.Running the jobs in Server Console does not populate theHealth Check Results Books.Note :An example of the Server Console Results, depending on the Run Profile, is as follows:6.2.4 Results BooksIf activated in the Health Check Run Profile, the following Results Books can bepopulated: Entity Profiling Results Entity Rules Results Entity Technical Analysis Individual Profiling Results Individual Rules Results Individual Technical AnalysisThe Technical Analysis Results Books are populated by the corresponding TechnicalAnalysis jobs. The Profiling Results and Rules Results Books are populated by thecorresponding Health Check jobs.Consider the following:16
When running these jobs, select the edq-cds-data-quality-health-check RunProfile, but do not specify a Run Label.The Results Books are only populated if the Data Quality jobs are run from EDQ.Running the jobs either from Siebel or Server Console will not populate ResultsBook data.The Business Object grouping of rules in Results Books is pulled from theBusiness Object column in rulesreference.xls where each rule is associatedwith a business object text value. To reclassify rules, edit the Business Objectcolumn.The Technical Analysis jobs only use customer data and publish the analysisresults to Server Console or in Results Books only.It is possible to drill-down through these results for further analysis. Drillable resultsare links (highlighted in blue):7 Managing Business RulesThis section provides several examples describing how to turn on, edit and addbusiness rules.7.1 Example A - Turning on a RuleThe Entity rule ER418 - Country is missing is disabled by default.To turn the rule on:1.Navigate to the oedq local home/landingarea/dqhealthcheck folder.2.Open the rulesreference.xls file.3.Select the Address tab.4.Find the E418 rule row, and change the value of the cell in the Enabled column toyes.5.Save the file.6.If required, open the Dashboard Administration application to add the rule to anappropriate Summary.To disable the rule again, repeat this procedure, changing the cell value back to no.If a rule that is included in a Dashboard Summary isdisabled, it will still be displayed in the Summary with no resultsreturned. Therefore, it is recommended that any disabled rules beremoved from Dashboard Summaries so they do not influenceoverall pass or failure indicators.Note :17
7.2 Example B - Editing Rules: Adding an Extra Common TitleThe titles tab in the dq-health-check-business-rules-individual.xls file is usedby rule IR411- Check Upper Case Title is in the list.The following procedure shows how to ensure the rule also checks for the term"PROFESSOR" as an common title:1.Navigate to the oedq local home/businessrules folder, and open thedq-health-check-business-rules-individual.xls spreadsheet.2.Select the titles tab.3.Add PROFESSOR to the bottom of the list in column A of the worksheet.4.Save the file.7.3 Example C - Editing a Rule: Changing a Value CheckThis example describes how to change the value check of the IR430 - Check if DOBis very old ( 1900) to check for birthdates older than 1890.1.Navigate to the oedq local home/businessrules folder, and open thedq-health-check-business-rules-individual.xls spreadsheet.2.Select the Rules tab, and scroll to the IR430 rule.3.Change the Rule Label to Check if DOB is very old ( 1890).4.Scroll to the Check1 column, and change the cell value to chGreaterThan1890.5.Select the Checks tab, and select the two rows that describe thechGreaterThan1900 check. In an unmodified sheet, these are normal
Oracle Enterprise Data Quality Customer Data Services Pack Data Quality Health Check Guide 11g Release 1 (11.1.1.7) E40735-02 October 2013 Data Quality Health Check extends the capability of the Oracle Enterprise Data Quality Customer Data Services Pack (EDQ-CDS), allowing users to perform batch data quality checking of customer data before .