Transcription
Operations ManualBarcode ScannerUpdated March, 2016Version 1.8DOC0019
Table of ContentsBarcode Scanner1. Introduction . 31.1 System overview . 31.2 Organization of this Manual. 31.3 Contact Information . 32. Scanner Overview . 43. Setup . 63.1 Set Prefixes . 63.2 Set Barcode Length . 73.2.1 Set Length of Truck Barcode . 83.2.2 Set Length of Battery Barcode . 83.3 Register Assets . 93.3.1 Register Battery . 93.3.2 Register Truck . 103.4 Set to 2 Battery Change . 113.5 Set Decimal Point Option . 123.5.1 Calculator Style . 123.5.2 ATM Style . 134. Operating Instructions . 144.1 Change Battery . 144.1.1 Changing One Battery . 144.1.2 Changing Two Batteries . 164.2 Battery Maintenance . 195. Troubleshooting . 20Appendix A – Scanner and Cradle Pairing Process . 22Appendix B – Barcode Formats . 24Appendix C – Watering and Washing Barcodes. 25Watering . 25Washing . 25Philadelphia Scientific Barcode Scanner Operations ManualPage 2 of 26
1. Introduction1.1 System overviewThis manual will give you all the information that you need to operate the Barcode Scanner, BOS-SC6000handheld computer scanner. The scanner is to be used in conjunction with an iBOS battery roommanagement system and subscriptions to Battery Tracker and iBOSworld.com.The scanner can be used to register forklifts and batteries into the iBOS system. It is also used during abattery exchange to scan a forklift barcode, enter its hour meter reading, and scan the barcode of thedischarged battery as well as the fully charged replacement battery. When a maintenance activity isrequired, such as watering or washing, the battery will be scanned followed by the barcode of theappropriate activity. When the registration information is saved, the battery exchange is complete, or themaintenance activity is complete, the information is sent via Bluetooth to the scanner cradle. Theinformation is then sent via cable to the controller where it is uploaded via cellular modem toiBOSworld.com.The data from the scanner is organized into informative reports that can be viewed in the Battery Tracker section of iBOSworld.com. Not only can you see the log of battery room activity, but you can see valuableinformation such as number of cycles per day or week as well as average battery run time.Barcode labels must be installed on all assets (batteries and trucks) before operating the scanner. See theBarcode Scanner Installation Manual, DOC0018, for information regarding the installation of the labels.***Barcode labels are not included with the system and must be supplied by the customer.***1.2 Organization of this Manual Section 2 – Scanner Overview Section 3 – Setup Section 4 – Operating Instructions Section 5 – Troubleshooting1.3 Contact InformationPhiladelphia Scientific LLC207 Progress DriveMontgomeryville, PA 18936USAPhone: 215-616-0390Fax: 215-616-0500Email: Info@phlsci.comPhiladelphia Scientific UK Ltd.188 Oxford GroveBolton BL13BHEnglandPhone: 44 (0) 1204-467777Fax: 44 (0) 1204-493300Email: Info@ps-europe.netPhiladelphia Scientific Barcode Scanner Operations ManualPhiladelphia ScientificAsia/Pacific2/17 Norman StreetNSW, 2225AustraliaPhone: 61 2 8004-2447Fax: 61 2 9012-0383Email: Info@phlsci.com.auPage 3 of 26
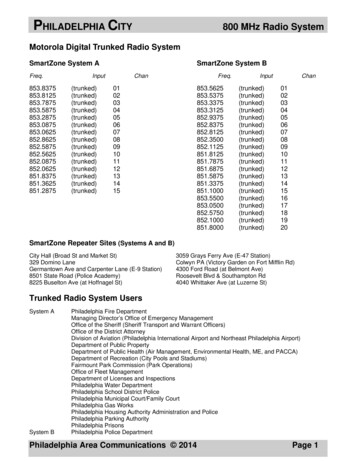
2. Scanner OverviewPhiladelphia Scientific Barcode Scanner Operations ManualPage 4 of 26
Philadelphia Scientific Barcode Scanner Operations ManualPage 5 of 26
3. Setup3.1 Set PrefixesWhen registering assets, you may want to begin each reference with a letter or group of letters specific to agroup of assets. If there are several assets to register, the input process can become repetitive. In orderto make the process more efficient, the prefix of an asset group can be pre-programmed into the system. Press the right menu key under theword “Menu” to begin. Press “3”. Up to 9 prefixes can be entered. Enter the slot number where youwould like to store the prefix. Prefixes will be upper case. The prefixes will be only letters. The maximum length of a prefix is 7letters. Type the prefix. (Use orange key toaccess letters.) Press “Enter”.Philadelphia Scientific Barcode Scanner Operations ManualPage 6 of 26
If there are additional prefixes to input,enter the slot number where youwould like to store the next prefix. If there are no more prefixes to add,press the menu key below “Menu”followed by the menu key below“Home”.3.2 Set Barcode LengthThe maximum number of digits in the barcode should be no more than 20 digits. The scanner can read alarge number of barcode formats. See Appendix B – Barcode Formats for a complete list.To help prevent other barcodes from being scanned as a battery room asset, it is recommended that allbattery barcodes should be the same length, and all truck barcodes should be the same length but differentfrom the batteries. The length of the barcodes can be programmed during the scanner setup.It is recommended that the battery barcode be a different length than the truck barcode. This will preventbatteries from being accidentally scanned as trucks and vice versa. To set the barcode lengths, press theright menu key under the word“Menu.” Press “4.”Philadelphia Scientific Barcode Scanner Operations ManualPage 7 of 26
3.2.1 Set Length of Truck Barcode To set the length of truck barcodes.Press “1”. Input the desired length of truckbarcodes. (Up to 4 different lengthscan be added.) Press “Enter”.3.2.2 Set Length of Battery Barcode To set the length of battery barcodes.Press “2”. Enter the desired length of batterybarcodes. Press “Enter”.Philadelphia Scientific Barcode Scanner Operations ManualPage 8 of 26
Press the menu key below “Menu”followed by the menu key below“Home” to return to the Home screen.3.3 Register Assets3.3.1 Register Battery To register a battery in the iBOS system, press the right menu keyunder the word “Menu”. Press “1”. Scan the barcode on the battery thatyou would like to register. Enter the battery reference number. Ifyou are using a preset prefix, hit thekey below “Prefix” as many times asneeded to scroll to the slot numbercontaining the desired prefix. Use the orange key to access lettersand special characters. Press “Enter”.Philadelphia Scientific Barcode Scanner Operations ManualPage 9 of 26
Select the desired pool number. Press “1” to send the data to thecontroller. If you do not press “Back”,the data will be automatically sent in 5seconds. Repeat the process for the rest of thebatteries. If there are no more batteries toregister, press the menu key below“Menu” to go back.3.3.2 Register Truck To register a truck in the iBOS system, press the right menu keyunder the word “Menu”. Press “2”. Scan the barcode on the truck thatyou would like to register.Philadelphia Scientific Barcode Scanner Operations ManualPage 10 of 26
Enter the truck reference number. Ifyou are using a preset prefix, hit thekey below “Prefix” as many times asneeded to scroll to the slot numbercontaining the desired prefix. Use the orange key to access lettersand special characters. Press “Enter”. Select the desired pool number. Press “1” to send the data to thecontroller. If you do not press “Back”,the data will be automatically sent in 5seconds. Repeat the process for the rest of thetrucks. If there are no more trucks to register,press the menu key below “Menu” togo back.3.4 Set to 2 Battery Change To set the system to change 2batteries in one transaction, press theright menu key under the word“Menu”.Philadelphia Scientific Barcode Scanner Operations ManualPage 11 of 26
Press “5”. To allow changing two batteries at onetime press “1”. To allow changing only one battery ata time, press “2”. 3.5Press the menu key below “Menu”followedby thePointmenu keybelowSetDecimalOption“Home” to return to the Home screen. To set the decimal point option whenentering hour meter readings, pressthe right menu key under the word“Menu”. Press “8”.3.5.1 Calculator Style To set the system to manually enter adecimal point, press “1”. The scanner is now in “Calculator”mode. To verify, press “8”, again, andthe screen will show “(set toCalculator)”.Philadelphia Scientific Barcode Scanner Operations ManualPage 12 of 26
The decimal point will only appear ifmanually entered.3.5.2 ATM Style To set the system to automaticallyenter a decimal point on the screen,press “2”. The scanner is now in “ATM” mode.To verify, press “8”, again, and thescreen will show “(set to ATM)”. The decimal point automaticallyappears on the screen.Philadelphia Scientific Barcode Scanner Operations ManualPage 13 of 26
4. Operating Instructions4.1 Change Battery4.1.1 Changing One Battery Press “1”. Scan the truck barcode. Note: If the truck or battery barcode istorn and not able to be scanned, typein either the barcode number or assetreference number. If you scan a barcode of the wronglength, the screen to the right willappear. The truck number that was justscanned or input is listed at the top ofthe following screen. Use the “Back”button to re-enter the information ifneeded. Input the truck’s dead man hour meterreading using the keypad on thescanner. Note: If not recording hour meterreadings, enter zero for the hourmeter.Philadelphia Scientific Barcode Scanner Operations ManualPage 14 of 26
Note: To enter a decimal point, pressthe right menu key under the decimalpoint on the screen. Press “Enter”. Scan the discharged battery to beremoved from the forklift. Scan the fully charged battery to beplaced in the forklift. If you are satisfied that the batterychange was done correctly, press “1”to send the data to the controller.Philadelphia Scientific Barcode Scanner Operations ManualPage 15 of 26
If the information was sent to thecontroller without issue, the screen tothe right will appear, and after a fewseconds, the scanner will return to theHome screen. If there are communications issues,see Section 5 – Troubleshooting.4.1.2 Changing Two Batteries Press “1”. Press “2”. Scan the first truck’s barcode Note: If the truck or battery barcode istorn and not able to be scanned, typein either the barcode number or assetreference number. If you scan a barcode of the wronglength, a screen similar to the one onthe right will appear.Philadelphia Scientific Barcode Scanner Operations ManualPage 16 of 26
Input the truck’s hour meter readingand press “Enter”. Note: If not recording hour meterreadings, enter zero for the hourmeter. Scan the discharged battery to beremoved from the forklift. Scan the second truck’s barcode. Input the truck’s hour meter readingand press “Enter”. Note: If not recording hour meterreadings, enter zero for the hourmeter. Scan the discharged battery to beremoved from the forklift. Complete a battery change in bothforklifts. Scan the first truck’s barcode.Philadelphia Scientific Barcode Scanner Operations ManualPage 17 of 26
Scan the fully charged battery to beplaced in the forklift. Scan the second truck’s barcode. Scan the fully charged battery to beplaced in the forklift. If you are satisfied that the batterychange was done correctly, press “1”to send the data to the controller. If the information was sent to thecontroller without issue, the screen tothe right will appear, and after a fewseconds, the scanner will return to theHome screen. If there are communications issues,see Section 5 – Troubleshooting.Philadelphia Scientific Barcode Scanner Operations ManualPage 18 of 26
4.2 Battery Maintenance Press “2”. Scan the battery to be maintained. Scan the appropriate activity code forthe maintenance that is beingperformed. If you scanned the appropriate codes,press “1” to complete the activity. Ifyou do not press the key below“Back”, the data will be automaticallysent to the controller after 5 seconds. If the information was sent to thecontroller without issue, the screen tothe right will appear, and after a fewseconds, the scanner will return to theHome screen. If there are communications issues,see Section 5 – Troubleshooting.Philadelphia Scientific Barcode Scanner Operations ManualPage 19 of 26
5. TroubleshootingScanner cannot read barcodesBe sure that the cradle base is connected to power andto the communications cable.Be sure that the tape is removed from the scannerbattery and battery is properly seated in handle.Be sure that the scanner is connected to the cradle basevia Bluetooth. If after powering the scanner on and off itwill not connect to the cradle base, see Appendix A –Scanner and Cradle Pairing Process.Be sure to squeeze the trigger on the scanner whenscanning barcodes.When scanning, be sure that the laser line crosses all ofthe bars of the barcode.Be sure that the scanner is synchronized with thecontroller.Check the format of the barcodes. Refer to Appendix B– Barcode Formats for a complete list of acceptableformats.Scanner is locked upReboot the scanner by holding down the trigger and thenumber 2 key. Hold for ten seconds before releasingScanner will not sync with controllerCheck connections in cable assembly between cradleand controller.Check that USB cable is firmly connected to controller.Press the menu key below “Menu”.Press “6”.Philadelphia Scientific Barcode Scanner Operations ManualPage 20 of 26
Press “1” to exit.Press “7” to check System Info and verify that there is abox S#.Press the key below “Menu” to go back and the keybelow “Home” to return home.Note: Packets are sent with Change Battery or BatteryMaintenance. No packets are sent during aCommunication Test.Communication failureOnce the number of data packets saved but not sentreaches 10, the Comm fail 1/1 screen will display at theend of a battery change/maintenance sequence ofscans.Make sure that all the cables between the cradle andcontrol box are securely connected. Power cycle thecradle.Philadelphia Scientific Barcode Scanner Operations ManualPage 21 of 26
Appendix A – Scanner and Cradle Pairing Process The scanner is tested and pairedat the factory before shipping. For the scanner to transmit itsdata through the cradle to theiBOS controller, the cradle mustbe powered, and the scannerand cradle must be paired.Pairing registers a device to thecradle such that the device andcradle can exchange information. If the scanner and cradle arepaired and communicating, theBluetooth symbol “B” on thescanner screen will be green. Ifthey are not communicating, the“B” will be white. The screen to the right mayappear when the scanner is firstpowered up. It may also appear,if the cradle loses power or thescanner goes out of range. If the “B” is still white, press “1”. Power cycle the cradle and press“1”. Scan the cradle’s PAIR barcode.Philadelphia Scientific Barcode Scanner Operations ManualPage 22 of 26
Each cradle has a uniquebarcode. Only pair the scannerwith a cradle that you intend touse. Do not scan data untilpairing completes. Once the pairing process iscomplete, the scanner will returnto the Home screen.Philadelphia Scientific Barcode Scanner Operations ManualPage 23 of 26
Appendix B – Barcode Formats1DUPC/EAN (UPCA/UPCE/UPCE1/EAN-8/EAN-13/JAN-8/JAN-13plus supplements, ISBN (Bookland), Code 39 (Standard, FullASCII, UCC/EAN-128, ISBT-128 Concatenated), Code 93,Codabar/NW7, MSI Plessey, I 2 of 5 (Interleaved 2 of 5 / ITF,Discrete 2 of 5, IATA, Chinese 2 of 5), GS1 DataBar(Omnidirectional, Truncated, Stacked, Stacked mnidirectional,Limited, Expanded, Expanded Stacked, Inverse),Base 32 (Italian Pharmacode)2DTLC-39, Aztec (Standard, Inverse), Maxicode, DataMatrix/ECC200 (Standard,Inverse), QR code (Standard, Inverse, Micro)PDF417PDF417 (Standard, Macro), Composite Codes (CC-A,CC-B,CC-C)PostalU.S. Postnet and Planet, U.K. Post, Japan Post, Australian Post,NetherlandsKIX Code, Royal Mail 4 State Customer, upu fics 4 State Postal,USPS 4CBPhiladelphia Scientific Barcode Scanner Operations ManualPage 24 of 26
Appendix C – Watering and Washing a Scientific Barcode Scanner Operations ManualPage 25 of 26
2016 Philadelphia Scientific LLC. All Rights Reserved. Philadelphia Scientific, the PS logo and iBOS are registered trademarksof Philadelphia Scientific LLC. iBOSworld and Real-Time Monitor are trademarks of Philadelphia Scientific. E&O.E.Philadelphia Scientific Barcode Scanner Operations ManualPage 26 of 26
Barcode labels must be installed on all assets (batteries and trucks) before operating the scanner. See the Barcode Scanner Installation Manual, DOC0018, for information regarding the installation of the labels. ***Barcode labels are not included with the system and must be supplied by the customer.*** 1.2 Organization of this Manual

![Prekindergarten Head Start Application [Initial Screening]](/img/43/head-start-application.jpg)