Transcription
Digital Government: Agency PlatformDrupal 7 – Views –Creating a GalleryVersion 1.0
Digital Government: Agency PlatformExecutive SummarySummary of ChangesThis section records the history of significant changes to this document. Only the most significantchanges are described here.VersionDateAuthorDescription of change1.008/05/2016Danielle WilcoxCreated Content1Created: 08/05/2016Revised: 08/05/2016Drupal 7 – Views – Creating a GalleryFOR INTERNAL OR CUSTOMER USE ONLY
Digital Government: Agency PlatformTable of ContentsEXECUTIVE SUMMARY . 1SUMMARY OF CHANGES .1GENERAL INFORMATION . 3REQUIRED MODULES . 3SKILL LEVEL: BEGINNER/INTERMEDIATE . 3THE EXAMPLE SCENARIO . 4PREREQUISITES TO COMPLETE . 4CREATE A STANDARD GALLERY [BEGINNER] . 5UPDATE THE STANDARD GALLERY [BEGINNER/INTERMEDIATE] . 8ADDING MASONRY EFFECTS TO A GALLERY [INTERMEDIATE] . 122Created: 08/05/2016Revised: 08/05/2016Drupal 7 – Views – Creating a GalleryFOR INTERNAL OR CUSTOMER USE ONLY
Digital Government: Agency PlatformDrupal 7 – Views – Creating a GalleryGeneral InformationGalleries are a collection of items that is often sought out for with sites handlingphotos, graphics, ecommerce, or simple showcasing in general. Out of the box, theDrupal 7 environment does not have a way to handle making and displaying galleries.In the newest Drupal environment (8), galleries are a bit more possible due to theinclusion of the Views module to the core system.With some minor additions, creating a gallery in the Drupal 7 environment is veryeasy to accomplish. The hardest part is to make it responsive.Required ModulesThe following modules are required to create a basic gallery: Views - This module is a quick way to develop a list or information bundles based on certain filters or fieldsdefined and updates automatically, as well as provide an option to search through the list. For example, thismodule can create a basic site map of all pages under a specific content type. CSS Injector – This module allows site administrators to add bits of custom CSS code to the Drupal websitewithout making it required to edit the theme’s standard CSS files on the server.For a more complex system in creating a Masonry based gallery the following must also be installed: Masonry API – An API module developed for integrating the jQuery Masonry plugin. Masonry is a JavaScript gridlayout library. It works by placing elements in optimal position based on available vertical space, sort of like amason fitting stones in a wall. Masonry Views – This module provides the ability to use the Masonry API with the Views module. Libraries – (v 2.x) This module is an API based module for providing a common repository for all externallibraries.Skill Level: Beginner/Intermediate At a Beginner level, this guide requires some experience in the Drupal environment with spinning up Views.At an Intermediate level, this guide requires more experience with applying CSS and installing libraries.3Created: 08/05/2016Revised: 08/05/2016Drupal 7 – Views – Creating a GalleryFOR INTERNAL OR CUSTOMER USE ONLY
Digital Government: Agency PlatformThe Example ScenarioThroughout the documentation, various images may contain additional captions as an example in order to provide asimple experience to the reader. This allows the reader to replicate what is shown as part of their learning process, if it isnecessary.For this scenario, the following will be referenced:The local zoo has requested to create a gallery to display a main image they have fromtheir upcoming events that will link to that event page. They’ve yet to determine ifadditional images will be used on the event page, but they’re anxious to get a workinggallery up that will link the visitor to the event information. Thankfully, they’ve goneahead and created the content type already to funnel the events to with the followingfields in the content: Event name (Title), Image field (Image), and a taxonomy reference(Tags).Prerequisites to CompletePrior to beginning this guide, it will be assumed that the below list has been created, or may be in the process ofcreation as you reach each section. Each item listed will be provided in generic form, but also with alignment to theexample scenario in parenthesis. This guide can be completed within one content type, but it is possible to add and useadditional ones for further complexity. Remember, all fields can be reused in different content types and can be foundunder Add existing field when using the Manage Fields section.1) Generate the content type (Gallery Item)a. For the example scenario fields: Title, Image (image field), Body, Tags (term reference/taxonomy).2)Create an empty taxonomy list.a. As users enter content, this list will auto generate when entering their own taxonomy terms.3) [OPTIONAL] URL Alias patterns have been created; ideal in such that when adding custom CSS, blocks, or Panels,it makes a wild card selection very useful. (event/[node:title])4) [OPTIONAL] Prepopulate with the appropriate content type to generate some items/examples to work with forvisualization.5) [INTERMEDIATE] If planning to use the Masonry type gallery, the below must also be completed prior to settinganything up. In case the steps become out of date or to gather necessary/updated plugin files, check the DrupalMasonry API installation notes.a. Ensure that Libraries module is enabled/installed (v 2.x).4Created: 08/05/2016Revised: 08/05/2016Drupal 7 – Views – Creating a GalleryFOR INTERNAL OR CUSTOMER USE ONLY
Digital Government: Agency Platformb. Ensure that jQuery meets the recommendation version (v1.6 or greater). This can be checked by visitingthe Status Report of the Drupal environment (admin/reports/status).c. Download the appropriate Masonry plugin files at the Drupal Masonry API page. (v3)d. Save – Rename – Relocate the file to the site server: /code/sites/all/libraries/masonry.pkgd.min.jse. Download the appropriate library directory for imagesloaded at the Drupal Masonry API page.f.Save – Rename – Relocate the file to the site server: d.pkgd.min.jsg. Download and enable the Masonry API and Masonry Views modules – verify at the Status Report thatthe API plugin is properly detected.Create a Standard Gallery [Beginner]Required Modules: ViewsThe following steps will assist with creating a very basic gallery in Views to use right away, or as a starting point foradditional sections later. There is no special customization other than building a standard Views to display each item forthis section of the guide, and this, by default, does not adhere to responsive framework such as Bootstrap. Meaning – asthe screen gets smaller, none of the images will stack.Note: If not planning to develop further by using Masonry with filling in “white space” of a gallery,please co nsider to hav e a standard size of image widths/heights already determined. This willallow a uniform look across the images so that they do not a ppear off centered because one imageis taller than the other.1) After the content type has been created (and example content has been created), create a new View by going toStructure Views Add new view.2)Provide a View name.3) [OPTIONAL] Provide a Description (first check the Description box).4) Ensure that Content is selected to show, from the appropriate content type selected. Leave the rest of this fieldat its default.5Created: 08/05/2016Revised: 08/05/2016Drupal 7 – Views – Creating a GalleryFOR INTERNAL OR CUSTOMER USE ONLY
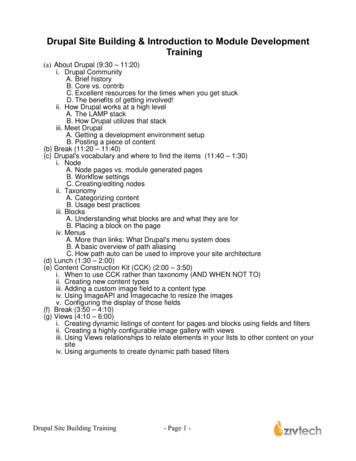
Digital Government: Agency Platform5) Check the Create a page option.Alternatively, if planning to insert this view elsewhere (such asPanels) this can be turned off, or a creation of a block can bedone instead.6) Provide a Page Title.7) Under Path, it should auto generate the URL. If necessary,change the data provided.8) Select Grid from the first drop down and Fields from thesecond of Display Format.9) Leave the remaining options at its default value.10) [OPTIONAL] If necessary, selecting Create a menu link willprovide the settings to add a menu link automatically.11) Select Continue & Edit.For this scenario, the following has been generated:“Event Gallery” is the view name; it is showing“content” of type “Gallery Item”, with no additionalsettings; we will be creating a page with a title of“Event Gallery” that displays Grid of fields; uses apager; and created a menu link.REMEMBER: AT ANY TIME, THESE SETTINGS CAN BE CHANGED AFTER THE VIEW HAS BEEN GENERATED IN THE VIEW CONFIGURATION ITSELF.12) As appropriate, edit the Display Name to easily locate this view later.13) Under Fields, select Add.14) Locate and select the Image field appropriate to the content type.15) Under For , select This page (override).16) Select Apply (this display).When adding a new field,we’ve selected “Content:Image”, as it displays in ourGallery Item content type.17) In the second window, unselect “Create a label”.18) Under Image Style, select None (original image).19) Set the Link image to as Content.6Created: 08/05/2016Revised: 08/05/2016Drupal 7 – Views – Creating a GalleryFOR INTERNAL OR CUSTOMER USE ONLY
Digital Government: Agency Platform20) Leave the remaining settings as default.21) Select Apply (this display).22) Rearrange the fields as necessary.23) Click Save at the top of the Views configuration window tosave and apply the view.24) Verify the view works as intended, and adjust additional Viewssettings as needed (such as pager, menu, etc).7Created: 08/05/2016Revised: 08/05/2016Drupal 7 – Views – Creating a GalleryFOR INTERNAL OR CUSTOMER USE ONLY
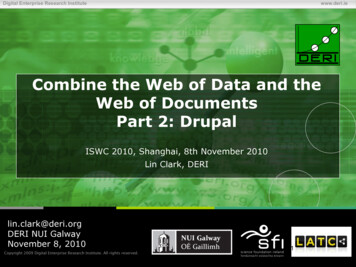
Digital Government: Agency PlatformUpdate the Standard Gallery [Beginner/Intermediate]Required Modules: Views, CSS Injector (unless creating/editing a CSS file)The following steps will assist with making the basic gallery from the previous section more responsive and appealing tothe web site visitor through the use of CSS. This guide assumes that knowledge and access to a CSS editing tool isavailable (such as CSS Injector module, or the direct CSS file), as well as that the responsive theming is developed onBootstrap. It is recommended to use CSS Injector, as it is possible to define CSS changes to specific pages.Note: If not planning to develop further by using Masonry with filling in “white space” of a gallery,please co nsider to hav e a standard size of image widths/heights already determined. This willallow a uniform look across the images so that they do not appear off centered because one imageis taller than the other.1) Create the basic view, and adjust standard settings as necessary.If this has not been created, please see the “Create a Standard Gallery” section.2) Under the view Format, change the format to Unformatted List.3) For Unformatted List settings, remove all checked boxes.4) For Row class, enter the ideal Bootstrap column CSS for the differentcolumn behaviours. Example, .col-xs-6 for mobile phone based layouts with2 images across, or .col-lg-4 to go three images on desktop. This field cansupport multiple classes at once.Note: In this field, CSS classes can be added with the leading period symbolor without. It will render the same.5) Select Apple (this display).6) Under Fields, only have an image based field and a title based field availableand the image field should be above the title field.In this scenario, we are using thefollowing bootstrap CSS: col-lg-3 (largedisplay, 4 per row), col-md-4 (mediumdisplays, 3 per row), and col-sm-6 (smalldisplays, 2 per row). By default, eventhough the extra small display is notdefined, it will still apply one per rowwhen the browser is smaller than 768px.7) Click on the image field to enter its settings window.a. Uncheck Create a label.b. Verify None (original image) is set as the Image Style.8Created: 08/05/2016Revised: 08/05/2016Drupal 7 – Views – Creating a GalleryFOR INTERNAL OR CUSTOMER USE ONLY
Digital Government: Agency Platformc. Verify that the Link image to is set to Content.d. Click Style Settings.i. Check Customize field HTML.ii. Under HTML element, select DIV from the list.iii. Check Create a CSS class.iv. Enter an appropriate CSS class name.If necessary, this allows for additional CSS customization outsideof the Views generated classes to help not accidently overrideother areas.For this example, the CSS class touse will be listimgv. Leave the default settings.e. Click Apply (this display).8) Click on the title field to enter its settings window.a. Uncheck Create a label.b. Verify that Link this field to the original piece of content is checked.c. Click Style Settings.i. Check Customize field HTML.ii. Under HTML element, select DIV from the list.For this example, the CSS class to usewill be listtitleiii. Check Create a CSS class.iv. Enter an appropriate CSS class name.If necessary, this allows for additional CSS customization outside of the Views generated classesto help not accidently override other areas.v. Leave the default settings.d. Click Apply (this display).9Created: 08/05/2016Revised: 08/05/2016Drupal 7 – Views – Creating a GalleryFOR INTERNAL OR CUSTOMER USE ONLY
Digital Government: Agency Platform9) Click the Advanced section on the most right of the Views window to expand additionalsettings.10) Click None next to CSS List.a. Enter an appropriate CSS class name.If necessary, this allows for additional CSS customization outside of the Viewsgenerated classes to help not accidently override other areas.For this scenario, wewill use gallistb. Leave the default settings.11) Click Save at the top right corner of the Views settings window.12) Go to the location necessary to edit the CSS. For the purpose of this guide, the CSS Injector module will be usedand it is found under Configuration Development CSS Injector.13) In CSS Injector – edit the following fields:a. Friendly Name – provide a unique ID name for the CSS rule. Ideally, attempt to create the name to helpeasily identify what it does.For the scenario – We will use “Gallery CSS”.b. Description – Provide a simple description to describe what the code will accomplish.For the scenario – We will use “Gallery CSS for unformatted list”.c. Advanced Options – If planning to have this apply to all themes, this area can be left at its default.Otherwise, adjust settings as appropriate.For the scenario – We will leave this area as its default settings.d. Pages – Assign specific pages if necessary that will use this CSS. Ideally, this is recommended if it is notplanned to have the gallery on every page.For the scenario – We will assign The listed pages only with the relative URL path the gallery is currentlyassigned to.14) Under CSS code, enter the necessary code to accomplish the desired outcome.15) Click Save at the bottom to add the CSS.10Created: 08/05/2016Revised: 08/05/2016Drupal 7 – Views – Creating a GalleryFOR INTERNAL OR CUSTOMER USE ONLY
Digital Government: Agency PlatformFOR THE CURRENT SCENARIO, THE FOLLOWING CSS CODE WILL BE USED, AS WELL AS AN EXPLANATION TO WHAT IT IS ACCOMPLISHING. IF ATANY TIME IT MAY BE NECESSARY TO INSPECT AND LOCATE ADDITIONAL VIEWS CLASSES, MOST WEB BROWSERS CAN INSPECT THE WEBPAGEAND PROVIDE YOU WITH THE CLASSES USED.gallist .views-field {margin-bottom: 0px !important;}.gallist .listimg img {height: auto !important;width: 100% !important;}.gallist .listtitle {position: absolute;bottom: 0;background: rgba(25, 25, 25, .4);width: 100%;}.gallist .listtitle a {color: #ffffff;margin-left: 10%;margin-bottom: 5%;}We are calling out the individual div groups that contain the image and iitle fields. Bydefault, a bottom margin is applied between list items and we would like to removethis margin between the rows when we look at the gallery. We would like for this toapply only to this specific view in case we add future views later. To do this, we firstcall the CSS class that we applied to the entire view (.gallist) and then we add thestandard/default views class that targets each list item (.views-field). From there, weare forcing the bottom margin to not have a size.The img tag, when used within the image field (.listimg) of the view that is beingcalled (.gallist) will now force all images to fill the entire space it belongs to widthwise. The height will automatically adjust itself as necessary. This allows images thatare much taller to not show gaps while adjusting to the responsive layout if widerimages are also surrounding the taller image. If all images are of the same height andwidth, this piece can be omitted.When the title field (.listtitle) is showing in the specific view (.gallist), we want toforce the DIV to align directly to the bottom of the picture that it relates to – this iscompleted by adding bottom to the CSS. The position property is telling the DIV tooverlay the image field. The background and width property are adjusted to have thetitle field expand with the image and show a transparent background.In the title field, when a link is provided, we want the links to be white. As well, weare telling the links to be slightly offset so that they are not directly against the left orright edges. Instead of assigning pixels to the margin properties, we use percentagesso that it can be responsive to the width of the area.16) Preview and verify that the CSS has been applied tothe appropriate View.17) Adjust any settings if necessary.11Created: 08/05/2016Revised: 08/05/2016Drupal 7 – Views – Creating a GalleryFOR INTERNAL OR CUSTOMER USE ONLY
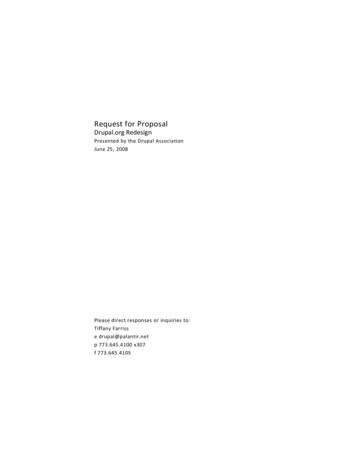
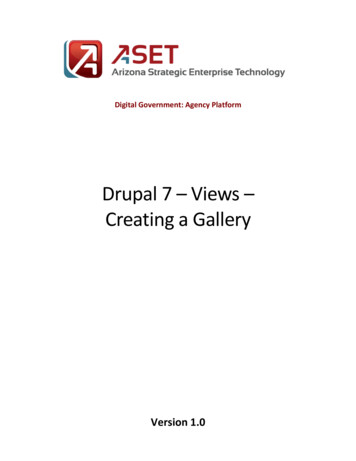
Digital Government: Agency PlatformAdding Masonry Effects to a Gallery [Intermediate]Required Modules: Views, CSS Injector (unless creating/editing a CSS file), Masonry API, Masonry ViewsThe following steps will assist with making the basic gallery from the first section more responsive and appealing to theweb site visitor through the use of CSS and Masonry API. This guide assumes that knowledge and access to a CSS editingtool is available (such as CSS Injector module, or the direct CSS file), as well as that the responsive theming is developedon Bootstrap. It is recommended to use CSS Injector, as it is possible to define CSS changes to specific pages.Note: This method is typically ideal if planning to have multiple im ages of various sizes. TheMasonry API is a JavaScript that will automatically figure o ut the image sizes and fit them in apuzzle -like format when the page loads .1) Create the basic view, and adjust standard settings as necessary.If this has not been created, please see the “Create a Standard Gallery” section. Ideally, this guide will be pickingup from the previous section, “Update the Standard Gallery”, and the future changes will reflect from this setup.2) Verify that the Masonry API and Masonry Views modules have been installed correctly.3) Under Format, change the format to Masonry. The settingsshould be as follows:a. For Row class, follow the same method as the previoussection - enter the ideal Bootstrap column CSS for thedifferent column behaviours. Example, .col-xs-6 formobile phone based layouts with 2 images across, or.col-lg-4 to go three images on desktop. This field cansupport multiple classes at once.Note: In this field, CSS classes can be added with the leadingperiod symbol or without. It will render the sameb. Under Masonry section, set the Column width to eitherthe medium or large Bootstrap column class used in theprevious step. This provides a default of the column(each masonry item) to be one view-row wide of theview. The previous step will define the responsive setup.c. Ensure CSS Selector is selected.For this scenario, the Row classes will consist of colxs-12 col-sm-6 col-md-4 col-lg-4. The Column widthwill be set to col-lg-4.12Created: 08/05/2016Revised: 08/05/2016Drupal 7 – Views – Creating a GalleryFOR INTERNAL OR CUSTOMER USE ONLY
Digital Government: Agency Platformd. Gutter width should be set to 0.e. Leave the remaining sections as their default values.f.Select Apply (this display).4) Click Save at the top right corner of the Views settings window.5) Go to the location necessary to edit the CSS. For the purpose of this guide, the CSS Injector module will be usedand it is found under Configuration Development CSS Injector.6) In CSS Injector – edit the following fields:a. Friendly Name – provide a unique ID name for the CSS rule. Ideally, attempt to create the name to helpeasily identify what it does.For the scenario – We will use “Gallery CSS Masonry”.b. Description – Provide a simple description to describe what the code will accomplish.For the scenario – We will use “Gallery CSS for Masonry”.c. Advanced Options – If planning to have this apply to all themes, this area can be left at its default.Otherwise, adjust settings as appropriate.For the scenario – We will leave this area as its default settings.d. Pages – Assign specific pages if necessary that will use this CSS. Ideally, this is recommended if it is notplanned to have the gallery on every page.For the scenario – We will assign The listed pages only with the relative URL path the gallery is currentlyassigned to.7) Under CSS code, enter the necessary code to accomplish the desired outcome.8) Click Save at the bottom to add the CSS.13Created: 08/05/2016Revised: 08/05/2016Drupal 7 – Views – Creating a GalleryFOR INTERNAL OR CUSTOMER USE ONLY
Digital Government: Agency PlatformFOR THE CURRENT SCENARIO, THE FOLLOWING CSS CODE WILL BE USED, AS WELL AS AN EXPLANATION TO WHAT IT IS ACCOMPLISHING. IF ATANY TIME IT MAY BE NECESSARY TO INSPECT AND LOCATE ADDITIONAL VIEWS CLASSES, MOST WEB BROWSERS CAN INSPECT THE WEBPAGEAND PROVIDE YOU WITH THE CLASSES USED. ALL PREVIOUS CSS CODE WILL BE USED FROM THE PREVIOUS SECTION OF THIS GUIDE. THEBELOW IS ADDITIONAL CODE USED.gallist .masonry-item {We are requesting that any Masonry item (.masonry-item) within the specificpadding: 0px !important;View/Gallery (.gallist) needs to have all borders and empty space between each itemremoved. By default, Masonry adds these properties. The idea for this gallery is tomargin: 0px !important;have each image attached to the other like a puzzle without space in between. Weborder: 0px !important;added !important so that it will override the Masonry settings.}9) Preview and verify that the CSS has been appliedto the appropriate View.10) Adjust any settings if necessary.14Created: 08/05/2016Revised: 08/05/2016Drupal 7 – Views – Creating a GalleryFOR INTERNAL OR CUSTOMER USE ONLY
Drupal 7 environment does not have a way to handle making and displaying galleries. In the newest Drupal environment (8), galleries are a bit more possible due to the inclusion of the Views module to the core system. With some minor additions, creating a gallery in the Drupal 7 environment is very easy to accomplish.