Transcription
Grandstream Networks, Inc.UCM6xxx Series - Conference Guide
Table of ContentINTRODUCTION . 4CONFERENCE CONFIGURATION SETTINGS . 5Create and Edit Conference Rooms . 5Configure Conference settings . 7Join A Conference Call . 7Invite Other Parties to Join Conference . 7Invite from Web GUI . 7Invite by Dialing 0 or 1 During Conference Call. . 8Manage The Conference Room . 8Manage Conference Call from Web GUI . 8Manage Conference Call from IVR . 9Record Conference . 9CONFERENCE SCHEDULE . 11Conference Schedule Configuration . 11Create New Conference Schedule . 11Cleaner Options . 14Synchronize Conference Schedule with Google Calendar . 14OAuth2.0 Authentication . 15Google Calendar Authorization . 15MULTIPLE CONFERENCE BRIDGES . 16CONFERENCE SCHEDULE EXAMPLE APPLICATION . 18UCM6XXX Conference GuidePage 2
Table of FiguresFigure 1: Creating New Conference Room . 5Figure 2: Conference Invitation From Web GUI . 8Figure 3: Conference Recording . 10Figure 4: Conference Schedule Options . 11Figure 5: Create New Conference Schedule Conference Room Options . 12Figure 6: Google Calendar Authorization . 14Figure 7: Google Calendar Settings . 15Figure 8: Remote Conference Room Invitation. 16Figure 9: Inbound Route . 17Figure 10: Creating Conference Room 6300 . 18Figure 11: Conference Schedule. 20Table of TablesTable 1: Conference Configuration Parameters . 5Table 2: Conference Settings . 7Table 3: Conference Caller IVR Menu . 9Table 4: Conference Schedule Parameters . 12UCM6XXX Conference GuidePage 3
INTRODUCTIONThe UCM6xxx support call conferencing which increase employee efficiency and productivity, and alsoprovide more cost-effective way to hold business meetings. A variety of conference call features are offeredby UCM6xxx including individual management of conference call activity, multiple conference rooms,conference bridge, and conference schedule.The UCM6xxx supports conference bridge allowing multiple bridges used at the same time: UCM6xx2/6xx4 supports up to 3 conference bridges allowing up to 25 simultaneous PSTN or IPparticipants. UCM6xx8/6x16 supports up to 6 conference bridges allowing up to 32 simultaneous PSTN or IPparticipantsThe UCM6510 supports conference bridge allowing 64 participants with up to 8 bridges at the sametime. This document introduces the conference options, conference bridge configurations including joining,inviting, recording during conference and also including Google Calendar schedule.UCM6XXX Conference GuidePage 4
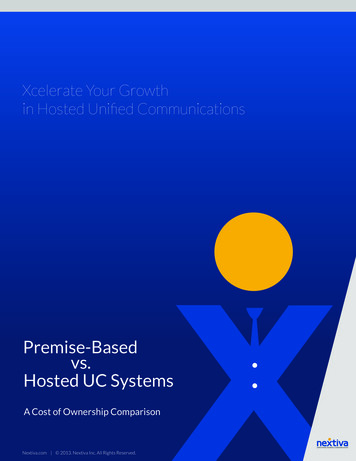
CONFERENCE CONFIGURATION SETTINGSThe conference configuration settings are available under Web GUI Call Features Conferenceallowing users to create, edit, view, invite, manage the participants and delete conference bridges. Theconference bridge status and conference call recordings (if recording is enabled) will be displayed underthe same web page as well.Create and Edit Conference RoomsTo create, edit or delete the conference rooms please refer to following steps:1. Access the UCM6xxx Web GUI using the administrator username and password. (By default theusername and password is: admin/admin).2. Navigate to Call Features Conference.3. Click on "Create New Conference Room" to add a new conference bridge as displayed on figure 1or click onNote: Click onto edit the conference bridge.to delete the conference bridge.Figure 1: Creating New Conference RoomPlease refer to following table describing the configuration options available for conference room feature.Table 1: Conference Configuration ParametersExtensionConfigure the conference number for the users to dial into the conference.When configured, the users who would like to join the conference call must enterthis password before accessing the conference bridge.PasswordNote: If "Public Mode" is enabled, the password is not required to join the conferencebridge thus this field is invalid. The password has to be at least 4 characters.UCM6XXX Conference GuidePage 5
Admin PasswordConfigure the password to join the conference bridge as administrator. Conferenceadministrator can manage the conference call via IVR (if "Enable Caller Menu" isenabled) as well as invite other parties to join the conference by dialing "0"(permission required from the invited party) or "1" (permission not required from theinvited party) during the conference call.Note: If "Public Mode" is enabled, the password is not required to join the conferencebridge thus this field is invalid. The password has to be at least 4 characters different from the conferenceroom password.If enabled, the participants will not hear each other until the conferenceadministrator joins the conference. The default setting is "No".Wait For AdminQuiet ModeNote:If "Quiet Mode" is enabled, the voice prompt for "Wait For Admin" will not beannounced.If enabled, if there are users joining or leaving the conference, voice prompt ornotification tone won't be played. The default setting is "No".Note: "Quiet Mode" and "Announce Callers" cannot be enabled at the same time.Announce CallersIf enabled, the caller will be announced to all conference participants when therethe caller joins the conference. The default setting is "No".Note: "Quiet Mode" and "Announce Callers" cannot be enabled at the same time.Enable Caller MenuIf enabled, conference participant could press the * key to access the conferencebridge menu. The default setting is "No".Record ConferenceIf enabled, the calls in this conference bridge will be recorded automatically ina .wav format file. All the recording files will be displayed and can be downloadedin the conference web page. The default setting is "No".Play Hold MusicIf enabled, the UCM6200 will play Hold music when there is only one user in theconference. The default setting is "No".Enable User InviteIf enabled, users could press 0 to invite other users (with the users' permission) orpress 1 to invite other users (without the user's permission) to join the conference.The default setting is "No".Note:Conference administrator can always invite other users without enabling this option.Public ModeIf enabled, no authentication will be required when joining the conference call. Thedefault setting is "Yes".Music On HoldSelect the music on hold class to be played in conference call. Music On Hold classcan be set up under web UI- PBX- Internal Options- Music On Hold.Skip AuthenticationWhen inviting Uservia Trunk from WebGUIIf enabled, the invitation from Web GUI for a conference bridge with password willskip the authentication for the invited users. The default setting is "No".UCM6XXX Conference GuidePage 6
Configure Conference settingsPlease refer to following steps in order to configure conference settings:1. Access the UCM6xxx Web GUI using the administrator username and password. (By default theusername and password is: admin/admin).2. Navigate to Call Features Conference.3. Click on “Conference settings”.4. Configure the DSP Talking/Silence Threshold and enable the talk detection if needed.The following table describe the conference settings in details:Table 2: Conference SettingsEnable TalkDetectionEnables/disables the talk detection, when enabled the AMI will send thecorresponding event when a user starts or ends talking.DSP TalkingThresholdConfigures the time of sound above that the DSP has established as base linesilence for a user before is considered to be talking. This value affects severaloperations and should not be changed unless the impact on call quality is fullyunderstood. The default setting is 128. (Time in milliseconds)DSP SilenceThresholdConfigures the time of sound above that the DSP has established as base linesilence for a user before is considered to be silent. This value affects severaloperations and should not be changed unless the impact on call quality is fullyunderstood. The default setting is 2500. (Time in milliseconds)Join A Conference CallThe UCM6xxx allows users to dial the conference bridge extension to join the conference. If the passwordis required, users need to enter the password to join the conference as a normal user, or enter the adminpassword to join the conference as administrator.Invite Other Parties to Join ConferenceWhen using the UCM6xxx conference bridge, there are two ways to invite other parties to join theconference.Invite from Web GUIPlease refer to following steps in to invite participants to join the conference bridge:1. Access the UCM6xxx Web GUI Call Features Conference.2. Select the conference room to invite participant.UCM6XXX Conference GuidePage 7
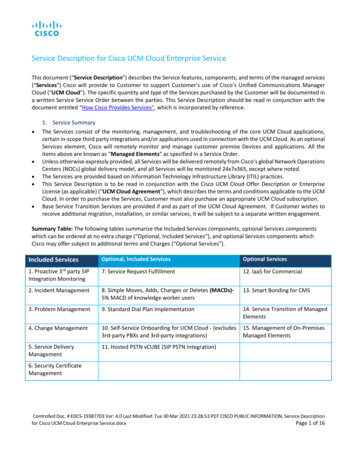
3. Click on the invite iconfor option "Invite a participant".4. Enter the number of the party you would like to invite. Then click on "Add", a call will be sent to thisnumber to join into the conference.Figure 2: Conference Invitation From Web GUIInvite by Dialing 0 or 1 During Conference Call.During the conference calls, the conference administrator or a sample participant can invite other partiesto join the conference already established by dialing 0 or 1 and following voice prompt to input the newparticipant’s number, then the UCM will send a call to this number to join into the conference.Notes: The 0 and 1 digits pressed allow to set the conference joining permission, if users press 0, once theinvited party picks up the invitation call, a permission will be asked to "accept" or "reject" the invitationbefore joining the conference, if 1 is pressed to invite other party, no permission will be required fromthe invited party. Make sure that the option "Enable User Invite" is enabled for the conference bridge.Manage The Conference RoomThe following steps allow to manage conference rooms using the web GUI or IVR during a conference call.Manage Conference Call from Web GUIAccess the UCM6xxx web GUI during the conference call, the participants in each conference bridge willbe listed.1. Click onto kick a participant from the conference.2. Click onto mute the participant.3. Click onto lock this conference bridge so that other users cannot join it anymore.4. Click onto invite other users into the conference bridge.UCM6XXX Conference GuidePage 8
Manage Conference Call from IVRIf "Enable Caller Menu" is enabled, conference participant can input * to enter the IVR menu for theconference. Please see options listed in the table below.Table 3: Conference Caller IVR MenuConference Administrator IVR Menu1Mute/unmute yourself.2Lock/unlock the conference bridge.3Kick the last joined user from the conference.4Decrease the volume of the conference call.5Decrease your volume.6Increase the volume of the conference call.7Increase your volume.8More options. 1: List all users currently in the conference call. 2: Kick all non-Administrator participants from the conference call. 3: Mute/Unmute all non-Administrator participants from the conference call. 4: Record the conference call. 8: Exit the caller menu and return to the conference.Conference User IVR Menu1Mute/unmute yourself.4Decrease the volume of the conference call.5Decrease your volume.6Increase the volume of the conference call.7Increase your volume.8Exit the caller menu and return to the conference.Note: The conference bridge configuration cannot be modified, when there is participant in the conference.The Administrator needs to enable the option “Enable Caller Menu” before inviting participants to join theconference bridge.Record ConferenceThe UCM6xxx allows users to record the conference call and retrieve the recording from web GUI CallFeatures Conference.To record the conference call, when the conference bridge is in idle, enable "Record Conference" from theconference bridge configuration settings. Save the setting and apply the change.UCM6XXX Conference GuidePage 9
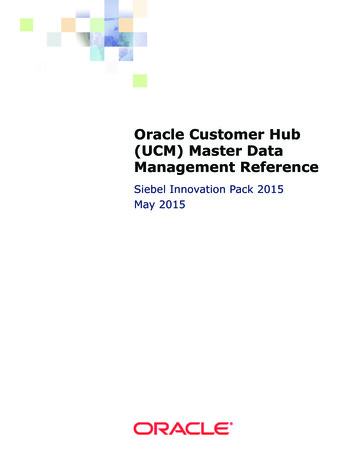
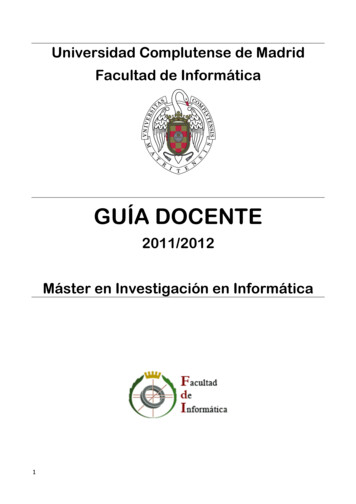
When the conference call starts, the call will be automatically recorded in .wav format. The recording fileswill be listed under “Conference Recording” as below once available. Users could click onto downloadthe recording or click onto delete the recording. Users could also delete all recording files by clickingon “Delete All Recording Files”, or delete multiple recording files at once by clicking on “Delete SelectedRecording Files” after selecting the recording files.Figure 3: Conference RecordingUCM6XXX Conference GuideP a g e 10
CONFERENCE SCHEDULEConference Schedule ConfigurationCreate New Conference ScheduleConference schedule Settings can be found under UCM6xxx web GUI Call Features Conference.Users can create, edit, view and delete a Conference Schedule. Click on “Create New Conference Schedule” to add a new Conference Schedule and configure schedulesettings. Or click on the scheduled conference to edit or delete the event.Figure 4: Conference Schedule OptionsMore advanced options such as configuring password, quiet mode, recording conference, announcingcallers and others are available under “Conference Room Options” section.UCM6XXX Conference GuideP a g e 11
Figure 5: Create New Conference Schedule Conference Room OptionsThe following table describes the conference schedule settings:Table 4: Conference Schedule ParametersSchedule OptionsConference SubjectConfigure the name of the scheduled conference. Letters, digits, and - areallowed.Conference RoomSelect a conference room for this scheduled conference.ConferenceAdministratorSelect the administrator of scheduled conference from selected extensions.Note: “Public Mode” must be disabled from Conference Room Options tab.Schedule TimeConfigure the beginning date and duration of scheduled conference.Note: Please pay attention to avoid time conflict on schedules in the sameconference room.Kick Time(m)Set kick time before conference starts. When kick time is reached, a warningprompt will be played for all attendees in the conference room. After 5 minutes,this conference room will be cleared and locked for the scheduled conference tobegin.Note: Kick Time cannot be less than 6 minutes in order to clear the conferenceroom.Duration(m)Set the period required to finish the scheduled conference.Local ExtensionSelect available extensions from the list to attend scheduled conference.Remote ExtensionSelect available extensions from the remote peer PBX.Note: “LDAP Sync” must be enabled on the UCM6200 in order to view remoteextensions here.Special ExtensionAdd extensions that are not in the list (both local and remote list). If the user wishesto add the special extension, please match the pattern on the outbound route.Remote ConferenceInvite a remote conference by specifying the number and the password.DescriptionThe description of scheduled conference.UCM6XXX Conference GuideP a g e 12
RepeatRepeat interval of scheduled conference. By default it’s set to single event.Enable GoogleCalendarSelect this option to sync scheduled conference with Google Calendar.Note: Google Service Setting OAuth2.0 must be configured on the UCM6xxx.Conference Room OptionsPublic ModeIf this option is enabled, no authentication is required for entering the conferenceroom.Note: Please be aware of the potential security risks when turning on this option.Wait For AdminIf this option is enabled, the participants in the conference won’t be able to heareach other until conference administrator joins the conference.Note: If “Quiet Mode” is enabled, voice prompt for this option won’t be played.PasswordConfigure conference room password. Please note that if “Public Mode” isenabled, this option is automatically disabled.Admin PasswordConfigure the password to join as conference administrator. Please note that if“Public Mode” is enabled, this option is automatically disabled.Quiet ModeIf this option is enabled, the notification tone or voice prompt for joining or leavingthe conference won’t be played.Note: Option “Quiet Mode” and option “Announce Caller” cannot be enabled at thesame time.Announce CallersIf this option is enabled, when a participant joins the conference room, participant’sname will be announced to all members in the conference room.Note: Option “Quiet Mode” and option “Announce Caller” cannot be enabled at thesame time.Enable Caller MenuIf this option is enabled, conference participants will be able to access conferencebridge menu by pressing the * key.Record ConferenceIf this option is enabled, conference call will be recorded in .wav format. Therecorded file can be found from Conference page.Enable User InviteIf this option is enabled, the user can: Press ‘0’ to invite others to join the conference with invited party’spermission Press ‘1’ to invite without invited party’s permission Press ‘2’ to create a multi-conference bridge to another conference room Press ‘3’ to drop all current multi-conference bridgesNote: Conference Administrator is always allowed to access this menu.Play Hold MusicIf this option is enabled, UCM6xxx will play Hold Music while there is only oneparticipant in the conference room or the conference is not yet started.Custom Music OnHoldSpecifies the custom hold music played while there is only one participant in theconference room or the conference is not yet started.Skip AuthenticationWhen Inviting Usersvia Trunk from WebGUIIf this option is enabled, the invitation from Web GUI via a trunk with passwordwon’t require authentication.Note: Please be aware of the potential security risks when turning on this option.UCM6XXX Conference GuideP a g e 13
Cleaner OptionsThe cleaner options allow users to automatically clean up configured conference schedule, please refer tofollowing table describing the cleaner parameters.Cleaner OptionsEnable ConferenceSchedules CleanerIf this option is enabled, conference schedules will be automatically cleaned asconfigured.ConferenceSchedules CleanTimeEnter the clean time (in hours). The valid range is from 0 to 23.Clean IntervalEnter the clean interval (in days). The valid range is from 1 to 30.Synchronize Conference Schedule with Google CalendarThere are two ways to authorize the synchronization of the conference schedule with the google calendarof your account: OAuth2.0 AuthenticationGoogle Calendar AuthorizationFigure 6: Google Calendar AuthorizationUCM6XXX Conference GuideP a g e 14
OAuth2.0 AuthenticationPlease refer to following steps:1. Go to the Google Developers Console (https://console.developers.google.com/project).2. Select a project or create a new one.3. In the sidebar on the left, expand APIs & auth. Next, click APIs.4. Select the enabled APIs link in the API section to see all the enabled APIs. Make sure that “calendarAPI” is on the list of enabled APIs. If you have not enabled it, select API from the list of APIs, thenselect the enable API button for the API.5. In the sidebar on the left, select “Credentials”. Click “Create New Client ID”.6. Select the installed application type for your project and enter any additional information required.Click create Client ID.7. Copy the “OAuth2.0 Client ID” and “OAuth2.0 Client Secret” to the UCM6xxx’s web GUI under CallFeatures Conference Google Service Settings, and click “SAVE”.Google Calendar AuthorizationPlease refer to following steps:1. Access the UCM6xxx web GUI Call Features Conference Google Service Settings.2. Click "Get Authorization Code" to obtain authentication code from Google Service.3. Enter the Google account and password (Note: please make sure the account on authorizationpage is correct, if you have logged in other account, please log out then log in again).4. Click "Accept" on authorization page.5. Copy the strings returned by Google authentication server under “Authorization code” input field,and click the "Authorization" button.Once the google account is authorized, it will be displayed under “Authorized Account” and it will beconnected with Google Service.Important: Users can also configure the Status update, which refresh automatically your Google Calendarwith the configured time (m). (Note: “Zero” means disable).Figure 7: Google Calendar SettingsUCM6XXX Conference GuideP a g e 15
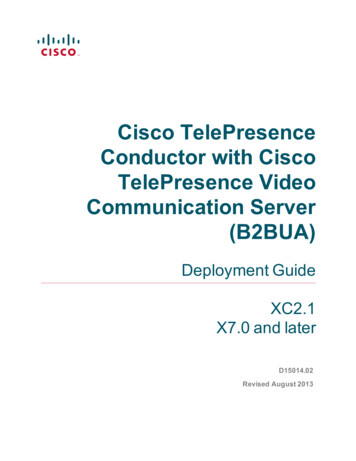
MULTIPLE CONFERENCE BRIDGESThe UCM6xxx support multiple conference bridges between different conference (remote or local) roomsto essentially bridge two conference rooms together reducing bandwidth usage as displayed on thefollowing diagram illustration a conference bridge between two UCMs in a peered scenario.UCM6xxx AUCM6xxx BSIP Peer TrunkConference Room AConference Room BPlease refer to following steps in order to invite a conference room to join the conference call:1. Access the UCM6xxx Web GUI Call Features Conference.2. Select the conference room to invite participants.3. Click on the conference room invite iconfor option "Invite Conference Room".4. Enter the remote conference’s number that you would like to invite and its appropriated password.Note: Users can also invite a local conference room to join the conference call by adding its roomnumber under “Remote Conference’s Number” field.5. Click on "Add", a call will be sent to this number to join into the conference.Figure 8: Remote Conference Room InvitationUCM6XXX Conference GuideP a g e 16
Important notes:For the peered trunks, users need to do the following on both UCM6xxx peered:1. Enable Sync LDAP feature.2. Configure the Sync LDAP Port and password.3. Set the LDAP outbound rules under VoIP Trunk Advanced settings.4. Synchronize the LDAP by click on Sync LDAPunder VoIP Trunk Settings.5. Configure the inbound routes and set the default destination to “” By DID “and check “Conference”on DID destination as displayed on following screenshot.Figure 9: Inbound RouteUCM6XXX Conference GuideP a g e 17
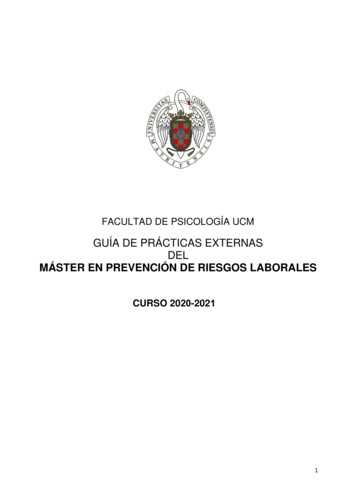
CONFERENCE SCHEDULE EXAMPLE APPLICATIONThis chapter illustrates an example of configuring conference schedule feature.The sales director of the company “ABC” needs to organize a conference and invite different salesmanagers to discuss different topics. We will assume the following:1. Sales director needs to have a conference room available on the extension number 6300 which willallow him to invite manually Sales Team members to discuss different topics.2. Every Monday at 9 AM, the sales director will organize with sales team a conference to discussdifferent topics and assign new tasks, the conference room used to host this weekly meeting is 6301.3. We will assume in this example that the UCM6xxx is already synchronized with Google Calendarservices. Configuring Conference room 6300Please refer to following steps in order to configure the conference room 6300:1. Access the Web GUI of the UCM6xxx using the administrator username and password (By defaultthe admin username/password is: admin/admin).2. Navigate to Call Feature Conference.3. Click on “Create New Conference Room “.4. Set the extension number to “6300.5. Press Save button to save the new conference room.Figure 10: Creating Conference Room 6300Once creating the conference room 6300, the sales director can initiate the conference by dialing6300 and inviting other participant. Please see steps bellow:6. Click on the invite iconfor option "Invite a participant".7. Enter the number of the party you would like to invite. Then click on "Add", a call will be sent to thisnumber to join into the conference.UCM6XXX Conference GuideP a g e 18
Note:-Inviting other participant is also available by dialing 0 or 1 and following voice prompt to input thenew participant’s number, then the UCM will send a call to this number to join into the conference.-Users may disable “Pubic mode” for authentication while joining the conference, if this mode isdisabled, password options should be configured.-Enabling “Record Conference” permits to record the conference calls and retrieve them underconference recording. Configuring conference room 6301The conference room 6301 is programmed to host the weekly meeting planned with Google calendar, onthe following steps we will create a new conference schedule and update the Google calendar.1.Access the Web GUI of the UCM6xxx using the administrator username and password. (By defaultthe admin username/password is: admin/admin)2. Navigate to Call Feature Conference.3. Click on “Create New Conference Room “.4. Set the extension number to “6301”.5. Press Save button to save the new conference room.6. Access to Call Feature Conference schedule.7. Click on “Create New Conference Schedule “.8. Set the “Conference topic” and select the “Conference room”.9. Configure the “kick time” and set the “Description”.10. Since this meeting is planned for each week, configure “Repeat” to weekly.11. Enable Google Calendar and select the extensions of the participants to join.12. Press Save button and click on “Update Google Calendar “to update the Google calendar.13. Press Apply Changes button to save and apply the new settings on the UCM6xxx.UCM6XXX Conference GuideP a g e 19
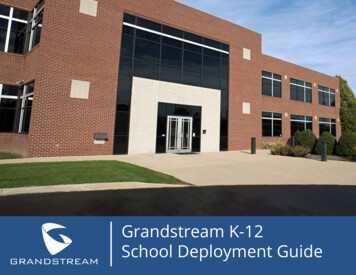
Figure 11: Conference ScheduleNote:-The conference can also invite remote extensions available when the main UCM6xxx is peeredwith other UCMs or a special extension.-The Google Calendar is updated also on your Google Account with the new parameters of theconference schedule.UCM6XXX Conference GuideP a g e 20
3. Click on "Create New Conference Room" to add a new conference bridge as displayed on figure 1 or click on to edit the conference bridge. Note: Click on to delete the conference bridge. Figure 1: Creating New Conference Room Please refer to following table describing the configuration options available for conference room feature.