Transcription
Northeast Alabama Community CollegeAdvising HandbookFor Faculty1
Table of ContentsThe New Advisor .41. Advising 101 .5-62. Avoiding Legal Issues .63. FERPA .6-74. Alliant Software .7-115. Web Site .11-13Advising Process .146. Advising Checklist .157. Transfer Program .168. Technical/Terminal Programs Advising .16-179. MAPS Guide Documents .1710. Class Schedule .1811. Programs of Study.1812. STARS .1813. Graduation Information .18AdvisorTrac .1914. AdvisorTrac .2015. How to Find Documents That StudentsHave posted .2116. How to Make an Appointment on AdvisorTrac .2117. How to Send a Mass Email to Your AdviseesThrough AdvisorTrac .2218. How to Upload Your Document to AdvisorTrac .2319. How to View MAPS Forms in AdvisorTrac .24Diagnostic Assessment and Placement Testing .2520. Placement Testing .26-2721. Development Reading and English Information .2822. Mathematics Information .29-3123. Kuder Journey Career Assessment .32Campus Resources .3324. Center for College Success/Tutoring .3325. College and Career Planning Center.3326. Academic Calendar .3327. Book Store Information.3328. Email Login .3329. Financial Aid .3330. GPA Calculator .3331. Job Search .3332. NOAH .332
Academic Advising HandbookA message from our President, Dr. David Campbell, to faculty andacademic advisors:Academic advising is one of the very important functions you perform hereat Northeast. Excellent advising is fundamental to our retention andcompletion rates as you build a strong mentoring relationship between youand the student.Student surveys of academic advising at NACC indicate that students arehighly satisfied with academic advising, and we will strive to continue thatrecord of success. The purpose of this Handbook is to equip you with theresources you need to be the best possible advisor. Please use it as areference tool to assist your advisees as they complete their Associate'sDegrees.3
The New Advisor1. Advising 1012. Avoiding Legal Issues3. FERPA4. Alliant Software (Green Screen) Faculty/Staff Guide5. Web Suite (NOAH) Faculty/Staff Guide4
Advising 101At NACC, Academic advising is an interactive relationship between a faculty advisor anda student. The advisor helps the student to identify, prepare for, and achieve short-termand long-term educational and career goals. Advisors provide guidance, leadership, andencouragement as students navigate the potentially unfamiliar world of degree plans,STARS, career pathways guides, and developmental studies.Educate Yourself on AdvisingEthical Issues in Advising Help your advisees feel comfortable—call them by name, inquire about anyconcerns they may have. Assist advisees with short term as well as long term educational and career goalplanning. Be prepared to work with students whose value systems are different from yours. Respect each student’s opinions and feelings. Strive to give all students accurate, appropriate information, no matter yourpersonal feelings or opinions about the students. Be honest but kind in communicating your advice to your students; it may differgreatly from their own. Do not become defensive when an advisee disagrees or does not take youradvice. Allow the advisee to make his/her own decisions, knowing that you have givenhim/her accurate advice.Guidelines for Working with New Advisees1. See Advising Syllabus/Checklist under the Advising column.Help for Students with Academic Difficulty Help students learn that getting help early is a key to success. Students shouldconsult with the Center for College success and/or tutors if experiencing difficulty.Helpful Tips for Advising Title IV (Pell Grant) Students To receive 100% of their Pell Grant allotment, the student must take at least twelvesemester hours. Students taking 9-11 semester hours will receive 75% of their Pell Grant allotmentand will be considered three-quarter time students.5
Students taking 6-8 semester hours will receive 50% of their Pell Grant allotmentand will be considered half-time students.Students must complete at least 66% of scheduled courses each semester.Title IV funds will pay for retaking a class once.Title IV will not pay for courses that are out of degree plan (ODP).Students must drop a class or withdraw before or on the last day to drop classes.Students may have a second program of study.For information on WIA, TRA, TAA, PACT see Financial Aid Office.Avoid Legal Issues Involved with AdvisingThe following list of tips will help the advisor avoid complaints and/or legal difficulties: Always follow FERPA (see next section). Keep accurate notes for each advising session. Only advise those areas for which you are qualified. Stay abreast of any policy, procedural, or curricular change. Use the STARS Guide, program of study sheet, and/or Career Pathways Guide, asindicated. Be accessible to students. Refrain from negative or demeaning verbal or non-verbal statements. If you do not know the answer to a question, do not guess. Find the answer.What Faculty Advisors Need to Know About FERPAThe Family Education Rights and Privacy Act of 1974 (FERPA) is a federal law intendedto protect the privacy of student records. All schools that receive funds under anapplicable program of the U.S. Department of Education must comply with this law.Under the law, parents retain certain rights until a child turns 18 or attends a schoolbeyond the high school level. Students to whom rights have been transferred are termed“eligible students.”Eligible students have the right to: Inspect and review their educational records maintained by the college. Schoolsare not required to provide copies of records unless, for reasons of distance, it isimpossible for eligible students to review the records. Schools may charge a fee forcopies. Request that a college correct records which they believe to be inaccurate ormisleading. If the college refuses to amend the record, the student has the right toa formal hearing.6
Generally, the college must have written permission from the eligible student to releaseany information from the student’s education record, with the exception that informationmay be released to certain persons under certain conditions.In addition, schools may disclose, without consent, specific directory information,including the student’s name, address, telephone number, date and place of birth, honorsand awards, and dates of attendance. However, students must be given the opportunity toopt out of directory information.As an advisor, your best course of action is to:1. Refer anyone requesting student information (directory or otherwise) to the Dean ofStudents2. Refrain from sharing any information about your advisees, except internally on aneed to know basis3. Secure all advising files, treating them as confidential documentsFind FERPA information at x.htmlALLIANT SOFTWARE (Green Screen)FACULTY/STAFF GUIDENote: Student or faculty numbers may be substituted for social security numbersin all instances.The ALLIANT/400 administrative software now utilized by the college provides morecapabilities. The purpose of this booklet is to provide users with a list of steps andexamples for those tasks they utilize most often. Full time faculty have access to the“green screens” and the WEB SUITE. Because of connectivity issues, adjunct facultywill only have use of the WEB SUITE. Since faculty and staff use ALLIANT programssporadically, the “how and where” details may become fuzzy. This guide will provide areference for those fuzzy moments.GENERAL GREEN SCREEN INFORMATIONThe “Green screen” software requires that IBM/AS400 software is installed on your PC.Two “screen/computer” icons must be present on your desk top for this operation.Clicking on these icons and providing the requested information will begin the“sessions” needed to use this phase of the software. If they are not present, contact theMIS department for assistance.7
GREEN SCREEN SIGN-ON1.Begin an AS/400 session and a printer session by double clicking thecorresponding icons on your desk top.2.Sign on using the user ID and password provided by the MIS department (this isnot the same ID and password used on the WEB).3.After completion of sign-on you will be presented with the FERPA screen, pressenter. The next screen will be your printer assignment, press enter. The nextscreen will be the ALLIANT/400 main menu.MAKE SURE THAT YOUR “CAPS LOCK” IS IN THE “ON” POSITIONREGISTRATION USING GREEN SCREENGreen screen registration is restricted to full-time or on campus faculty.1.Your cursor will be positioned at the bottom of the screen on the command line.With caps lock in the ON position, type IN and press enter.2.You will be taken to the “INFORMATION MENU.” As an advisor, you haveaccess and authority to all options on this menu. You may execute these optionsby typing IN and the letters preceding the option you wish to execute. TypeINAIC and press enter to execute the advisor options for registration.3.You will see the current term displayed. The term may be changed if necessary.Press enter and your name will appear. The cursor will be positioned between“population” and the “F1” option.4.Pressing F1 will give you a listing of all students assigned to you for advisement.Pressing F2 will give you a list of currently active students assigned to you.Pressing F3 will position the cursor beside the word [Student] and you may enterany student number regardless of his advisor assignment. PRESS F35.Enter the student’s student number and press enter.6.The student’s name will appear with a list of possible actions you may need totake concerning this student at the top of the screen. Each option has acorresponding number which you will enter in the blank spaces before thestudent’s number. Place a 7 in the space. Press enter. You will see the term forwhich you are registering this student. Press enter again. Remember that thisoption is only valid during pre-registration, registration, and the drop-add period.(If you receive an error because you do not have authorization to use DP LC, callKyna Bowman.)7.The student’s information will appear at the top of the screen and the cursor willbe positioned beside the number 1. Enter a valid section number (this field is 5digits, you must enter leading zeros) and press enter. The corresponding coursewill appear on the schedule and the cursor will position itself beside the # 2.Continue to enter courses until the schedule is complete.8.Press enter once again to position the cursor in the bottom left hand corner of thescreen.8
9.10.11.12.Press F3 to process. You will be shown a screen with the student’s charges andhis or her financial aid awards.Press F12, you will return to the previous screen. At this point you may print thestudent’s schedule by clicking on the printer icon on your menu bar. Press F12again, you will return to the screen where you entered the student’s socialsecurity number. You are ready to register another student.You may exit the program at any time by continuing to press F12 until you returnto the information menu.Before ending a 400 session, always type, on the command line, “SIGNOFF” andpress enter. You may then “X” out of the green screens.ATTENDANCE VERIFICATION THROUGH GREEN SCREENAttendance verification requires the instructor to verify those students whoHave stopped attending, never attended, or were never on roll.1.2.3.4.5.6.7.8.9.Your cursor will be positioned at the bottom of the screen on the command line.With caps lock in the ON position, type IN and press enter.You will be taken to the “INFORMATION MENU.” As an instructor, you haveaccess and authority to all options on this menu. You may execute these optionsby typing IN and the letters preceding the option you wish to execute. Type INIICand press enter to execute the advisor options for registration.You will see the current term displayed. Press enter and your name will appearalong with a list of the classes assigned to you for the term.The “registrar’s request” will appear in red in the upper right side of the screen.Press F7 to respond.The next screen identifies the control number of the request with due date andstatus. Place an M (for maintain) in the space before the control number andpress enter.Choose the course you wish to verify and place an M in the space provided.Press enter.The next screen provides you with a list of registered students for that class.Place the appropriate code (listed in the top left corner of the screen) in thespace before the student’s name and the last date of attendance if the student isno longer attending.The green screen offers an additional option not found on the web suite. Youmay enter the student number, name, and a brief comment on a student who isnot appearing on your roll by pressing F3. In essence you may unofficially addhim to your roll, but you must have a valid student number for the student.Otherwise, the information will not be stored.When the exceptions have been identified and data entered,PRESS F1. This places an * beside all other attending students.9
10.11.12.13.PRESS ENTER one more time. This saves everything you have done.Press F2 to SUBMIT, and this verification is complete.Press F12 to return to the previous screen. You may click on another course andrepeat the steps needed to complete verification of your remaining classes.Pressing F12 numerous times will ultimately take you back to the original menu.GRADE ENTRY ON GREEN SCREEN1.With caps lock “ON”, type on the command line, GRIRG. This acronym standsfor GRADE MENU, INSTRUCTOR RECORD GRADE. Press enter.2.The term for grade entry will display. Press enter.3.A list of all classes assigned to you in the semester schedule will be displayed.Place an “X” in the space before the class for which you wish to record gradesand press enter.4.A list of registered students for that class will display. Fill each space with theappropriate grade for the student. No blank spaces or numeric grades areallowed in this field.5.6.7.8.9.High school students will have a space for their numeric grade.You must enter a “last date of attendance” for any student who has withdrawn orreceived a grade of “I” or “F”. This date is used by Financial Aid.Press Enter. Failure to press enter before exit will result in loss of the dataentered.You now have the ability to print your grades. (One copy must be signed andreturned to the registrar’s office at the end of the term. Print additional copies foryour records if desired.) You may access the posted section using the samesequence above for printing, but no grade changes are allowed. Press F6 to printyour grades.As with all AS400 options, pressing F12 one or more times will return you toprevious screens or menus.UPDATE AUTHORIZATION GREEN SCREENSUsing the “green screens,” type INAIC. Press Enter. F1 lists all your assignedadvisees, F2 – advisees for the current term, and F3- requires you to provide avalid social security number. Press F3 and enter a valid social security number.Press enter. The student appears with a blank before the student number.There are 7 options available (listed in white lettering in the upper left area of thescreen). Place a 6 in the blank space and press enter. The action taken will bereflected beneath the A U heading in the form of Y or N beside the Catlg field.The GREEN SCREEN options for viewing and printing of student transcripts areseparate entries. To view a transcript type, INTI. Enter a student number and10
press enter. Cumulative data will appear. Press F1 and use page up and pagedown to view the entire transcript. Printing a transcript is accomplished by typingINPT and pressing enter. Place an M or P in the space by “address” and pressenter. Enter the student number and press enter. Enter the number of copiesdesired and press enter then F12.WEB SUITE (NOAH)FACULTY/STAFF GUIDEWEB SUITE SIGN-ON1.Open a web browser and go to the NACC.EDU web site.2.At the top of the home page, click NOAH ACCOUNT LOG-IN.3.You will be required to enter your USER ID and PIN numbers. Your user ID is yoursocial security number or faculty number. Your Northeast faculty number isassigned when you are entered as a college employee and will remain the sameregardless of employment status. This number can be obtained from the payrollclerk or Ms. Stewart in the Dean of Instruction’s office. Your PIN is your date ofbirth, mm/dd/yy format (unless you have changed your pin). All six digits arerequired with no slashes or dashes in either field. Click “login”.REGISTRATION via WebOnly instructors with advisor status (normally full-time) have the authority to register astudent on-line. A student must be authorized to register via web before you can enterhis/her schedule.1.2.3.Click on Advisee Registration.You will be presented with a screen to enter a student’s student number or pickfrom one of your advisees. If you know the student’s student number, you mayregister any active student. If you do not, you can search by using the studentlook-up option.Upon selection of a student, you will be offered the options of adding/droppingclasses from his existing schedule or simply adding to create the schedule.Remember that this option is only valid during pre-registration, registration, and thevalid drop-add period. The student has these same options on his web page andcan manipulate his schedule during this same time frame if student has beenauthorized. After the official last day to drop-add, any changes in schedule arehandled in the traditional manner by filling out a drop-add form and directing the11
4.5.6.student to the proper office for processing (Dean of Instruction, Financial Aid,Technical Dean, Evening Dean).To see the student’s schedule, you must “arrow down” on the page. When thecorrect schedule has been entered, click on “Complete Schedule.”You will then be given the option of printing a mailer by clicking on the “print mailer”button at the bottom of the screen or by clicking the printer icon on your tool bar atthe top of the screen.To get back to the previous screen so that you may register another student, youmay either click on the words “change student” above the large blue title bar“ADVISEE REGISTRATION” or click on “Main Menu” in the smaller blue title bar atthe top of the screen and eliminate step #1.ATTENDANCE VERIFICATION VIA WEBThere is a time-out issue associated with this option. The maximum amount of timeallowed between actions is 30 seconds. Please identify those students who have stoppedattending or never attended before accessing the program. Looking up information duringthis process will cause you to time-out and have to begin again. You are only beingasked to identify those who have stopped attending or never attended.1.2.3.7.8.9.Attendance Verification is located in your “FACULTY INFORMATION CENTER.”Click on Attendance Verification.You will be presented with a list of classes which are assigned to you through theschedule creation. If this list is incorrect, contact the Dean of Instruction’s office.Click on the course you wish to verify. That course will come up in the headingbeneath your name. Click on the control number and a listing of registeredstudents will appear.Beside each student is a status box. In that box place the appropriate code. Validcodes are listed at the bottom of the screen. No notation is necessary if the studentis attending.Press save.Complete data entry for the entire class before pressing “Post Attendance.” Thiswill make the information available to the registrar’s office and financial aid. Nochanges can be made after posting except through the Registrar’s Office.GRADE ENTRY VIA WEBThere is a time-out issue associated with this option. Because you only have 30 secondsbetween activities or entries, looking up information during this process will cause you totime-out, requiring you to start again. Careful planning will eliminate this issue.12
1.2.3.4.5.Record Grades is located under the Faculty Information Center. Click on RecordGrades.You will be presented with a screen listing all courses for which you areresponsible in the current schedule. Click on a course and number for grade entry,ie. MTH 100.An alphabetical listing of students registered for the class will be displayed. Placethe grade earned for each student in the appropriate space by the student’s name.Numeric grades are not acceptable, except for dual enrollment students. If astudent is dual enrollment, a place for his/her numeric grade will be available at theright of the screen. Audit grades are not allowed (audit must be done in advancethrough the Dean of Instruction’s office). All grades must be entered beforeposting. After entry, click on “POST GRADES.”Record grades for all courses assigned to you from the schedule using the samesequence of steps. Click on the “Change Course” line beneath your name at thetop of the screen.You must print, sign, and return a copy of your grades to the Registrar’s office afterterm completion. It is advisable to print two copies retaining one copy for your files.You can access your posted grades by displaying the official course roll andutilizing the printer icon on your tool bar if you did not print before posting.ADDITIONAL ACCESS OPTIONS YOU NEED TO KNOWStudents who wish to register on the web must be authorized to do so. A change indegree plan will automatically remove authorization. Advisors have the ability to authorizea student by WEB SUITE or the GREEN SCREENS.AUTHORIZATION TO SELF-REGISTEROn the web, click on UPDATE AUTHORIZATION. Choose the student you need from adrop down box or enter a valid student number. Choose the student from the namesearch or enter a valid social or student number. This is a toggle action and will authorizeor unauthorized as needed.13
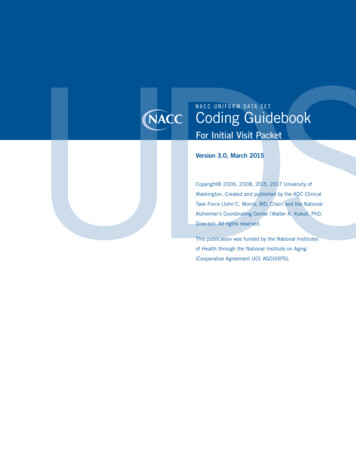
Advising Process1. Advising Checklist2. Transfer Programs Advising3. Technical/Terminal Programs Advising4. MAPS Guide Documents5. Class Schedules6. Programs of Study7. STARS/2to4 Page8. Graduation Information14
15
Transfer ProgramsIf you are advising a student who plans to transfer to a four-year college or university, ata minimum, you should:1. Discuss the appropriate MAPS Guide components with students.2. Help the student to register on STARS and print a STARS Guide for his/herprogram of study. Explain to the student how to use the STARS Guide and that itis only applicable to a specific major transferring to a specific institution. Thestudent must print a new STARS Guide every time he/she changes majors orchanges transfer institutions.3. Assist students in planning for registration by helping them work through theMAPS Registration Worksheet (A).4. Encourage students to work on their MAPS Goals Worksheet each semester (P).5. Using your knowledge of course rotations, help the student to develop a plan thatwill achieve an AA or AS degree and will meet requirements for transfer.6. Register the student for his/her courses, or (at the appropriate time) authorizehim/her to register online. (ADVISORS MUST MEET WITH STUDENTS FOR ATLEAST THE FIRST TWO SEMESTERS).7. Encourage the student to apply for the appropriate (AS or AA) degree.8. Provide students with a graduation application (provided by the Vice President’sOffice) and remind them of the importance of completing their MAPS AcademicCareer Goals Questionnaire (S).9. Sign off on the student’s degree application and fill out the degree sheet, beforehaving the student return the paper work to the Vice President’s Office forapproval.Technical/Terminal Degree Programs1. Discuss the appropriate MAPS Guide components with students.2. Using a Career Pathways Guide for the student’s program of study and yourknowledge of the course rotations, help him/her to map out a plan for programcompletion, noting intermediate steps (certificates and industry certifications)within the process.3. Assist students in planning for registration by helping them work through theMAPS Registration Worksheet (A).4. Encourage students to work on their MAPS Goals Worksheet each semester (P).5. Register the student for his/her courses, or (at the appropriate time) authorizehim/her to register online. (ADVISORS MUST MEET WITH STUDENTS FOR ATLEAST THE FIRST TWO SEMESTERS).16
6. Encourage the student to apply for all awards (STC, CER, AAS) and industrycertifications for which he/she is eligible.7. Provide students with a graduation application (provided by the Vice President’sOffice) and remind them of the importance of completing their MAPS AcademicCareer Goals Questionnaire (S).8. Sign off on the student’s certificate and degree applications, and provide copies ofeither the degree plan and transcript, the career pathways guide and transcript, orthe degree plan (for the specific award for which they are applying) printed fromNOAH, before having the student return the paperwork to the Vice President’sOffice for approval.MAPS Guide DocumentsInstructions:(M) MAPS Career Exploration Worksheet: This document is to be completed anduploaded to AdvisorTrac during ORIENTATION.(A) MAPS Registration Worksheet: This document is to be completed (to the best of yourability) prior to meeting with your advisor for registration of your second semester, andevery semester following that.(P1) MAPS Goals Worksheet (1): This document is to be completed before meeting withyour advisor to register for your second semester. Upload the document to AdvisorTracunder “Document Post ” Discuss your answers to the three goals questions with youradvisor during your advising session.(P2) MAPS Goals Worksheet (2): This document is to be completed before meeting withyour advisor to register for your third semester. Upload the document to AdvisorTracunder “Document Post ” Discuss your answers to the SIX goals questions with youradvisor during your advising session.Use this link to access your current MAPS Guide vising/maps-guide-documents17
Class SchedulesUse this link to access current class schedules: Programs of StudyUse this link to access current Programs of Study: https://www.nacc.edu/programs-ofstudySTARS/2to4 PageUse this link to access the Transfer Resources STARS Guide and 2to4 ising/transfer-resourcesGraduation InformationUse this link to access current graduation information: https://www.nacc.edu/currentstudents/graduation18
AdvisorTrac1. AdvisorTrac2. How to Find Documents That Students Have Posted3. How to Make an Appointment on AdvisorTrac4. How to Send a Mass Email to Your Advisees through AdvisorTrac5. How to Upload Your Document to AdvisorTrac6. How to View MAPS Forms in AdvisorTrac19
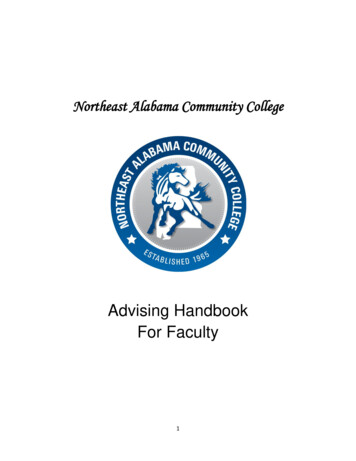
AdvisorTracUse this link to access AdvisorTrac: How to Find Documents That Students Have Posted20
How to Make an Appointment on AdvisorTrac21
How to Send a Mass Email to Your Advisees through AdvisorTrac22
How to Upload Your Document to AdvisorTrac23
How to View MAPS Forms in AdvisorTrac24
Diagnostic Assessment and Placement Testing1. Placement Testing2. Developmental Reading and English Information3. Mathematics Information4. Kuder Journey Career Assessment25
Placement TestingACCUPLACER is an integrated system of computer-adaptive assessments designed toevaluate a student’s skills in reading, writing, and mathematics. ReadingComprehension: This test, comprised of 20 questions, measures yourability to understand what you read, to identify main ideas and to makeconclusions. WritePlacer (Writing): The WritePlacer test, a written essay, measures your abilityto write effectively and will be scored on the basis of how you communicate apurpose-driven message in at least 300 words. Mathematics: Scratch paper and pencils are provided to work out problems forthis test. No personal calculators are allowed, but one will be provided for specificquestions.The ACCUPLACER test is administered by the Admissions Office at no cost to thestudent; however, one retest is provided at
1. See Advising Syllabus/Checklist under the Advising column. Help for Students with Academic Difficulty Help students learn that getting help early is a key to success. Students should consult with the Center for College success and/or tutors if experiencing difficulty. Helpful Tips for Advising Title IV (Pell Grant) Students