Transcription
ZCM1000/M1000 Series
CONTENTSRead this user’s manual before use to ensure proper operation. Keep the manual on handfor reference in case there is a problem.Warranty InformationNotesFeaturesDescription of Parts and ventive MaintenanceExploded Views/Parts BreakdownParts ListPage 2Page 3Page 3Page 4Page 5-6Page 7Page 7Page 8Page 9-13Page 14-22WARRANTY POLICY FOR LD SERIES LABEL DISPENSERSSTART International warrants all parts on ZCM series tape dispensers against defects in design,materials and work manship for a period of 360 days. Parts excluded from this are: cutting blades,silicone rollers and cutter liners; these parts are considered “wear parts”. Labor to replace defectiveparts will be performed at no charge for the first 180 days after date of purchase. Warranty does notcover transportation costs.START International’s sole obligation under this warranty is limited to repair, replacement or creditof the purchase price, at our option, which do not properly perform the function for which they weredesigned.Warranty repair is contingent upon START’s examination and determination that alleged defects havenot been caused by misuse, abuse, improper installation or application, repair, alteration, accident orneglect in use, storage, transportation or handling.The above warranty and remedy constitutes START International’s sole liability hereunder and are inlieu and exclusive of all other warranties and remedies expressed, implied, or statutory, including, butnot limited to, those of merchantability and fitness for a particular purpose.REPAIR POLICYContact START INTERNATIONAL to determine nature of problem.Furnish START with the following information:1. Who the unit was purchased from.2. Model number and serial number.3. Date purchased (copy of invoice or packing slip required).START will issue an RMA (Return Material Authorization) for the repair. Return machine to STARTby freight, insured and prepaid. START will notify the customer if there is a repair charge.A 25.00evaluation charge will apply to all non-warranty repairs, which will be applied to repair change.For the full Warranty & Repair policy please visit www.STARTinternational.com2
FEATURES Will dispense butt-cut and die-cut material. Adjustable photosensor for pinpoint accuracy. Handled lock rod makes scrap removal easy. No tools required for adjustment.NOTES Keep strip plate free of adhesive build-up. Clean photosensor with compressed air or dry cloth. Do not drop the dispenser or subject it to heavy shock. Turn off machine when not in use.3
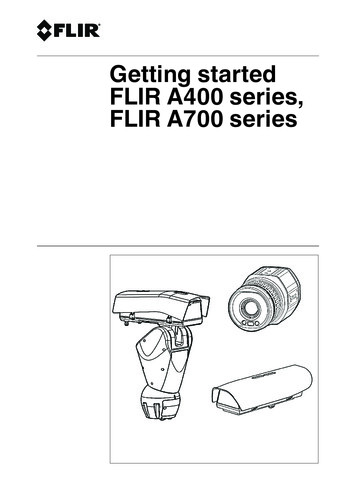
DESCRIPTION OF PARTS AND FUNCTIONS4
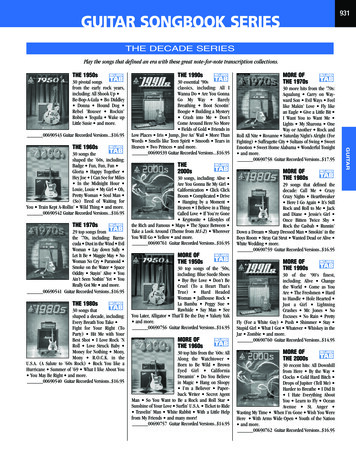
OPERATIONUsing Automatic Feed:1. Plug in power cord and turn unit on.2. Set tape on the center of reel and stick the end of the tape onto the metal feed roller.Press ADVANCE key until tape feeds through cutting unit. If the tape will not feed throughthe cutter, fold corners of the tape to form a triangle shape and re-feed (Fig. A).3. Press CUT key to cut tape.4. Set the tape length.Press MM key to set length of 0-9mm.Press CM key to set length of 20-990 mm.5. Set PRESSURE knob If tape curls or slips, increase pressure. If tape creases, decrease pressure.6. Turn sensor switch ON. Tape will be fed to set length and cut. When the piece of tape isremoved from machine, another piece will be fed and cut. (Turn sensor switch OFF whennot in use.)Using ADVANCE / CUT keyWith AUTO SENSOR switch OFF, press ADVANCE / CUT key. Tape will be fed to set lengthand cut.Using ADVANCE keyPress ADVANCE key until desired tape length has been fed. (This key overrides the presetlength.) Press cut to cut tape.Changing tapePress the REVERSE key. The feed roller will rewind the tape away from cutter area. Removethe tape manually.In case of tape jamPress REVERSE key to remove tape from cutter area. Rewind and replace tape on roller.Also, remove cutter unit to verify no tape is stuck on roller or cutter.5
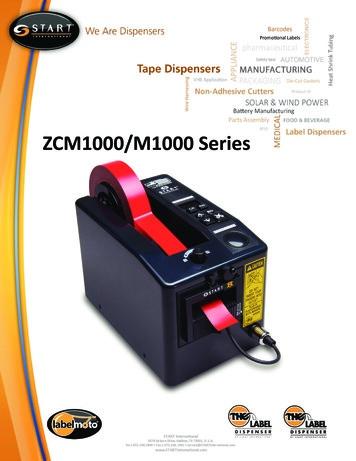
OPERATION (CONT’D)To Replace Cutter UnitTurn off auto sensor and power before removing cutterunit. Pull sensor plug out, then pull cutter unit forward whilepressing the knob on the top of the unit(Fig. 1).To replace blades, remove the two screws inside head. Bladecan then be lifted out and replaced. Before remounting thecutter unit to the frame, the lower blade must be bottomedout. If it is not completely down, use a screwdriver to lower it(Fig. 2).Remount the cutter unit by aligning the bottom of the unitthen pushing in the top.Replacing the Separating RollerTurn off the sensor and power before removing the separating roller. Remove the cutter unit, then remove the twoscrews (Fig. 3).To remove roller holder, grip rubber ring in the center of separating roller and pull. Then remove the screws on the leftand right of the roller holder and pull off shaft and gear(Fig. 4). Set the tape properly as described in these instructions. (If the end of the tape is folded whenthe tape is set, the tape may jam at the tape outlet.) This machine will cut virtually any type of pressure sensitive tape (aluminum, filament, etc.). Iftape is thicker than .05” or thinner than .03”, test for compatibility. Because of tape differences (elasticity, stickiness, etc.), some tapes may not cut at the setlength. If this occurs, adjust the set length accordingly. If tape sticks to the blade, remove the cutter unit, clean with alcohol and apply silicone oil tothe blade. To reduce jamming, remove tape from machine when not in use.6
SPECIFICATIONSTROUBLE SHOOTINGWhen problems occur, carry out the following procedures. If the tape dispenser does not operatenormally after following the troubleshooting procedures, contact your supplier.1. If the motor does not drive: Check that the power cord is plugged in. Check that the power switch is turned on.2. If the tape does not cut: Make sure the cutter unit is set properly and clean.3. If the LED does not light: Check that the power cord is plugged in. Check that the power switch is turned on.4. If the tape does not advance: Check if the tape is jammed at the roller or in the cutter unit. Check that the tape is set properly.5. If the auto sensor does not work: Check that the sensor plug is plugged in. Check that the sensor switch of cutter unit is on. Check that the sensor part of the cutter unit is not stained.6. If the tape advancing does not stop: Check that the tape is centered. If not, set the tape at the center of the feed roller so thatthe sensor will see the tape.7
PREVENTIVE MAINTENANCEWEEKLY -Remove cutting head. Clean and look for missing roller rings.Replace as needed.MONTHLY-Remove blade spring and blades to inspect cutter liners. Place onedrop of silicone oil on each liner, or replace if worn. Inspect feedroller and blades for tape fragments or adhesive buildup. Clean withalcohol.ADDITIONAL INFORMATION FOR THE ZCM2000MEMORY KeyThe reverse key on the ZCM1000 is changed to the MEMORY (M) keyon the ZCM2000. (The reverse function can be accessed by pressing the FEED key and the Mkey at the same time. This function is for changing tape.)Setting Memories1. Press and hold the M key until the LED display flashes.2. Using the cm and mm keys, set the desired length for first cut.A. The mm key controls the millimeter setting (1 digit).B. The cm key controls the centimeter setting (2 digits).(Ex:125mm 12cm and 5mm.)C. Press M key to record memory. (The display will then flash “999”.)3. Set additional lengths as shown in #2. (If only two lengths are needed, record “999” as lastlength — “999” length will not be memorized.)4. After lengths are set, the display will flash “0”.Press mm key to switch between “0” and “5”: On “0”, the machine will feed and cut the first set length until the M key is pressed, thenit will feed the second length until the M key is pressed, and so on. On “5”, the machine will feed and cut the recorded lengths in series.5. When set correctly, press and hold the M key until the display stops flashing. The first presetlength will be shown on the display and the unit is ready to use.6. Programmed tape lengths will be fed and cut in order when using either the sensor unit automatic feed and cut or the ADVANCE / CUT button.7. If RESET (20) key is pressed, all of the memory will be erased.8
EXPLODED VIEWS / PARTS BREAKDOWNREMOVE BODY COVER AND BOTTOM PLATECHANGE THE SEPARATING ROLLER9
EXPLODED VIEWFRONT HOLDER STRUCTURE10
EXPLODED VIEWFEED STRUCTUREREMOVING SENSOR UNIT11
EXPLODED VIEW12
EXPLODED VIEWBOTTOM PLATE WIRINGCONTROL PANEL CONNECTIONS13
PARTS14
PARTS15
PARTS16
PARTS17
PARTS18
PARTS19
PARTS20
PARTS21
PARTS22
ZCM1000/M1000 Series. CONTENTS Read this user’s manual before use to ensure proper operation. Keep the manual on hand for reference in case there is a problem. WARRANTY POLICY FOR LD SERIES LABEL DISPENSERS START International warrants all parts on ZCM series tape dispensers against defects in design, materials and workmanship for a period of 360 days. Parts excluded from