Transcription
Data Protection ServicesSecure Large File Transfer(SLFT) User Guide
2016 Atos IT Solutions and Services. All rights reserved.Document Version: 1.4 (June 2016).
Table of ContentsIntroduction . 4What is Secure Large File Transfer? . 4Sending Files . 4Receiving Files . 4SLFT Features. 4Getting Started . 4Logging In . 9Sending files . 10Retrieving your file . 13The Outbox . 19The Address Book . 21Sending Invitations . 22SLFT Outlook Plug-in . 23Requirements. 23Installing SLFT Outlook Plug-in . 23Troubleshooting . 24Recovering or Resetting Your SLFT Account Password . 28To Recover Your SLFT Account Password: . 28
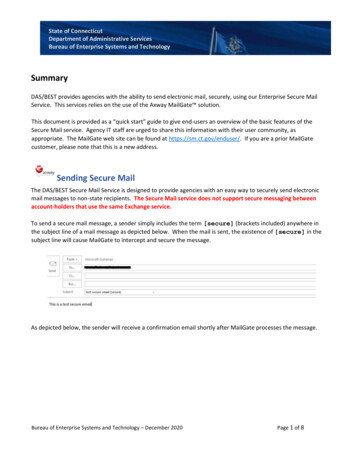
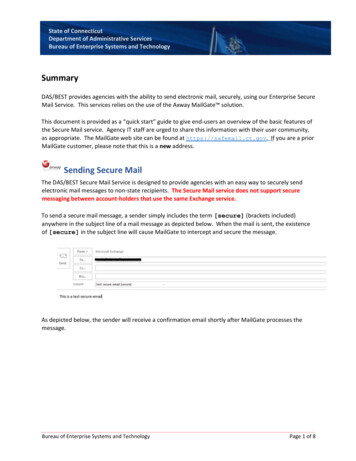
IntroductionWhat is Secure Large File Transfer?Data Protection Secure Large-File Transfer Service (SLFT) is your hassle-free way toeasily and securely transfer large files to other users. There is no software needed onyour end, other than your web browser and email client. Everything else is managed bythe SLFT server.Sending FilesSending files to internal or external users is a breeze. You simply login to your SLFTaccount; upload the file, using the HTTPS protocol, and SLFT automatically emails anotification message to the recipient, once the file is ready for downloading. Yourtransmission is locked and protected. The data is securely encrypted using a passphrasethat you provideReceiving FilesReceiving a file is just as easy. The recipient gets the email notification from SLFT,explaining that a file is waiting and ready to be downloaded. The notification includesinstructions for downloading the file. The recipient logs onto the SLFT server, as directedby the notification, and downloads the fileOnce the file has been downloaded by the recipient, the SLFT server updates the statusof the message to confirm that the file was successfully downloaded. The encrypted filewill be stored for a specified period of time, configurable by SLFT retention policy (currentdefault is 17 business days).SLFT Features Encrypt large files.Seamless uploads and notifications to recipients.Customers can download files using their web browser in multiple OperatingSystems.No software required to decrypt data at the recipient’s computer.Secure web transmission with SSL for upload and download.Data at rest is encrypted and can be set with an expiration date for addedprotection.Note: SFLT should not be used for backup or storage purposes.Remember to always keep your original file in a safe place. Failure to do socould result in data loss.Secure Large File Transfer User Guide4
Getting StartedSending large files up to 2GB is simple with SLFT. Files can be sent to any users;however, before you can send a file, you must be a registered user on a manageddomain. The first step in registering is obtaining a token.To register as a new user:1. Go to https://slft.atos-nao.net/2. Click the “Sign Up” link.Figure 13. Enter your First Name, Last Name and Email Address in Sign up form.Figure 2Secure Large File Transfer User Guide5
4. Click the “Request Token” button.Figure 3You will receive a confirmation message.Secure Large File Transfer User Guide6
A message containing a unique token will be sent immediately to your email address.5. Open the email, and then click on the link to the SLFT login page.Figure 46. Click the “New User Registration” link on the login page or the link in the email.Figure 5Secure Large File Transfer User Guide7
7. Type your email address along with your first, last name and phone (optional).Figure 68. Enter the 15-character token from your email invitation.9. Create a password for your SLFT account and confirm a second time.10. Click the Register button.You will receive a confirmation message stating that you have successfully registered.Click the “Click here” link to login.Figure 71Secure Large File Transfer User Guide8
Logging InTo login to SLFT:1. Type the email address and Password you used to create the account.Figure 82. Click the Sign in button.Secure Large File Transfer User Guide9
Sending filesThe Send tab allows you to send files to other users via the secure web protocol HTTPS.When you complete and send the form, SLFT encrypts the file using the passphrase yousupplied, and then sends a notification to the user that a file is ready for them todownload from the SLFT server. For added security, SLFT never stores or sends thepassphrase to the user. You will need to communicate the passphrase to the recipient foruse during the download process.STOP: SLFT never stores the passphrase on the server, so it isimportant that you remember the passphrase and communicate itto the intended recipient(s) for download. If the passphrase islost, the file will have to be uploaded again; as the original filecannot be recovered without the passphrase that was specifiedduring the encryption process.The Send form has the following required fields:SettingEmail AddressCc:AttachmentSubjectSecure Large File Transfer User GuideDescriptionEnter the email address of the recipient(s)that will receive a notification to come to theserver to pick up the file. Separate multipleaddresses by a comma.Enter the email address of the individual youwould like to send a copy of the notification.Optional.Enter the full path and name of the file to besent or use the Browse button to navigate tothe file on your computer that you wish tosend to the recipient(s).Enter the subject line for the emailnotification message that will be sent to therecipient(s) listed in the To: and Cc: textboxes.10
SettingMessageRecipient OSPassphraseConfirm PassphrasePassphrase Strength isOptionsSecure Large File Transfer User GuideDescriptionEnter a custom message here. Thismessage will be included in thenotification email sent to therecipient(s) along with instructions onhow to retrieve the encrypted file.NOTE: DO NOT include thePASSPHRASE.Choose the operating system therecipient will use to decrypt the file.(Windows is default.)Enter a passphrase to encrypt the fileagainst. This will be the passphraserequired by the recipient in order todownload and decrypt the file. Thispassphrase must meet the minimumstrength requirements as defined bythe SLFT Policies.Enter the passphrase a second time toconfirm it.Displays the strength of thepassphrase currently entered in thePassphrase text box. This value mustbe equal to or exceed the Min.Passphrase Strength displayed in thePolicies section of the page. Set High Priority: Check thisbox if the file is high priority. Disable Self Notification:Check this box if you do notwant to receive a copy of thenotification message sent tothe recipient(s). Disable Download Receipt:Check this box if you do notwant to receive a notificationmessage when the recipientdownloads the file.11
To Send a File using the HTTPS Protocol:1.2.3.4.5.6.7.8.9.Click on the Send Tab.Type the recipient’s email address in the Email Address field.Type the recipient’s email address in the Cc field. OptionalClick the Browse button to select the file you want to send.Type a subject name in the Subject field.Type a description in the Description field.Select the Recipient’s OS. (Default is Windows).Enter and confirm your passphrase.Click the Send button.Click the Details link to see confirmation stating that the file was sent successfully.Note: Recipients that are not registered SLFT users willbe emailed an invitation with instructions on becoming aregistered user.Figure 9Secure Large File Transfer User Guide12
Retrieving your fileThe SLFT Inbox is where you can see all of the files that have been sent to you by otherSLFT users. You can choose to view the files sent to you in the last 30, 90 or 365 days,you can view downloadable files only or view all the files sent to you at once. You canalso use the Search function to easily locate files in your Inbox. Once a file is sent to you,you will receive a notification email from the SLFT server.To retrieve your file(s):1. Open your notification email.2. Click on the link to the SLFT login page. Remember to contact the sender toget the passphrase.Note: You can also click the link provided in the email to download your filewithout going to the SLFT site.Secure Large File Transfer User Guide13
3. Type the email and password you used to create your account. Click the Sign inbutton.Figure 10You will be directed to your inbox.Figure 11Helpful Hint: You can forward the file to another recipient by clicking the“Click to Forward” a file icon.Secure Large File Transfer User Guide14
The Inbox has the following columns:ColumnDescriptionYour Received filesContains the name of the file being sent.Clicking the link or the Down arrow to the rightof the file name will start to the downloadingprocess.Date:Contains the date the file was sent to you andthe date that the file will expire and no longerbe available to download.SenderContains the email address of the personsending you the file and a system generatedstring used to keep each file name unique onthe SLFT SystemSizeIndicated the size of the file being sent.DeleteCheck the box to the file and click the red trashcan to remove the corresponding file fromSLFT. The transaction remains in your Inboxbut the file can no longer be downloaded.To download a file from your Inbox:1. Click on the file name link or the down arrow immediately to the left of the filename. (Note: for Linux, UNIX and MAC OS see Decrypting Linux SDAs, on page14.2. Click the Run button in the File Download dialog box.Secure Large File Transfer User Guide15
Figure 123. Click the Run button on the Security warning dialog box.Figure 134. Click the Browse button if you would like to modify the location where thedecrypted file will be saved. (Optional)Note: If you do not wish to run the file, save it to yourdesktop and open it at a later time.Secure Large File Transfer User Guide16
Figure 14NOTE: The desktop is default location. To make yourpassphrase visible, uncheck the “Hide Typing” checkbox.5. Enter the passphrase that was given to you by the person who sent the file.6. Click OK to decrypt the file and save it to the desired location.Decrypting Linux SDAs:StepAction1Download the file using Secure Large-File Transfer Service(SLFT).2Open up the terminal. (Go to Applications Utilities Terminal).3Change Directory to where you downloaded the file (cd /dir).4Change the permission on the file type the followingcommand (CHMOD 777 /full path/filename).5Drag the file to the terminal or type the full path and filenamehit enter.6If you drag the file into the terminal remove the single quotesfrom the path ('/path/filename'). Then hit enterSecure Large File Transfer User Guide17
7This will prompt you for a passphrase (You will need toretrieve this from the sender).8The file will be decrypted and available where ever theoriginal file was located.To delete files from your Inbox:StepAction1Click on the Inbox Tab.2Locate the file to be deleted.3Click on the red “x” in the Del column for file to be deleted.4Click OK on the “Are you sure that you want to delete thisfile?” prompt.SLFT displays a confirmation message indicating that the selected file has been deletedfrom the system. The transaction remains in your Inbox but the file can no longer bedownloaded.Note: You can use SLFT Search feature to locate files in your Inbox.Simply enter the name or partial name into the search box and clickSearch. SLFT will display all files that match the string entered.Secure Large File Transfer User Guide18
The OutboxThe Outbox is where you can see all of the files that you have sent to other SLFT users.In addition, you can delete files from your Outbox making them no longer available to therecipient to download.Like the Inbox, you can choose to view the files that you sent in the last 30, 90 or 365days, you can view downloadable files only or view all the files that you sent at once. Youcan also use the Search function to easily locate files in your Outbox.The Outbox has the following columns:ColumnDescriptionYour Received filesContains the name of the file being sent. Clickingthe link or the Down arrow to the right of the filename will start to the downloading process.Date:Contains the date the file was sent to you and thedate that the file will expire and no longer beavailable to download.SenderContains the email address of the person sendingyou the file and a system generated string used tokeep each file name unique on the SLFT SystemSizeIndicated the size of the file being sent.DeleteCheck the box to the file and click the red trash canto remove the corresponding file from SLFT. Thetransaction remains in your Inbox but the file can nolonger be downloaded.Secure Large File Transfer User Guide19
To delete a file from your Outbox:Step1234ActionClick the Outbox Tab.Locate the file to be deleted. Place a check in the box next to thefile.Click on the Delete button.Click OK on the “Are you sure that you want to delete this file?”prompt.Figure 15Secure Large File Transfer User Guide20
The Address BookThe Address book can be used to store the names and email addresses of contacts thatyou frequently send files to. You can also import your Outlook Contacts.Figure 16To add a contact to the address book:Step123ActionClick the Add Contacts button.Enter the name and email address in the Add Contact box.Click the Submit button.SLFT displays a message stating that the contact was added to the address book.To import your Outlook contacts follow the instructions below:Step12345678910111213ActionGo to your contacts in Outlook.Click File then go to Import and Export.This will open the Import and Export Wizard.Click Export to a file and next.Select Comma Separated Values (DOS or Windows).Select folder to export from (Contacts) Next.Set the filename and path of the exported file. Next.Note: do not select Map Custom Fields.Select Finish CSV is created.Go to Address Book tab in SLFT.Click Import Contacts and browse to your CSV file.Select your CSV file and click Open.Click Import and verify all contacts were imported.Secure Large File Transfer User Guide21
Sending InvitationsAll SLFT senders and receivers must be registered users of the system. As a registeredsender, you can use the INVITE tab to invite new users to the Secure Large-File Transfersystem. SLFT will send an invitation email, containing a service link and a unique 15character registration token.Note: SLFT will automatically create and send invitations by email toany unregistered recipients specified during the normal Send Fileprocess.The Invite page has the following fields:FieldDescriptionEnter the email address of the person you wish to inviteto user your SLFT system.Enter a custom message to be included with the emailinvitation.To:Message:Figure 17To Invite a New User to the SLFT system:Step12345ActionClick on the Invite Tab.This tab is only visible to internal SLFT users.Enter the email address of the person you wish to invite.Enter any custom message desired.Click the Preview buttonClick Send Invitation.Secure Large File Transfer User Guide22
SLFT Outlook Plug-inThe SLFT Outlook plug-in allows easy access to the SLFT login screen from yourOutlook toolbar.Requirements Any PC that meets the same requirements for: Microsoft Outlook 2003 Microsoft Outlook 2007 .NET Framework - http://www.microsoft.com/NET/Some Outlook 2003 clients may require the following fixes and registry changes:http://support.microsoft.com/kb/908002 extensibilityMSM lockbackRegKey office2003-kb907417sfxcab-ENUInstalling SLFT Outlook Plug-in1. Close your Outlook and save/close all applications.2. Click on the SLFT Outlook Plug-in Installer.3. Click Next on the Welcome window.Figure 18Secure Large File Transfer User Guide23
4. Click I Agree on the License window. Click Next.Figure 195. Choose where you will install the plug-in. It is recommended that you leave thedefault in place.Figure 20Secure Large File Transfer User Guide24
6. Confirm your installation.Figure 21Installation will begin.Figure 22Secure Large File Transfer User Guide25
Once the installation is complete, click Close and open Outlook.Figure 23Secure Large File Transfer User Guide26
Sending a FileSending a file is very easy. Launch SLFT by clicking on the icon.1. Complete the required fields.2. You can send to multiple recipients (separate emails with a semi-colon “;”) andattach multiple files (click Browse again).3. Click Next4. Choose the recipient OS and passphrase used to encrypt.Disable self-Notification: You will not get a copy of the notification email sent to therecipient.Send as High-Importance: Sends the notification as high importance.You will also notice the policy requirements for passphrase strength.5. Once complete click Send.Clicking on “Show details” will display more information about the transaction. This canbe very helpful when troubleshooting.6. Click Close when done.You should receive a copy of the notification email unless you chose not to receive duringthe wizard.An email should be in your Sent Items with the same data from the form you filled out.Secure Large File Transfer User Guide27
TroubleshootingRecovering or Resetting Your SLFT Account PasswordSLFT will email you a notification message with a new token, a link to the PasswordReset page and instructions for completing the password reset process.To Recover Your SLFT Account Password:1. Go to https://slft.atos-nao.net/. Click the “Password Recovery” link.Figure 242. Enter the email address you used to create your SLFT account.Figure 25Secure Large File Transfer User Guide28
2. Click on the Request Token button.SLFT will display a confirmation message indicating that a new token has been sent toyou via email.3. Click on the link provided in the email.4. Complete the Reset Password form using the new 15-character token from youremail.5. Click Set Password button.You will receive a confirmation stating that your password was successfully reset.6. Click the Return to Login button.If you have any questions or feedback, please email us at acs-dit@atos.netFor Technical Support, please contact the Help Desk at: Toll Free # 866-356-4890(Option 3) or by email at: es.helpdesk@atos.netSecure Large File Transfer User Guide29
Secure Large File Transfer User Guide 12 To Send a File using the HTTPS Protocol: 1. Click on the Send Tab. 2. Type the recipient's email address in the Email Address field. 3. Type the recipient's email address in the Cc field. Optional 4. Click the Browse button to select the file you want to send. 5. Type a subject name in the Subject .