Transcription
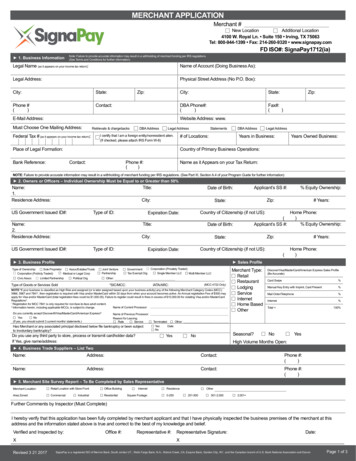
First Data TransArmor: Installation GuideVersion 1.1 – For Magento 1 – Updated 2016-12-13InstallationThe installation process differs based on where you purchased our extension.If you purchased from Magento MarketplaceStep 1: Download the SoftwareDownload the extension from the Magento Marketplace. If you need help, follow the official guide here todownload: http://docs.magento.com/marketplace/user guide/quick-tour/downloads.htmlWe strongly recommend installing, configuring, and testing all extensions on a development website beforeinstalling and using them in production.Step 2: Open Magento Connect ManagerAfter purchasing the extension from the Magento Marketplace, login to the admin panel and head to System Magento Connect Magento Connect Manager. You will be prompted to login, using the same admin levelcredentials to login to Magento Connect Manager.If you are installing the extension on a live website, check the setting to Put store on the maintenance mode.ParadoxLabs 8 N Queen St 9th Floor Lancaster, PA 17603 717-431-33301
Step 3: UploadAfter purchasing the extension, you should have received an archive file. Select Choose File and locate the archivefile you stored on your device. Once you have set the Settings and Direct package file upload settings as specifiedabove, click the Upload button.Step 4: InstallAfter clicking Upload the terminal window at the bottom of the screen will output any errors and successmessages. If the installation fails at any point, you will be given an error message and will need to fix the error(s) toattempt the install again.ParadoxLabs 8 N Queen St 9th Floor Lancaster, PA 17603 717-431-33302
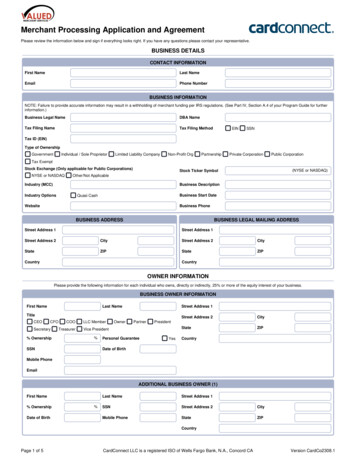
If you need assistance with installation, please contact us.Step 5: ConfigureOnce the installation is complete, return to the admin panel and continue with the configuration section below.If you purchased from store.paradoxlabs.comStep 1: Upload filesUpload all files within the upload folder into the root directory of Magento.Folder in Download/upload/app/ Folder on Server/app/Step 2: Refresh the CacheTo complete the installation process, open the Admin Panel and go to System Cache Management. Click theFlush Magento Cache button at the top-right and wait for the page to load.Step 3: ConfigureSee the configuration section below.ConfigurationEnter API InformationBefore proceeding: Sign up for a First Data merchant account if you have not done so, and request thatTransArmor be enabled for your account.Open your Admin Panel and go to System Configuration Payment Methods. If the extension was uploadedcorrectly, you will see a new section on this page titled First Data - TransArmor Tokenization. Enter your FirstData Gateway ID, API Password, and HMAC Key, and complete the rest of the configuration as desired.To find your First Data account details, log in to the First Data account manager, then go to Administration Terminals (tab) and open the appropriate terminal. You should see the following form. Your Gateway ID and APIPassword are highlighted in red; generate a new password and 'update' if you do not know it.While you are here, ensure that some value is entered into the 'Transarmor Token' field. If the Transarmor Tokenfield is blank, stored cards will not work. If the field is blank, you will need to contact First Data to enableTransarmor on your account.ParadoxLabs 8 N Queen St 9th Floor Lancaster, PA 17603 717-431-33303
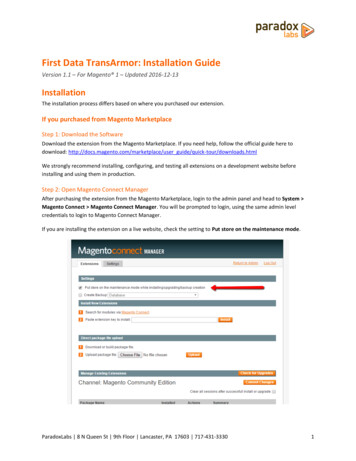
Next, open the API Access tab from the same page. Here you will see a field titled 'Hmac key'. Generate a new key(if you do not know it), update the settings, then copy that key into the Magento configuration.Once you have completed all of the payment module settings in Magento, click Save Config to save your changes.Set up CronTo use the recurring billing features of this extension, you must set up Magento's Cron scheduler in your server'scrontab or scheduler if you have not already done so. This will need to be done either through your server controlpanel or through SSH. Magento's scheduling script, cron.php, should be executed at intervals of 15 minutes or less.For instructions, see this guide: Magento Tip: Setting Up Cron (Scheduled Tasks)If you need assistance in setting this up, please contact us.Enable LoggingIf logs are enabled in Magento, this extension will record any errors if something goes wrong.To set up logging, in FTP, go into the var folder in your Magento installation, and create a folder called log if it doesnot already exist. Be sure to set the folder permissions such that Magento can write to it. Once that is done, in theAdmin Panel go to System Configuration Developer Log Settings, enable logs, and save.ParadoxLabs 8 N Queen St 9th Floor Lancaster, PA 17603 717-431-33304
ProfitYou're done! Give your new payment method a try, and let us know if you have any problems.SupportIf you have any questions not covered by this document, or something isn’t working right, please open a ticket inour support system: support.paradoxlabs.comParadoxLabs 8 N Queen St 9th Floor Lancaster, PA 17603 717-431-33305
First Data TransArmor: Installation Guide Version 1.1 - For Magento 1 . Admin Panel go to System Configuration Developer Log Settings, enable logs, and save. ParadoxLabs 8 N Queen St 9th Floor Lancaster, PA 17603 717-431-3330 5 Profit You're done! Give your new payment method a try, and let us know if you have any problems.