Transcription
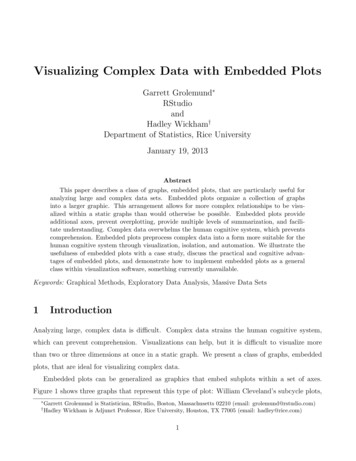
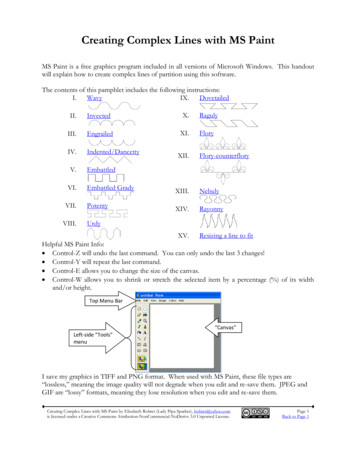
Creating Complex Lines with MS PaintMS Paint is a free graphics program included in all versions of Microsoft Windows. This handoutwill explain how to create complex lines of partition using this software.The contents of this pamphlet includes the following .VIII.XII.Flory-counterfloryEmbattledEmbattled GradyXIII.NebulyPotentyXIV.RayonnyUrdyXV. Resizing a line to fitHelpful MS Paint Info: Control-Z will undo the last command. You can only undo the last 3 changes! Control-Y will repeat the last command. Control-E allows you to change the size of the canvas. Control-W allows you to shrink or stretch the selected item by a percentage (%) of its widthand/or height.Top Menu Bar“Canvas”Left-side “Tools”menuI save my graphics in TIFF and PNG format. When used with MS Paint, these file types are“lossless,” meaning the image quality will not degrade when you edit and re-save them. JPEG andGIF are “lossy” formats, meaning they lose resolution when you edit and re-save them.Creating Complex Lines with MS Paint by Elizabeth Rohret (Lady Pipa Sparkes), lrohret@yahoo.comis licensed under a Creative Commons Attribution-NonCommercial-NoDerivs 3.0 Unported License.Page 1Back to Page 1
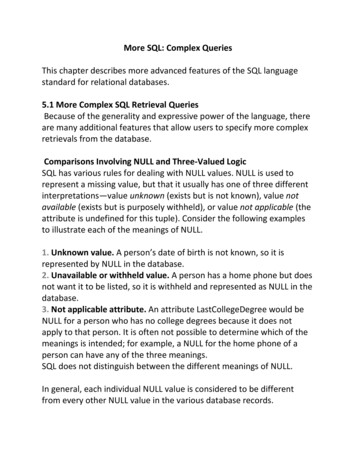
I. WAVY1. Click on the circle toolon the left menu.2. Hold the Shift key down, then click and drag across the canvas to create a perfect circle:3. Click the rectangular select toolon the left menu, and click the invisible backgroundselection at the bottom of the Tools menu4. Select a little more than the top half of the circle and hit the Delete key.5. Select the remaining lower portion of the circle and hit Control-C to copy.6. Hit Control-V to paste, then Control-R to “flip vertical”.7. Move the new portion to the right, overlapping the ends of the semi-circles, then click on anempty portion of the canvas to leave it there:Creating Complex Lines with MS Paint by Elizabeth Rohret (Lady Pipa Sparkes), lrohret@yahoo.comis licensed under a Creative Commons Attribution-NonCommercial-NoDerivs 3.0 Unported License.Page 2Back to Page 1
8. Hit Control-A to select all of the canvas and hit Control-C to copy it.9. Hit Control-V to paste the copied image. If your canvas isn’t big enough, you may need to hitControl-E to make it wider.10. Hit Control-R and flip the copy horizontally:11. Overlap the last semi-circle with the pasted image and click on an empty portion of the canvasto leave it there (the overlapping ensures that the spacing stays even):12.13.14.15.Select the entire image.Hit Control-C to copy.Hit Control-V to paste.Overlap the last semi-circle of the original image with the new pasted image and click on anempty portion of the canvas to leave it there:16. Repeat steps 9-12 until you feel like you have enough “bumps”.17. Click “File” and “Save As” to save the image with a name like “Line Wavy”.Creating Complex Lines with MS Paint by Elizabeth Rohret (Lady Pipa Sparkes), lrohret@yahoo.comis licensed under a Creative Commons Attribution-NonCommercial-NoDerivs 3.0 Unported License.Page 3Back to Page 1
II. INVECTED1. Click on the circle toolon the left menu.2. Hold the Shift key down, then click and drag across the canvas to create a perfect circle:3. Click the rectangular select toolon the left menu, and click the invisible backgroundselection at the bottom of the Tools menu4. Select the bottom half of the circle and hit the Delete key to remove it:5. Select the remaining top half of the circle and hit Control-C to copy it.6. Hit Control-V to paste the copy, overlap the ends of the semi-circles, and click elsewhere on thecanvas to leave it in place:7. Select the entire picture and hit Control-C to copy it.8. Hit Control-V to paste, overlap the ends of the semicircles, and click elsewhere on the canvas toleave it in place:9. Repeat steps 7-8 until you have enough “bumps.”10. Click “File” and “Save As” to save the image with a name like “Line Invected”.Creating Complex Lines with MS Paint by Elizabeth Rohret (Lady Pipa Sparkes), lrohret@yahoo.comis licensed under a Creative Commons Attribution-NonCommercial-NoDerivs 3.0 Unported License.Page 4Back to Page 1
III. ENGRAILED1. Follow all the steps to make an invected line and save it with a name like “Line Invected.”2. Hit Control-A to select all of the canvas.3. Hit Control-R and flip it vertically:4. Click “File” and “Save As” to save the image with a name like “Line Engrailed”.Creating Complex Lines with MS Paint by Elizabeth Rohret (Lady Pipa Sparkes), lrohret@yahoo.comis licensed under a Creative Commons Attribution-NonCommercial-NoDerivs 3.0 Unported License.Page 5Back to Page 1
IV. INDENTED/DANCETTY1. Click the straight line toolon the left-side menu.2. Hold the Shift key down and draw a 45-degree line to the distance you want:3. Click the rectangular select toolon the left menu, and click the invisible backgroundselection at the bottom of the Tools menu4. Select the entire line and hit Control-C to copy.5. Hit Control-V to paste and Control-R to flip the copy horizontally:6. Overlap just the tips of the lines and click somewhere else on the canvas to leave the copy inplace:7. Select the entire “V” shape and hit Control-C to copy it.8. Hit Control-V to paste the copy.9. Overlap the edge of the copy with the original and click elsewhere on the canvas to leave thecopy:10. Repeat steps 7-9 until you have enough bumps.11. Click “File” and “Save As” to save the image with a name like “Line Invected”.Creating Complex Lines with MS Paint by Elizabeth Rohret (Lady Pipa Sparkes), lrohret@yahoo.comis licensed under a Creative Commons Attribution-NonCommercial-NoDerivs 3.0 Unported License.Page 6Back to Page 1
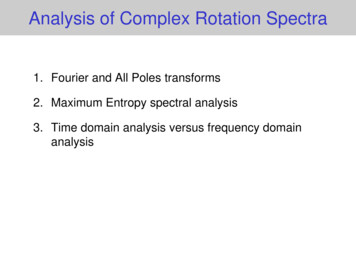
V. EMBATTLED1. Click the Rectangle toolon the left-side menu.2. Hold down the Shift key and click and drag to create a perfect square:18. Click the rectangular select toolon the left menu, and click the invisible backgroundselection at the bottom of the Tools menu3. Select the entire square and hit Control-C to copy it.4. Hit Control-V to paste the copy.5. Overlap just the vertical edges of the square and click elsewhere on the canvas to leave the copyin place:6. Repeat steps 5 and 6 until you have 7 or 9 squares (an odd number works best):7. Use the eraser toolfrom the left-side menu to remove alternating sections of the top andbottom lines (if you make any mistakes, hit Control-Z to undo them):8. Click “File” and “Save As” to save the image with a name like “Line Embattled”.Creating Complex Lines with MS Paint by Elizabeth Rohret (Lady Pipa Sparkes), lrohret@yahoo.comis licensed under a Creative Commons Attribution-NonCommercial-NoDerivs 3.0 Unported License.Page 7Back to Page 1
VI. EMBATTLED GRADY1. Click the Rectangle toolon the left-side menu.2. Hold down the Shift key and click and drag to create a perfect square:3. Click the rectangular select toolon the left menu, and click the invisible backgroundselection at the bottom of the Tools menu4. Select the square and hit Control-C to copy it.5. Hit Control-V to paste the copy, then set the copy down so it overlaps one edge of the originalsquare:6. Continue to paste copies of the square and overlap them until you have a set of squares that is 2squares high and 3 squares wide:7. Use the eraser toolto remove line segments until a “zigzag” line is left:8. Click the rectangular select toolon the left menu.9. Select the entire shape and hit Control-C to copy it.Creating Complex Lines with MS Paint by Elizabeth Rohret (Lady Pipa Sparkes), lrohret@yahoo.comis licensed under a Creative Commons Attribution-NonCommercial-NoDerivs 3.0 Unported License.Page 8Back to Page 1
10. Hit Control-V to paste the copy, then hit Control-R to flip it horizontally:11. Overlap the bottom line of the copy with the original, then click elsewhere on the canvas toleave it in place:12. Select the entire line and hit Control-C to copy it.13. Hit Control-V to paste the copy, overlap the top edges, and then click elsewhere on the canvasto leave it in place:14. Repeat until you have enough “bumps.”15. Click “File” and “Save As” to save the image with a name like “Line Embattled Grady”.Creating Complex Lines with MS Paint by Elizabeth Rohret (Lady Pipa Sparkes), lrohret@yahoo.comis licensed under a Creative Commons Attribution-NonCommercial-NoDerivs 3.0 Unported License.Page 9Back to Page 1
VII. POTENTY1. Click the Rectangle toolon the left-side menu.2. Hold down the Shift key and click and drag to create a perfect square:3. Click the rectangular select toolon the left menu, and click the invisible backgroundselection at the bottom of the Tools menu4. Select the square and hit Control-C to copy it.5. Hit Control-V to paste the copy, then set the copy down so it overlaps one edge of the originalsquare:6. Continue to paste copies of the square and overlap them until you have a set of squares that is 2squares high and 3 squares wide:7. Use the eraser toolto remove line segments until a “T” shape is left:8. Select the entire shape, then hit Control-C to copy it.Creating Complex Lines with MS Paint by Elizabeth Rohret (Lady Pipa Sparkes), lrohret@yahoo.comis licensed under a Creative Commons Attribution-NonCommercial-NoDerivs 3.0 Unported License.Page 10Back to Page 1
9. Hit Control-V to paste the copy, then Control-R to flip it vertically:10. Overlap the images, then click elsewhere on the canvas to leave the copy in place:11. Select the entire image, then hit Control-C to copy it.12. Hit Control-V to paste the copy.13. Overlap the original and click elsewhere on the canvas to leave the copy in place:14. Repeat steps 11-13 until you have enough “bumps”.15. Click “File” and “Save As” to save the image with a name like “Line Potenty”.Creating Complex Lines with MS Paint by Elizabeth Rohret (Lady Pipa Sparkes), lrohret@yahoo.comis licensed under a Creative Commons Attribution-NonCommercial-NoDerivs 3.0 Unported License.Page 11Back to Page 1
VIII. URDY1. Click the Rectangle toolon the left-side menu.2. Hold down the Shift key and click and drag to create a perfect square:3. Use the eraser toolto remove the top and bottom lines:4. Select the straight line tool5. Hold down the Shift key while you click on the top tip of the first vertical line and drag to drawa 45-degree line up and to the right (don’t worry about going too far):6. Hold down the Shift key while you click on the top tip of the second vertical line and drag todraw a 45-degree line up and to the left, overlapping the other line:7. Use the eraser toolto remove the excess lines:8. Click the rectangular select toolon the left menu, and click the invisible backgroundselection at the bottom of the Tools menu9. Hit Control-A to select all of the canvas and hit Control-C to copy it.Creating Complex Lines with MS Paint by Elizabeth Rohret (Lady Pipa Sparkes), lrohret@yahoo.comis licensed under a Creative Commons Attribution-NonCommercial-NoDerivs 3.0 Unported License.Page 12Back to Page 1
10. Hit Control-V to paste the copy, then Control-R to flip it vertically:11. Overlap the edges of the copy and the original, then click elsewhere on the canvas to leave thecopy in place:12. Hit Control-A to select all of the canvas and hit Control-C to copy it.13. Hit Control-V to paste the copy, then Control-R to flip it horizontally:14. Repeat steps 11-12 until you feel like you have enough “bumps”.15. Click “File” and “Save As” to save the image with a name like “Line Urdy”.Creating Complex Lines with MS Paint by Elizabeth Rohret (Lady Pipa Sparkes), lrohret@yahoo.comis licensed under a Creative Commons Attribution-NonCommercial-NoDerivs 3.0 Unported License.Page 13Back to Page 1
IX. DOVETAILED1. Select the straight line toolfrom the left-hand menu.2. Hold down the Shift key while you click and drag to draw a horizontal line.3. Repeat step 2 so you have 2 horizontal lines that are roughly parallel:4. Hold down the Shift key and draw a line at 45-degrees from the top line to the bottom line:5. Click the rectangular select toolon the left menu, and click the invisible backgroundselection at the bottom of the Tools menu6. Select the section of the image with the 45-degree line.7. Hit Control-C to copy the section.8. Hit Control-V to paste the section, then hit Control-R to flip it horizontally:9. Overlap the copy and the original until it looks right, then click elsewhere on the screen to leaveit in place:10. Hit Control-A to select all of the canvas and hit Control-C to copy it.Creating Complex Lines with MS Paint by Elizabeth Rohret (Lady Pipa Sparkes), lrohret@yahoo.comis licensed under a Creative Commons Attribution-NonCommercial-NoDerivs 3.0 Unported License.Page 14Back to Page 1
11. Hit Control-V to paste, then Control-R to flip the copy vertically:12. Overlap the 45-degree line on the left side of the copy with the 45-degree line on the right sideof the original (this ensures that the spacing is even). Click elsewhere on the canvas to leave thecopy in place:13. Hit Control-A to select all of the canvas and hit Control-C to copy it.14. Hit Control-V to paste the copy, overlap it with the right edge of the original, and clickelsewhere on the canvas to leave it in place:15. Use the eraser toolto remove the SHORT line segments as well as the ends from theoriginal horizontal lines:16. Click “File” and “Save As” to save the image with a name like “Line Dovetailed”.Creating Complex Lines with MS Paint by Elizabeth Rohret (Lady Pipa Sparkes), lrohret@yahoo.comis licensed under a Creative Commons Attribution-NonCommercial-NoDerivs 3.0 Unported License.Page 15Back to Page 1
X. RAGULY1. Select the straight line toolfrom the left-hand menu.2. Hold down the Shift key while you click and drag to draw a horizontal line.3. Repeat step 2 so you have 2 horizontal lines that are roughly parallel:4.5. Hold down the Shift key and draw a line at 45-degrees from the top line to the bottom line:6.7. Click the rectan
10. Hit Control-V to paste the copy, then hit Control-R to flip it horizontally: 11. Overlap the bottom line of the copy with the original, then click elsewhere on the canvas to leave it in place: 12. Select the entire line and hit Control-C to copy it. 13. Hit Control-V to paste the copy, overlap the top edges, and then click elsewhere on the canvas