Transcription
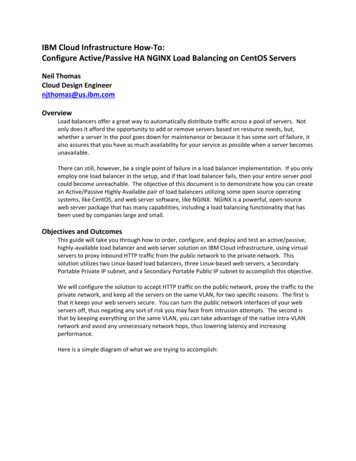
IBM Cloud Infrastructure How-To:Configure Active/Passive HA NGINX Load Balancing on CentOS ServersNeil ThomasCloud Design Engineernjthomas@us.ibm.comOverviewLoad balancers offer a great way to automatically distribute traffic across a pool of servers. Notonly does it afford the opportunity to add or remove servers based on resource needs, but,whether a server in the pool goes down for maintenance or because it has some sort of failure, italso assures that you have as much availability for your service as possible when a server becomesunavailable.There can still, however, be a single point of failure in a load balancer implementation. If you onlyemploy one load balancer in the setup, and if that load balancer fails, then your entire server poolcould become unreachable. The objective of this document is to demonstrate how you can createan Active/Passive Highly Available pair of load balancers utilizing some open source operatingsystems, like CentOS, and web server software, like NGINX. NGINX is a powerful, open-sourceweb server package that has many capabilities, including a load balancing functionality that hasbeen used by companies large and small.Objectives and OutcomesThis guide will take you through how to order, configure, and deploy and test an active/passive,highly-available load balancer and web server solution on IBM Cloud Infrastructure, using virtualservers to proxy inbound HTTP traffic from the public network to the private network. Thissolution utilizes two Linux-based load balancers, three Linux-based web servers, a SecondaryPortable Private IP subnet, and a Secondary Portable Public IP subnet to accomplish this objective.We will configure the solution to accept HTTP traffic on the public network, proxy the traffic to theprivate network, and keep all the servers on the same VLAN, for two specific reasons. The first isthat it keeps your web servers secure. You can turn the public network interfaces of your webservers off, thus negating any sort of risk you may face from intrusion attempts. The second isthat by keeping everything on the same VLAN, you can take advantage of the native intra-VLANnetwork and avoid any unnecessary network hops, thus lowering latency and increasingperformance.Here is a simple diagram of what we are trying to accomplish:
Servers and Services Needed2 x Virtual Servers with CentOS (6 or 7) Minimal InstallThese will be used to install NGINX for the load balancers.3 x Virtual Servers with CentOS (6 or 7) LAMP InstallThese will be used as the simple Web Servers./30 or /29 Portable Private SubnetFor Private Network load balancing, we will use these IP addresses to bind to Apache HTTPDservice as listeners. This way we can use the Primary Private IP addresses for managementpurposes. It also gives us the added benefit of being able to move the Portable Private IPaddresses to new servers if we have a problem with one of our web servers./29 Portable Public SubnetWe will use one of these IP addresses as the "floating" or "virtual" IP for our load balancers.*Note*: This can also be accomplished using Bare Metal Servers for the NGINX Load Balancers, inplace of virtual servers. If you need more than 1Gbps throughput (the current maximum for IBMCloud Infrastructure Virtual Server Instances (VSIs), or if you need more compute power (CPU,RAM, etc.), our Bare Metal Server offering is available with up to Dual 10Gbps Public and Privateconnections, as well as multiple CPU and RAM configuration options.Order Virtual ServersFor this example, we will be ordering the servers with minimal resources (1 x virtual core, 1GBRAM, and 25GB primary disk), as the services and configurations we will be loading are very lighton resources. In production, you will want to scale these resources to meet your needs.Once Servers are provisioned:This guide uses nano as the text editor, which is included in CentOS 6. If you're going to useCentOS 7, vi is the included text editor. If you're fine using vi, then you can skip this step
and replace all the following nano commands with equivalent vi commands, otherwise youcan run this command to install nano:sudo yum install nanoOrder IP Addresses You Will NeedAs mentioned earlier, you will want to use a Public IP address as an entry point, but proxy thatincoming traffic to the Private Network connection for each web server for security, and keepthem all on the same VLAN for reduced latency and increased performance.Public IP TypeFor the Public IP address, you will want to order a subnet of Secondary Portable Public IPaddresses. You will only need to use one of these for this basic setup, as it will be servingone NGINX load balancer until it fails, and then will be automatically failed over to thesecondary device if/when the primary device fails to communicate.Ordering Public IPs Log into the portal at https://control.softlayer.com Navigate to the Network tab, hover over IP Management, and select Subnets In the top right-hand corner, select Order IP Addresses From the drop-down list, select Portable Public Select the number of IP addresses you wish to purchase§ *NOTE: The number of IP addresses listed is the number of raw IP addresses youwill receive. This does not take into account the assignment of the Gateway,Network, and Broadcast IP addresses that will be reserved in this subnet. Also,due to the use of HSRP in almost all of our data centers, an additional two IPaddresses will be unusable. Since we are only using one of these IP addresses,we will order a /29 subnet (8 IPs), which leaves us 3 usable IP addresses. Click Continue Select the Public VLAN on which your NGINX servers reside Click Continue The next page is an IP justification, which our IP reviewers use to make sure we areefficiently using our IP addresses, as IPv4 addresses are now are a limited resource Once completed, check the "I agree " box, check the "I have read " box, and clickPlace Order Once the IP addresses are provisioned, we can move onto configuring our NGINXservers to use them, which we will cover later, in the Install and Configure KeepalivedsectionPrivate IP TypeFor the Private IP addresses, you will want to order a Secondary Portable Private IP subnet.You will want to order a subnet large enough to have one for each web server. You don'tneed to worry about the load balancers using Portable Private IP addresses, as you can'tforce NGINX to proxy load balanced traffic from a specific IP address.Ordering Private IPs Log into the portal at https://control.softlayer.com Navigate to the Network tab, hover over IP Management, and select Subnets In the top right-hand corner, select Order IP Addresses
From the drop-down list, select Portable PrivateSelect the number of IP addresses you wish to purchase§ *NOTE: Because we will be using these IP addresses for load balancingpurposes, only, we will open a ticket after the IP addresses are provisioned toconvert the subnet from a Secondary on VLAN subnet to a Routed on VLANsubnet. This allows us to do without the Gateway, Broadcast, and Networkaddresses, meaning we can use all of the IP addresses in the subnet withoutlosing any. The subnet that most closely matches your IP needs for this exampleis a /30 (4 IPs).Click ContinueSelect the Private VLAN on which your NGINX and web servers liveClick ContinueThe next page is an IP justification, which our IP reviewers use to make sure we areefficiently using our IP addresses, as they are a limited resourceOnce completed, check the "I agree " box, check the "I have read " box, and clickPlace OrderOnce the IP addresses are provisioned, we can move onto configuring our servers withthese secondary IP addresses, which will be covered in the Assigning and ConfiguringSecondary Private IP Addresses to Servers sectionAssigning and Configuring Secondary Private IPsAssign a Secondary Private IP Addresses to Each web serverBy default, IBM Cloud virtual servers have three network interfaces: 1: loThis is the loopback interface, and we will not be modifying this interface 2: eth0This is the Private Network interface, which is the one we will be adding thesecondary IP address to 3: eth1This is the Public Network interface. It is not needed, as we will be proxyingtraffic to the Private Network, and since we won't be using the public Network,at all it should be disabled in the Control Portal.o On each of your web servers, pick one of the Private IP addresses that we ordered in theprevious section of this document. On each server, run the following command:sudo nano /etc/sysconfig/network-scripts/ifcfg-eth0o This will enter the text editor so that you can add the second IP addressAt the end of the file, press enter to add a new line, and type this in:IPADDR2 [whichever IP address you have chosen for thisspecific machine]o Make sure you document which IP address will be used on which server to maketroubleshooting easier should something go wrong, and save and exit the nano editor.o Run this command to restart the network stack on the machine, which will then pick up onthe changes:sudo service network restarto Once the network stack has restarted, and you have regained access to the machine, youwill want to ping test from each server to the others to make sure that they arecommunicating properly
Install and Configure KeepalivedInstall Keepalivedo On each machine that will be an NGINX load balancer, run this command to installKeepalivedsudo yum install keepalivedConfigure Keepalivedo Once you see the notification that the install is complete, use this command to edit theKeepalived configuration file:sudo nano /etc/keepalived/keepalived.confo Your output will have many lines that you don't need. Unless you need all of the optionsoutlined in this config file, you can delete all of the contents, and use just a small portiono For the NGINX load balancer that you would like to be the primary, use this snippet. Thevalues you should change are highlighted:! Configuration File for keepalivedvrrp instance VI 1 {state MASTERinterface eth1virtual router id 51priority 101advert int 1authentication {auth type PASSauth pass 1111}virtual ipaddress {192.168.10.121}}o For the NGINX load balancer that you would like to be the secondary, use this snippet.Again, the values you should change are highlighted:! Configuration File for keepalivedvrrp instance VI 1 {state MASTERinterface eth1virtual router id 51priority 101advert int 1authentication {auth type PASSauth pass 1111}virtual ipaddress {192.168.10.121}}o The virtual ipaddress parameter should be changed to the same IP on both servers,and you should use one of the Secondary Public Portable IP addresses you ordered in aprevious step.
oooNote that you can change the auth pass value to any four-digit value you would like, aslong as the value is the same on both servers.Now you can run the command on each server to start Keepalived:sudo service keepalived startYou will also want to set the services to start automatically when the machine is poweredon:sudo chkconfig keepalived onConfiguration Changes to Bind an undefined IPNext, we will need to make a configuration change to the Linux base kernel. By default,Linux will not allow you to define an IP address that isn't currently bound to an interface,which in turn will cause the NGINX service (that we will install in the next step) to throw anerror about identifying an IP address that isn't currently mapped to an interface. To changethis, follow these steps:ooooOn each NGINX load balancer, run this command:sudo nano /etc/sysctl.confAt the end of the .conf file, add a line of code that says this:net.ipv4.ip nonlocal bind 1Save and exit the .conf fileIn order to enable this configuration after the changes have been made, run this command:sudo sysctl -pTestingo You can verify that the Portable Public IP address is being assigned to each server. On theprimary server, type this command:ip addr show eth1 If your configurations worked, you will see the Portable Public IP address listed as oneof the connections on the eth1 interface.o To verify that the IP gets automatically assigned to the secondary load balancer, shut downthe primary server, and run the same command on the secondary server:ip addr show eth1 If the configurations on the second server are correct, then the portable IP addressshould now show up for the eth1 interface on the secondary load balancero Once the primary load balancer comes back online, you can verify that the IP address isreassigned to the primary server. If your configurations work as they are supposed to, thenit should automatically reassign the IP.Install and configure NGINXInstall NGINXo Use the following command to open and edit the nginx repo filesudo nano /etc/yum.repos.d/nginx.repoo Enter the following to the file[nginx]name nginx repobaseurl http://nginx.org/packages/centos/ releasever/ basearch/gpgcheck 0enabled 1
ooooSave and exit, then use the command belowsudo yum updatesudo yum install nginxOnce the install is complete, you will need to start the nginx service using the followingcommandsudo service nginx startTest to make sure that NGINX installed correctly by opening a web browser and navigatingto the machine's public IP address. You should get a page that looks similar to this, but mayvary depending on versioning:If you don't see this page, make sure a firewall is not blocking the connection.Configure NGINXo Edit NGINX config and enable load balancing with upstreamsudo nano /etc/nginx/conf.d/load-balancer.confo In the following example, you'll need to define the following two segments: upstream andserver.upstream backend {server [web server 1 portable private ip address];server [web server 2 portable private ip address];server [web server 3 portable private ip address];}server {listen [Portable Public IP Address you chose forFloating IP]:80;location / {proxy pass http://backend;}ooo}#This tells the nginx server to accept all traffic to port 80 and pass it to the upstream. Noticethe upstream name and the proxy pass need to match.The highlighted portions will be where you define the portable IP addresses you orderedand configured earlierSave the file and exit the nano editorDisable the default server configuration you tested earlier (the "Welcome to NGINX!"message).
ooosudo mv fault.conf.disabledYou will need to restart the NGINX service again, in order for these changes to take effect:sudo service nginx restartThe "Welcome to NGINX!" message should no longer be displayed if you try to refresh thebrowser you tested in earlier, or try to navigate to the load balancer's public IP addressagain.You will also want to set the NGINX service to start automatically when the machine powerson:sudo chkconfig nginx onDefine Your Load Balancing MethodWhen configured as we have in this example, NGINX will use round-robin, if no othermethod is defined. This will balance connections to each server, in turn, based on the orderin which they appear in the load-balancer.conf file. While this example uses roundrobin, NGINX can employ other types of load balancing, such as: Least Connections§ A new request is sent to the server with the fewest current connections toclients. The relative computing capacity of each server is factored intodetermining which one has the least connections. IP Hash§ The IP address of the client is used to determine which server receives therequest.To enable the Least Connections load balancing method, add the least conn parameterto the upstream section of your load-balancer.conf file, as in the example below:upstream backend {least conn;server [web server 1 ip];server [web server 2 ip];server [web server 3 ip];}To enable IP Hash, use the ip hash parameter to the upstream section of your loadbalancer.conf file, as in the example below:upstream backend {ip hash;server [web server 1 ip];server [web server 2 ip];server [web server 3 ip];}For more detailed information on the load balancing methods for NGINX, visit this -balancing/Configure Apache on Web Servers to Listen on Specific Private IPIt's been said throughout this guide that we want load balanced traffic to proxy to the servers'private IP addresses. Now, we are going to configure the Apache web server on our CentOS web
servers to listen for HTTP traffic specifically, and only, on the Secondary Private IP addresses weassigned to each server.ooooRun this command to edit the httpd.conf file:sudo nano /etc/httpd/conf/httpd.confFind the line that defines the listen options. By default, Apache will listen for HTTPrequests on all open interfaces with the command listen 80. To set it to listen only onthe private interface, specifically the Private Portable IP address that we defined, changethat command to this:listen [web server portable ip address]:80, where you define yourPortable Private IPOnce this is done, you will need to restart the Apache HTTPD service, using this command:service httpd restartAnd, since we're here, let's set the Apache HTTPD service to start automatically when themachine powers on:chkconfig httpd onCustomize Apache Web Server Splash PageBefore we test this final configuration, we will want to make some changes to the default Apacheweb server splash page. Customizing this will allow us to identify each of the web servers as wereload the page to test the round-robin load balancing configuration we created. Follow thesesteps to create a quick, custom web page that will show up when you connect to each server:ooooOn each web server, open this file in nano:sudo nano /var/www/html/index.htmlOnce the file is open, input this line of text: For the first web server: h1 Server 1 works! /h1 For the second web server: h1 Server 2 works! /h1 For the third web server: h1 Server 3 works! /h1 Save and exit the nano editor on each serverRestart the httpd service on each web server:sudo service httpd restartTest the SolutionIt's now time to test the round-robin load balancing, and the floating IP failover solution. You willwant to have SSH sessions open for each NGINX load balancer in order to run the command toinitiate the fail over.Test the Round-Robin Load Balancing Methodo Once those SSH connections are established, open a web browser on your local computerand navigate to the public "floating" IP you assigned to your load balancers.o You should see something similar to this:
oNow refresh the page, and you should see something similar to this:oRefresh the page one more time, and you should see something similar to this:If this is what you see, then you know your primary load balancer and web server configurationsare working correctly. Every time you refresh this page, it should cycle through the different webservers in numerical order, unless one of the web servers is not responding properly.Test the HA Floating IP Fail OverTo test the high-availability fail over portion of this, we will manually initiate the process thatkeepalived should do automaticallyo On the primary NGINX load balancer, run this command to make sure it currently has thefloating IP address assigned:ip addr show eth1 This should show the server's primary public IP address, as well as the floating IPaddresso Initiate the failover by stopping the keepalived service:sudo service keepalived stop Now if you run ip addr show eth1, the floating IP should now be gone from the listo On the secondary NGINX load balancer, run the ip addr show eth1 command to makesure the floating IP was assigned properlyo Once the floating IP failover has been confirmed, refresh the web page for the floating IPthat we tested earlier a few more times, and it should cycle through the servers numerically,just as it did beforeo To fail the load balancers back over to the primary server, run this command on the primaryNGINX load balancer:sudo service keepalived starto Once again, run the ip addr show eth1 command on the primary server to make surethe IP address failed back over to the primary load balancer as it should haveo For completeness' sake, run the ip addr show eth1 command on the secondary loadbalancer, as well, to make sure the floating IP is no longer listed in the eth1 stackConclusionIf all of your testing above went as it should, then you're done building the underlyinginfrastructure for an Active/Passive HA NGINX Load Balancer solution. Once the configuration andtesting is done, you can build (or import) your website on the web servers, in lieu of the testmessage, and rest easy that your service's availability now has redundancy built in at not only theweb server level, but also at the load balancer level.Get Started with Your Own Deployment
If you'd like more details about how to get started on your own infrastructure with this guide, youcan reach our 24/7 Sales teams at the contact information listed here:http://www.softlayer.com/contact.
need to worry about the load balancers using Portable Private IP addresses, as you can't force NGINX to proxy load balanced traffic from a specific IP address. Ordering Private IPs Log into the portal at https://control.softlayer.com Navigate to the Network tab, hover over IP Management, and select Subnets