Transcription
Bard Access SystemsGroshong Central VenousCathetersLong TermInstructions For Use
Table of ContentsContentsIntroduction .Page1DescriptionPlacementSchematicsGroshong Valve FunctionIndications For Use.5Contraindications, Warnings, Cautions and Precautions .6Possible Complications . 11Groshong Central Venous CatheterPlacement Procedures . 12Section A: CutdownSection B: PercutaneousSection C: TunnelingSection D: Connector AttachmentSection E: Catheter SecurementGroshong Catheter Removal . 24References . 25Patient Information - Care and Maintenance . 26Catheter DamageSite CareClamping the CatheterFlushing the CatheterChanging the Injection Cap
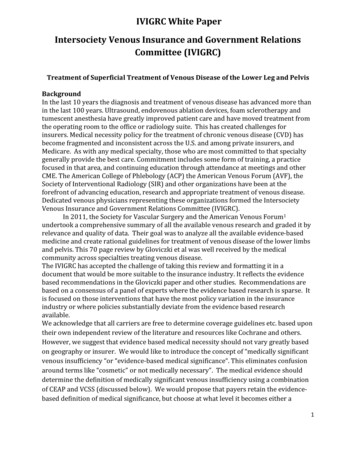
IntroductionDescriptionGroshong Catheters consist of soft, medical grade silicone tubing witha closed rounded tip. Unlike open-ended catheters, the closed end hasa patented three-position valve (or valves) which allows liquids to flow inor out, but remains closed when not in use.In addition to the Groshong Valve, Groshong Catheters have thefollowing features: Soft, Medical Grade Silicone TubingRadiopaque TipRadiopaque StripeSureCuff Tissue Ingrowth CuffWinged Connector(s)Connector Locking Sleeve(s)Depth MarkingsAttachable Suture WingsLarge Lumen(s)Multiple sizes and configurationsPlacementThe catheter is placed into one of the large central veins so the tip liesin the superior vena cava above the right atrium. It is tunnelled subcutaneously for several inches to the desired exit site. The SureCuff Tissue Ingrowth Cuff, attached to the long-term catheter, is positioned3-5 cms below the skin exit site in the tunnel. The cuff promotes tissueingrowth to secure the catheter in place.1
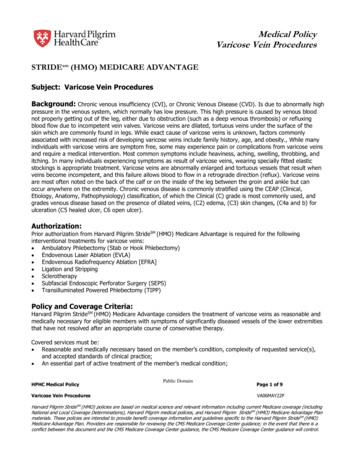
SchematicsSingle LumenWinged ConnectorPROX GROSHONG Connector Locking ong ValveSuture WingDot for propercuff placement withinsubcutaneous tunnelSureCuff TissueIngrowth Cuff2
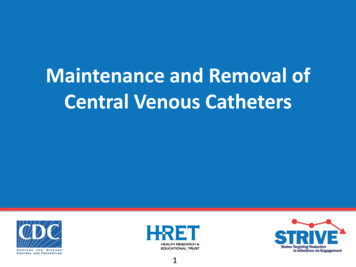
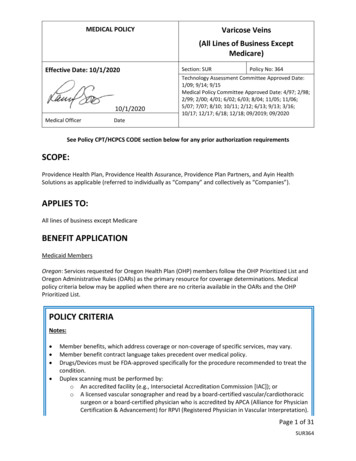
Dual LumenWinged ConnectorsPROXGROSHONG OSHONGDIST GRConnector Locking ong ValveSuture WingDot for propercuff placement withinsubcutaneous tunnelSureCuff TissueIngrowth Cuff3
Groshong Valve FunctionThe Groshong central venous catheter incorporates the patented,3-position, pressure-sensitive Groshong valve. The valve is locatednear the rounded, closed, radiopaque catheter tip and allows fluid infusion and blood aspiration. When not in use, the valve restricts bloodbackflow and air embolism by remaining closed.The Groshong valve is designed to remain closed between -7 and 80mm Hg. Since the normal central venous pressure range in the superior vena cava is 0 to 5 mm Hg, the valve remains closed at normal central venous pressure. Pressure in the superior vena cava must exceed80 mm Hg to open the valve inward. Also, negative pressure (vacuum)will cause the valve to open inward, allowing blood aspiration.When the valve is closed, air cannot enter the venous system if thecatheter is open unless the superior vena caval pressure drops below-7 mm Hg. Positive pressure into the catheter (gravity, pump, syringe)will open the valve outward, allowing fluid infusion. When pressuresreturn to between -7 and 80 mm Hg, the valve will close. The need forthe anticoagulant effect of heparin is eliminated because the closedvalve prevents blood from entering the catheter and clotting. If thecatheter is aspirated, pulling the valve inward, it must be flushedwith normal saline to clear blood from the lumen and allow thevalve to return to its normal closed position.ASPIRATIONNegative PressureINFUSIONPositive Pressure4CLOSEDNeutral Pressure
The benefits provided by the Groshong valve are:1.Increased patient safety due to reduced risk of air embolism orbleedback.2.Virtual elimination of heparin flushing to maintain catheterpatency.3.Reduced need for catheter clamping.4Reduced need for flushing when the catheter is not in use (onlyflushed every seven days with sterile normal saline when not inuse).Groshong multi-lumen catheters have Groshong valves which arerotated and staggered, allowing the concurrent infusion of incompatibledrugs. Each lumen of a multi-lumen catheter is treated separately formaintenance and irrigation purposes.Indications For UseGroshong Long-Term Catheters are designed for long-term vascularaccess and for use in patients that lack adequate peripheral venousaccess. They are available in single lumen and multi-lumen catheters.All Groshong central venous catheters are designed for the administration of I.V. fluids, blood products, drugs, and parenteral nutritionsolutions, as well as blood withdrawal.5
Contraindications, Warnings,Cautions and PrecautionsContraindicationsThe device is contraindicated whenever: The presence of device related infection, bacteremia, or septicemiais known or suspected. The patient·s body size is insufficient to accommodate the size ofthe implanted device. The patient is known or is suspected to be allergic to materials contained in the device. Severe chronic obstructive lung disease exists (percutaneous subclavian placement only.) Past irradiation of prospective insertion site. Previous episodes of venous thrombosis or vascular surgical procedures at the prospective placement site. Local tissue factors will prevent proper device stabilization and/oraccess.Warnings: Intended for Single Patient Use. DO NOT REUSE.Bard Access Systems products are single use devices and shouldnever be reimplanted. Reuse carries with it the attendant concernof cross-infection regardless of the cleaning or sterilization method.Resterilization of incompletely cleaned devices may not be effective.Any device that has been contaminated by blood should not bereused or resterilized.6
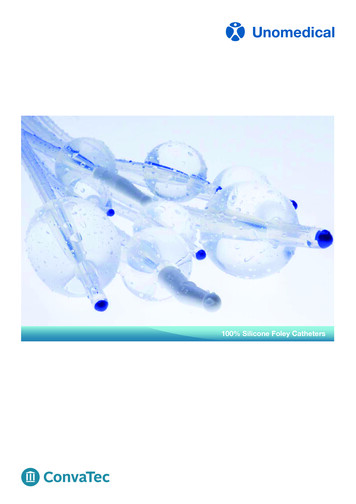
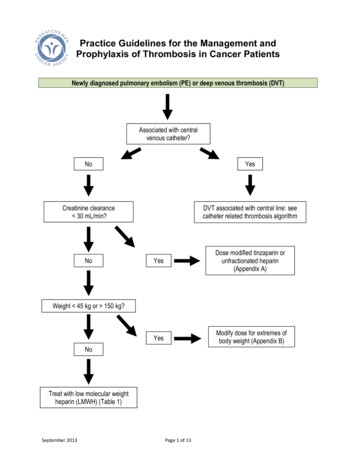
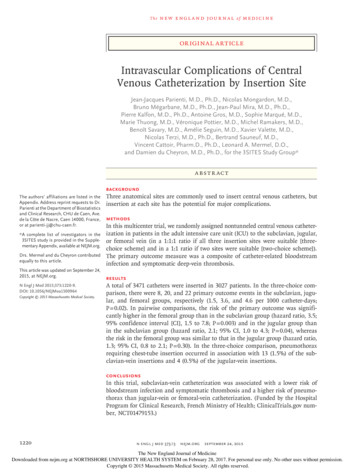
After use, this product may be a potential biohazard. Handle anddiscard in accordance with accepted medical practice and applicable local, state and federal laws and regulations. Pinch-off Prevention: Catheters placed percutaneously or througha cut-down, into the subclavian vein, should be inserted at the junction of the outer and middle thirds of the clavicle, lateral to the thoracic outlet. The catheter should not be inserted into the subclavianvein medially, because such placement can lead to compression ofthe catheter between the first rib and the clavicle, which can causedamage and even severance of the catheter. A radiographic confirmation of catheter placement should be made to ensure that thecatheter is not being pinched by the first rib and clavicle. 1,2VertebraFirst RibSubclavian VeinInternal Jugular VeinSuperior Vena CavaClavicleAxillary VeinPinch-off AreaSternumInfraclavicular FossaSigns of Pinch-offClinical: Difficulty with blood withdrawal Resistance to infusion of fluids Patient position changes required for infusion of fluids or blood withdrawal7
Radiologic: Grade 1 or 2 distortion on chest X-ray.Pinch-off should be evaluated for degree of severity prior to explantation. Patients indicating any degree of catheter distortion at theclavicle/first rib area should be followed diligently. There are gradesof pinch-off that should be recognized with appropriate chest x-rayas follows: 3,4GradeSeverityRecommended ActionGrade 0No distortionNo action.Distortion presentwithout luminalnarrowingChest x-ray should be taken every oneto three months to monitor progressionof pinch off to grade 2 distortion.Shoulder positioning during chest xrays should be noted as it can contribute to changes in distortion grades.Grade 2Distortion presentwith luminal narrowingRemoval of the catheter should beconsidered.Grade 3Catheter transection or fracturePrompt removal of the catheter.Grade 1Cautions: Carefully read and follow all instructions prior to use. Federal (U.S.A.) law restricts this device to sale by or on the order ofa physician. Only qualified healthcare practitioners should insert, manipulate andremove these devices.Precautions:Follow Universal Precautions when inserting and maintainingthe catheter.Follow all contraindications, warnings, cautions, precautions andinstructions for all infusates as specified by its manufacturer.8
Use aseptic techniques whenever the catheter lumen is opened orconnected to other devices. Povidone-iodine is the suggested antiseptic to use with this device and components. Acetone and tinctureof iodine should not be used because they could adversely affectthe performance of the catheter and connectors. 10% acetone/70%isopropyl alcohol swabsticks used for dressing changes should notadversely affect the catheter.I.Prior to beginning placement procedure, do the following: Examine package carefully before opening to confirm its integrityand that the expiration date has not passed. The device is suppliedin a double sterile package and is non-pyrogenic. Do not use ifpackage is damaged, opened or the expiration date has passed.Sterilized by ethylene oxide. Do not Resterilize. Inspect kit for inclusion of all components. Fill (prime) the device with normal saline solution to help avoid airembolism. When using an introducer kit, verify that the catheter fits easilythrough the introducer sheath.II. To avert device damage and/or patient injury duringplacement: Avoid accidental device contact with sharp instruments andmechanical damage to the catheter material. Use only smoothedged atraumatic clamps or forceps. Avoid perforating, tearing or fracturing the catheter when using aguidewire. Do not use the catheter if there is any evidence of mechanicaldamage or leaking. Avoid sharp or acute angles during implantation which could compromise the patency of the catheter lumen(s). Use suture wings to secure catheters. Do not place sutures directly around the catheter.9
When using percutaneous introducers:-Carefully insert the introducer and catheter to avoid inadvertentpenetration to vital structures in the thorax.-To avoid blood vessel damage, do not allow the percutaneousintroducer sheath to remain indwelling in the blood vesselwithout the internal support of a catheter or dilator.-Simultaneously advance the sheath and dilator with rotationalmotion to help prevent sheath damage.III. After insertion, observe the following precautions toavoid device damage and/or patient injury: Do not use the catheter if there is any evidence of mechanicaldamage or leaking. Damage to the catheter may lead to rupture, fragmentation and possible embolism and surgical removal. Accessories and components used in conjunction with this deviceshould incorporate Luer lock connections. If signs of extravasation exist, discontinue injections. Beginappropriate medical intervention immediately. Infusion pressure greater than 25 psi (172 kPa) may damage bloodvessels and viscus and is not recommended. DO NOT USE ASYRINGE SMALLER THAN 10 ml!10
Possible ComplicationsThe use of an indwelling central venous catheter provides an importantmeans of venous access for critically ill patients; however, the potentialexists for serious complications including the following: Air EmbolismBleedingBrachial Plexus InjuryCardiac ArrhythmiaCardiac TamponadeCatheter or Cuff ErosionThrough SkinCatheter EmbolismCatheter or Cuff OcclusionCatheter Occlusion, Damageor Breakage due toCompression Between theClavicle and First RibCatheter-related SepsisEndocarditisExit Site InfectionExit Site NecrosisExtravasationFibrin Sheath FormationHematomaHemothorax Hydrothorax Intolerance Reaction toImplanted Device Laceration of Vessels or Viscus Perforation of Vessels or Viscus Pneumothorax Spontaneous Catheter TipMalposition or Retraction Thoracic Duct Injury Thromboembolism Venous Thrombosis Ventricular Thrombosis Vessel Erosion Risks Normally Associated withLocal and General Anesthesia,Surgery, and Post-OperativeRecoveryThese and other complications are well documented in medical literature and should be carefully considered before placing the catheter.11
Groshong Central VenousCatheter Placement ProceduresBefore beginning procedure, read the “Contraindications,Warnings, Cautions and Precautions” and “PossibleComplications” sections of this manual.Section A: Cutdown1.Create sterile field and open tray.2.Prep cutdown area, tunnel and tunnel exit areas.3.Perform local anesthetic infiltration in cutdown area and alongpathway chosen for the subcutaneous catheter tunnel.4.Irrigate the catheter with sterile normal saline via the flushinghub:Single-Lumen Catheters have catheter-stylet attached to theflushing hub.Multi-Lumen Catheters have a flushing hub and no stylet.5.Place patient in the Trendelenburg position with head turnedaway from the intended venipuncture site.6.Surgically isolate the desired vessel through a small skin incision.7.Insert the catheter assembly and advance to desired position invessel by using the graduations on the catheter which are in 2.5cm (3.5 Fr catheter) or 5 cm (all other catheters) intervals fromthe distal tip.Refer to the “Warnings” section concerning Catheter Pinch-off.12
8.9.Verify catheter tip location radiographically. The preferred location of the catheter tip is at thejunction of the superior vena cavaand the right atrium. Caution:Avoid positioning the cathetertip in the right atrium.SuperiorVena CavaCatheter TipPlacementMeasure catheter against chestwall of patient to determinedesired location of SureCuff tissue ingrowth cuff and exit site.Mark locations.AtriumVentricleFor Tunneling Instructions refer to Section C.Section B: Percutaneous1.Create sterile field and open tray.2.Prep venipuncture, tunnel and exit site areas. Position drape.3.Perform local anesthetic infiltration in venipuncture, tunnel andtunnel exit areas.4.Irrigate the catheter with sterile normal saline via the flushinghub:Single-Lumen Catheters have catheter-stylet integrated in theflushing hub.Multi-Lumen Catheters have a flushing hub and no stylet.5.Place patient in the Trendelenburg position with head turnedaway from the intended venipuncture site.13
6.Locate desired vessel using a small needle attached to a syringe.Note: The subclavian vein is entered percutaneously at the pointthat identifies the junction of the outer and middle thirds of theclavicle using the needle and syringe.910876543Refer to the “Warnings” section concerning Catheter Pinch-off.Attach the introducer needle to syringe and insert into vesselalongside the small needle. Remove small needle.8.Aspirate gently as the insertion is made.Warning: If the artery is entered, withdraw the needle andapply manual pressure for several minutes. If the pleuralspace is entered, withdraw the needle and evaluate patientfor possible pneumothorax.9.When the subclavian vein has been entered, remove the syringeleaving the needle in place. Place a finger over the hub of theneedle to minimize blood loss and the risk of air aspiration.The risk of air aspiration is reduced by performing this partof the procedure with the patient performing the Valsalvamaneuver.9107.87654314
10.Straighten “J ” tip of guidewire with tip straightener and inserttapered end of tip straightener into the needle. Tip straightenershould not be advanced over the guidewire beyond the guidewiretip. Caution: Do not insert guidewire beyond the bevel ofthe needle while removing straightener from the needle, inorder to prevent guidewire shearing. Remove the tip straightener and advance the guidewire into the superior vena cava.Advance the guidewire as far as appropriate for the procedure.Verify correct positioning radiographically.11.Gently withdraw and remove needle.Caution: If the guidewire must be withdrawn while the needle is inserted, remove both the needle and guidewire as aunit to help prevent the needle from damaging or shearingthe guidewire.12.Make a small (approx. 1 cm wide) incision parallel to the clavicle,positioning the guidewire at the center of the incision to permitproper entry of vessel dilator and sheath introducer.(For Peel-Apart Introducer instructions proceed to step 20)15
Intro-Eze Introducer Instruction:13.Advance the vessel dilator and sheath introducer as a unit overthe exposed guidewire using a rotational motion. Advance it intothe subclavian vein as a unit, leaving at least 2 cms of sheathexposed. Warning: Avoid vessel perforation.14.Withdraw the vessel dilator and “J ” guidewire, leaving the sheathin place. Warning: Hold thumb over exposed orifice ofsheath to prevent air aspiration. The risk of air aspiration isreduced by performing this part of the procedure with thepatient performing the Valsalva maneuver.15.Advance the catheter through the sheath and into the vein.16
16.Verify catheter tip location radiographically.Warning: Avoid positioning the catheter tip in the right atrium. The preferred location of the catheter tip is at the junction of the superior vena cava and the right atrium.17.Pull the storage tube from the slitter. Place the channeled portion of the slitter onto the catheter near the proximal end of theintroducer sheath.18.Grasp the proximal end of the slitter between the thumb andindex finger of one hand. With the tips of the fingers, reacharound the slitter and secure the catheter into the channeled portion.19.Withdraw the sheath over the catheter, sliding the proximal opening of the sheath over the nose of the channel and into the blade.Continue to withdraw the sheath, pulling it away from the catheteruntil it is completely slit, remove and discard the slit sheath andslitter.Proceed to section C.17
Peel-Apart Sheath Introducer Instructions:20.Advance the vessel dilator and sheath introducer as a unit overthe exposed guidewire using a rotational motion. Advance it intothe subclavian vein as a unit, leaving at least 2 cms of sheathexposed. Warning: Avoid vessel perforation.21.Gently withdraw the vessel dilator and “J” guidewire, leaving thesheath in place.22.Warning: Hold thumb over exposed orifice of sheath toprevent air aspiration. The risk of air aspiration is reducedby performing this part of the procedure with the patient performing the Valsalva maneuver.18
23.Insert catheter-stylet assembly into lumen of sheath and advanceto desired position in vessel by using the graduations on thecatheter which are in 2.5 cm (3.5 Fr catheter) or 5 cm (all othercatheters) intervals from the distal tip.24.Verify catheter tip location radiographically.Warning: Avoid positioning the catheter tip in the right atrium. The preferred location of the catheter tip is at the junction of the superior vena cava and the right atrium.25.Grasp the two handles of the peel-apart sheath and pull outwardand upward at the same time.26.Peel the sheath away from the catheter completely. Make surethe catheter is not dislodged from vessel as sheath is removed.27.Use the depth markings on the catheter to ensure proper insertion depth.19
Section C: Tunneling(For multi-lumen catheter proceed to step 31)Inserting a Single Lumen Catheter:28.Slide flushing hub out of catheter. Gently withdraw stylet whilefirmly holding catheter. Do not permit catheter to be withdrawnfrom vessel while removing the stylet.WARNING: Do not leave stylet in catheter.29.30.Create subcutaneous tunnel to exit site using tunneler.a.Continue pushing sharppoint of tunneler throughskin to create exit site.b.Attach catheter to tunnelerextension.c.Secure catheter to tunnelerwith suture.d.Pull tunneler with securedcatheter out of exit site.Initial resistance may bemet as SureCuff TissueIngrowth Cuff first enters the tunnel. Gently holding thecatheter distal to the cuff while pulling the tunneler andcatheter through subcutaneous tunnel should result insmooth passage of the cuff through the subcutaneous tunnel. Caution: The catheter must not be forced.e.Avoid subcutaneous kinking of catheter between the venipuncture site and tunnel curvature point.Cut catheter from tunneler extension and trim external segmentof catheter to desired length using 90 cut.Proceed to section D.20
Inserting a Multi-Lumen Catheter:31.The multi-lumen catheter has no stylet that needs to be removed.32.Create subcutaneous tunnelto exit site using tunneler.33.a.Continue pushingsharp point of tunnelerthrough skin to createexit site.b.Cut flushing hubassembly from proximalend of catheter.c.Attach catheter to tunneler extension.d.Secure catheter to tunneler with suture.e.Pull tunneler with secured catheter out of exit site. Initialresistance may be met as SureCuff Tissue Ingrowth Cufffirst enters the tunnel. Gently holding the catheter distalto the cuff while pulling the tunneler and catheter throughsubcutaneous tunnel should result in smooth passage ofthe cuff through the subcutaneous tunnel. Caution: Thecatheter must not be forced.f.Avoid subcutaneous kinking of catheter between the venipuncture site and tunnel curvature point.Cut the extension tubes at the “Y” connection adjacent to the tunneler to allow separation of the catheter lumens.Section D: Connector Attachment34.Secure connector(s) to catheter per the following instructions:a.During Catheter Placement: Cut catheter at a 90 angleand trim external segment of catheter to desired length. Formulti-lumen catheters, match the connector hub color to thecolor of the respective tubing stripes. Proceed to b.21
When replacing connector. Using aseptic technique, cutthe catheter off at a 90 angle, 0.5 in. (12.7 mm) distal tothe location of the previous connector. This will remove anydamaged catheter material. Proceed to b.bTransfer clear connector locking sleeve (X) from connectoronto catheter.Xc.Firmly push catheter onto connector to position (Y).Yd.Slide clear connector locking sleeve over catheter toPosition (Y).Ye.35.Remove and discard stylet.Draw blood through catheter to insure patency after placement iscomplete, but before suturing the venipuncture site. If catheter isnot patent, adjust catheter at curvature point to relieve possiblerestriction. Flush catheter with 10ml sterile saline solution toclear catheter of blood and create a saline lock.Multi-Lumen — Draw blood through red lumen to insure patencyand irrigate all lumens with 10ml of sterile saline.36.Attach injection cap(s) or connect to intravenous fluid source.22
Section E: Catheter Securement37.Suture venipuncture site as necessary, taking care not to damage the catheter.38.Suture catheter at exit site using the provided movablesuture wing. Remove suture wing from card. Pinch the movable suture wings together to open the split underside of the wingbody. Place the wing body onto the catheter at the exit site andrelease. Secure wing in place with suture through holes in wing(avoid nicking catheter with suture needle) or sterile skin closure tape.39.Secure catheter at exit site with a sterile dressing. The externalsegment of the catheter should be coiled and taped. Many institutions have recommended the use of an extension set. Avoidtension on the external segment to prevent dislodging thecatheter.23
Groshong Catheter RemovalAfter tissue grows into the SureCuff Tissue Ingrowth Cuff (2 to 3weeks), catheters can be removed from the subcutaneous tunnel usingone of several methods. The method used will depend upon physicianpreference and the amount of tissue/cuff ingrowth that is present. Thecatheter can usually be removed by traction on the external segment(see #1 below) if it is not sutured internally at the cuff or vessel insertionsite. Surgical removal (see #2 below) may be necessary to preventbreaking the catheter if the catheter does not dislodge easily with traction or if there is no definite suture site information.Warning: You should not feel any resistance when withdrawingthe catheter from the vein. If you do encounter resistance, thismay indicate that the catheter is being pinched between the clavicle and first rib (the “pinch-off” sign). Do not continue pullingagainst resistance as this may cause catheter breakage and embolism. Free up the resistance (e.g. by repositioning the patient)before proceeding further.1.Traction RemovalPull the catheter external segment downward in a straight lineaway from the exit site with a series of gentle tugs. When separation of the cuff from the surrounding tissue and/or catheteroccurs, there will be a “break-away” feeling. Continue to pullgently on the catheter to complete the removal. Apply pressureto the catheter/vein insertion site as needed to control bleeding.If the cuff remains in the subcutaneous tissue, dissect it outthrough a small incision utilizing local anesthesia.2.Surgical Removal (using aseptic technique)a)Locate the position of the cuff either by palpation or byobserving the position of “dimpling” when traction isapplied to the catheter·s external segment.b)Make a short transverse incision at or below the externalside of the cuff taking care not to transect the catheter.Reach under the catheter with a curved, smooth-jawedclamp and pull up on the catheter to remove the cathetertip from the vein. Caution: Do not grasp the catheterwith any instrument that might sever or damage thecatheter.24
c)Dissect out the cuff. Transect the catheter on the exteriorside of the cuff and remove the interior portion of the catheter and cuff through the incision.Caution: Do not cut the catheter before removal fromvein to avoid catheter embolism.d)Remove the exterior segment of the catheter by pulling itfrom the skin exit site.e)Apply pressure to the catheter/vein insertion site as needed to control bleeding.f)Close the incision with a suture as needed. Apply antibiotic ointment to incision and skin exit sites and an occlusivedressing to prevent air embolism through the tract.References1. Aitken, D.R. and Minton, J.P. “The Pinch-Off Sign:A Subclavian Catheters”, American Journal of Surgery, Vol. 148,Nov. 1984, pp. 633-636.2. Rubenstein, R.B., Alberty, R.E., et al. “Hickman CatheterSeparation”, JPEN, Vol. 9, No. 6, Nov./Dec. 1985, pp. 754-757.3. Hinke, D.H.; Zandt-Stastny, D.A.; Goodman, L.R.; et al. Pinch-offsyndrome: A complication of implantable subclavian venous accessdevices. Radiology 177: 353-356, 1990.4. Ingle, Rebecca,; Nace, Corinne, Venous Access Devices: CatheterPinch-off and Fracture, 1993, Bard Access Systems25
Patient Information Catheter Care and MaintenanceCatheter DamageIf the catheter or connection is damaged or dislodged during orafter surgery, immediately clamp the catheter with an atraumaticcatheter clamp or kink and tape it. The catheter should be repairedas soon as possible using the designated Groshong repair kit forthat particular catheter size. Damage close to the catheter hub can berepaired using the appropriate Groshong replacement connector.Site CareSupplies you will need: Sterile gloves (if required)3 Alcohol swabsticksHydrogen peroxide3 Povidone iodine swabsticksPovidone iodine ointment packet1 Alcohol wipeSterile 2 in. x 2 in. (5 cm x 5 cm) gauze dressing1 Sterile pre-cut 2 in. x 2 in. (5 cm x 5 cm) gauze dressingSterile cotton tipped applicators1 Sterile cover dressing (transparent or tape)Tape1.Clean the work surface by wiping with a paper towel that hasbeen moistened with alcohol. Wipe dry or allow to air dry. Thenplace supplies on the cleaned surface.2.Wash your hands thoroughly using warm soapy water.Rinse completely and dry using a clean towel or fresh paper towels.3.Carefully open the dressing kit, or unwrap supplies, withouttouching the inside surfaces of the kits or wrappers.26
4.Carefully remove the old dressing, starting from the top of thedressing and working downward. Remove the tape or dressingcarefully to avoid irritating your skin or pulling on the catheter.Caution: Do not use scissors or any sharp-edgedinstruments as they could damage the catheter.5.Wash your hands again.6.Do a careful observation of the exit site and the skin around it. Ifyou notice anything unusual, finish the dressing procedure andthen call your doctor.7.If you are instructed to use gloves, put on the pair of sterilegloves following the procedure you were taught.Be careful to not touch anything except the supplies beingused for site care.8.Carefully clean the catheterexit site with an alcoholswabstick or sterile cottontipped applicator, soaked inhydrogen peroxide, startingat the exit site and spiralingoutward until a circle, at least8 cm. in diameter, has beencleaned. Do not return tothe catheter exit site with aswabstick that has touchedany skin away from the exitsite.9.Repeat this step using the other two swabsticks. Look at thecolor of the swabsticks for signs of drainage.10.Repeat step 8 using three of the povidone iodine swabsticks toclean the same skin area again as well as the part of the catheterthat will be lying on the cleaned skin.11.Gently clean the outside of the catheter with the inside surfaceof an alcohol wipe, starting from the exit site to the catheterconnector sleeve. You may hold the catheter at the exit site withanother alcohol wipe to prevent pulling on the catheter. DO NOTPULL ON THE CATHETER.27
eHerpmCla12.Allow the povidone iodine on the skin and catheter to air dry atleast two minutes.13.Apply a small amountof povidone iodine ointment tothe exit site (optional).14.Place the pre-cut gauze dressingover the ointment at the exit sitefitting it snugly around the catheter. Place the 2 in. x 2 in. (5 cmx 5 cm)gauze over the pre-cutgauze and catheter.15.Apply the cover dressing (tape or transparent dressing) followingthe directions in the package as well as instructions from yourdoctor or nurse.16.Coil the catheter, check to see that it is not kinked or pinched,and secure it to the chest or dressing with tape. This will preventpulling of the catheter at the exit site and decrease irritation.17.Always secure the cat
the catheter between the first rib and the clavicle, which can cause damage and even severance of the catheter. A radiographic con-firmation of catheter placement should be made to ensure that the catheter is not being pinched by the first rib and clavicle. 1,2 First Rib Subclavian Vein Clavicle Vertebra Internal Jugular Vein Superior Vena Cava .