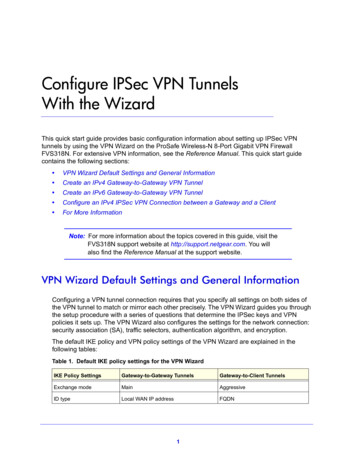
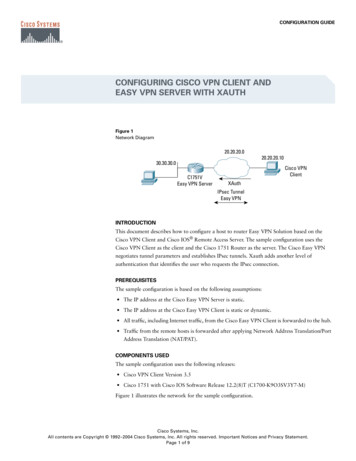
Transcription
Pocket GuideEstablish Site-to-Site VPN Connection usingPreshared KeyFor Customers with Sophos FirewallDocument Date: November 2016November, 2016Page 1 of 13
Establish Site-to-Site VPN Connection using Preshared KeyContentsOverview . 3Scenario . 3Site A Configuration. 4Step 1: Create IPsec Connection .4Step 2: Activate Connection .7Site B Configuration. 7Step 1: Create IPsec Connection .8Step 2: Activate and Establish Connection . 10November, 2016Page 2 of 13
Establish Site-to-Site VPN Connection using Preshared KeyOverviewIPsec is an end-to-end security technology operating in the Internet Layer of the Internet Protocol Suite.It is used in protecting data transfer between a pair of hosts (host-to-host), between a pair of securitygateways (network-to-network), or between a security gateway and a host (network-to-host).The IPsec VPN feature in Sophos Firewall (SF) offers site-to-site VPN with cost-effective site-to-site remoteconnectivity, eliminating the need for expensive private remote access technologies like leased lines,Asynchronous Transfer Mode (ATM) and Frame Relay. This article describes a detailed configurationexample that demonstrates how to set up a site-to-site IPsec VPN connection between the two networksusing preshared key to authenticate VPN peers.ScenarioConfigure a site-to-site IPsec VPN connection between Site A and Site B by following the steps givenbelow. In this article, we have used the following parameters to create the VPN connection.Site A (Local) Network Details:WAN IP Address - 14.15.16.17LAN - 10.5.6.0/24Site B (Remote) Network Details:WAN IP Address - 22.23.24.25LAN - 172.23.9.0/24November, 2016Page 3 of 13
Establish Site-to-Site IPsec Connection using Preshared KeySite A ConfigurationYou must be logged on to the Admin Console using Device Access Profile which has read/writeadministrative rights over relevant features.Step 1: Create IPsec ConnectionGo to Configure VPN and click Add under IPsec Connections. Create a Connection as per SiteA to SiteBSpecify a unique name to identify IPsec Connection.Connection TypeSitetoSiteSelect SitetoSite.PolicyDefaultHeadOfficeGeneral SettingsSelect policy to be used for connection.Policy can also be added by clicking “Create New” link.Select the Action to be taken on the connection when VPN services orDevice restarts.Available OptionsAction on VPNRestartRespond Only-Respond Only: Keeps connection ready to respond to any incomingrequest.Initiate: Activates connection on system/service start so that theconnection can be established whenever required.Disable: Keeps connection disabled till the user activates.Authentication DetailsAuthenticationTypePreshared KeySelect Authentication Type. Authentication of user depends on the type ofconnection.Preshared Key Key Enter the Preshared Key. The same is to be used in the Site B SF Device.PortB-14.15.16.17Select Local WAN port from the list.IP Aliases created for WAN interfaces will be listed along with the defaultWAN interfaces.Endpoint DetailsLocalSpecify an IP Address or domain name of the remote peer.Remote22.23.24.25Click Add iconagainst the option “Remote” to add new endpoint pairsor click Remove iconto remove the endpoint pairs.Network DetailsNovember 16Page 4 of 13
Establish Site-to-Site IPsec Connection using Preshared KeyIP FamilyIPv4Select IP family to configure IPsec VPN tunnels with mixed IP families.Available Options:IPv4IPv6By default, IPv4 will be selected.Four types of IPsec VPN tunnels can be created:4 in 4 (IPv4 subnets with IPv4 gateway)6 in 6 (IPv6 subnets with IPv6 gateway)4 in 6 (IPv4 subnets with IPv6 gateway)6 in 4 (IPv6 subnets with IPv4 gateway)Local Subnet10.5.6.0/24Select Local LAN Address of Site A.Add and Remove LAN Address using Add Button and Remove Button.172.23.9.0/24Select IP Addresses and netmask of remote network in Site B which isallowed to connect to the Device server through VPN tunnel. Multiplesubnets can be specified. Select IP Hosts from the list of IP Hosts available.You can also add a new IP Host and include in the list.Remote LANNetworkNovember 16Page 5 of 13
Establish Site-to-Site IPsec Connection using Preshared KeyNovember 16Page 6 of 13
Establish Site-to-Site IPsec Connection using Preshared KeyClick Save to create IPSec connection.Step 2: Activate ConnectionOn clicking Save, the following screen is displayed showing the connection created above.Clickunder Status (Active) and Status (Connection) to activate the connection.Site B ConfigurationAll configurations are to be done from Admin Console of Site B's SF Device using Device Access Profilehaving read/write administrative rights over relevant features.November 16Page 7 of 13
Establish Site-to-Site IPsec Connection using Preshared KeyStep 1: Create IPsec ConnectionGo to Configure VPN and click Add under IPsec Connections. Create a Connection as per SiteB to SiteASpecify a unique name to identify IPsec Connection.Connection TypeSitetoSiteSelect SitetoSite.PolicyDefaultBranchOfficeGeneral SettingsSelect policy to be used for connection.Policy can also be added by clicking “Create New” link.Select the Action to be taken on the connection when VPN services orDevice restarts.Available OptionsAction on VPNRestartInitiate-Respond Only: Keeps connection ready to respond to any incomingrequest.Initiate: Activates connection on system/service start so that theconnection can be established whenever required.Disable: Keeps connection disabled till the user activates.Authentication DetailsAuthentication TypePreshared KeySelect Authentication Type. Authentication of user depends on the type ofconnection.Preshared Key Key Enter the Preshared Key. The same is to be used in the Site B SF Device.Endpoint ct Local WAN port from the list.IP Aliases created for WAN interfaces will be listed along with the defaultWAN interfaces.Specify an IP Address or domain name of the remote peer.Click Add iconclick Remove iconagainst the option “Remote” to add new endpoint pairs orto remove the endpoint pairs.Network DetailsIP FamilyNovember 16IPv4Select IP family to configure IPsec VPN tunnels with mixed IP families.Available Options:IPv4IPv6By default, IPv4 will be selected.Four types of IPsec VPN tunnels can be created:4 in 4 (IPv4 subnets with IPv4 gateway)6 in 6 (IPv6 subnets with IPv6 gateway)4 in 6 (IPv4 subnets with IPv6 gateway)6 in 4 (IPv6 subnets with IPv4 gateway)Page 8 of 13
Establish Site-to-Site IPsec Connection using Preshared KeyParametersValueDescriptionLocal Subnet172.23.9.0/24Select Local LAN Address of Site B.Add and Remove LAN Address using Add Button and Remove Button.10.5.6.0/24Select IP Addresses and netmask of remote network in Site A which isallowed to connect to the Device server through VPN tunnel. Multiplesubnets can be specified. Select IP Hosts from the list of IP Hosts available.You can also add a new IP Host and include in the list.Remote LANNetworkNovember 16Page 9 of 13
Establish Site-to-Site IPsec Connection using Preshared KeyClick Save to create IPSec connection.Step 2: Activate and Establish ConnectionOn clicking Save, the following screen is displayed showing the connection created in Step 1.November 16Page 10 of 13
Establish Site-to-Site IPsec Connection using Preshared KeyClickunder Status (Active) and Status (Connection) to activate the connection.The above configuration establishes an IPSec connection between the two sites.November 16Page 11 of 13
Establish Site-to-Site IPsec Connection using Preshared KeyNote:Make sure that Network Policies that allow LAN to VPN and VPN to LAN traffic are configured. NetworkPolicies can be created from Protect Firewall page.In a Head Office and Branch Office setup, usually the Branch Office acts as the tunnel initiator and HeadOffice acts as a responder due to following reasons: Since Branch Office or other Remote Sites have dynamic IPs, Head Office is not able to initiate theconnection. As there can be many Branch Offices, to reduce the load on Head Office, it is a good practice thatBranch Offices retries the connection instead of the Head Office retrying all the branch officeconnections.November 16Page 12 of 13
Establish Site-to-Site IPsec Connection using Preshared KeyCopyright NoticeCopyright 2015-2016 Sophos Limited. All rights reserved.Sophos is a registered trademark of Sophos Limited and Sophos Group. All other product and companynames mentioned are trademarks or registered trademarks of their respective owners.No part of this publication may be reproduced, stored in a retrieval system, or transmitted, in any formor by any means, electronic, mechanical, photocopying, recording or otherwise unless you are either avalid licensee where the documentation can be reproduced in accordance with the license terms or youotherwise have the prior permission in writing of the copyright owner.November 16Page 13 of 13
example that demonstrates how to set up a site-to-site IPsec VPN connection between the two networks using preshared key to authenticate VPN peers. Scenario Configure a site-to-site IPsec VPN connection between Site A and Site B by following the steps given below. In this article, we have used the following parameters to create the VPN connection.