Transcription
(USA) Managing PeopleSoft SEVIS SolutionVisa Processing for J and F/M VisasUnderstanding SEVIS Visa ProcessingBundle 42. Various updates in release 6.27 SEVIS batch processing.Student and Exchange Visitor Information System (SEVIS) is an internet-based system that electronicallymonitors and reports on international students and exchange visitors and their dependents. The U.S.Department of Homeland Security (DHS) maintains SEVIS. It is an integral part of the DHS program toimprove data collection and reporting, facilitate compliance with regulations, and automate monitoringof school and exchange programs. The PeopleSoft SEVIS Solution collects data, monitors changes, andreports student and exchange visitor changes.The PeopleSoft system extracts information and sends it to SEVIS to be reported to the DHS. You canaudit the information after it is extracted. Once you are satisfied that it is correct, you can produce anXML file for transmission to SEVIS. The system verifies that the transmission was received, and itreports any errors. When you send changes to DHS, you receive an XML file from SEVIS that you useto import the results of the processing. You also receive PDF files containing any new I-20 or DS-2019forms that are requested.Understanding the Business Process Flow for Visa ProcessingIn this business process flow, it is assumed that you have completed the SEVIS setup in the PeopleSoftCampus Solutions system. This section discusses the PeopleSoft Campus Solutions-to-SEVIS batchinterface functionality business process for student (F/M) visas and for exchange visitor (J) visas.Copyright 2016, Oracle and/or its affiliates. All rights reserved.1
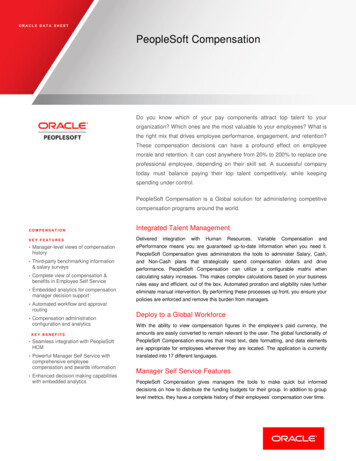
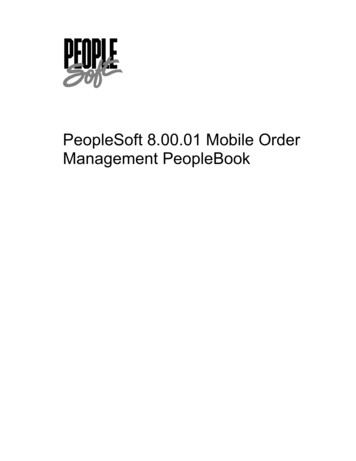
(USA) Managing PeopleSoft SEVIS Solution Visa Processing for J and F/M VisasChapterThis flowchart illustrates the SEVIS visa processing business process. It shows the flow of the SEVISalerts through to the XML log and SEVIS processor to the PeopleSoft database and printed I-20 orDS-2019 form.Image: PeopleSoft business process flow for SEVIS visa processingPeopleSoft business process flow for SEVIS visa processingIdentify New and Changed Data to Submit to SEVISFollow these steps for identifying new and changed data to submit to SEVIS.1. Run the SEVIS Alerts process.Run the appropriate SEVIS Alerts process (Process SEVIS Alerts - F/M or Process SEVIS Alerts - J).The process identifies information that should be submitted to SEVIS regarding new students (F/Mvisas) or exchange visitors (J visas) and data changes for existing students or exchange visitors. Theprocess also verifies SEVIS business rules, required fields, and certain eligibility edits.2. Use pages in the appropriate SEVIS Alerts component to evaluate the results of the SEVIS Alertsprocess.2Copyright 2016, Oracle and/or its affiliates. All rights reserved.
Chapter(USA) Managing PeopleSoft SEVIS Solution Visa Processing for J and F/M VisasUse the Select Alerts to Report - F/M component to evaluate results for all applicable school codes,and use the Select Alerts to Report - J component to evaluate results for all applicable programsponsors.a. Review all information with errors and take appropriate follow-up action.Errors indicate transactional data that is missing or that needs to be changed before submission toSEVIS. You can update the SEVIS Master component if errors exist.b. Review all information requiring additional data.Certain SEVIS events require you to enter additional data.c. Review all data set to send to SEVIS on the Alerts Header page.The SEVIS Alerts process sets the Send to field to SEVIS based on the default value that is set onthe SEVIS Event Types page, and includes the event in the XML file to send to SEVIS. If you donot want to include it in the XML file, change the Send to field to either Master or None.d. Select either Master or None for each remaining event.Select Master (Master Sync) to directly update the SEVIS Master component with the data for theevent without including it in the XML file. Select None to prevent an event from processing untilyou can review it.e. Save your changes to the Alerts Header page in the Select Alerts to Report component (SelectAlerts to Report - F/M or Select Alerts to Report - J).Export Data to SEVIS Master or to the XML File to Send to SEVISRun the SEVIS Export process for the appropriate visa type (Export SEVIS Events - F/M or ExportSEVIS Events - J).For events where the Send To field is set to Master on the Alerts Header page, the export process directlyupdates the active SEVIS Master row with the data from the event.For events where the Send To field is set to SEVIS, the export process generates an XML file compliantwith the SEVIS XML schema. The process creates multiple XML files if the number of recordstransmitted to SEVIS exceeds 100. The export process also populates the SEVIS Master component withan inactive row containing the data sent to SEVIS.Upload XML Batch Documents to SEVISTo upload the generated XML files to SEVIS, you must use a utility that supports secure sockets layer(SSL) and HTTPS. The XML batch document upload process is completed outside the PeopleSoftCampus Solutions system using the utility program of your choice. Consult the U.S. Immigrations andCustoms Enforcement (ICE) web site for information regarding digital certificate registration and batchfile transmission.See Reference Manual for the Student and Exchange Visitor Information System Batch Interface,Application Program Interface (API).Import the upload results transaction log using the SEVIS Import Results process.Copyright 2016, Oracle and/or its affiliates. All rights reserved.3
(USA) Managing PeopleSoft SEVIS Solution Visa Processing for J and F/M VisasChapterDownload XML Transaction Log and PDF Files from SEVISTo download the XML transaction log files and any form PDF files (I-20 forms or DS-2019 forms)generated by SEVIS, you must use a utility that supports SSL and HTTPS. The XML transaction log andPDF files are compressed into a single file in zip format. You print the PDF files outside the PeopleSoftsystem.Consult the U.S. Immigrations and Customs Enforcement (ICE) web site for information regardingretrieval and unzipping of the XML transaction log and PDF files.Note: Carefully evaluate the Application Program Interface (API) to determine the period during whichthe batch process results remain available. The DHS SEVIS system automatically deletes files that are notdownloaded within the specified period.Import the XML Transaction Log ResultsAfter the compressed batch result file is successfully downloaded and unzipped, import the XMLtransaction log result files into the PeopleSoft Campus Solutions system using the SEVIS Import Resultsprocess.Run the SEVIS Import Results process for all applicable result files. Evaluate the transaction log resultsusing the SEVIS Import Results pages. Review all transactions with errors and take appropriate follow-upaction.The import process also updates the SEVIS Master component to reflect the data successfully importedto SEVIS and populates the SEVIS ID Maintenance page with the SEVIS IDs for any new students orexchange students and their dependents.Note: You must resolve eligibility errors returned by SEVIS before the next run of the SEVIS Alertsprocess. Allow enough time between reviewing the SEVIS XML transaction log results and running theprocess again so that you can modify student or exchange visitor and dependents transactional data tocorrect any errors.Understanding the SEVIS Master ComponentBundle 42.Bio/Demo page: New field: Citizenship Status. This displays the value from SEV MST BIO. Country of Citizenship is now Citizenship CountryProgram page: New field, Initial Session Start Date – displays the value from SEV MST PGMDependents page: New field, Citizenship StatusWhen you run the SEVIS Export process (Export SEVIS Events - F/M process or Export SEVIS Events- J process), all of the data that you export for submission to SEVIS is stored on pages in the SEVISMaster component (Campus Community, SEVIS, SEVIS Maintenance, SEVIS Master). The SEVISAlerts process (Process SEVIS Alerts - F/M or Process SEVIS Alerts - J ) compares the master data to theongoing SEVIS data to detect updates to the student or exchange visitor and dependent data that should besubsequently submitted to SEVIS.4Copyright 2016, Oracle and/or its affiliates. All rights reserved.
Chapter(USA) Managing PeopleSoft SEVIS Solution Visa Processing for J and F/M VisasWarning! Do not manually update data on any of the SEVIS Master component pages unless you havemade changes directly in the DHS SEVIS Real Time Interface (RTI) that cannot be processed usingthe Send to Master feature on the Alerts Header page. The data on the SEVIS Master component pagesshould always match the data on the RTI.If the Education Level – Change event has been sent, two active rows are permitted on the Program andFinancial tabs. Otherwise, each tab should have only one active status row. Update existing active rows.Do not manually add new rows.Data in the SEVIS Master component is populated by either the SEVIS Extract Process (CCSEVEXT)or the SEVIS Master Sync Process (CCSEVSYF), both of which are part of the Export SEVIS Eventsprocess.Send To SEVISIf the Send To field on the Alerts Header page is set to SEVIS for an event, the system populates theSEVIS Master component when running the SEVIS Export process (Export SEVIS Events - F/M orExport SEVIS Events - J). The data varies by event. The effective status of each record is set to Inactiveuntil the SEVIS Import Results process runs.When the Create event (Create Student or Create EV) event is successfully imported to SEVIS and theSEVIS Import process runs, the SEVIS Master component inactive rows are set to Active. If the Createevent has errors, the system deletes the SEVIS Master component inactive rows. View the errors on theSEVIS Import Results inquiry page and determine how to correct them before running the SEVIS Alertsprocess for the relevant visa type again. The Create event appears on the Alerts Header page again whenthe SEVIS Alerts process runs for that visa type.When the Update events are processed, an inactive effective status row is added to the appropriate recordin the SEVIS Master component. If the event is successfully imported to SEVIS, the data sent to SEVISis updated on the active effective status row in the SEVIS Master component and the inactive rows aredeleted. If the Update event has errors, the inactive rows are deleted in the SEVIS Master component.View the errors on the SEVIS Import Results inquiry page and determine how to correct them beforerunning the SEVIS Alerts process for the relevant visa type again. The Update event appears on the AlertsHeader page again when the SEVIS Alerts process runs for that visa type.The SEVIS Import process for F/M visas also updates the SEVIS status when the following events aresuccessfully processed by SEVIS: Registration (Sets SEVIS Status to Active). Status – Cancel (Sets SEVIS Status to Cancelled). Status – Terminate (Sets SEVIS Status to Terminated). Status – Complete (Sets SEVIS Status to Complete).The SEVIS Import process for J visas also updates the SEVIS status when the following events aresuccessfully processed by SEVIS: Create EV (Sets SEVIS Status to Initial). Validate (Sets SEVIS Status to Active). Status – No Show (Sets SEVIS Status to No Show).Copyright 2016, Oracle and/or its affiliates. All rights reserved.5
(USA) Managing PeopleSoft SEVIS Solution Visa Processing for J and F/M Visas Status – Terminate (Sets SEVIS Status to Terminated). Status – End (Sets SEVIS Status to Inactive). Status – Invalid (Sets SEVIS Status to Invalid).ChapterSend To Master (Master Sync)If the Send To field on the Alerts Header page is set to Master, the system populates the SEVIS Mastercomponent when the SEVIS Export process (SEVIS Master Sync – F/M or SEVIS Master Sync – J) runs.The data varies by event.When the Create event (Create Student or Create EV) is processed using Master Sync, new activeeffective status rows are created for the Bio/Demo, Addresses, Program, Financial, Dependents (ifany) and Employment/SOA (J Visa only) pages in the SEVIS Master component. SEVIS Status on theProgram page is set to Initial.Warning! You must, on the SEVIS ID Maintenance page, manually enter the IDs assigned by SEVIS tothe student and their dependents for F/M visas or to the exchange visitor and their dependents for J visas.If the SEVIS IDs are not added, when you process the Update events, errors are detected and indicated inthe Select Alerts to Report component (Select Alerts to Report - F/M or Select Alerts to Report - J).When you process the Update events using Master Sync, data from the event is inserted into theappropriate effective status active row in the SEVIS Master component. The existing data on the activerow is overwritten with the new data from the event. The data varies by event. In addition, SEVIS Statusis updated if the event causes an update.Creating and Updating Student or Exchange Visitor andDependent DataThis section discusses how to:6 Create and update biographical data. Create and update addresses data. Create and update electronic addresses. Create and update phone numbers. Create and update visa and permit data. Create and update port of entry information for F and M visas. Create and update citizenship and passport data. Maintain SEVIS ID information. Create and update employment authorization information for F and M visas.Copyright 2016, Oracle and/or its affiliates. All rights reserved.
Chapter(USA) Managing PeopleSoft SEVIS Solution Visa Processing for J and F/M VisasPages Used to Create and Update Student or Exchange Visitor andDependent DataPage NameDefinition NameNavigationBiographical DetailsSCC BIO DEMO PERSCampus Community, SEVIS, Enter or update basicPersonal Information,biographical and demographicAdd/Update a Person,data for an individual.Biographical DetailsAddressesSCC BIO DEMO ADDRCampus Community, SEVIS, Update an individual's addressPersonal Information, Add/information.Update a Person, AddressesNote: This pages does notappear in the Add/Update aPerson component when youadd a new person. It appearsonly when you update anexisting person.AddressesADDRESSES 89Campus Community,Personal Information,Biographical, Addresses/Phones, AddressesElectronic AddressesE ADDR PERSCampus Community,Enter or update an individual'sPersonal Information,email address data.Biographical, Addresses/Phones, Electronic AddressesPhone NumbersPHONE PERSCampus Community,Personal Information,Biographical, Addresses/Phones, PhonesVisa/Permit DataSCC VISA PERMITCampus Community, SEVIS, Enter an individual's visa andPersonal Information, Visa/permit information for SEVIS.Permit DataVisa/Permit Data DetailVISA PERMIT DETAILClick the Visa/Permit link on Enter an individual's visa andthe Biographical Details page. permit information for SEVIS.Citizenship/Passport DataLS CITIZEN PASSPORTCampus Community, SEVIS, Enter or update an individual'sPersonal Information,citizenship and passport data.Citizenship/Passport DataCitizenship DetailSA CITIZENSHIP DTLClick the Citizenship link onEnter or update an individual'sthe Biographical Details page. citizenship and passport data.SEVIS ID MaintenanceSEV ID MAINTCampus Community, SEVIS, Enter or update an individual'sSEVIS Maintenance, SEVIS SEVIS ID information.ID MaintenanceCopyright 2016, Oracle and/or its affiliates. All rights reserved.UsageEnter or update an individual'saddress information.Enter or update anindividual’s phone number.7
(USA) Managing PeopleSoft SEVIS Solution Visa Processing for J and F/M VisasChapterPage NameDefinition NameNavigationUsagePort of Entry DataSEV POE DATACampus Community, SEVIS, Track an individual's port ofPersonal Information, Visa/entry into the United StatesPermit Data, Port of Entryfor F or M student visas.DataEmployment AuthorizationsSEV EMPL AUTHCampus Community, SEVIS, Enter or update an individual'sEmployment Authorizationsemployment authorizationinformation for F or Mstudent visas.SEVIS Employer AddressSEV EMPL ADDRClick the Employer Addresslink on the EmployeeAuthorization page.Enter or update employeraddress information for F orM student visas.Creating and Updating Biographical DataAccess the Biographical Details page (Campus Community, SEVIS, Personal Information, Add/Updatea Person, Biographical Details).The Biographical Details page in the SEVIS Add/Update component is the same as the BiographicalDetails page in the Personal Information, Add/Update component.See Adding or Updating Biographical Details Data.SEVIS requires specific biographical data for each student and dependent. The SEVIS Export processpulls the required data from the Biographical Details page.In addition to first and last names, the following fields must be completed for each student or exchangevisitor and dependent:Person InformationLast NameEnter the individual's last name.Date of BirthEnter the individual's date of birth.Birth Information (link)SEVIS requires that you enter the name of the individual's birthcity (J Visa only) and country.Click the Birth Information link next to the Date of Birth field toenter the individual's birth city and country.Biographical HistoryGenderSpecify the individual's gender. Options are Male, Female, orUnknown.(Links at Bottom)Visa/Permit Data8SEVIS requires that you identify the type of visa issued to theindividual.Copyright 2016, Oracle and/or its affiliates. All rights reserved.
Chapter(USA) Managing PeopleSoft SEVIS Solution Visa Processing for J and F/M VisasClick the Visa/Permit Data link to enter the visa type.CitizenshipSEVIS requires that you identify the individual's country ofcitizenship.Click the Citizenship link to the enter the country of citizenship.Creating and Updating Addresses DataAccess the Addresses page (Campus Community, SEVIS, Personal Information, Add/Update a Person,Addresses).Note: The Addresses page does not appear in the Add/Update a Person component (shown here) whenyou add a new person. It appears only when you update an existing person.Note: The PeopleSoft system stores up to the ninth digit of the U.S. postal code in the SEVIS Mastercomponent to enable you to store bulk mail codes on the Addresses page as part of the postal codewithout affecting SEVIS processing. The alerts process compares up to the ninth digit of the postal codeon the addresses record against the postal code stored in the SEVIS Master component. If the postal codefor a U.S. address is too short (1-4 digits or 6-8 digits) when you run the export and alerts processes,an error appears on the Alerts page saying that the postal code is invalid. If the postal code is too long(greater than 9 digits), the process ignores everything after the ninth digit.For F and M student visas, SEVIS requires a foreign address for each student with a creation reason ofInitial or Initial - Change of Status on the I-20 form.For exchange visitor J visas, SEVIS requires that each exchange visitor have a U.S. address whenreporting the Validate event.The address types reported to SEVIS are based on the types defined in the US, Foreign and Mailing fieldson the SEVIS Setup page. You can view address data on the Biographical Details page, and edit the dataon the Addresses page.The following fields are required for the foreign address: Country Address 1The following fields are required for the U.S. and Mailing addresses: Address 1 City State PostalRelated LinksAdding an Individual to Your DatabaseAdding or Updating Biographical Details DataCopyright 2016, Oracle and/or its affiliates. All rights reserved.9
(USA) Managing PeopleSoft SEVIS Solution Visa Processing for J and F/M VisasChapterCreating and Updating Electronic AddressesAccess the Electronic Addresses page (Campus Community, Personal Information, Biographical,Addresses/Phones, Electronic Addresses).Email InformationEnter the individual’s email address. The email address that you select as Preferred is reported to SEVISas part of the Create Student, Personal Info, Dependent – Add and Dependent – Edit events for F and Mvisas, as well as the Create Exchange Visitor, Biographical and Validate events, Dependent – Add, andDependent – Edit for J visas.Email address is required for students for the Personal Info event. For other events, it is not required, butis reported when provided.Note: The SEVIS Schema does not allow for sending a blank email address. If an alert is triggered due toan email address being removed, you will need to use SEVIS RTI to manually delete the email address.Creating and Updating Phone NumbersAccess the Electronic Addresses page (Campus Community, Personal Information, Biographical,Addresses/Phones, Phones).Enter the individual’s phone numbers.For J visas, provide a US phone number. The phone number you select as Preferred is reported to SEVISas part of Biographical and Validate events.For students, the US or international phone number you select as Preferred is reported to SEVIS as partof Personal Info events for F and M visas. If the student does not have a phone number, it is reported toSEVIS.Creating and Updating Visa and Permit DataAccess the Visa/Permit Data page (Campus Community, SEVIS, Personal Information, Visa/PermitData).Visa/Permit DataTypeEnter the type of visa issued to the individual.For the PeopleSoft system to send the individual's informationto SEVIS, the visa type that you enter must correspond to a visatype defined on the Visa Mapping page, which includes only F,M, or J visa types.Number, Issue Date, and Expiration Enter the visa number and appropriate dates.DateThis information is not required or reported.Related LinksEntering Visa and Permit Data10Copyright 2016, Oracle and/or its affiliates. All rights reserved.
Chapter(USA) Managing PeopleSoft SEVIS Solution Visa Processing for J and F/M VisasCreating and Updating Port of Entry Information for F and M VisasAccess the Port of Entry Data page (Campus Community, SEVIS, Personal Information, Visa/PermitData, Port of Entry Data).You can record data regarding a student's date and location of entry into the United States. The SEVISsystem is the official record of this data, however, you might find it helpful to record this information inyour PeopleSoft system.Port of entry data is not required or reported.Creating and Updating Citizenship and Passport DataAccess the Citizenship/Passport page (Campus Community, SEVIS, Personal Information, Citizenship/Passport Data).Citizenship/PassportCountryEnter the country of citizenship to use on the I-20 form or theDS-2019 form.If you enter more than one non-U.S. country, you must indicateon the form which citizenship country to send to SEVIS.Passport InformationPassport Number, Issue Date,Expiration Date, and CountryEnter the passport number and associated information.This data is not required or reported.Related LinksEntering Citizenship and Passport DataCopyright 2016, Oracle and/or its affiliates. All rights reserved.11
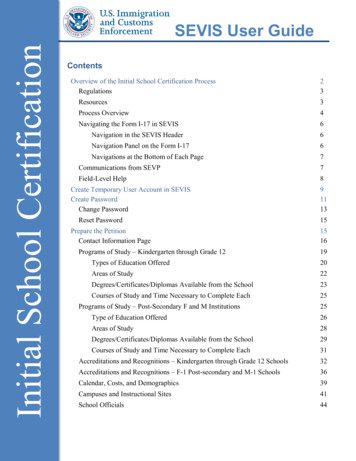
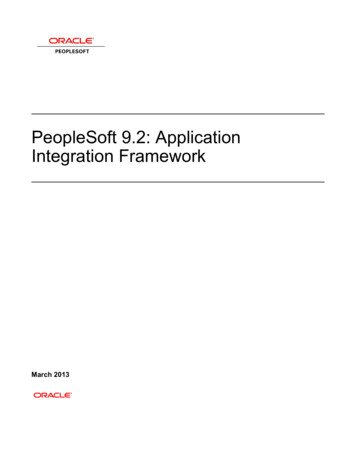
(USA) Managing PeopleSoft SEVIS Solution Visa Processing for J and F/M VisasChapterMaintaining SEVIS ID InformationAccess the SEVIS ID Maintenance page (Campus Community, SEVIS, SEVIS Maintenance, SEVIS IDMaintenance).Image: SEVIS ID Maintenance pageThis example illustrates the fields and controls on the SEVIS ID Maintenance page. You can finddefinitions for the fields and controls later on this page.Note: When SEVIS processes the Create Student and Dependent - Add events for F/M visas or the CreateEV and Dependent - Add events for J visas, it assigns SEVIS IDs to the new students or exchange visitorsand dependents. You must manually enter the IDs assigned by SEVIS into your PeopleSoft system if youused the Send to Master option on the Alerts Header page to populate SEVIS Master for Create Student,Create EV or Dependent - Add events.Use this page to store the SEVIS ID provided by the DHS for students or exchange visitors and theirdependents. The SEVIS ID is an 11-character unique identifier that SEVIS uses for students and theirdependents related to a specific school code and for exchange visitors and their dependents related toa specific program number. The system displays only the SEVIS IDs of the school codes or programnumbers for which you have security clearance.Running the SEVIS Import Results process for new students, exchange visitors, and dependentsautomatically populates the ID field. You may need to manually enter this value if you initially created thestudent or exchange visitor, or the dependent using the DHS SEVIS RTI.SEVIS Schools for F and M VisasSEVIS School Code, Effective Date,and SEVIS IDEnter each school code for which the student has an I-20 formor is listed as a dependent on an I-20 form.Enter the effective date of the SEVIS ID.12Copyright 2016, Oracle and/or its affiliates. All rights reserved.
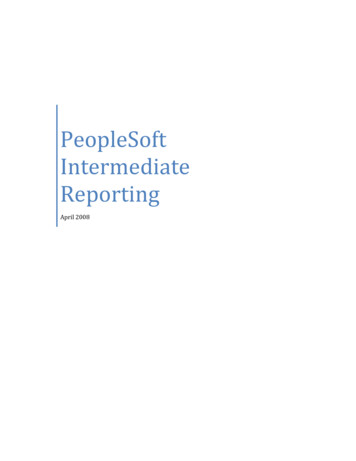
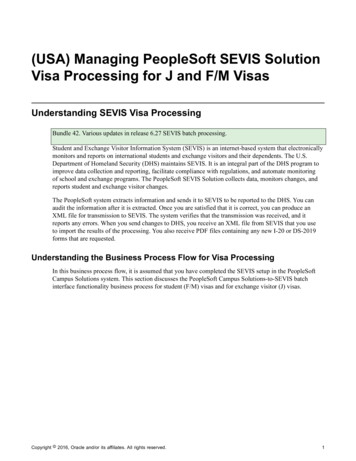
Chapter(USA) Managing PeopleSoft SEVIS Solution Visa Processing for J and F/M VisasEnter the unique 11-digit identifier for the student or dependentfor the SEVIS school code.SEVIS Programs for J visasSEVIS Program Number, EffectiveDate, and SEVIS IDEnter each program number for which the exchange visitor has aDS-2019 form or is listed as a dependent on a DS-2019 form.Enter the effective date of the SEVIS ID.Enter the unique 11-digit identifier for the exchange student ordependent for the SEVIS school code.Creating and Updating Employment Authorization Information for F and MVisasAccess the Employment Authorizations page (Campus Community, SEVIS, EmploymentAuthorizations).Image: Employment Authorizations pageThis example illustrates the fields and controls on the Employment Authorizations page. You can finddefinitions for the fields and controls later on this page.Copyright 2016, Oracle and/or its affiliates. All rights reserved.13
(USA) Managing PeopleSoft SEVIS Solution Visa Processing for J and F/M VisasChapterEmployment TypeEmployment TypeSelect the employment type relevant to the authorization orendorsement for this student.Options are:Curricular Practical Training (CPT)Optional Practical Training (OPT)Off-Campus (to enter recommendation information for thestudent to obtain off-campus employment authorization)M-1 students are authorized for OPT only. The system does notenable you to enter CPT or off-campus employment for an M-1student.F-1 students are eligible for all employment authorizations.Note: The fields in the Employment Details group box remain the same for CPT and OPT. The systemdisplays different fields when you enter the Off-Campus employment type.Employment Details (for CPT and OPT employment types)Sequence NumberDisplays the number that the system uses to track multiple rows.Completion TypeThis field appears only for the Employment Type of OptionalPractical Training for F-1 visas.Values are:Pre CompletionPost CompletionNote: For Pre Completion, the OPT end date must be on orbefore the program end date. For Post Completion, the OPTstart date must be on or after the program end date.Request StatusThis field appears for the Employment Types of OptionalPractical Training (OPT) and Off-Campus Employment.For OPT, the Request Status field value is used in combinationwith other values on the Employment Authorizations page totrigger the OPT Employment – Extend and OPT Employment –Edit events. For example, if the 17 Month Extension check boxis selected and the Request Status is Approved, the Extend eventis triggered.Values are:RequestedPending14Copyright 2016, Oracle and/or its affiliates. All rights reserved.
Chapter(USA) Managing PeopleSoft SEVIS Solution Visa Processing for J and F/M VisasApprovedCanceledDeniedUnknownWithdrawnThe default value is Requested.Note: For rows existing prior to SEVIS 6.0, the Request Fieldvalue is set to Unknown in the system. You must change thevalue for all current OPT students to trigger the appropriateevent.Note: Automatic status change updates are not sent as part ofthe SEVIS Batch process. You must manually update this fieldwhen the status changes.Warning! For OPT, SEVIS accepts changes to the Start Date,End Date, Employment Code, Completion Type or AcademicYear Met fields only when the Request Status field is set toRequested or Pending.Academic Year MetThis check box appears for the Employment Type of OptionalPractical Training (OPT).Select to indicate that the student has met the full academic yearrequirement for OPT.Cancel EmploymentSelect this check box to trigger the CPT Employment - Cancelor the OPT Employment - Cancel event.The start date must be later than the current system date for CPTEmployment.Cancellation of OPT Employment may be performed only priorto determination of the OPT by the Service Center.Start DateEnter the date when the employment is expected to begin.End DateEnter the date when the employment is expected to end.Note: Review DHS regulations to ensure that you comply withthe most recent duration rules for the employment type beforeentering the authorization start and end date.The Curricular Practical Training (CPT) employment typerequires that the end date be not later than the end date for thestudent on the I-20 form.Copyright 2016, Oracle and/or its affiliates. All rights reserved.15
(USA) Managing PeopleSoft SEVIS Solution Visa Processing for J and F/M VisasChapterSee the U.S. Immigration and Customs Enforcement website forregulations regarding employment duration.The authorization end date affects the Program – Completeevent trigger.See Running the SEVIS Alerts Process.Employment CodeSelect either Part-time or Full-time.17 Month ExtensionThis check box appears only for the Employment Type ofOptional Practical Training for F-1 visas.When selected, the employer's name and address are required.The 17 Month Extension field value is used in combinationwith the Request Status value to trigger the OPT Employment– Extend event. For example, if the 17 Month E
of school and exchange programs. The PeopleSoft SEVIS Solution collects data, monitors changes, and reports student and exchange visitor changes. The PeopleSoft system extracts information and sends it to SEVIS to be reported to the DHS. You can audit the information after it is extracted. Once you are satisfied that it is correct, you can .