Transcription
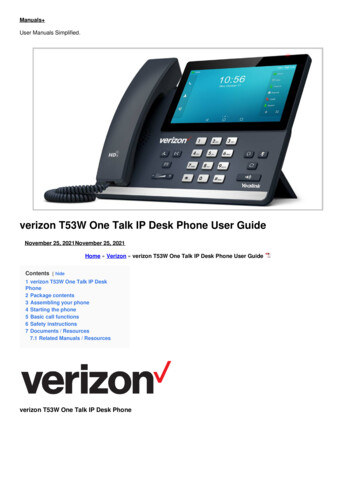
Manuals User Manuals Simplified.verizon T53W One Talk IP Desk Phone User GuideNovember 25, 2021November 25, 2021Home » Verizon » verizon T53W One Talk IP Desk Phone User GuideContents [ hide1 verizon T53W One Talk IP DeskPhone2 Package contents3 Assembling your phone4 Starting the phone5 Basic call functions6 Safety instructions7 Documents / Resources7.1 Related Manuals / Resourcesverizon T53W One Talk IP Desk Phone
Package contentsThe following items are included in your package:Assembling your phone1. Attach the stand and adjust the angle of the screen
Note: You can also mount the phone to a wall.2. Connect the handset and optional headset3. Optional: Connect the USB devicesNote: The USB port can also be used to connect other USB devices, such as EXP50 Expansion Module, USB headset, etc.4. Connect the network and powerYou have two options for network and power connections. Your system administrator will advise you which one to use.Note: The One Talkphone should be used with the original power adaptor (5 V/1.2 A) only. The use of a third-party power adaptor may causedamage to the phone. If inline power (PoE) is provided, you don’t need to connect the power adaptor. Make sure the network
switch is PoE compliant.Starting the phoneAfter the One Talk phone is connected to a network and supplied with power, it will automatically begin the initialization process.The phone will go through a series of screens and update the firmware on the device; the first-time setup process takes about 15minutes and should not be interrupted. You will know the phone is ready to be used when the 911 address appears in the screenof the device.Basic call functionsPlacing a callUsing the handset:1. Pick up the handset2. Enter the number, and then press SendUsing the speakerphone:1. With the handset on-hook, press2. Enter the number, and then press SendUsing the headset:1. With the headset connected, press to activate the headset mode2. Enter the number, and then press SendNote: During a call, you can alternate between the headset, hands-free speakerphone and handset modes by pressing theHeadset key, the Speakerphone key or by picking up the handset. Headset mode requires a connected headset.Answering a callUsing the handset:Pick up the handset.Using the speakerphone:Press button.Using the headset:Press button.Note: You can reject an incoming call by pressing Reject.Ending a callUsing the handset:Hang up the handset or press End Call.
Using the speakerphone:Press or End Call.Using the headset:Press End call.Redialing a callPress button to enter the Placed Calls list, press to select the desired entry, and then press sendTo resume the call, do one of the following: If there is only one call on hold, press Resume If there is more than one call on hold, press select the desired call, and then press ResumeTransferring a callYou can transfer a call in the following ways:Direct transfer1. Press the Direct soft key during an active call. The call is placed on hold2. Enter the number you want to transfer to3. Press the Direct soft keyConsultative transfer1. Press the Consult soft key during an active call. The call is placed on hold2. Enter the number you want to transfer to, and then press3. Press the Consult soft key when you hear the ringback toneForwarding a callTo enable call forward:1. Navigate to Menu Features Call Forward2. Select the desired forward type:Always Forward—Incoming calls are forwarded unconditionally.Busy Forward—Incoming calls are forwarded when the phone is busy.No Answer Forward—Incoming calls are forwarded if not answered after a period of time.3. Enter the number you want to forward to. For No Answer Forward, press or to select the desired ring time to wait beforeforwarding from the After Ring Time field4. Press Save to accept the changeInitiating a conference call1. Press Conference during an active call. The call is placed on hold2. Enter the number of the second party, and then press Send3. Press Conference again when the second party answers. Three parties are now joined in the conferenceNote: You can split the conference call into two individual calls by pressing Split.Configuring and using speed dialTo configure a speed-dial key:1. Navigate to Menu Features Dsskey2. Select the desired DSS key, and then press Enter3. Select Speed Dial from the Type field, select the desired line from the Account ID field, enter a label in the Label field andthen enter the number in the Value field4. Press Save to accept the change.To use the speed-dial key:Press the speed-dial key to dial the preset number.Listening to voicemail messagesThe “message waiting” indicator on the idle screen indicates that one or more voicemail messages are waiting at the messagecenter. The power indicator LED slowly flashes red.To listen to voicemail:1. Press or Connect2. Follow the voice prompts to listen to your voicemail messagesCustomizing your phoneManaging call history
1. Press History2. Press or to select an entry from the list3. Do the following: Press Send to call the entry Press Delete to delete the entry from the list Press Option, then you can do the following:– Select Detail to view detailed information about the entry– Select Add to Contacts to add the entry to the local directory– Select Add to Blacklist to add the entry to the blacklist– Select Delete All to delete all entries from the listManaging contact directoryAdding a contact:1.2.3.4.Press Directory, and then select All ContactsPress Add to add a contactEnter a unique contact name in the Name field and contact numbers in the corresponding fieldsPress Save to accept the changeRegulatory noticesOperating ambient temperatures: Operating temperature: 14 F to 122 F (-10 C to 50 C) Relative humidity: 5% to 90%, noncondensing Storage temperature: -22 F to 160 F (-30 C to 70 C)Safety instructionsSave these instructions. Read these safety instructions before use!The following basic safety precautions should always be followed to reduce the risk of fire, electrical shock, and other personalinjury.General requirements Before you install and use the device, read the safety instructions carefully During the process of storage, transportation and operation, please always keep the device dry and clean During the process of storage, transportation and operation, please avoid smashing or dropping the device Do not attempt to dismantle the deviceEnvironmental requirements Place the device in a well-ventilated place. Do not expose the device to direct sunlight Keep the device dry and free of dust Place the device on a stable and level surface Please do not place heavy objects on the device Do not place the device on or near any flammable or fire-vulnerable materials, such as rubber Keep the device away from any heat source or open flame, such as a candle or an electric heater Keep the device away from any household appliance with a strong magnetic field or electromagnetic field, such as a microwaveoven or a refrigeratorOperating requirements Do not let a child operate the device without supervision Do not let a child play with the device or any accessory in case of accidental swallowing Please use only the accessories provided or authorized by the manufacturer The power supply of the device should meet the requirements of the input voltage of the device Before plugging in or unplugging any cable, make sure that your hands are completely dry Do not spill liquid of any kind on the product or use the equipment near water, for example, near a bathtub, washbowl, kitchensink, wet basement or swimming pool Do not tread on, pull or overbend any cable in case of malfunction of the device During a thunderstorm, stop using the device and disconnect it from the power supply If the device emits smoke or an abnormal noise or smell, disconnect the device from the power supply and unplug the powerplug immediately. Contact the specified maintenance center for repair Do not insert any object into equipment slots that is not part of the product or auxiliary product Before connecting a cable, connect the grounding cable of the device. Do not disconnect the grounding cable until youdisconnect all other cablesCleaning requirements
Before cleaning the device, stop using it and disconnect it from the power supply Use a piece of soft, dry antistatic cloth to clean the device Keep the power plug clean and dry. Using a dirty or wet power plug may lead to electric shock or other hazardsFCC statementThis device complies with Part 15 of the FCC Rules. Operation is subject to the following two conditions: 1) This device may notcause harmful interference, and 2) this device must accept any interference received, including interference that may causeundesired operation.Environmental recyclingThis device needs to be treated as an electronic device for recycling purposes.Technical supportFor additional support information, please visit verizon.com/support/one-talkDocuments / Resourcesverizon T53W One Talk IP Desk Phone [pdf] User GuideT53W, One Talk IP Desk PhoneRelated Manuals / Resourcesverizon T54W One Talk IP Desk Phone User GuideT54W One Talk IP Desk Phone One Talk T54W User guide IP Desk Phone Package contents The following alcatel SP2503 IP Phone with Caller ID and 4 SIP Account User Guidealcatel SP2503 IP Phone with Caller ID and 4 SIP Account User Guide OVERVIEWDisplay icon description Phone Lively Smart Phone InstructionsLively Smart Phone Instructions IMPORTANT! Before turning on your new Lively Smart, you must activate your phone. Activation hama 00095822 Sit-Stand Desk Instruction Manualhama 00095822 Sit-Stand Desk Package contents Operating Instructions Service &Support www.hama.com 49 9091 502-0 All listed brands Manuals ,homeprivacy
Note: The One Talk phone should be used with the original power adaptor (5 V/1.2 A) only. The use of a third-party power adaptor may cause damage to the phone. If inline power (PoE) is provided, you don't need to connect the power adaptor. Make sure the network. switch is PoE compliant.