Transcription
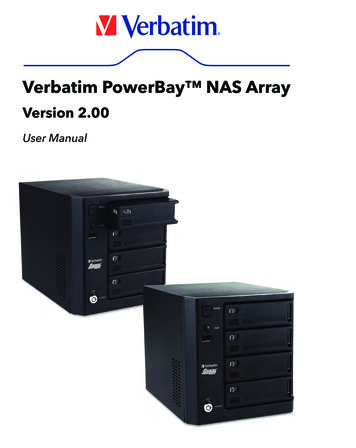
Verbatim PowerBay NAS ArrayVersion 2.00User nowledgeBase
Table of ContentsProduct Overview. 2About this User Guide. . 2Introduction. 2Package Contents. 2System Requirements. 2Features and Benefits. . 3Hardware Overview. 4Installation. 6Before You Begin. 6Default Settings. 6Factory Reset Button. 7Basic Installation. 7Hardware Setup. 7Software Setup. . 8Magical Finder - Network Setup Utility. 8Acronis Backup Software. .10Web Configuration. 10Wizard Pages.11Home.12Device Information. .12Networks.13LAN Port. .13ProductOverviewEXT Port.14Basic Setup.14Date and Time. .15Device Settings.15Language Settings.17InstallationAdvanced Setup.17Users. .18Groups. .19Shared Folders Settings. .19Quotas.20FTP Server. .20WebConfigurationNFS Server.21Rsync Server. .22AFP.23LLTD.23Disk Management.24Disk Status.24KnowledgeBase
Table of ContentsDisk Configuration.25Array Mirroring to eSATA Drive. .26Array Encryption.27Disk Configuration (Steps). .29Disk Utilities.31Power Management.31Download/Backup.32FTP/HTTP.32Schedule Status.33USB/eSATA Backup.34Schedule LAN Backup. .34Real Time LAN Backup.36Maintenance. .38Password. .38System.39Firmware.40E-Mail Settings.41E-Mail Alerts. .42System Status.42Information.42Help Menu. .43Getting Help. 44ProductOverviewKnowledge Base. 44Sharing files using Windows.44Run Dialogue.44Browse Network Neighborhood. .44Search Dialogue. .44InstallationBrowse My Computer. .45Sharing files using Mac OS X.45Sharing files using Linux.45USB Print Server Installation.46Hot-Swap Function.48What is RAID?.49WebConfigurationTechnical Specifications. 50Limited Warranty Terms. . 51Rights. 52GNU General Public License. 52FCC Compliance. 55KnowledgeBase
Product OverviewAbout this User GuideThis user guide describes the functionality of the Verbatim PowerBay NetworkAttached Storage (NAS) array product. The guide provides the information youwill need to install and configure the product based on your specific networkenvironment and storage needs. To obtain further product information,firmware updates, and useful articles, please check our web site regularlyat www.verbatim.com/support.IntroductionThe Verbatim PowerBay NAS array provides four disk cartridges configurable invarious RAID levels for superior performance and data redundancy. The PowerBayNAS array enables you to share documents, files, and digital media with everyoneon the home or office network. Remotely accessing files through the Internet isalso possible with the built-in FTP server. Whether you are allowing access locallyor over the Internet, keep data safe by giving access rights only to specific users orgroups.When configuring the PowerBay NAS array, you can create users and groups andassign them to folders with either read or read/write permissions. This is ideal foran office environment with employee-specific sensitive data or for the homenetwork. The PowerBay NAS array will be available to any computer (PC, MAC,or Linux-based) on your network, without the need to install any software on thecomputer.Package Contents Verbatim PowerBay 4-Bay NAS array CAT-6 Network Cable CD-ROM containing software and documentation. Front Panel Lock Key AC Power Cord User ManualProductOverviewSystem RequirementsFor best results, the following systemrequirements are recommended:Installation Computer with:1GHz Processor / 512 MB RAM /200MB available space / DVD-ROMDrive Current web browser, such asInternet Explorer, Mozilla Firefoxor Safari Gigabit Ethernet router or switch Windows XP, Windows Vista,Windows 7, Mac OS X 10.2 orhigher, or LinuxWebConfigurationKnowledgeBase2
Product OverviewFeatures and BenefitsThe Verbatim PowerBay NAS array supports 4 hard drive cartridges and includes theproduct features listed below:RAID RAID 0, 1 spare, 5, 5 spare, 6Hardware Embedded four internal SATA II 3.5”HDD interface 1.2 GHz Marvel processor Hot swappable HDD cartridgesSystem Management Supports Magical Finder NetworkUtility (included) Active Directory Support for WindowsServer 2003/2008 LLTD for Vista 32/64 Supports configuration file save/load Email alerts Scheduled Power On/Off Wake On LAN Automatic Power Recovery Unicode Character/Text Support Print Server UPS Monitoring via USB Port 256 bit AES Encryption Key Lock Kensington SlotConnectivity Equipped two 10/100/1000MbpsFull-duplex auto-MDIX GigabitEthernet ports One eSATA for backup or mirror to aneSATA device One USB 2.0 for connecting an externalUSB storage device One USB 2.0 for connecting a USBprinter or USB UPS monitorFile System EXT2/3 Internal hard drive format FAT32 (R/W) and NTFS (Read Only)for eSATA device FAT32 (R/W) and NTFS (Read Only)for USB deviceBackup Real Time Data Mirroring viaeSATA port Real Time LAN Backup to anotherPowerBay NAS Scheduled LAN Backup(replication via rsync) Scheduled Backup from PC to NAS Acronis OEM Backup Software(included) Supports Apple Time MachineNetwork File Protocols CIFS/SMB for Windows NFSv2/v3 for Linux and UNIX AFP3.1 for Macintosh FTP/HTTP for download NetworkService Protocols DHCP Client SMB (Samba) SMTP NTPHDD Management S.M.A.R.T. Check Disk Check Reformat Disk Power Saving (Disk idle, spin down) System StatusFile Sharing Supports up to 128 Users and 10 Groups 32 Public Folders Max concurrent connections:128 (Samba) / 10 (FTP) Share folder level permission User share folder quota control Users can be assigned to multiple nowledgeBase3
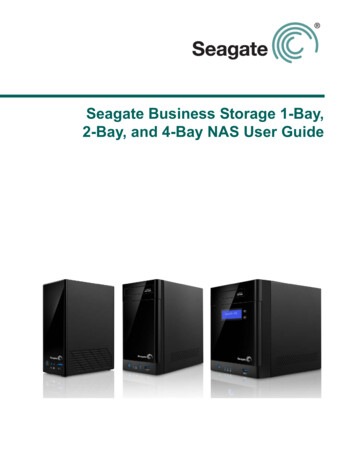
Product OverviewHardware OverviewFront View15263784COMPONENTDESCRIPTION1. Power Button Press to power on. Press and hold for more than 5 seconds to power off.2. Function ButtonUSB One-Touch-Copy function is available when a USB storage device is connected to thePowerBay NAS array. Press momentarily to initiate file copy from external USB storage device to the PowerBay NAS array. Press and hold for more than 3 seconds to safely dismount the external USB device.Alarm Buzzer feature is available during alarm conditions. When alarm buzzer is sounding, press button to cancel alarm.3. USB Connector One USB 2.0 (Type A) connector: USB Host port for connecting an external USB storage device. Supports USB backup (copy files from attached USB drive to NAS array) Provides additional storage as a shared volume on the LAN (default name “USBDisk 1”) Supports USB Unlock Key for use with disk encryption Power: 5V/500mA maxProductOverviewInstallation4. Cartridge Key Lock Turn key counterclockwise to the Lock position to lock all cartridges in place. Turn key clockwise to the Unlock position to unlock all cartridges.5. Power LEDThe power button contains a colored LED to indicate power status. Solid Green Device is Powered On Solid Red Device is in Standby Mode with AC power applied6. Status LED Solid Green Device operational status is Normal Blinking Green Device is starting up or shutting down Solid Red Device Error7. Cartridge Lock Slide locking button to the left to lock each cartridge. Slide locking button to the right to unlock each cartridge.8. Cartridge LEDEach HDD cartridge locking button contains a colored LED to indicate disk status: Solid Blue Disk Ready Blinking Blue Data Access Activity Blinking Red Disk Error Solid Red When all 4 cartridge LEDs are red indicates Locked Encrypted Volume4WebConfigurationKnowledgeBase
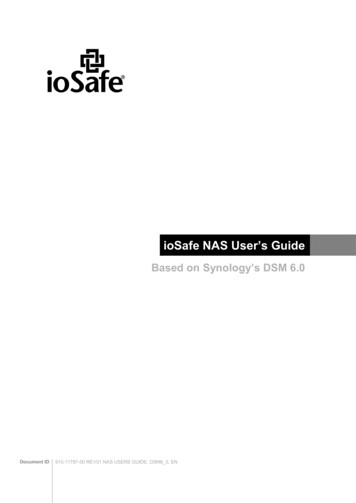
Product OverviewRear Panel (Connections)91210131114COMPONENTDESCRIPTION9. eSATA connector One SATA-II (eSATA) connector for connecting external storage device. Supports eSATA backup (copy files from attached eSATA drive to NAS array) Provides additional storage as a shared volume on the LAN (default name “eSATA 1”) Supports mirror function between NAS array and attached eSATA drive10. USB Connector USB Host Port. One USB 2.0 (Type A) connector; Power: 5V/500mA max. Used for connecting USB Printer; or USB UPS Monitor. If the attached UPS detects a power failure, an automatic shutdown of the NASarray will be initiated by use of this feature. Compatible with the following UPS equipment:- APC BACK-UPS ES BE500TW- Powerware PW-3105- Tripp-Lite SMART550USB- Phoenixtec A-500Plus11. RJ-45ConnectorsTwo Gigabit Ethernet ports. Port 1 (LAN): For connecting the PowerBay NAS array to LAN. This port supports Wake-OnLAN function. Port 2 (EXT): For real time backup to another PowerBay NAS array12. Reset Button Press and hold for more than 5 seconds to reset configuration to factory default settings13. Cooling Fans Exhaust ports for two cooling fans are provided.14. AC PowerConnector For AC power wledgeBase5
InstallationThis section will walk you through the installation process. Placement of the deviceis very important. Do not place the device in an enclosed area such as a closet orcabinet.Before You BeginPlease read and make sure you understand all the prerequisites for proper installation of your new device. Have all the necessary information and equipment on handbefore beginning the installation.ProductOverviewInstallationNote: Capacity depends on model. 1 MB 1,000,000 bytes / 1 GB 1,000,000,000 bytes /1 TB 1,000,000,000,000 bytes. Some capacity used for pre-loaded software, formattingand other functions, and thus is not available for data storage. As a result, and due todiffering calculation methods, your operating systems may report as fewer megabytes/gigabytes/ terabytes.WebConfigurationDefault SettingsThe default values for the PowerBay NAS array are as follows: User Name is ‘admin’ Password is blank LAN IP Address is 192.168.0.32 LAN Subnet Mask is 255.255.255.06KnowledgeBase
InstallationFactory Reset ButtonThe device can be reset to the original factory default settings by using a ballpointor paperclip to gently push down the reset button in the following sequence:1. Ensure the device is powered on.2. Press and hold the reset button for approximately 5 seconds.3. The factory reset process should take around 1 to 2 minutes.Remember that this will wipe out any settings stored in flash memory includinguser account information and LAN IP settings.Basic InstallationHardware SetupThis section provides unpacking and installation information for the PowerBay NASarray. Open the shipping carton for the PowerBay NAS array and carefully unpackits contents.1. Ensure that a hard drive cartridge is inserted into each of the four mounting racksand that the cartridge locking buttons are in the left (locked) position.2. Connect the supplied Ethernet cable to the LAN port located at the back of thedevice. Connect the other end of this cable to your network, either via a switch/router or via direct connection to your computer for configuration.3. Connect the supplied power cord to the rear of the PowerBay NAS array and toan AC power receptacle.4. Press the Power button on the front of the PowerBay NAS array. The green status LEDwill begin to flash to indicate that the unit has initiated the power-on sequence.5. Wait for the PowerBay NAS array to boot up and to auto-configure its connectionon the network. Depending on your particular LAN configuration and settings,this may take several minutes. The following protocols will be followed duringauto-configuration:a. DHCP client is enabled by default. Therefore, your router or other LAN equipment that is providing the DHCP service will automatically assign an IP addressto the PowerBay NAS array and complete the network connection.b. If no DHCP server is available on your network, then the PowerBay NAS arraywill take its default IP address of 192.168.0.32.6. After successfully connecting to your network you will be able to discover thePowerBay NAS array on your network. Its default name is “PowerBay”.7. Before you can see any PowerBay NAS array shared folders, you must first setup user accounts or at a minimum must assign read/write privileges for the default folder named Volume 1. This process is explained further below. Once thisis done, you will be able to discover shared folders in network workgroup named“Workgroup”. In Windows go to My Network Places / Entire Network / MicrosoftWindows Network / Workgroup, or in Mac OS X navigate to Go / onKnowledgeBase
InstallationTo set up other user accounts and to configure other basic system settings, youshould continue setup using the web-based administration tool described in thenext section.Once the PowerBay NAS array is connected to your network and has been configured for your network environment, it can be accessed from any computer withinthe same subnet on your LAN. Furthermore, more advanced users may choose toconfigure name servers (such as WIN servers or DNS servers) in order to access thePowerBay NAS array from a different subnet.Software SetupThe included CD-ROM contains copies of the User Guide, as well as two softwareapplications: 1) MagicalFinder, and 2) Acronis backup software.Magical Finder - Network Setup UtilityWhen first powered on, during the initial boot sequence, the PowerBay NAS arraywill wait to be assigned an IP address via DHCP. If it does not receive a DHCP assigned IP address, by default it will have a self-assigned IP address of 192.168.0.32.If your router assigns addresses automatically, your router’s manual will describehow to view the DHCP Lease List so you can see your drive’s assigned IP address.Alternatively, you can find your drive’s IP address using the included Magical Finderutility that is provided on the product CD. If you are unfamiliar with the operation ofyour router, you may find it easier to use the Magical 1. Open the Magical Finder Utility and allow it to search for the PowerBay NAS array.KnowledgeBase8
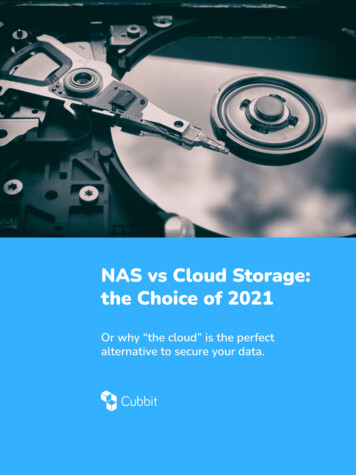
Installation2. After finding the PowerBay NAS array, the utility will list the device’s IP address, MAC address and DeviceName. (If the device is not listed on the initial scan you can press the Refresh button to initiate a Re-Scan)You have three options: IP Setup Button: To enter the IP Address Setup. Folder Button: To open Windows Explorer to \\PowerBay. Browser Button: To link to the device web configuration.3. After clicking the IP Setup Button you’ll be promptedto enter the password (The default password is blank)and click OK.ProductOverviewInstallation4. Here you can change:Device Name - Network name of the PowerBay NAS array.Workgroup - Workgroup name of your network.IP Address Setup - Edit the IP to fit your network.Network Interface - Your network adapter.WebConfigurationAfter the changes you can click OK to apply the changes.KnowledgeBase9
InstallationAcronis Backup SoftwareAcronis backup software is included on CD-ROM. To install this application on one ofyour client Windows computers, open the Acronis folder on the CD and then doubleclick the setup file to start installation. The Acronis installation window will appear. Follow the setup wizard to install the software. To backup files to your PowerBay NAS arrayusing Acronis, you must first assign a drive letter to your destination folder.Web ConfigurationThe PowerBay NAS array has a web based configuration tool. You can access theconfiguration tool by selecting the Browser Button of the Magical Finder as describedabove, or by opening your browser and entering the PowerBay NAS array IP address.The configuration tool includes a setup Wizard that allows you to quickly configuresome of the basic device settings. Click “Wizard” to start the Wizard nowledgeBase10
Web ConfigurationWizard Pages1. When initiating the Wizard, the user will always be promptedto re-enter the login user name and password as a securitymeasure. Do so and click the next button.2. In this window the user can change the time zone configurationof the device.ProductOverview3. In this window the user can change the IP configuration of theLAN Port of the device. You can choose: DHCP Client - Allows an IP to be assigned to the device automatically (this option requires a DHCP Server in your network). Static IP - Allows you to assign an IP address to the devicemanually.4. In this window the user can change the IP configuration of theEXT Port of the device. You can choose: DHCP Client - Allows an IP to be assigned to the device automatically (this option requires a DHCP Server in your network). Static IP - Allows you to assign an IP address to the devicemanually.InstallationWebConfiguration5. In this window you can configure the Workgroup settings for yourdevice. If you have Active Directory configured in your network youcan choose the Active Directory option to setup those settings.116. In this window you can configure the Active Directory settings for your device.KnowledgeBase
Web ConfigurationWizard Pages7. In this window you can complete your setup. Click the Save Button tosave your settings.Home - SectionDevice Information - PageThe Device information page allows you to view basic information about the setupof the device. Here you can see the current settings for Device Name, Description,LAN Port IP Address, EXT Port IP Address, Firmware Version, Date, Time, RAIDLevel, and HDD ationKnowledgeBase12
Web ConfigurationNetworks - SectionThe Local Area Network settings for the device can be configured on the LAN Portpage.ProductOverviewLAN Port - PageDHCP Client:Selecting DHCP Client willcause the device to obtainan IP address from the localDHCP server.InstallationStatic IP:Selecting Static IP requiresyou to assign the IP information for the device manually.WebConfigurationMTU:The default MTU (maximumtransmission unit) is 1500bytes. If your network supports Jumbo Frames you canspecify larger frame sizes (inthe range of 3000-9000) byfirst selecting Enable in theMTU Settings dialogue.KnowledgeBase13
Web ConfigurationEXT Port - PageThe Local Area Networksettings for the device’s EXTPort can be configured onthe EXT Port page.DHCP Client:Selecting DHCP Client willcause the device to obtainan IP address from the localDHCP server.Static IP:Selecting Static IP requiresyou to assign the IP information for the device manually.MTU:The default MTU (maximum transmission unit) is 1500 bytes. If your network supportsJumbo Frames you can specify larger frame sizes (in the range of 3000-9000) by firstselecting Enable in the MTU Settings dialogue.Basic Setup - SectionThe Time and Date of the device’s internal clock can be set manually or be set automatically from the client computer or using an NTP KnowledgeBase14
Web ConfigurationDate and Time - PageTime Zone:Choose the Time Zone ofwhere you are located fromthe drop-down menu.Set from Computer:To set the internal clock ofthe PowerBay NAS array tothe same time as the clientcomputer, select Set fromComputer and hit Save.Set the Dateand Time Manually:To set the date and timemanually, select Set Manually, and fill in the date and time using the drop-downmenus. Press Save to save the new settings.NTP Server:Tick the Enable NTP Server checkbox to enable NTP. Network Time Protocol (NTP)synchronizes the device with an Internet time server. Type the URL of the NTP Serverin the NTP Server checkbox or use the drop-down menu to choose one of the defaulttime servers listed for your convenience. Press Save to save the new settings.Device Settings - PageThe device settings page allows you to configure the Workgroup or Active Directorysettings of your network on the device.ProductOverviewIf your network is configured as a Workgroup, click the Workgroup radio button.Configure the parameters as described below:InstallationWorkgroup:The Workgroup is usedby Microsoft WindowsNetwork to organizeavailable network groupswithin the same network.WebConfigurationName:The unique Name appears for other network services including shared libraries oniTunes and other media players. The name can be used to access your device froma web browser instead of using an IP address, for example, http://powerbay. By default the device name is “PowerBay”.15KnowledgeBase
Web ConfigurationDescription:This field assigns a device description to help identify the device in the workgroup.If your network is configured in an Active Directory, make sure the following conditions are true:1. Ensure that the Time and Date is synchronized between the device and the Windows Active Directory server. The device and Active Directory server will onlytolerate a maximum time difference of 5 minutes.2. Ensure that you can get the IP address of the 2008 AD server from the DNS server.The DNS1 and DNS2 settings are the same as the LAN Setup. Please make surethis is working properly.To configure the PowerBay NAS array to use Active Directory, click the Active Directory radio button and configure the parameters as described below:User Name:Input the user name ofan account setup on theActive Directory thatrequires access to theresources on the device.Password:Input the password of thechosen Active Directoryuser account.ProductOverviewName:Input a Domain NameService (DNS) name forthe PowerBay NAS array.If the device connecting to the PowerBay NAS array is a browser or logon serverthis will be the name that these services are advertised by.Workgroup:Enter your Workgroup name here. The workgroup name should be the same as thecomputers on the network. Devices using the same workgroup will have additionalfile sharing methods available.Realm Name:Input the FQDN (Fully Qualified Domain Name) of the Active Directory Domain inthis field. This option specifies the Kerberos realm to use.AD Server Name:Input the name of the
Real Time LAN Backup to another PowerBay NAS Scheduled LAN Backup (replication via rsync) Scheduled Backup from PC to NAS Acronis OEM Backup Software (included) Supports Apple Time Machine HDD Management S.M.A.R.T. Check Disk Check Reformat Disk Power Saving (Disk idle, spin down) System Status