Transcription
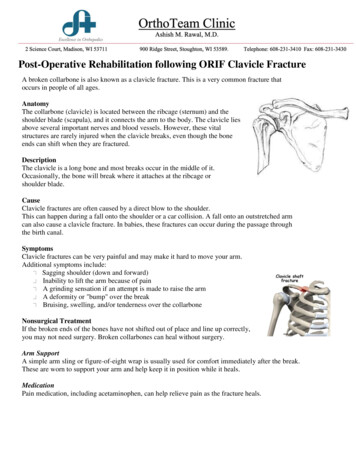
Post-Operative Rehabilitation following ORIF Clavicle FractureA broken collarbone is also known as a clavicle fracture. This is a very common fracture thatoccurs in people of all ages.AnatomyThe collarbone (clavicle) is located between the ribcage (sternum) and theshoulder blade (scapula), and it connects the arm to the body. The clavicle liesabove several important nerves and blood vessels. However, these vitalstructures are rarely injured when the clavicle breaks, even though the boneends can shift when they are fractured.DescriptionThe clavicle is a long bone and most breaks occur in the middle of it.Occasionally, the bone will break where it attaches at the ribcage orshoulder blade.CauseClavicle fractures are often caused by a direct blow to the shoulder.This can happen during a fall onto the shoulder or a car collision. A fall onto an outstretched armcan also cause a clavicle fracture. In babies, these fractures can occur during the passage throughthe birth canal.SymptomsClavicle fractures can be very painful and may make it hard to move your arm.Additional symptoms include:Sagging shoulder (down and forward) Inability to lift the arm because of pain A grinding sensation if an attempt is made to raise the arm A deformity or "bump" over the break Bruising, swelling, and/or tenderness over the collarbone Nonsurgical TreatmentIf the broken ends of the bones have not shifted out of place and line up correctly,you may not need surgery. Broken collarbones can heal without surgery.Arm SupportA simple arm sling or figure-of-eight wrap is usually used for comfort immediately after the break.These are worn to support your arm and help keep it in position while it heals.MedicationPain medication, including acetaminophen, can help relieve pain as the fracture heals.
Physical TherapyWhile you are wearing the sling, you will likely lose muscle strength in your shoulder. Once yourbone begins to heal, the pain will decrease and your doctor may start gentle shoulder and elbowexercises. These exercises will help prevent stiffness and weakness. More strenuous exercises cangradually be started once the fracture is completely healed.Doctor Follow-UpYou will need to see your doctor regularly until your fracture heals. He or she will examine youand take x-rays to make sure the bone is healing in good position. After the bone has healed, youwill be able to gradually return to your normal activities.ComplicationsThe fracture can move out of place before it heals. It is important to follow up with your doctor asscheduled to make sure the bone stays in position. If the fracture fragments do move out of placeand the bones heal in that position, it is called a "malunion." Treatment for this is determined byhow far out of place the bones are and how much this affects your arm movement. A large bumpover the fracture site may develop as the fracture heals. This usually gets smaller over time, but asmall bump may remain permanently.Surgical TreatmentIf your bones are out of place (displaced), your doctor may recommend surgery. Surgery can alignthe bones exactly and hold them in good position while they heal. This can improve shoulderstrength when you have recovered.Plates and ScrewsDuring this operation, the bone fragments are first repositioned into their normalalignment, and then held in place with special screws and/or by attaching metal platesto the outer surface of the bone. After surgery, you may notice a small patch of numbskin below the incision. This numbness will become less noticeable with time. Becausethere is not a lot of fat over the collarbone, you may be able to feel the plate throughyour skin. Plates and screws are usually not removed after the bone has healed, unlessthey are causing discomfort. Problems with the hardware are not common, butsometimes, seatbelts and backpacks can irritate the collarbone area. If this happens, thehardware can be removed after the fracture has healed.
PinsPins are also used to hold the fracture in good position after the bone ends have beenput back in place. The incisions for pin placement are usually smaller than those usedfor plates. Pins often irritate the skin where they have been inserted and are usuallyremoved once the fracture has healed.RehabilitationSpecific exercises will help restore movement and strengthen your shoulder. Yourdoctor may provide you with a home therapy plan or suggest that you work with aphysical therapist. Therapy programs typically start with gentle motion exercises. Yourdoctor will gradually add strengthening exercises to your program as your fractureheals.OutcomeWhether your treatment involves surgery or not, it can take several months for your collarbone toheal. It may take longer in diabetics or people who smoke or chew tobacco. Most people return toregular activities within 3 months of their injury. Your doctor will tell you when your injury is stableenough to do so. Returning to regular activities or lifting with your arm before your doctor advisesmay cause your fracture fragments to move or your hardware to break. This may require you to startyour treatment from the beginning. Once your fracture has completely healed, you can safely returnto sports activities.
SURGERY TO REPAIR A FRACTURED CLAVICLE:Phase One: the first week after surgeryGOALS:1.2.3.4.Control pain and swellingProtect the clavicle fracture repairProtect wound healingBegin early shoulder motionACTIVITIES:Immediately After Surgery1. After surgery you will be taken to the recovery room, where your family can meet you. Youwill have a sling on your operated arm. Rarely, an abduction pillow is needed to hold the armup in the air away from the body.2. You should get out of bed and move around as much as you can.3. When lying in bed, elevate the head of your bed and put a small pillow under your arm to holdit away from your body.4. Apply cold packs to the operated shoulder to reduce pain and swelling.5. Move your fingers, hand and elbow to increase circulation.6. You will receive a prescription for pain medication prior to going home later unless youhave already received it at your pre-op discussion in the office. Take pain medication asneeded in addition to ibuprofen.The Next Day After Surgery1. Remove the sling several times a day to gently move the arm in a pendulum motion: leanforward and passively swing the arm. Continue to move your fingers, hand and elbow toincrease circulation.2. Keep the dressing in place and do NOT remove it as it will be removed at your postoperative appointment.3.At Home1. You may shower with your dressing in place. To wash under the operated arm, bend over atthe waist and let the arm passively come away from the body. It is safe to wash under the armin this position. This is the same position as the pendulum exercise.2. Apply cold to the shoulder for 20 minutes at a time as needed to reduce pain and swelling.3. Remove the sling several times a day: move the elbow wrist and hand. Lean over and dopendulum exercises for 3 to 5 minutes every 1 to 2 hours.4. DO NOT lift your arm at the shoulder using your muscles.5. Because of the need for your comfort and the protection of the repaired clavicle fracture, asling is usually necessary for 4 to 6 weeks, unless otherwise instructed by your surgeon.OFFICE VISIT:Your first post-operative appointment in the office is 7-10 days after surgery where your dressingwill be removed and you will receive further instructions. If you have questions or concernsregarding your surgery or the rehab protocol and exercises call 608-231-3410.
Rehabilitation after clavicle ORIF phase one: 0 to 6 weeks after surgeryGoals:1. Protect the surgical repair2. Ensure wound healing3. Prevent shoulder stiffness4. Regain range of motion5. Control pain and swellingActivities:1. SlingUse your sling most of the time for the first 2 weeks. The doctor will give you additionalinstructions on the use of the sling at your post-operative office visit. Remove the sling 4or 5 times a day to do pendulum exercises.2. Use of the operated armDo not elevate surgical arm above 90 degrees in any plane for the first 3 weeks post-op.Do not lift any objects over 1 or 2 pounds with the surgical arm for the first 6 weeks.Avoid excessive reaching and external/internal rotation for the first 6 weeks.3. ShoweringYou may shower or bath and wash the incision area. To wash under the operated arm,bend over at the waist and let the arm passively come away from the body. It is safe towash under the arm in this position. This is the same position as the pendulum exercise.Exercise ProgramICEDays per Week: 7Times per Day: 4-5as necessary15- 20 minutesSTRETCHING / PASSIVE MOTIONDays per Week: 7Times per day: 4-5Program:-Pendulum exercises-Supine External rotation-Supine assisted arm elevation limit to 90 degrees weeks 1 to 3, 120 degrees weeks 3 to 6-Isometric exercises: internal and external rotation at neutral Elbow and forearm exercises-Ball squeezes-Scapular retraction
Rehabilitation after clavicle ORIF phase two: 7 to 12weeks after surgeryGoals:1. Protect the surgical repair2. Improve range of motion of the shoulder3. Begin gentle strengtheningActivities1. SlingYour sling is no longer necessary unless your doctor instructs you to continue using it (use itfor comfort only).2. Use of the operated armYou can now move your arm for most daily activities, but at first, you need to continue to becareful not to lift objects heavier than 1 or 2 pounds and avoid forceful pushing or pullingactivities.3. Bathing and showeringContinue to follow the instructions from phase one and the instructions above.Exercise ProgramSTRETCHING / ACTIVE MOTIONDays per week: 7Times per day: 1 to 3-Supine External RotationStanding External RotationSupine assisted arm elevationArm Elevation in scapular planeBehind the back internal rotationHorizontal adductionBiceps curlHands behind-the-head stretchER @ 90º abduction stretchProprioception drillsRhythmic stabilizationScapulohumeral Rhythm exercises InitiateSide lying IR @ 90ºSTRENGTHENING / THERABANDInternal and External rotationRowForward punch (Serratus punch)STRENGTHENING / DYNAMICSide lying ERProne rowProne extensionProne ‘T’sProne ‘Y’sStanding scaptionIsotonic biceps curlPush-ups into wall at week 8 (then pushup progression per MD)
Rehabilitation after clavicle ORIF Phase Three:starting 13 to 18 weeks after surgeryGoals:1. Protect the surgical repair2. Regain full range of motion3. Continue strengthening progressionActivities:Use of the operated armYou may now safely use the arm for normal daily activities involved with dressing, bathing and selfcare. You may raise the arm away from the body; however, you should not raise the arm whencarrying objects greater than one pound. Any forceful pushing or pulling activities could still disruptthe healing of your surgical repair. Continue to avoid lifting weighted objects overheadExercise Program:STRETCHING / RANGE OF MOTIONDays per week: 7Times per day: 1-2Pendulum exercisesStanding External Rotation / DoorwayWall slide StretchHands-behind-head stretchStanding Forward FlexionBehind the back internal rotationHorizontal Adduction StretchSide lying internal rotation (sleeper stretch)External rotation at 90 Abduction stretchSTRENGTHENING / THERABANDDays per week: 7Times per day: 1External RotationInternal RotationStanding Forward PunchDynamic hugSeated RowBiceps curlWsSTRENGTHENING / DYNAMICDays per week: 7 Times per day: 1Side-lying External RotationProne Horizontal Arm Raises ‘T’sProne rowProne scaption ‘Y’sProne extensionStanding forward flexion “full-can” scaptionAdd progressive resistance 1 to 5 lbRhythmic stabilization and proprioceptivetraining drills with physical therapistContinue push up progressionLimited weight training can begin week 13
Rehabilitation after Surgery to Repair Fractured Clavicle Phase Four: starting 19 to 28 weeks after surgeryGoals:1. Progression of functional activities2. Maintain full range of motion3. Continue progressive strengthening4. Advance sports and recreational activity per surgeonExercise ProgramSTRETCHING / RANGE OF MOTIONDays per week: 5-7 Times per day: 1 Continueall exercises from phase 3STRENGTHENING / THERABANDDays per week: 3 Times per day: 1 Continuefrom phase 3STRENGTHENING / DYNAMICDays per week: 3 Times per day: 1 Continuefrom phase 3Closed Kinetic Chain ExercisesPLYOMETRIC PROGRAMUsually for throwing and overhead athletesDays per week and times per day per physical therapist‘Rebounder’ throws with arm at side Walldribbles overheadRebounder throwing/weighted ballDeceleration drills with weighted ball Walldribbles at 90 Wall dribble circlesWEIGHT TRAININGProgressive return to weight training based upon surgeon’s adviceINTERVAL SPORT PROGRAMSSee individual programs for golf, tennis, swimming and throwing.Progressive return to sports based upon surgeon’s advice
Rehabilitation Guidelines after Surgery to Repair Fractured ClaviclePost-op phaseSlingRange ofMotionPhase 10 to 6 weeks after surgeryGoals:*Allow healing of repairedtissuePer MDinstructions.An armsling/supportis used for 6weeks postop wheneverstandingWeeks 1 to 3*Pendulum exercises*Flexion to 90degrees as tolerated*Supine forwardflexion with wand*ER @ 0º astolerated,* shoulder abductionlimit 90*IR and ER@ 90º to45*Supine ER atneutral*No IR behind back,*Scapular retraction*Initiate early protected andrestricted range of motion.*Minimize Gradually restore range ofmotion*Increase strength*Improve neuromuscularcontrol*Enhance proprioceptionand kinesthesia*Isometrics: ER, IR,FLX, EXT, ABD*Ball squeeze*No horizontaladduction* Ice shoulder 3-5 times (15minutes each time) per dayto control swelling andinflammation.Phase 27 to 12 weeks aftersurgeryTherapeutic exercises*Elbow and forearmexercises*Theraband exercisesStarting weeks 3 to 6ER, IR (limit IR toneutral)Weeks 3 to 6*Flexion to 120D/C*In general, increaseROMs gradually astolerated*Shoulder flexionand abduction totolerance (full byweek 12)*Horizontaladduction astolerated*Progressive IR andER as tolerated*Gradually improveROM all planes*Elevation inscapular planeTheraband exercises:,Continue phase 1Biceps curlRowForward punch(Serratus punch)*Wall slide*IR behind back tobeltline only*Horizontaladduction activereach only*Hands behind-thehead stretch*ER @ 90ºabduction stretch*Side lying IR @ 90º* Standing ExternalRotationDynamic exercises:PRE 1-5 lb as tolerated*Side lying ER*Prone row*Prone extension* Standing forwardflexion to 90º*Prone ‘T’s*Standing scaption*Isotonic biceps curl*Prone ‘Y’s*Rhythmicstabilization*Proprioception drills*ScapulohumeralRhythm exercises*Initiate push-ups intowall at week 8 (thenpush-up progressionper MD)Precautions-DO NOT let weightof arm pull onfixation device x 6weeks-DO NOT elevatesurgical arm above90 degrees in anyplane for the first 3weeks post-op.-DO NOT lift anyobjects over 1 to 2pounds with thesurgical arm for thefirst 6 weeks.-AVOIDEXCESSIVEreaching andexternal/internalrotation for the first6 weeks.Progress based onfracture healingProgressive PREAvoid forcefulpushing, pulling andlifting overhead
Post-op PhaseTherapeutic ExercisesPhase 313-16 weeks after surgery*Progress to fullROMGoals:* Progress to full ROM*Improve:strength/power/endurance*Improve neuromuscular control*Improve dynamic stability*Improve scapular muscularstrength*Horizontaladduction stretch*IR behind backfull* Externalrotation at 90 Abduction stretch*Continue theraband anddynamic exercises from phase1 and 2Theraband: add ‘T’s, diagonalup and down, Externalrotation at 90 , Internalrotation at 90 NotesPrecautionsGradual return torecreationalactivities withoutforce on the armContinue to avoidforceful pushingpulling and liftingoverheadInterval sportsprograms canbeginWeight trainingprecautions.Dynamic:*Continue previous*Progressive resistance astolerated*Weight training can begin at12 weeks.*Machine resistance (limitedROM):*Biceps and Triceps*Front pull downs*Seated row*Seated bench press at week16*Other weight training persurgeon’s permissionPhase 416-18 weeks after surgery onwardGoals:Progressively increase activities toprepare patient for unrestrictedfunctional returnProgress to full sports based uponhealing of clavicle fracture andMD approvalFull ROM*May progress CKCprogram:*Ball on wall*Pushup on unstable surfaceat 16 weeksPlyometric exercises forthrowers:*Rebounder throws arm atside*Wall dribbles overhead*Rebounder throws withweighted ball,*Decelerations, wall dribblesat 90º*Wall dribble circles.Strength athletescan graduallyresume regulartraining astolerated
Shoulder Exercises for Clavicle ORIF Rehabilitation Protocol:The exercises illustrated and described in this document should be performed only afterinstruction by your physical therapist or doctor.Pendulum exerciseBend over at the waist and let the arm hang down. Using your body toinitiate movement, swing the arm gently forward and backward and in acircular motion.Shoulder shrugShrug shoulders upward as illustrated.Shoulder blade pinchesPinch shoulder blades backward and together, as illustrated.Isometric internal and external rotationStand facing a doorjamb or the corner of a wall.Keep the elbow tight against your side and hold theforearm at a right angle to the arm. For internal rotation,place the palm against the wall with the thumb facingup. For external rotation, place the back of the handagainst the wall with the thumb facing up.Pull or push against the wall and hold for 5 secondsBall squeeze exercisesHolding a rubber ball or tennis ball, squeeze the ball and hold for 5secondsSupine passive arm elevationLie on your back. Hold the affected arm at the wrist with the oppositehand. Using the strength of the opposite arm, lift the affected arm upward,as if to bring the arm overhead, slowly lower the arm back to the bed.
Supine external rotationLie on your back. Keep the elbow of the affected armagainst your side with the elbow bent at 90 degrees.Using a cane or long stick in the opposite hand, pushagainst the hand of the affected arm so that the affectedarm rotates outward. Hold 10 seconds, relax and repeat.Behind-the-back internal rotationSitting in a chair or standing, place the hand of theoperated arm behind your back at the waistline. Useyour opposite hand, as illustrated, to help the otherhand higher toward the shoulder blade. Hold 10seconds, relax and repeat.Hand-behind-the-head stretchLie on your back. Clasp your hands and placeyour hands behind your head with the elbowsfacing forward. Slowly lower the elbows to theside to stretch the shoulder outward. Hold for 10seconds, and then return to the starting position.Standing external rotationStand in a doorway facing the doorframe or near the edgeof a wall. With your hand against the wall or doorframe,keep the affected arm firmly against your side, and theelbow at a right (90 degree) angle. By moving your feet,rotate your body away from the door or wall to produceoutward rotation at the shoulder.Supine cross-chest stretchLying on your back, hold the elbowof the operated arm with the oppositehand. Gently stretch the elbow towardthe opposite shoulder. Hold for 10seconds.
Sidelying Internal rotation stretchLie on your side with the arm positioned so that thearm is at a right angle to the body and the elbow bentat a 90º angle. Keeping the elbow at a right angle,rotate the arm forward as if to touch the thumb to thetable. Apply a gentle stretch with the opposite arm.Hold 10 to 15 seconds.External rotation at 90º abduction stretchLie on your back. Support the upper arm, if needed,with towels or a small pillow. Keep arm at 90degrees to the body and the elbow bent at 90 degrees.Using a stick and the opposite arm, stretch as if tobring the thumb to the corner of the table adjacent toyour ear. Hold for10 seconds, and then return to the starting positionWall slide stretchStand facing a wall; place the hands of both arms on the wall. Slide thehands and arms upward. As you are able to stretch the hand and armhigher, you should move your body closer to the wall. Hold 10seconds, lower the arm by pressing the hand into the wall and letting itslide slowly down.Seated/Standing Forward Elevation (Overhead Elbow Lift)During this phase, you can stand or sit in a chair. If it is easier,begin lying on your back until you achieve maximal motion,then use the standing or seated position. Assume an uprightposition with erect posture, looking straight ahead. Place yourhands on either thigh with the operated thumb facing up andyour elbow straight. In the beginning, this stretch is notperformed solely with the operated arm, but uses theuninjured hand for assistance going up and coming down. Asyou become stronger, you can raise and lower your armwithout assistance. The operated arm should be lifted as highas possible, or to your end-point of pain. Try to raise the armby hinging at the shoulder as opposed to raising the arm withthe shoulder blade.
Standing forward flexionStand facing a mirror with the hands rotated so that thethumbs face forward. Raise the arm upward keeping theelbow straight. Try to raise the arm by hinging at theshoulder as opposed to raising the arm with the shoulderblade. Do 10 repetitions to 90 degrees. If you can do thiswithout hiking the shoulder blade, do 10 repetitions fullyoverhead.Prone rowingThe starting position for this exercise is to bend over at thewaist so that the affected arm is hanging freely straightdown. Alternatively, lie face down on your bed with theoperated arm hanging freely off of the side. While keepingthe shoulder blade ‘set’, raise the arm up toward the ceilingwhile bending at the elbow. The elbow should be drawnalong the side of the body until the hands touch the lowerribs. Always return slowly to the start position.Prone horizontal abduction (‘T’s)The starting position for this exercise is to bend over at the waist sothat the affected arm is hanging freely straight down. Alternatively, lieface down on your bed with the operated arm hanging freely off of theside. Rotate your hand so that the thumb faces forward. While keepingthe shoulder blade ‘set’ and keeping the elbows straight, slowly raiseyour arm away from your body to shoulder height, through a pain-freerange of motion (so that your hand now has the thumb facing forward,and aligned with your cheek). Hold that position for 1 to 2 seconds andslowly lower. Limit the height that you raise the arm to 90 degrees, orin other words, horizontal to the floor.Prone horizontal abduction with external rotationThe starting position for this exercise is to bend over at the waist so thatthe affected arm is hanging freely straight down. Alternatively, lie facedown on your bed with the operated arm hanging freely off of the side.Rotate your hand so that the thumb faces outward. While keeping theshoulder blade ‘set’ and keeping the elbows straight, slowly raise yourarm away from your body to shoulder height, through a pain-free rangeof motion (so that your hand now has the thumb facing forward, andaligned with your cheek). Hold that position for 1 to 2 seconds andslowly lower. Limit the height that you raise the arm to 90 degrees, or inother words, horizontal to the floor.
Prone scaption (‘Y’s)The starting position for this exercise is to bendover at the waist so that the affected arm is hangingfreely straight down.Alternatively, lie face down on your bed with theoperated arm hanging freely off of the side. Keep theshoulder blade ‘set’ and keep the elbows straight. Slowlyraise the arm away from your body and slightly forwardthrough a pain-free range of motion (so that your handnow has the thumb facing up, and is aligned with yourforehead). Hold that position for 1 to 2 seconds andslowly lower. Limit the height that you raise the arm to90 degrees, or in other words, horizontal to the floor.Prone extensionThe starting position for this exercise is to bend over at thewaist so that the affected arm is hanging freely straight down.Alternatively, lie face down on your bed with the operatedarm hanging freely off of the side. While keeping the shoulderblade ‘set’ and keeping the elbow straight, raise the armbackward toward your hip with the thumb pointing outward.Do not lift your hand past the level of your hip.Prone external rotation at 90 º AbductionLie face down on a table with your arm hangingover the side of the table. Raise the arm to shoulderheight at a 90º angle to the body. While holding thearm in this position, rotate the hand upward, untilthe hand is even with the elbow. Hold one secondand slowly let the hand rotate to the startingposition and repeat.Sidelying external rotationLying on the non-operated side, bend your elbow to a 90-degreeangle and keep the operated arm firmly against your side withyour hand resting on your abdomen. By rotation at the shoulder,raise your hand upward, toward the ceiling through acomfortable range of motion. Hold this position for 1 to 2seconds, and then slowly lower the hand.
Standing forward flexion (‘full-can’) exerciseStand facing a mirror with the hands rotated so that thethumbs face forward. While keeping the shoulder blade‘set’ and keeping the elbows straight, raise the armsforward and upward to shoulder level with a slightoutward angle (30 ). Pause for one second and slowlylower and repeat.Lateral RaisesStand with the arm at your side with the elbow straightand the hands rotated so that the thumbs face forward.Raise the arm straight out to the side, palm down, untilthe hands reach shoulder level. Do not raise the handshigher than the shoulder. Pause and slowly lower the arm.Theraband StrengtheningThese resistance exercises should be done very slowly in both directions.We want to strengthen you throughout the full range of motion and it is veryimportant that these exercises be done very slowly, not only when youcomplete the exercise (concentric), but also as you come back to the startposition (eccentric). The slower the motion, the more maximal thecontraction throughout a full range of motion.External RotationAttach the theraband at waist level in a doorjamb or other.While standing sideways to the door and looking straightahead, grasp one end of the band and pull the band allthe way through until it is taut. Feet are shoulder widthapart and the knees are slightly flexed. The elbow isplaced next to the side with the hand as close toyour chest as possible (think of this elbow as being ahinge on a gate). Taking the cord in the hand, move thehand away from the body as far as it feels comfortable.Return to the start position.Internal RotationAttach the Theraband at waist level in a doorjamb or other.While standing sideways to the door and looking straightahead, grasp one end of the handle and pull the cord allthe way through until it is taut. Feet are shoulder widthapart and the knees are slightly flexed. The elbow is placednext to the side and is flexed at 90 degrees (think of thiselbow as being a hinge on a gate). Taking the cord inthe hand, move the hand toward the chest as faras it feels comfortable. Return to the start position.
Shoulder ShrugStand on the theraband with your feet at should widthapart and look straight ahead. Next, straighten up,keeping the knees slightly flexed, with your armsstraight down at the sides (palms in). Slowly raisethe shoulders in a shrug (toward the ears), then rotatethe shoulders backward in a circular motion, andfinally down to the original position. This movementis completed while keeping constant tension on the cord.Seated / Standing RowAttach the theraband in a doorjamb or other. Sit or standfacing the door. Use a wide flat—footed stance and keepyour back straight. Begin with the arms slightlyflexed, hands together at waist level in front of yourbody, thumbs pointing upward, and with the cordtaut. You are producing a rowing motion. Pull the cordall the way toward the chest. While pulling the cord,the elbows should be drawn along the side of the bodyuntil the hands touch the lower ribs. Always returnslowly to the start position.Standing Forward PunchAttach the theraband at waist level in the doorjamb.Facing away from the door, stand in a boxing positionwith one leg ahead of the other (stride position). Do notbend at the waist and remain in an upright position.If the right shoulder is the injured extremity, you willwant to grasp the handle in the right hand and stepout until the cord is taut. If you use the right hand,the left foot should be forward in the stride position.Begin with your right arm at waist level and bend theelbow at a 90 degree angle, with the elbow remainingnear your side. Slowly punch forward while slightlyraising the right arm in a forward, upward punchingmotion. The hand should reach approximately necklevel with the right arm almost straight.
Biceps CurlsPlace your feet on the cord, shoulder width apart,knees slightly bent. Keeping your elbows close tothe sides of your body, slowly bend the arm at theelbow and curl towards the shoulder.Dynamic HugWith the tubing attach behind you at shoulder height,grip both ends of the tubing in your hands with thetubing on the outside of your shoulders. Pull theband forward and slightly downward in a ‘hugging’motion, or as if you were wrapping both arm arounda small tree. Pause and return slowly to the startingposition.‘W’sWith the tubing attached in front of you,stand with the tubing in both hands withthe elbows bent at 90º and fixed at your side.Pull the band outward, keeping the elbow atyour side. The arms rotate outward makingthe shape of a ‘W’.Standing ‘T’s.Stand with the theraband attached in frontof you. Stand with the arm flexed forwardat shoulder height with the elbow straight.While keeping the elbow straight, pull thearm toward the rear until the arm is by your side.Theraband external rotation at 90º.Stand with the theraband attached in front of you.Keeping the arm elevated to 90 degrees and theelbow at a 90-degree angle, rotate the hand andarm
2. Ensure wound healing 3. Prevent shoulder stiffness 4. Regain range of motion 5. Control pain and swelling Activities: 1. Sling Use your sling most of the time for the first 2 weeks. The doctor will give you additional instructions on the use of the sling at your post-operative office visit. Remove the sling 4 or 5 times a day to do pendulum .