Transcription
NC TURRET PUNCH PRESSOPERATOR'S MANUALCopyright 1998 by Amada Engineering & Service Co., Inc.14921 East Northam Street, La Mirada, CA 90638All rights reserved. No part of this book shall be reproduced, stored in a retrieval system, or transmitted byany means, electronic, mechanical, photocopying, recording, or otherwise, without written permission fromthe publisher. No patent liability is assumed with respect to the use of the information contained herein.While every precaution has been taken in the preparation of this book, the publisher assumes noresponsibility for errors or omissions. Neither is any liability assumed for damages resulting from the useof the information contained herein.
FOREWORDThis manual has been prepared to acquaint you with the installation, operation and maintenance procedures of your Amada machine. We urge thatyou read this manual carefully for a thorough understanding of the equipmentand for trouble-free operation of the machine. In addition to this manual, youmay also refer to the Tooling Manual and to the Programming Manual.As Amada’s policy is one of continuous development of each type of --machine, this manual, though completely up to date when issued, is subjectto change without notice.sERiALNU M B E RPlease enter the serial number of your machine in the space above. When consulting with Amada,‘be sure to provide the machine model and serial number.,-
CONTENTS- \\4,gSECTION 1 - ‘MACHINE DESCRIPTIONTABLE.-.l-2CARRIAGE . . . . . . . . . . . . . . . . . . . . . . . . . . . . . . . . . . . . . . . . . . . . . .1-2CLAMPS . . . . . . . . . . . . . . . . . . . . . r.: . . . . . . . . . . . . . . . . l-2X-GAUGE BLOCK . . . . . . . . . . . . . . . . . . . . . . .:. . . . . . . . . . . . . . . . . l - 2TURRET .l- 3 WORK HOLDERS . . . . . . . . . . . . . . . . . . . . . . . . . . . . . . . . . . . . . . . . l - 3STRIKER. . . . . . . . . . . . . . . . . . . . . . . . . . . . . . . . . . . !. . . . . . . . . . . 1 - 3INDEX PINS . . . . . . . . . . . . . . . . . . . . . . . . . . . . . . . . . . . . . . . . . . . . . l - 3WORK CHUTE . . . . . . . . . . . . . . . . . . . . . . . . . . . . . . . . . . . . . . . . . . . . l - 4TOOL BALANCER . . . . . . .: . . . . . . . . . . . . . . . . . . . . . . . . . . . . . . . . . l - 4PRESS MOTOR . . . . . . . . . . . . . . . . . . . . . . . :;. . . . . . . . . . . . . . . . . . . 1 - 5CLUTCH AND BRAKE (EXCEPT PEGA KING) . . . . . . . . . . . . . . . l - 5HYDRAULIC UNIT (EXCEPT PEGA KING). . . . . . . . . . . . . . . . . . . l - 5CLUTCH AND BRAKE (PEGA KIN G ONLY) . . . . . . . . . . . . . . . . . l - 6SAFETY DEVICES . . . . . . . . . . . . . . . . . . . . . . . . . . . . . . . . . . . . . . . . l - 7SECTION 2 - INSTALLATION‘I. .IPLACEMENT . . . . . . . . . . . . . . . . . . . . . . . . . . . . . . . . . . . . . . . . . . . . . 2 - lAIR SUPPLY . . . . . . . . . . . . . . . . . . . . . . . . . . . . . . . . . . . . . . . . . . . . 2 - 2ELECTRICAL POWER CONNECTION . . . . . . . . . . . . . . . . . . . . . . . . 2 - 2SECTION 3 - CONTROLSNC UNIT CONTROL PANEL . . . . . . . . . . . . . . . . . . . . . . . . . . . . . . .CONTROL PANEL A . . . . . . . . . . . . . . . . . . . . . . . . . . . . . . . . .:. . . .CONTROL PANEL B . . . . . . . . . . . . . . . . . . .:. . . . . . . . . . . . . . . . . .ELECTRICAL ENCLOSURE . . . . . . . . . . . . . . . . . . . . . . . . . . . . . . . .TOOL BALANCER . . . . . . . . . . . . . . . . . . . . . . . . . . . . . . . . . . . . . . . .,OTHER INDICATOR LAMPS (EXCEPT PEGA KING) . . . . . . . . . .OTHER CONTROLS . . . . . . . . . . . . . . . . . . . . . . . . . . . . . . . . . . . . . . . .3-l3-133-143-163-173-193-19CRT ,D ISPLAYStatus characters . . . . . . . . . . . . . . . . . . . . . . . . . . . . . . . . . . . . . . . . . . . 3 - 2 0Inputdata . . . . . . . . . . . . . . . . . . . . . . . . . . . . . . . . . . . . . . . . . . . . . .3-2 1Program and sequence numbers . . . . . . . . . . . . . . . . . . . . . . . . . . . . . . . . 3 - 2 2Alarm. .;. .3-2 2Position data . . . . . . . . . . . . . . . . . . . . . . . . . . . . ; . . . . . . . . . . . . . . . . . 3 - 2 3:Commanddata.3-2 5Program data . . . . . . . . . . . . . . . . . . . . . . . . . . . . . . . . . . . . . . . . . . . . . 3 - 2 7 ’.
SECTION 4 - OPERATION-.PREPARATION. . . . . . . . . . . . . . . . . . . . . . . . . . . . . . . . . . . . . . . . . . 4-lAUTOMATIC OPERATIONTAPEmode . . . . . . . . . . . . . . . . . . . . . . . . . . . . . . . . . . . . . . . . . . . .4-2MEMORY mode. . . . . . . . . , . . . . . . . . . . . . . . . . . . . . . . . . . . . . . . . . 4-4MDI (Manual data input) mode ,.4 - 6OPERATION INTERRUPTS . . . . . . , . . . . . . . . . . . . . . . . . . . . . . . . . 4-8PROGRAM CHECKProgram tape . . . . . . . . . . . . . . . .-. . . . . . . . . . . . . . . . . . . . . . . . . . . . . . . .Programs stored in memory . . . . . . . . . . . . . . . . . . . . . . . . . . . . . . . . . . . .Program errors . . . . . . . . . . . . . . . . . . . . . . . . . . . . . . . . . . . . . . . . . . . .Program check end . . . . . . . . . . . . . . . . . . . . . . . . . . . . . . . ; . . . . . . . . . . . .4-104-104-l 14-l 1PROGRAM REGISTRATION AND DELETIONRegistering program tape data in memory . . . . . . . . . . . . . . . . . . . . . . . . .Adding tape program to existing programs in memory . . . . . . . . . . . . . .Entering programs from NC control panel . . . . . . . . . . . . . . . . . . . . . 1 . .Program deletion . . . . . . . . . . . . . . . . . . . . . . . : . . . . . . . . . . . . . . . . . .Deletion-of all programs . . . . . . . . . . . . . . . . . . . . . . . . . . . . . . . . . . . . .4-124-134-134-l 54-l 5.ISEQUENCE NUMBER SEARCH . . . . . . . . . . . . . . . . . . . . . . . . . . . . . 4 - 1 6PROGRAM NUMBER SEARCH . . . . . . . . . . . . . . . . . . . . . . . . . . . . . 4 - 1 7PROGRAM EDITINGEditing procedures . . . . . . . . . . . . . . . . . . . . . . . . . . . . . . . . . . . . . . . . . 4 - 1 8Scanmethod . . . . . . . . . . . . . . . . . . . . . . . . . . . . . . . . . . . . . . . . . . . . . 4 - 1 8Word search method. . . . . . . . . . . . . . . . . . . . . . . . . . . . . . . . . . . . . . . . . 4 - 1 9Return to program start . . . . . . . . . . . . . . . . . . . . . . . . . . . . . . . . . . . . . . 4 - 2 0Word insertion . . . . . . . . . . . . . . . . . ; . . . . . . . . . . . . . . . . . . . . . . . . . . 4-21Word alteration . . . . . . . . . . . . . . . . . . . . . . . . . . . . . . . . . . . . . . . . . . . . 4 - 2 2Insertion/alteration of multiple words 0: blocks . . . . . . . . . . . . . . . . . . 4 - 2 3Worddeletion.4-2 4Deleting words up to EOB (;) . . . . . . . . . . . . . . . . . . . . . . . . . . . . . . . . . 4 - 2 4Deleting multiple blocks . . . . . . . . . . . . . . . . . . . . . . . . . . . . . . . . . . . . . . 4 - 2 4Memory’rearrangement . . . . . . . . . : . . . . . . . . . . . . . . . . . . . . . . . . . . . 4 - 2 5\INCH-ME?;RIC SELECTIONSelection by setting data . . . . . . . . . . . . . . . . . . . . . . . . . . . . . . . . . . . . . . 4 - 2 6SelectionbyGcode. . . . . . . . . . . . . . . . . . . . . . . . . . . . . . . . . . . . . .4-2 6,MACRO MEMORY SETTING . . . . . . . . . . . . . . . . . . . . . . . . . . . . . . . . . 4 - 2 7MULTIPLE PART PUNCHING .PROGRAM SETTING . . . . . . . . . . . 4 - 2 7BENDING COMPENSATION (G94) DATA SETTING . . . . . . . . . . . 4 - 2 7DISPLAY/SETTING OF TOTAL NUMBER OFTOOL OPERATIONSDisplay.:.4-29Setting . . . . . . . . . . . . . . . . . . . . . . . . . . . . . . . . . . . . . . . . . . . . . . . .4-29--.
. 2ALARM MESSAGES . . . . . . . . . . . . . . . . . . . . . . . . . . . . . . . . . . . . . . 4 - 3 3Program and operation errors . . . . . . . . . . . . . . i . . . . . . . . . . . . . . . . . . 4 - 3 4Ovenravel. .4-4 1Errors in servo system . . . . . . . . . . . . . . . . . . . . . . . . . . . . . . . . . . . . . . 4 - 4 3Faulty PC boards, cables, etc. . . . . . . . . . . . . . . . . . . . . . . . . . . . . . . . . . 4 - 4 6Control system and motor overheat . . . . . . . . . . . . . . . . . . . . . . . . . . . . . . 4 - 4 6Memory errors . . . . . . . . . . . . . . . . . . . . . . . . . . . . . . . . . ; . . . . . . . . . . 4 - 4 7Other errors . . . . . . . . . . . . . . . . . . . . . . . . . . . . . . . . . . . . . . . . . . . . . . ; . 4 - 4 8NC STATUS DISPLAY . . . . . . . . . . . . . . . . . . . . . . . . . . . . . . . . . . . . 4-49DISPLAY/SETTING OF RUNNING TIMEDisplay . . . . . . . . . . ; . . . . . . . . . . . . . . . . . . . . . . . , . . . . . :. . . . . . . . . 4-51Setting . . . . . . . . . . . . . . . . . . . . . . . . . . . . . . . . . . . . . . . . . . . . . . . .4-52SECTION !i - MAINTENANCEMECHANICAL MAINTENANCEDaily maintenance . . . . . . . . . . . . . . . . . . , . . . . . . . . . . . . . . . . . . . . . . . 5-lMonthly maintenance. . . . . . . . . . . . . . . . . . . . . . . . . . . . . . . . . . . . . . . 5-4Replacement of hydraulic oil and line filter . . . . . . . . . . . . . . . . ; . . . . . 5-5Shear plate replacement . . . . . . . . . . . . . . . . . . . . . . . . . . . . . . . . . . . . . 5-6LUBRICATIONDaily lubrication . . . . . . . . . . . . . . . . . . . . . . . . . . . . . . . . . . . . . . . . . . . 5-7Periodic lubrication . . . . . . . . . . . . . . . . . . . . . . . . . . . . . . . . . . . . . . . . 5-8ELECTRICAL MAINTENANCE. . . . . . . . . . . . . . . . . . . . . . . . . . . . . 5-13NC UNIT MAINTENANCETape reader . . . . . . . . . . . . . . . . . . . . . . . . . . . . . . . . . . . . . . . . . . . . . . . . 5-l 4Air filter . . . . . . . . . . . . . . . . . . . . . . . . . . . . . . . . . . . . . . . . . . . . . .; . . . 5 - 1 4SELF-DIAGNOSTIC FUNCTION . . . . . . . . . . . . . . . . . . . . . . . . . . . . .5-15 .ACCESS0 R IESPNEUlvlATIC X-GAUGE BLOCK . . . . . . . . . . . . . . . . . . . . . . . . . . . . .WORK PUSHER . . . . . . . . . . . . . . . . . . . . . . . . . . . . . . . . . . . . . . . . . . . .WORKP(ECE/SCRAP SEPARATOR . . . . . . . . . . . . . . . . . . . . . . . . . .TAPPING UNIT . . . . . . . . . . . . . . . . . . . . . . . . . . . . . . . . . . . . . . . . . .HYDRAULIC WORK CLAMP . . . . . . . . . . . . . . . . . . . . . . . . . . . . . . .PUNCH ASSEMBLY JIG SET. . . . . . . . . . . . . . . . . . . . . . . . . . . . . . . .AUTO-INDEX DEVICE . . . .:. . . . . . . . . . . . . . . . . . . . . . . . . . . . . . . .‘TAPE PUNCH INTERFACE . . . . . . . . . . . . . . . . . .:. . . . . . . . . . . . .6-l6-l6-26-36-46-56-56-6
SECtION 1 -. MACHINE DESCRIPTIONTABLE.l- 2CARRIAGE . . . . . . . . . . . . . . . . . . . . . . . . . . . . . . . . . . . . . . . . . . . . . . l - 2CLAMPS . . . . . . . . . . . . . . . . . . . . . . . . . . . . . . . . . . . . . . . . . . . . . . . . l - 2X-GAUGE BLOCK . . . . . . . . . . . . . . . . . . . . . . . . . . . . . . . . . . . . . . . . l - 2TURRET . . . . . . . . . . . . . . . . . . . . . . . . . . . . . . . . . . . . . . . . . . . . . . .l- 3WORK HOLDERS . . . . . . . . . . . . . . . . . . . . . . . . . . . . . . . . . . . . . . . . l - 3STRlKER.l- 3INDEX PINS . . . . . . . . . . . . . . . . . . . . . . . . . . . . . . . . . . . . . . . . . . . . . l - 3WORK CHUTE . . . . . . . . . . . . . . . . . . . . . . . . . . . . . . . . . . . . . . . . . . . l - 4c T O O L BALANCER . . . . . . . . . . . . . . . . . . . . . . . . . . . . . . . . . . . . . . . . l - 4‘-PRESS MOTOR . . . . . . . .:. . . . . . . . . . . . . . . . . . . . . . . . . . . . . . . . . . l - 5‘CLUTCH AND BRAKE (EXCEPT PEGA KING) . . . . . . . . . . . . . . . l - 5HYDRAULIC UNIT (EXCEPT PEGA KING). . . . . . . . . . . . . . . . . . . l-5CLUTCH AND BRAKE (PEGA KING ONLY) . . . .:. . . . .;. . . . . . . l - 6SAFETY DEVICES. . . . . . . . . . . . .:. . . . . . . . . . . . . . . . . . . . . . . . . . . . . l - 7.‘, ’
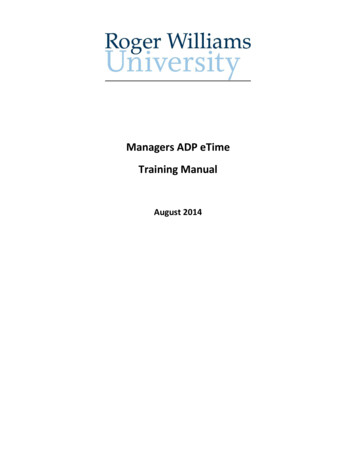
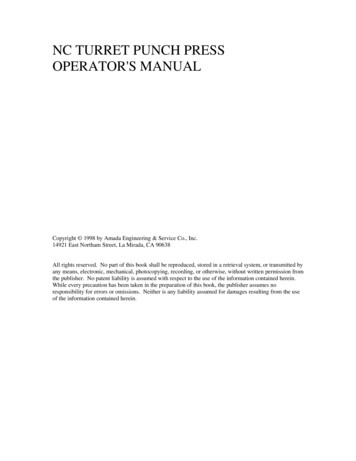
SECTION 1 - MACHINE DESCRIPTIONThe Amada Turret Punch- Press is equipped with a Numerical Control (NC) system in whichthree driving axes are simultaneously controlled by three DC sen/o motors.The NC system decodes the input command and the corresponding instruction is transmittedto DC servo motors which drive the table and the carriage to position the worksheet forpunching. At- the same time, the-turret is driven by a DC servo motor to select the desiredtool. Upon completion of these operations, punching is performed.CRANK POSITIONINDICATOR-CARRIAGEIOTHER.INDICATOR*TOOL BALANCERCONTROLPANEL ‘3’WORK HOLDER/FOOT SWITCHTABLE/\\ENCLOSURECONTROLPANEL “A”X-GAUGE BLOCK[Photo 11*Standard equipment on the VELA II with thick turret, the COMA series and the PEGA KING.
TABLEThe table, which consists of a center table and two side tables, supports the worksheet. Theside tables are driven by a DC servo motor and slide smoothly along guide bars with the aidof linear motion bearings. Freemotion bearings have been placed on both the center andside table surfaces in order to ensure smooth movement of the worksheet.CARRIAGEThe carriage is driven by a DC servo motor and moves the worksheet along the X-axis.CLAMPSThe clamps are attached to the carriage, and hold the worksheet during punching. Clampingand unclamping are accomplished in a convenient one-touch operation by a foot switch.The clamps can be relocated by simply loosening the clamp-lever. There are four air connectars on the carriage so that the clamps can be connected to the air supply regardless of theirposition.,IX-GAUGE BLOCKIThe X-gauge block is used to determine the zero point (the origin) along the X-axis whensecuring the worksheet with the clamps. The zero .point along the Y-axis is determined bypushing the worksheet up against the two clamps while they are open.The X-gauge block is equipped with an interlock mechanism for safe operation. While theX-gauge block remains elevated, operation will not begin.NOTE: When the worksheet is too narrow to use the X-gauge block, use the locator pin(standard accessory). Be sure to remove the pin after the zero point of.the worksheet has been set.Il-2,.
TURRETThe turret selects the desired tool quickly by automatically rotating in either direction forthe shortest index time. It is a triple track turret, and is driven by a DC servo motor.WORK HOLDERSTwo work holders secure the worksheet while the automatic repositioning function is operating. This function is used when the clamp ‘positions must be changed in order to punchbeyond the normal punching range or to punch positions too close to the clamps.STRIKERThe striker moves to one of the three available tracks (inner, center or outer) and strikesthe punch. The-striker is moved to the proper track by air pressure.INDEX PINSThe index pins lock the turret in position during the punching operation. Two index pinsare used, one each for the upper and lower turrets.
WORK CHUTEThe work chute drops small workpieces or scrap down through the window [2OO mm x200 mm (7.8” x. 7.8’91 cut into the table, The window is opened and closed by programinstruction. When M80 is programmed the window is opened, and when M81 is programmedthe window is closed.NOTE: The work chute is optional equipment on the PEGA model.TOOL BALANCERDue to the weight of punch sets of 3-l/2 inches and more in diameter, it may be difficult tochange them. The tool balancer supports the weight of large punch sets so that they may. bechanged easily.NOTE: The tool balancer is \optional equipment on the PEGA model, and not available forthin turret machine. ’(I, ,i:L’
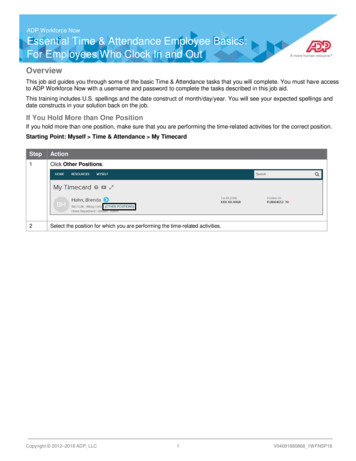
‘.PRESS MOTORA three-phase induction motor is used as the press motor. This motor drives the flywheel,which generates the force required to-punch the worksheet.CLUTCH AND BRAKE (EXCEPT PEGA KING)The clutch and brake are the most important parts of the press. The torque of the fl,ywheelis transmitted to the crankshaft &hen the clutch is engaged and the brake is released. Theclutch and brake are actuated by hydraulic pressure. These two units work in combination,and are cooled and lubricated by an oil bath to provide quiet operation and long service life.HYDRAULIC UNIT (EXCEPT PEGA KING)‘,The hydraulic unit serves as a power source for both the clutch and brake. It consists of highand low oil-pressure lines. The high-pressureline is used to activate the clutch and brake, andthe low-pressure line to cool and lubricate these units.BRAKE PLATEPRESS MOTOR’,,ACCUMt JL.ATOR‘HYDRAULIC UNITil-5:
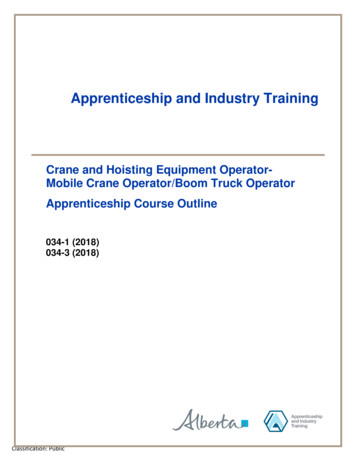
CLUTCH AND BRAKE (PEGA KING ONLY)The clutch and the brake are the most important parts of the press. The torque of ?he flywheel is instantly transmitted to the crankshaft when the clutch is engaged and the brake isreleased. The clutch and the brake are actuated by air pressure.PRESS MOTORCLUTCH1-6
SAFETY DEVICESOVERRIDE DETECTION (CLAMP PROTECTION)I-25-JThis machine is designed so that the clamps can actually enter between the upper and lowerturrets. This feature minimizes the area in which punching cannot be done. A detectormoniters the clamp positions. If a clamp is in danger of being punched, the detector interrupts the pun&ng operation and the OVERRIDE light comes on.OVERLOAD PROTECTION (Press Mechanism)When an overload is imposed on the shear plate, which is built into the triple track striker,the shear plate will break, protecting the press mechanism. Replace the broken shear plateaccording to the procedure on page 5-6.OVERLOAD PROTECTION (DC Se& Motor)If a fault (overloading or other malfunction) occurs in the DC servo system, an alarm number will appear on the CRT, and the machine will stop immediately.OVERTRAVEL PROTECTIONIf either the carriage or the table moves beyond its maximum range, one of the limit switchesat both ends of the X- and Y-axes will activate. The machine will then stop immediately andthe overtraveled axis will be shown on the CRT.OVERTRAVEL PRECHECKDuring a TAPE, MDI (Manual Data Input) or MEMORY operation, an instruction causingovertravel may be ,detected by calculations within the NC (Numerical Control) unit beforethe overtravel actually occurs. In this case, the NC system treats the overtravel calculationas an error in the program and an alarm message will be displayed on the CRT.CRANK OVERRUN DETECTION.When the crank does not stop exactly at top dead center, the TOP DEAD CENTER light willnot come on, and the machine will go t.o an emergency stop status immediately.TOOL CHANGE DOOR INTERLOCKWhen -the tool change door is opened, the-TOOL CHANGE DOOR light will come on. Themachine will not start unless the tool change door is closed.INDEX PIN AND STRIKER POSITION CHECKThe machine will not punch if either the striker fails to move to the proper track or the bothindex pins do not enter into lower and upper turret index pin holes.l-7
UNCLAMPING PROTECTIONDuring automatic operation, the clamps will not open even if the foot switch is accidentallypressed. However, when either the PROGRAM STOP light or the OPTIONAL STOP-lightis on, this function is ineffective.X-GAUGE BLOCK INTERLOCKWhen the X-gauge block is raised, the X-GAUGE BLOCK light will come on. The machinewill not start unless the X-gauge block is lowered.STRIPPING MISS DETECTIONIf punch retraction is delayed due to its wear or improper clearance, the STRIPPING MISSlight will come on, and the machine operation will stop.TOOL CHANGE SWITCHWhen this switch is turned to ON, the press motor will stop and both X- and Y-axes will belocked. The turret can be rotated.in the MANUAL mode for tool replacement.LOW AIR PRESSURE DETECTIONIf the air pressure falls below approx. 3.0 kg/cm2 (43 psi), the press motor will stop and alloperations will cease.EMERGENCY STOP BUTTCNThe EMERGENCY STOP button is located on the NC unit. It immediately stops 1 operations of this machine.ABNORMAL HYDRAULIC OIL DETECTION (except PEGA KING)When oil pressure drops below the specified value or oil temperature rises abnormally, themachine will come to an emergency stop.l-8
SECTION 2 - INSTALLATIONPLACEMENT . . . . . . . . . . . . . . . . . . . . . . . . . . . . . . . . . . . . . . . . . . . . . 2 - lAIR SUPPLY . . . . . . . . . . . . . . . . . . . . . . . . . . . . . . . . . .2- 2ELECTRICAL POWER CONNECTION . . . . . . . . . . . . . . . . . . . . . . . . 2 - 2.
SECTION 2 - INSTALLATIONii.,:,‘-When your machine is delivered, an AMADA service engineer will be sent to your facility. Installation of the machine should be accomplished in accordance with his instructions.PLACEMENTThe foundation for the machine must be constructed of concrete and must be level, asspecified in the foundation plan provided by AMADA. In addition to the foundation planrequirements, extra space is required for the following: working area, tool storage, and.installation of the NC unit and air compressor.Should there be other machinery producing vibration or dust near this machine, extra precautions must be taken to isolate the machine and the NC unit. Also, should there be nearbymachinery producing electrical interference (such as a welder, drill, or sander),: keep the NCunit at least 2 to 3 meters (7 to 10 ft) away from it. The machine electric power source mustbe grounded, and separate from that of equipment which ‘may produce electrical noise.Attach the sling wire ropes to the four ribs located on the upper machine, frame after confirming the machine weight. Balance the machine and lift it slowly and carefully.To lift the NC unit, attach the wire rope slings to the four hooks. Balance the unit and lift itslowly and carefully.Yf .LNCI2-lLESS THAN20 DEGREES
AIR SUPPLYIt is necessary to supply clean, dry air to this machine. When in use, it requires 80 Q (2.8 ft3 1of air per minute. The line pressure must be more than 5.0 kg/cmi (70 psi) and the air hoseor pipe must have an inside diameter of at least l/4”. On the model PEGA 30 40 50 KING,it requires 2,OOOQ (71 ft3) of air per minute at a pressure of more than 5.7 kg/cm2 (80 psi)and the air hose or pipe must have an inside diameter of at least 3/4”. A smaller size willcause a decrease in air pressure. The distance between the compressor and the machine shouldbe as short as possible in order to obtain maximum pressure efficiency.NOTE: If piping length is greater than 5 meters (169, use air hoses or pipes of at-least 3/8”diameter (except PEGA KING).ELECTRICAL POWER CONNECTIONA threephase power cable with a capacity of at least 17 KVA must be used. On the modelPEGA 30 40 50 KING, a cable with a capacity of at least 15 KVA must be used. Connect itto the input side terminals of the circuit breaker (NFB), located in the electrical enclosure.Connect a ground cable to the ground terminal in the enclosure. Turn the machine on andcheck that the press motor is rotating in the cor.rect direction. If the press motor rotates inthe reverse direction, interchange any two phase connections of the power cable at the circuitbreaker.CAUTION: To protect personnel against injury and the machine against possible damage,ensure that all electrical work is done by a qualified electrician.2-2
SECTION 3 - CCNTROLS\ .’NC UNIT CONTROL PANEL . . . . . . . . . . . . . . . . . . . . . . . . . . . . . . . .CONTROL PANEL A . . . . . . . . . . . . . . . . . . . . . . . . . . . . . . . . . . . . .CONTROL PA N E L 8 . . . . . . . . . . . . . . . . . . . . . . . . . . . . . . . . . . . . . .ELECTRICAL ENCLOSURE . . . . . . . . . . . . . . . . . . . . . . . . . . . . . . . .TOOL BALANCER . . . . . . . . . . . . . . . . . . . . . . . . . . . . . . . . . . . . . . . .3-l3-133-143--163-17OTHER INDICATOR LAMPS (EXCEPT PEGA KING) . . . . . . . . . . 3 - 1 9OTHER CONTROLS . . . . . . . :. . . . . . . . . . . . . . . . . . . . . . . . . . . . . . . 3 - 1 9CRT D,lSPLAYStatus characters . . . . . . . . . . . . . . . . . . . . . . . . . . . . . . . . . . . . . . . . . . 3 - 2 0Inputdata . . . . . . . . . . . . . . . . . . . . . . . . . . . . . . . . . . . . . . . . . . . . . .3-2 1Program and sequence numbers . . . . . . . . . . . . . . . . . . . . . . . . . . . . . . . 3 - 2 2iAlarm.3-2 2Position data . . . . . . . . . . . . . . . . . . . . . . . . . . . . . . . . . . . . . . . . . . . . . . 3 - 2 3Commanddata. .3-2 5Program data . . . . . . . . . . . . . . . . . . . . . . . . . . . . . . . . . . . . . . . . . . . . . 3 - 2 7
SECTION 3 - CONTROLS.\ \.’NC UNIT CONTROL PANEL1. tic POWER ON BUTTONPush this button to turn the NC unit on. The circuit breaker (84) must be on before pushingthis button.2:’ NC (POWER OFF BUTTONPush this&button to turn the NC unit off.I3. CRTThe CRT displays operating, programming, and troubleshooting data.4. ABWNC B U T T O NThis button selects the coordinate value mode of the X- and Y-axes (absolute or incremental)during MDI (Manual Data Input) mode operation. ABS or INC will be displayed on the lowerright corner of the CRT. When the NC power is turned on, ABS will be displayed on the CRT.3-l
5. CURSOR BUTTONSThese buttons control the position of the cursor on the CRT. When the t‘- - button is push-s-‘ button is pushed, the cursor will move downed, the cursor will move upward; when theward. The cursor will continue to move as long as either button is pushed.8. PAGE BUTTONSThe data displayed on the CRT is in page format. These buttons select the desired page num7‘ button is pushed, the data will back up one page number. W-hen theber. When the . .-i’buttonispushed,the data will advance one page number. The pages will continue to-.change as long as ehher button is pushed.7. ADDRESS KEYSThese keys enter data addresses (alphabetic).8. DATA KEYSThese keys enter numerical data.9. READ BUTTONThis button enters program tape data into the NC memory.10. PUNCH BUTTONThis button outputs NC memory data to program tape when the customer’s tape puncher isconnected to the tape punch interface of the NC unit.11. INPUT BUTTONThis button enters address and numerical data in the MDI mode.12. START BUTTON.This .buttqn starts machine operation in the TAPE, MEMORY, or MDI mode. This buttonhas the same function as START buttons (461, (651, and (70).13. RESET BUTTONThis button has the following functions:I(a) Resets alarm condition.(b) Clears MDI (Manual Data Input) data.(cl Displays LSK (labek skip).IMPORTANT: If this button is pushed during machine operation, the data registereh in theoperating memory will be erased. When restarting the machine, be sure toreturn both X- and Y-axes to their origins and start at the beginning of theprogram.3-2:
14. ORIGIN BUTTONThis button resets the X- and Y-axis displayed coordinate values to their origins.15. EDIT BUTTONSThese three buttons edit the contents of programs registered in memory.A L T E.R - ilrlodifies data.“i&RT- - Adds data.7’DELET- - Deletes data.For detailed instructions, refer to “Program Editing” in Section 4.16. FUNCTION BUTTONSThese buttons have the following functions:- Displays the current position of four axes (X, Y, T, and optional C).Displays or enters “setting data.”:.: TPRGR Y - Displays the programs registered in memory in the EDIT or MEMORY mode.Displays the current block and the next block in the TAPE mode.PARAy - Displays or enters parameters for maintenance.OFSET - Not used.A L AR M - Displays the content of alarm message.CO&%lD- Displays the command value or enters the value.in MDI.-- DGNOS - For diagnosing the NC system.AUX - Not used.MACRO - Not used.-MENU - Not used.POSThe data displayed by these. buttons is in page format. Use the P-AGE buttons1 as required.iandThe following function buttons operate as follows when pushed twice. Pushing them a thirdtime returns them to the functions described above.- Displays or sets-user macro parameters for system maintenance.SETPARAY - Displays or sets PC parameters for system maintenance.OFSET - Not used.ALARM - Displays the current NC status.COMN’D - Not used.-AUX’- - Not used.- Notused.-%kCRCMENUNot used,.- . . ,.NOTE: a) Pushing the - POS- ,,pP GRy; , or DGNOS‘L- -. button twice will display thefirst page of their contents on the CRT. Ib) Pushing any function button and the --CAN-i key simultaneously causes thedisplay on the CRT to disappear. After that, pushing any function’button causesthe corresponding data to be displayed. When the CRT is not in use for an extended period of time with power on, cancel the display in this manner to prevent CRT deterioration.3-3
17, NC READY LIGHT (green)This light comes on when the NC system, including the servo unit, is ready for operation.The light will go out if either of the following situations occurs:(a) An overtravel limit switch is actuated.(b) The emergency stop button is pushed.(c). The machine is in the emergency stop status-(SV alarm, low air pressure, etc.).After corrective action, the NC READY light will come on-ipgain.When the NC READY light blinks, the clutch solenoid valve is being energized and neither ofthe following operations can be effected. (EXCEPT PEGA KING)(a) Automatic operation in the TAPE, MEMORY or MDI mode. (However, the PROGRAMCHECK operation can be effected.)(b) Punching operation in the MANUAL or MDI mode.,.’ -.\\;.::.i:‘, :./18. TOP DEAD CENTER LIGHT (green)This light comes on when the crank is at top dead center. During normal operation, the lightwill come on after each punch stroke. If the EMERGENCY STOP button (48) is pushed, airpressure is too low, or there is a fault in the clutch/brake unit, the crank will not stop at topdead center, the light will remain off, and the machine w/II come to an -emergency stop.To resume machi
SECTION 1 - MACHINE DESCRIPTION The Amada Turret Punch- Press is equipped with a Numerical Control (NC) system in which three driving axes are simultaneously controlled by three DC sen/o motors.