Transcription
Smart MirrorINSTALLATION AND OPERATING INSTRUCTION
READ BEFORE USE Thank you for purchasing this product. Please read the instructions carefully before attempting to install,operate or service the product. Please retain this booklet for future reference. Pictures for reference only, subject to our available productsSCOPE OF DELIVERYA: Smart Mirror 1B: Screw 4C: Dowel 4D: Drill template 1E: Manual 1Ⅰ
CONTENTSProduct Introduction 1Safety Introduction 1Product Information 4Installation 5Operation 6Maintenance 10Troubleshooting 11Warranty 12Ⅱ
PRODUCT INTRODUCTIONSmart mirror is a device which with that functions as a bathroom mirror with additionalfunctions, such as displaying weather forecast, date and time, temperature and humidity,LED lighting, defogging etc. Users can select the product with different functionsaccording to self-requirement. Please ignore the related operating instructions in thisbooklet if you didn't subscribe some functions when ordering.SAFETY INTRODUCTIONRead this manual carefully before starting or using the device. Always store the manual inthe immediate vicinity of the device or its site of use!WarningDo not ceiling mount those devices designed for wall only!Or else it may cause burning, fire and falling off risk!WarningThis appliance can be used by children aged from 8 years and above and persons withreduced physical, sensory or mental capabilities or lack of experience and knowledge ifthey have been given supervision or instruction concerning use of the appliance in a safeway and understand the hazards involved.Children shall not play with the appliance. Cleaning and user maintenance shall not bemade by children without supervision.WarningChildren of less than 3 years should be kept away unless continuously supervised.Children aged from 3 years and less than 8 years shall only switch on/off the applianceprovided that it has been placed or installed in its intended normal operating position andthey have been given supervision or instruction concerning use of the appliance in a safeway and understand the hazards involved.Children aged from 3 years and less than 8 years shall not plug in, regulate and clean theappliance or perform user maintenance.WarningDo not use the device in small rooms if persons are present who cannot leave the roomindependently and who are not under constant supervision.WarningSome parts of this product can become very hot and cause burns. Particular attention has tobe given where children and vulnerable people are present. Its dangerous of installation1
close to curtains and other combustible materials. To avoid the possibility of burns, thefollowing people should be much more careful when using the heaters: infants and kids,people with sensitive skin, the old, the sick, people who is drunk, people who takessleeping pills. Remove all the blue protective films(both on the front and on the back) before using. Be sure the usage voltage is between 110-240V, 50Hz, and power supply has been strictly inaccordance with IEC, left is null wire and right is live wire, and also well grounded. The devices will draw more current than small appliances, so a separate 5A socket is required. Do not use the device in potentially explosive rooms. Do not use the device in aggressive atmosphere. Set the device up in an upright and stable position. Let the device dry out after a wet clean. Do not operate itwhen wet. Do not use the device with wet or damp hands. Do not expose the device to directly squirting water. Never insert any objects or limbs into the device. Do not cover or transport the device during operation. Do not sit on the device. This appliance is not a toy! Keep away from children and animals. Do not leave the deviceunattended during operation. Check accessories and connection parts for possible damage prior to every use of the device. Do notuse any defective devices or device parts. Ensure that all electric cables outside of the device are protected from damage (e.g. caused byanimals). Never use the device if electric cables or the power connection are damaged! The electrical connection must be according to the specifications in chapter Technical data. Insert the mains plug into a properly secured mains socket. Do not use the device when the socket or wire overloaded. Observe the device's power input, cable length and intended use when selecting extensions to thepower cable. Completely unroll extension cables. Avoid electrical overload. Before carrying out maintenance, care or repair work on the device, remove the mains plug from the2
mains socket. Hold onto the mains plug while doing so. Switch the device off and disconnect the power cable from the mains socket when the device is notin use. Do not under any circumstances use the device if you detect damages on the mains plug or powercable. If the supply cord is damaged, it must be replaced by the manufacturer, its service agent orsimilarly qualifiedpersons in order to avoid a hazard. Defective power cables pose a serious health risk. During the installation of the device observe the minimum distances from walls and other objects aswell as the storage and operating conditions specified in the Technical data chapter. Never drill into the heating device. Do not use the device once any damage found on the glass or mirror surface. Do not use the device in immediate proximity to curtains. Do not place the device on combustible ground. Do not transport the device during operation. Do not touch the surface during the device working to avoid burns. Allow the device to cool down before transport and / or maintenance work. Do not use this device near bathtubs, shower trays, swimming pools or other water containers. Riskof electric shock! The device must be placed where the switches and controllers cannot be touched by a person in abathtub or shower. Do not use this device in a child-care centre and bathroom.(Only for Sweden) Do not place any objects, e.g. clothing, on the device. Do not use the device outdoors. Do not place the device on wet or flooded ground. Do not unplug by pulling on the cable. To unplug, grasp the plug, not the cable. Do not stretch the cable or place the cable under strain.Keep cable away from heated surfaces. Do not run the cable under carpeting. Do not cover the cable with throw rugs, runners, or similarcoverings. Do not route the cable under furniture or appliances. To avoid a tripping hazard arrange thecable away from traffic areas so that it will not be tripped over.3
Do not use on soft surfaces, such as a bed, where openings may become blocked. Keep combustible materials, such as furniture, pillows, bedding, papers, clothes and curtains, atleast 0.9m (3 feet) from the front of the appliance and keep them away from the sides and rear whenthe appliance is plugged in. If there is a loose fit between the plug and the socket or the plug becomes very hot, the socket mayneed to be replaced. Check with a qualified electrician to replace the socket. Turn off all controls before unplugging. Unplug before connecting any tool or accessory. Allow the device to cool down before transport or maintenance work. Do not privately disassemble the device or replace parts, otherwise it may cause mechanical failure,electric shock, fire or body injury. The warranty is not applicable for the product fault caused by private disassembly.Warning:Do not cover.Insert the mains plug into an outlet that is properly installed and grounded.Do not locate directly below a mains electricity supply socket.PRODUCT INFORMATIONTECHNICAL m600*1200mmThickness(after install)44mm44mm44mm44mmNet Weight7.2KG9.8KG12.2KG14.9KGRated Voltage110-240V/50HZHeating/Defogging Power200W/26W250W/35W350W/50W500W/66WLED Power10W12W13W15WWeather Display Module PowerAround 2WMaterialMirror AluminumWeather serverInternet WeatherNote: Heating and Defogging functions should be mutually exclusive.4
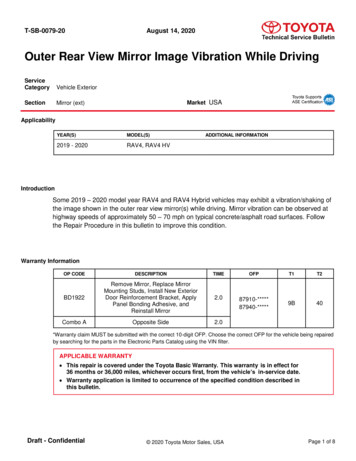
STRUCTURE(Front)(Back)Fout! ,5 ,2Fout!Fout! ,6① Mirror Surface② LED Strip Light③ Touch Switch④ Display Screen(Visible when double-click)⑤ Mounting Brackets⑥ Temperature Humidity SensorINSTALLATION(1)Choose the mounting position, keep the required minimum distances;(2)Mark the positions for the bore holes onto the drilling template (D) if there are noexisting marks. Stick the drilling template on the wall;5
(3)Drill the holes. Insert the screws into the dowels and fasten the screws. The screwsshould protrude approx.1.5 cm from the dowels;(4)Tear off the back protective film, Hang the mirror (A) on the screws and move it toone direction.Note: please tear off the front and back protective film once you start to use.OPERATIONSTART-UP:1. Check if the power cord is intact.2. Check if the power supply voltage is consistent, the power socket is required to have agrounding terminal and good grounding performance.3. Whether the power cord plug and socket are matched, the socket can withstand110-240V/50HZ, 10A. If it is lower than this value, it cannot be used to avoid accidents.FUNCTIONAL OPERATING INSTRUCTIONS:6
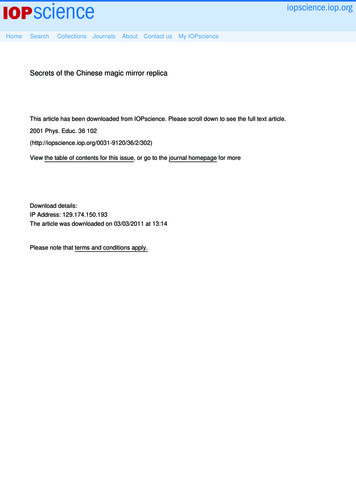
1. After the power is turned on, the backlight of the touch button is always on;Click the touch button once, the surrounding LED lights up, touch again, the light goesout. If the LED lighting is not selected when ordering, click the touch button is invalid;2. Double click the touch button once, the weather display screen is turned on, and doubleclick again to close;3. Long press the touch button to turn on the heating or defogging function, the blueheating indicator next to the touch button lights up, long press again to turn offheating/Defogging. If the function of heating or fogging is not selected when ordering,Long press the touch button is invalid.WEATHER DISPLAY OPERATING INSTRUCTIONS:1. Ensure that the installation location has a good WIFI signal, and make the operating ofmobile phone and smart mirror APP connected to the same WIFI hotspot;2. Double click the touch switch to start the screen and wait for the screen to display theSCAN status;3. Scan the QR code of the following figure (1) and install the APP according to theprompts;Note: This App only supports Android phone operation for the time being. The weatherdisplay WIFI needs to use the Android phone only for the first time and when youoccasionally changes its settings later.For IOS operating system, please search and install the APP named“WifiClock" in AppStoreFigure (1)Figure (2)4. After the installation is successful, find the WifiClock application icon on the mobilephone desktop and open it, as shown in the figure above (2);7
5. After opening the app, the following interface is displayed, click to add a WIFI clock;6. Next select the WIFI hotspot and enter the wireless password. The screen will displaythe configuration, waiting for about 60 seconds, at the same time, the mirror screendisplays JOIN, then PAIR is set successfully.7. After the pairing is successful, the following interface is displayed. A mobile phonecan add several WIFI clock terminals.8. For each WIFI clock device, you can make the following settings.8
1) Basic setting: You can set the switch button sound. This button sound refers towhether the buzzer inside the mirror is buzzing when the phone is operated. 24 hours/12hours display selection; day and month mode selection; temperature unit selection; digitaltube display brightness adjustment on the mirror.2) Alarm setting: Users can set several groups of alarms through the mobile phone. Untilthe time, the buzzer alarm inside the mirror will sound.3) Weather setting: After the weather scroll screen is turned on, the screen will scroll theweather of the day and tomorrow (d2);the area setting is used to select the area where theweather is to be displayed. The default is automatically set to the local area where thenetwork IP belongs. If the automatic positioning is not successful, you need to manuallyset the area; server selection means that if the user finds that the displayed weather isquite different from the actual weather, you can replace another server to get a moreaccurate weather display; today's weather selection refers to whether the screen display isreal-time weather or the total forecast of the day.Note: The weather information source of this APP application is from internet, and theremay be that the weather update is not timely.4) Sleep mode: Refers to setting the digital light screen display timing, the screen systemwill automatically reduce the brightness during sleep, to achieve the purpose that energysaving or not affect the user's sleep;5) Firmware version: Refers to the current software version, the system willautomatically update the version if necessary;6)Delete device: Refers to the mobile phone is no longer connected to the device, afterdeleting, you need to restart the connection.7) When the WIFI hotspot is replaced, you need to restart the device to reconnect. Thespecific operation is to cut off the total power supply three times or more. Eachpower-on needs to hear the “Patter” inside the mirror before the next power-off.After three or more power-offs, double click the touch switch to turn on the screen.The SCAN status is displayed and set up by the mobile phone.9
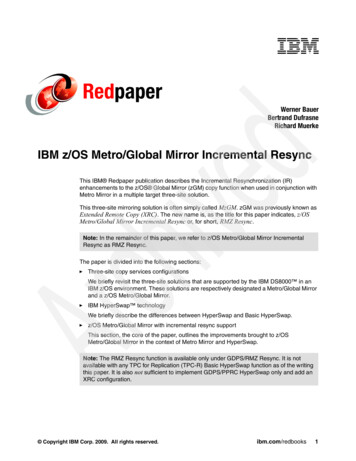
8)The device displays 11 different icons, including sunny, overcast, cloudy, light rain,heavy rain, thunderstorm, shower, light snow, heavy snow, sleet and haze / fog. The iconsis shown in the following table:MAINTENANCE The appliance must be switched off and unplugged before taking regular cleaningand care. Otherwise, it may cause electric shock. The appliance needed only external cleaning and care regularly. Please use some medicinal alcohol clean the surface with damped soft cloth. Never10
clean it under running water. Do not use thinner, toluene,benzene, acidic/alcoholiccleaning agents, or any chemical clothes on the appliance. After regular care and cleaning, well pack it into the original packing box, then put it todry and cool environment for storage. Wind and keep dry the cable when not in use.TROUBLESHOOTINGThe device has been checked for proper functioning several times during production. Ifmalfunction occur nonetheless, check the device according to the following list.ProblemThe touch button does not lightReasonMeasureThe device does not startThe device makes noises after Some parts are looseswitch-oncaused by transportationThe material expands dueThe surface bulges slightlyto heatingIndoor Temperature / humidityThe sensor maybe coveredare displayed inaccuratelyThe device is unable to connect Wifi signal is poor orWIFInetwork failuresThe real-time weather isweather data is not updateddisplayed inaccuratelyThe device failed toconnecttoconfiguredDisplay code Errnetwork, and the previousdata already expired.The configured router isDisplay code 05connected to too manydevicesThe configured network isDisplay code 201unreachable or . WIFIhotspot is replaced11Check the power connectionIt’s a normal process. No measure arerequired.It’s a normal process. No measure arerequired.Make sure that the senor is placed at aright position,should not be coveredor touched by other materials.Restart the router and device.Connect another sever in your APP.Restart your router, make sure that thewifi signal strength as good as enoughReplace another router or reduceconnected devices.Make sure the device, Wi-Fi routerand the smartphone closer together.Refer to Step 8-(7).
Warranty CardNAMETELADDMODELORDER NO.DateFailure DescriptionTHANK YOU FOR CHOOSING TO BUY THIS APPLIANCE.Customers can contact us for repairing or replacement of this appliance if it is found to bedefective due to faulty materials, workmanship or function within 1 years of purchase ordelivery.We do not guarantee the repair or replacement of a product where a defect is the result of: Damage caused by not carrying out the recommended appliance maintenance. Accidental damage, faults caused by negligent use or care, misuse, neglect,carelessoperation or handling of the appliance which is not in accordance with our OperatingManual. Use of the appliance for anything other than normal domestic household purposes. Faulty installation . Repairs or alterations carried out by parties other than the manufacturer or itsauthorised agents.If you are in any doubt as to what is covered by your guarantee, please contact us.12
Smart mirror is a device which with that functions as a bathroom mirror with additional functions, such as displaying weather forecast, date and time, temperature and humidity, LED lighting, defogging etc. Users can select the product with different functions according to self-requirement.