Transcription
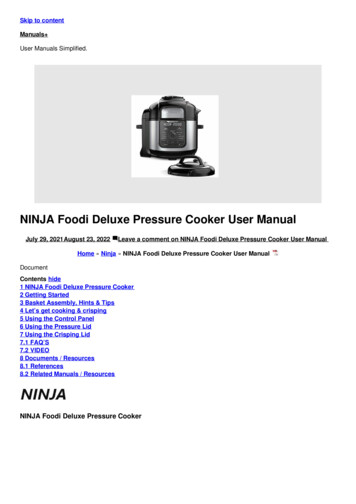
Please make sure to read the enclosed Ninja Owner’s Guide prior to using your unit.SMARTCookerSteam FryerXLPressurewith SmartLid
Your guide tocooking with your Foodi Welcome to the Ninja Foodi SMART XL Pressure CookerSteam Fryer recipe book. From here, you’re just a few pagesaway from recipes, tips and tricks, and helpful hints that willhelp you SteamCrisp meals, vegetables, proteins, breads,and baked goods.SCAN TOGET TO KNOWYOUR FOODI EXPLORE RECIPESAND MORE.Table of ContentsKickstarter RecipesGarlic Parmesan Chicken WingsLoaded Potato WedgesHerb-Roasted ChickenBeef Roast with Root Vegetables& Pan GravyHerbed Chicken with LemonySteamed Broccoli & Penne MarinaraRosemary FoccaciaEasy Cookies & Cream Cake262830Make a Steam & Crisp Meal with Pasta32Make a Steam & Crisp Meal with Grains34Bake a Cake Using your FavoriteCake Batter & Mix-Ins3638MainsPork Hawaiian Pulled Pork SlidersCarnitas TacosPulled Pork with Crispy BiscuitsPork Tenderloin with au Gratin PotatoesHam & Cheese TurnoversBratwurst with Beer-Braised Cabbage4040404243444546Poultry47Caprese Chicken Breast with Pesto Orzo 47Shredded Chicken Lettuce Wraps48Adobo Spiced Chicken Thighs withSpanish Rice & Corn on the Cob49Teriyaki Glazed Chicken Breast & Rice50Chicken Breast with Spinach,Tomatoes & Pesto Cream Farfalle51Chicken Pot Pie52Buffalo Mac & Cheese54Join us and thousands of Foodi friendson the Official Ninja Foodi Family Community.Facebook.com/groups/NinjaFoodiFamily youtube.com/EPNinjaKitchen245 Keys to Making the Perfect DoughLooking for more recipe inspiration,tips, and tricks?@NinjaKitchen18182022SeafoodSalmon with Red Quinoa &Steamed Brussels SproutsShrimp with Edamame & Fried Rice555556 Beef57Steak Fajitas57Italian Beef Sandwiches58Meatloaf with Cheddar MashedPotatoes & Honey Carrots60VegeterianCreamy Mushroom RisottoMediterranean Cauliflower Steaks withPearled Couscous & Cucumber Salad616162Calzones/Pasta63Build Your Own CalzonesPepperoni Pizza Pasta Bake6364Sides & Snacks66Creamy Tomato Soup with GrilledCheese Croutons66Root Vegetable Medley68Twice-Baked Potatoes69Crusty Bread70Crispy Tofu Bites with Chili-Garlic& Hoison Dipping Sauce72Beef Jerky73Corned Beef Hash74Scallion & Bacon Mashed Potatoes75Stuffed Peppers76Upside-Down Loaded Chicken Nachos77Maple-Pecan Sweet Potatoes78Spinach & Artichoke Dip79Desserts80Banana Bread80Chocolate Chip Skillet Cookie82Bread Pudding with Bourbon Sauce83Vanilla Cheesecake with Berry Sauce84Cinnamon Buns85Cooking ChartsSteam & Crisp ChartTenderCrisp ChartPressure Cook ChartSous Vide ChartSteam ChartAir Fry ChartDehydrate Chart86869294102106108112
SmartLid SliderOpening and closing the lid3 modes under one lidUse the lift tab above the SmartLid Slider to open and close the lid.Pressure cooker. Steam fryer. Air fryer.123LIFT TABPressureSimply move the SmartLid Slider to effortlessly toggle between13 cooking functions. The cooking environment will intelligentlychange as you slide from mode to mode.When SmartLid Slider is inthe left position, lid cannotbe opened for safety.SteamCrispAir Fry/StovetopWhen SmartLid Slider is inthe middle position, steamwill build. It is best to leavelid closed during SteamCrispas steam and convectionheat are working together.When SmartLid Slider is inthe right position, open lidany time to check on food.Always place the valve in SEAL when using the PRESSURE function.The position of the valve does not matter for all other functions.
An entirely new way of cookingSteamCrispTECHNOLOGYThe juiciest way to air fryFaster one-touch mealsCrisp with steam-infused air for moist interiorsand crispy exteriors.Mains and sides all done at thesame time.STEAM CRISP at the same timefor juicier air frying,faster meals, and baking.Best for full layered meals, baked goods,breads, leftovers, and delicate proteins.Fluffy cakesFaster bakingWhole roastsBake with steamand convection.Proof and bake in one pot.Crusty outside, chewy inside.Tenderize and crisp large cutsof meat at the same time.
The juiciest way to air fryPerfect whole roastsSteam & CrispSteam & CrispFrozen or fresh chicken wings and salmon fillets, andfresh root vegetables like potatoes and carrots.Great for large cuts of lean meatslike a whole chicken or pork.The choice is yoursSteam & CrispTender &caramelizedAir FryCrunchy& charredTenderize the inside. Crisp up the outside.All in one step.Tip: For frozen foods like breaded chicken nuggetsor French fries, use the Air Fry function for best results.6Questions? ninjakitchen.com7
8Making a SteamCrispOne-Touch MealStack your mains and sides and cook them at the same timeEasy 2-part layered meals, done at the same time.Easy 3-part layered meals, done at the same time.STARCH PROTEINSTARCH VEGETABLE PROTEINUse the bottom layer of the Deluxe Reversible Rack in thelower or higher position when making 2-part meals.Nest delicate vegetables like broccoli in an aluminum foil pouchon the bottom layer of the Deluxe Reversible Rack.Questions? ninjakitchen.com9
Faster bread-makingFluffy cakes & baked goodsSteam & CrispSteam & BakePerfect for homemade or store-bought dough.Plus, proof and cook in one pot.Perfect for homemade batters, boxed cakes,quick breads, and turnovers.Steam allows for higher rise,chewy interior, and crusty exterior.Steam allows for super-moist, super-fluffy,and super-repeatable results.Tip: For cookies and brownies, use the Bake/Roast function for best results.10Questions? ninjakitchen.com11
So many cooking functions.12Even more possibilities.PressureSear/SautéSteamAir FryBake/RoastBroilCook foods quickly whilemaintaining tenderness.Brown meats,sauté vegetables, andsimmer sauces.Gently cookdelicate foods ata high temperature.Give foods crispinessand crunch with littleto no oil.Prepare oven-tendermeats, baked treats, andmore using dry heat only.Cook at high heatto caramelize andbrown foods.Slow CookYogurtSous VideDehydrateProofCook at a lowertemperature for longerperiods of time.Make homemadeyogurt.Cook slowly in atemperature controlledwater bath.Dehydrate meats, fruits,and vegetables.Create an environmentfor dough to restand rise.Questions? ninjakitchen.com13
Perfectly done with the Foodi SmartThermometerHow to place the thermometerInsert the Foodi Smart Thermometer into the thickest part of the protein.Then select a cook function, cook temperature, protein type,and desired level of doneness.FOOD TYPESteaksPork chopsLamb chopsChicken breastsBurgersTenderloinsFish filletsNinja Beef Doneness GuidePerception of what a specific internal doneness looks like differs from person to person, evenrestaurant to restaurant. This guide shows what to expect with each preset beef doneness level(we have provided a wide range of options so you can customize doneness to your liking).PLACEMENTCORRECTINCORRECT Insert thermometer horizontally into thecenter of the thickest part of the meat. Make sure the tip of the thermometer isinserted straight into the center of the meat,not angled toward the bottom or top of it. Make sure the thermometer is close to(but not touching) the bone and awayfrom any fat or gristle.NOTE: The thickest part of the fillet maynot be the center. It is important that theend of the thermometer hits the thickestpart so desired results are achieved.12RARE34MEDIUM RARE56MEDIUM78MEDIUM WELL9WELLBeef doneness from Rare to Well works only with the SteamCrisp and Air Fry/Stovetop functions.For pressure cooking with the thermometer, ONLY the Well and Shred doneness levels are available.Thermometer can be used for all functions except Steam & Bake,Dehydrate, Proof, Steam, Sous Vide, Slow Cook, and Yogurt.Replace the cap on the jack in the lid after every use.Whole chicken Insert thermometer horizontally into thethickest part of the breast, parallel to, butnot touching, the bone. M ake sure the tip reaches the center of thethickest part of the breast and doesn’t go allthe way through the breast into the cavity.DO NOT use the thermometer with frozen protein or for cuts of meat thinner than 1 inch.14For complete thermometer instructions, see your Ninja Owner’s Guide.15
Cooking with theleave-in thermometerSTEP 1Set up R emove thermometer from thestorage compartment on the rightside of the unit. Unwind the cord.STEP 2Plug In Thermometer R emove cap from jack insidelid on bottom right, then putcap in thermometer storagecompartment for safekeeping.STEP 3Place Thermometer I nsert thermometer in proteinusing the guide on page 5.The Foodi Smart Thermometer continues to monitordoneness throughout the cooking process, unlike a traditionalinstant-read thermometer.STEP 4Add FoodSTEP 5Select Cook Function Add the food to the unit. Makesure the thermometer grip is fullyinside the unit, then close the lid. Move slider to PRESSURE,STEAMCRISP, or AIRFRY/STOVETOP. Use dial to select the desiredcooking function. P lug thermometer cord into jack.STEP 6Program Thermometer Press the PRESET button. Use the right arrows to choosethe desired protein. Use the left arrows to choosethe desired doneness. Press START/STOP tobegin cooking.NOTE: When using thethermometer with the Pressurefunction, ALWAYS set the pressurerelease to QUICK RELEASE toavoid overcooking the protein.Using the thermometer in different cooking scenariosSAME PROTEINS, SAME SIZEDIFFERENT DONENESS1 Set the Preset feature to thelower desired level of doneness.2 Insert the thermometer in theprotein with the lower desiredlevel of doneness.3 When the lower desired levelof doneness is reached, removethe protein with the thermometerfrom the unit. Use oven mittsto transfer the thermometer tothe remaining protein.4 Repeat steps 1 and 2 forthe second protein.SAME PROTEINSDIFFERENT SIZES1 Set the Preset feature to thedesired level of donenessfor the smaller protein.2 Insert thermometer in thesmaller protein. Then referto steps 5 and 6 above.3 Using oven mitts, transferthermometer to the largerprotein, as thermometer ishot, and use the arrows to theleft of the display to choosethe level of doneness.2 DIFFERENT PROTEINS1 Insert thermometer in theprotein with the lowestdesired level of doneness.2 Use the Manual feature to choosethe desired internal temperature(refer to Owner's Guide).3 Use oven mitts to transferthermometer to the other protein,as thermometer is hot, and usethe Manual feature to choose thedesired internal temperature.STEP 7Carry-Over Cook & Rest After cooking in the unit, it’simportant to let proteins carry-overcook and rest on a plate for3–10 minutes.- 3 minutes for fish fillets-5 minutes for proteins under 1 lblike steaks, chicken breastsand thighs, and pork chops- 1 0 minutes for proteins over 1 lblike whole roasts and chickens Carry-over cooking is when foodretains heat and continues to cookafter being removed from thesource of heat. Resting helps lockin the protein’s natural juices. Did you know? Meat keeps cookingwhen you remove it from the unit.To prevent overcooking, the unitwill beep right before your foodreaches desired doneness, takingcarry-over cooking into account.STEP 8Replace Cap When unit has cooled, replacethe cap on the jack.NOTE: Skipping carry-over cookingand cutting into food right away mayresult in a rarer level of doneness andmay cause the protein’s naturaljuices to run dry.Questions? ninjakitchen.com17
KICKSTARTERSKICKSTARTERSGarlic ParmesanChicken WingsBEGINNER RECIPEPREP: 5 MINUTES TOTAL COOK TIME: 30 MINUTES MAKES: 4 SERVINGSSTEAM: APROX. 10 MINUTES COOK: 20 MINUTES ACCESSORIES: COOK & CRISP BASKETINGREDIENTS1/2 cup water, for steaming1 tablespoon minced garlic2 pounds individually frozenchicken wingsGround black pepper, as desired1 tablespoon canola oil¼ cup (½ stick) unsaltedbutter, meltedKosher salt, as desired1/3 cup grated Parmesan cheese2 tablespoons freshparsley, choppedDIRECTIONSAdd 1/2 cup waterto the pot.In a medium bowl,toss the chicken wingsand canola oil untilevenly coated.Don't forget to add water or stockto create steam and cook your food.18KickstartersPlace the wings in theCook & Crisp Basketand place the basketin the pot.Close the lid and moveslider to STEAMCRISP.TIP If using fresh chicken wings, set temperature to450 F and time to 20 minutes (PrE will displayfor approx. 8 minutes as the unit steams, then thetimer will start counting down).Select STEAM & CRISPset temperature to450 F, and settime to 20 minutes.Press START/STOPto begin cooking(PrE will display forapprox. 10 minutes asthe unit steams, thenthe timer will startcounting down).Place the remainingingredients in a bowland mix to combine.When cooking is complete,carefully remove the basketfrom the pot. Transfer wingsto the Parmesan mixtureand toss to combine. Serveimmediately.TIP I f you prefer crispier chicken wings, add anadditional 5 minutes by pressing the up arrowwhen in STEAM & CRISP mode.Questions? ninjakitchen.com19
KICKSTARTERSKICKSTARTERSLoadedPotato WedgesBEGINNER RECIPEPREP: 2 MINUTES SOAK: 30 MINUTES TOTAL COOK TIME: 31 MINUTES STEAM: APPROX. 8 MINUTESCOOK: 23 MINUTES MAKES: 4 SERVINGS ACCESSORIES: COOK & CRISP BASKETINGREDIENTS1 gallon water, for soakingTOPPINGS (optional)3 tablespoons 1 teaspoon koshersalt, divided10 ounces cheese product, cubed3 tablespoons distilled white vinegar3 tablespoons scallions, chopped11/2 pounds russet potatoes,cut in 1-inch wedges1/2 cup bacon bits1/4 cup sour cream1 tablespoon canola oil1/2 cup water, for steamingDIRECTIONSCombine 1 gallon water,3 tablespoons salt, and whitevinegar in a large bowl. Addthe potato wedges and soakfor 30 minutes, then strainand pat dry.Don't forget to add water or stockto create steam and cook your food.20KickstartersIn a medium bowl, toss the driedpotato wedges with canola oiland 1 teaspoon salt. Add ½ cupwater to the pot.Transfer the wedges to theCook & Crisp Basket and placethe basket in the pot.Close the lid and move sliderto STEAMCRISP. Select STEAM& CRISP, set temperature to450 F, and set time to 23minutes. Select START/STOP tobegin cooking (PrE will displayfor approx. 8 minutes as the unitsteams, then the timer will startcounting down).When the timer reads 12 minutes,open the lid, toss the potatowedges. Close lid and continuecooking. With 3 minutesremaining, open the lid andadd the cheese. Close the lidto finish cooking.When cooking is complete,carefully remove the basket andtransfer the potato wedges toa serving plate. Top with baconbits, scallions, and a dollop ofsour cream.TIP Substitute 2 cups shredded cheddar cheese for1 pound cheese product and cook as instructed.Questions? ninjakitchen.com21
R RECIPEPREP: 10 MINUTES TOTAL COOK TIME: APPROX. 1 HOUR, 10 MINUTES STEAM: APPROX. 15 MINUTESCOOK: APPROX. 55 MINUTES MAKES: 6 SERVINGSACCESSORIES: FOODI SMART THERMOMETER, COOK & CRISP BASKETINGREDIENTS1 whole fresh chicken (6–7 pounds)2 sprigs fresh rosemary1/2 cup water1 tablespoon canola oilJuice of 2 lemonsKosher salt, as desired1 tablespoon wholeblack peppercornsGround black pepper, as desired5 cloves garlic, peeled, smashedDIRECTIONSRemove packet of giblets, ifincluded in cavity of the chicken.Tie legs together with cookingtwine. Place the Foodi SmartThermometer in the center ofthe thickest part of the meat(see thermometer placementinstructions on page 15).Add the water, lemon juice,peppercorns, garlic, androsemary to the pot.Brush the chicken with oiland season generously with saltand pepper.Place chicken in the Cook &Crisp Basket and place thebasket in the pot. Closethe lid and move sliderto STEAMCRISP.Select STEAM & CRISP,set temperature to 365 F, thenselect PRESET. Use the arrowsto the right of the display toselect CHICKEN. Press START/STOP to begin cooking (PrE willdisplay for approx. 15 minutesas the unit steams, then thetimer will start counting down).When cooking is complete,remove the basket from the potand let rest for 5 to 10 minutesbefore cutting and serving.Don't forget to add water or stockto create steam and cook your food.22KickstartersThe Ninja Roast Lifters are available for purchase separately at ninjakitchen.com.Questions? ninjakitchen.com23
KICKSTARTERSKICKSTARTERSBeef Roast with RootVegetables & Pan GravyBEGINNER RECIPEPREP: 20 MINUTES TOTAL COOK TIME: APPROX. 45 MINUTES STEAM: APPROX. 15 MINUTESCOOK: APPROX. 30 MINUTES FOR MEDIUM DONENESS MAKES: 4 SERVINGSACCESSORIES: DELUXE REVERSIBLE RACK (BOTTOM LAYER ONLY)INGREDIENTSLEVEL 1 (BOTTOM OF POT)LEVEL 2 (BOTTOM LAYER OF RACK)LEVEL 2 (CONTINUED)4 cups beef stock2 cups carrots, peeled, trimmed,cut in 2-inch pieces2 tablespoons canola oil, divided1 medium yellow onion, peeled,cut in quartersGround black pepper, as desired2 cloves garlic, peeled1 sprig fresh rosemary1 bay leaf1 tablespoon whole peppercorns3 small russet potatoes, quarteredKosher salt, as desired2 pounds bottom round roast orprime rib roast3 tablespoons cornstarch, set aside3 tablespoons water, set asideDIRECTIONSPlace all Level 1ingredients, except thecornstarch and waterin the pot and stir untilcombined.In a large bowl, addthe carrots, onions,potatoes, 1 tablespooncanola oil, salt, andpepper and toss untilevenly combined.Don't forget to add water or stockto create steam and cook your food.24KickstartersRub the remaining1 tablespoon canola oilon the roast then seasongenerously with salt andpepper. Place the Foodi Smart Thermometer inthe center of the thickestpart of the meat (seethermometer placementinstructions on page 15).Place the bottom layerof the Deluxe ReversibleRack in the lowerposition, then place inthe pot. Place the roastin the center of therack and surround withvegetables.Select STEAM & CRISP andset temperature to 365 F,then select PRESET. Theunit will default to BEEF.Then use the arrows tothe left to select desireddoneness. Press START/STOP to begin cooking(PrE will display forapprox. 15 minutes as theunit steams, then the timerwill start counting down).When cooking iscomplete, carefullyremove the vegetablesand then the rack withthe roast. Allow theroast to rest for10 minutes.In a small bowl, whisktogether the cornstarchand water to makea slurry. Add thecornstarch slurry to thepot and stir to combine.Return to a boil andcontinue to cook,stirring occasionally,until gravy reachesdesired thickness.Strain the gravy andserve warm with theroast and vegetables.Questions? ninjakitchen.com25
KICKSTARTERSKICKSTARTERSHerbed Chicken with Lemony SteamedBroccoli & Penne MarinaraBEGINNER RECIPEPREP: 10 MINUTES TOTAL COOK TIME: 30 MINUTES STEAM: APPROX. 20 MINUTES COOK: 10 MINUTESMAKES: 4 SERVINGS ACCESSORIES: DELUXE REVERSIBLE RACK (BOTH LAYERS), ALUMINUM FOILINGREDIENTSLEVEL 1 (BOTTOM OF POT)LEVEL 2 (BOTTOM LAYER OF RACK) LEVEL 3 (TOP LAYER OF RACK)2 jars (24 ounces each)marinara sauce3 heaping cups broccoli florets(approx. 10 ounces total)4 chicken breasts, 1–inch thick3 cups chicken stock3 cloves garlic, peeled, smashed1 box (16 ounces) dry penne pasta1/2 small lemon, thinly sliced1 packet (3 tablespoons) ranchseasoning1 tablespoon olive oilGround black pepper, as desiredKosher salt, as desiredGround black pepper, as desired2 tablespoons canola oilTOPPING (optional)1/4 cup grated Parmesan cheeseDIRECTIONSPlace all Level 1ingredients in the potand stir until combined.Place all Level 2ingredients in amedium bowl and tossuntil fully combined.Don't forget to add water or stockto create steam and cook your food.26KickstartersPat the chicken breastsdry with a paper towel,then place in a mediumbowl or casserole dish.Evenly coat each breastwith canola oil, ranchseasoning, and pepper.TIP F or chicken breasts more than 8 ouncesor 1-inch thick, add 2 to 5 minutes.Place a 15-inch sheet ofaluminum foil on a flatsurface. Add the broccolimixture to the center andfold the edges in to create asealed packet. Place the foilpacket on the bottom layerof the Deluxe ReversibleRack in the lower position,then place the rack in thepot over the pasta mixture.Slide the Deluxe Layerthrough the lowerlayer's handles. Placethe chicken breasts onthe Deluxe Layer.Close the lid and moveslider to STEAMCRISP.Select STEAM & CRISPset temperature to 390 F,and set time to 10 minutes.Press START/STOP tobegin cooking (PrE willdisplay for approx. 20minutes as the unit steams,then the timer will startcounting down).When cooking iscomplete, carefullyremove the entire rackwith the chicken and foilpacket.Stir the pasta andserve with chicken andbroccoli. Garnish withParmesan cheese asdesired.TIP F or chicken breasts over 8 ounces add anadditional 2-5 minutes to cook time.Questions? ninjakitchen.com27
KICKSTARTERSKICKSTARTERSRosemary FocacciaBEGINNER RECIPEPREP: 5 MINUTES TOTAL COOK TIME: 60 MINUTES PROOF: 30 MINUTES STEAM: APPROX. 5 MINUTESBAKE: 25 MINUTES MAKES: 1 LOAF ACCESSORIES: PARCHMENT PAPER, COOK & CRISP BASKETINGREDIENTS1/2 tablespoon choppedfresh rosemary leaves1/4 cup water, for steamingNonstick cooking spray1 package (16 ounces)store-bought pizza dough, roomtemperature1 tablespoon extra-virginolive oilKosher salt, as desiredGround black pepper, as desired2 tablespoons shredded Parmesancheese, for garnishDIRECTIONSTIP If using frozendough, allow dough tosit and defrost beforeproofing. If usingdough right from therefrigerator, PROOFfor 1 hour at 95 F. Seepage 35 for more tipson dough.Add 1/4 cup water tothe pot.Don't forget to add wateror stock to create steamand cook your food.28KickstartersPlace an 8-inch circle ofparchment paper in thebottom of the Cook &Crisp Basket and spraywith cooking spray.Form the dough intoa ball and place in thebasket. Place the basketin the pot. Close the lidand move slider toAIR FRY/STOVETOP.Select PROOF,set temperature to95 F, and set timeto 30 minutes.Press START/STOPto begin the rise.When the rise iscomplete, remove thebasket from the pot.Deflate the dough bygently pressing on it,then spread it withyour fingertips into thebottom of the basket.Drizzle with olive oiland sprinkle withrosemary, salt,and pepper.Return the basket tothe pot. Close the lidand move the sliderto STEAMCRISP.Select STEAM & CRISP,set temperature to335 F, and set timeto 25 minutes. PressSTART/STOP to begincooking (PrE willdisplay for approx.5 minutes as the unitsteams, then the timerwill start countingdown).When cooking iscomplete, the surfaceof the focaccia willbe crusty and brown.Top with Parmesancheese. Remove fromthe basket and allowto cool for 5 minutesbefore serving.TIP Create morecustomizable flavors byadding olives, cubedfeta, fresh or sundriedtomatoes or desiredherbs before cooking.Questions? ninjakitchen.com29
KICKSTARTERSKICKSTARTERSEasy Cookies & Cream CakeBEGINNER RECIPEPREP: 10 MINUTES TOTAL COOK TIME: 45 MINUTES STEAM: APPROX. 20 MINUTESBAKE: 25 MINUTES MAKES: 1 CAKE (8–10 SERVINGS)ACCESSORIES: NINJA MULTI-PURPOSE PAN* (OR 8” ROUND BAKING PAN),DELUXE REVERSIBLE RACK (BOTTOM LAYER ONLY)INGREDIENTS3 cups water for steaming 3/4 cup water, divided1/2 cup canola oil (or vegetable oil)3 large eggsNonstick cooking spray2 tablespoons all-purpose flour,for dusting1 box (16 ounces) white cake mix1 container (14 ounces) whippedvanilla frosting6 chocolate sandwich cookies,crushed3/4 cup water, for cake batterDIRECTIONSPour 3 cups water into the pot.Spray the bottom of the NinjaMulti-Purpose Pan* (or 8" roundbaking pan) with cooking sprayand dust with flour.To make the cake, place thecake mix, 3/4 cup water, oil, andeggs in a large bowl. Prepareaccording to the directions onthe cake box. Pour the batterinto the prepared pan.Place the pan on the bottomlayer of the Deluxe ReversibleRack in the lower position,then place the rack in the pot.Close the lid and move sliderto STEAMCRISP.Don't forget to add water or stockto create steam and cook your food.30Kickstarters*The Ninja Multi-Purpose Pan is sold separately on ninjaaccessories.com.Select STEAM & BAKE, settemperature to 285 F, andset time to 25 minutes. PressSTART/STOP to begin cooking(PrE will display for approx. 20minutes as the unit steams, thenthe timer will start countingdown).When cooking is complete,check doneness by insertinga wooden toothpick into themiddle of the cake. If it comesout clean, remove the rack withthe pan and let cool for at least1 hour. If the toothpick comesout with moist crumbs stuckto it, continue to bake until thetoothpick comes out clean.When the cake has cooled, frostwith the whipped vanilla frostingand top with crushed chocolatesandwich cookies.TIP F or more customizable cakeoptions, reference the CakeNinja Chart (page 36–37).Questions? ninjakitchen.com31
Make a Steam & Crisp meal with Pasta1. Start with the bottom layer2. Assemble middle layer3. Assemble top layerAdd pasta and sauce to the potand stir until combined.Cover the bottom layer of theDeluxe Reversible Rack withaluminum foil. Place the rack in thepot. Place prepared vegetableson top of the aluminum foil.Select a protein and season as desired. Slide the Deluxe Layer through the lowerlayer’s handles. Place protein on the top layer of the rack. Close lid, move slider toSTEAMCRISP, and select STEAM & CRISP. Set time and temperature based on protein.Add finishing touches as desired.PASTASAUCEWhite pasta,uncookedTomato sauce2 jars (24 oz each)marinara sauce3 cups chickenor vegetable stock12–16-oz boxVEGETABLE2 cups mix & match. Coat with 1 tbsp oil and season.1 pint cherry tomatoesWhole-wheatpasta,uncookedCreamy alfredo1 jar (16 oz)alfredo sauce3 cups chicken stock1 cup whole milk1 head (10 oz) broccoli, cut in half326 portobella mushroom caps,6 (3 inches each) or3 (4 inches each)4 frozen chicken breasts,boneless skinless(6–8 oz each)3 bell peppers, cut in 1–inch stripsStock (plain pasta)4 cups chickenor vegetableWater (sauceless)4 cups12 plant-based meatballs(fresh or frozen)6 plant-based sausages10 oz cauliflower floretsGluten-freepasta, uncooked4 chicken breasts, boneless,skinless (6–8 oz each)6 Italian sausages3 zucchini, cut in half lengthwiseBlush sauce2 jars (24 oz each)marinara sauce2 ½ cups chickenor vegetable stock1 cup half & halfPROTEINFresh and frozen4 frozen breadedeggplant cutletsSEASONItalian seasoningHerbs de ProvenceLemon pepperseasoningSeasoning saltGarlic & herbseasoningSeasoning of choice4 frozen breaded chickenbreast cutlets (5 oz each)12 frozen meatballs6 frozen plant-based sausagesCRISPINGTEMPERATURE & TIMEFINISHING TOUCHES390 F for 10–15 minutesWhen cooking iscomplete, add finishingtouches by stirringcheese, spinach, arugula, orpesto into the pasta.390 F for 8–10 minutes425 F for 5–10 minutes450 F for 5–10 minutes375 F for 10–15 minutes450 F for 8–10 minutes450 F for 7–10 minutesTIP Marinate proteinsup to 6 hours or buythem pre-marinated tosave time.375 F for 10–15 minutes400 F for 5–10 minutes1 bunch asparagus, trimmedToo much pasta? Cut the sauces in half with 8 oz of pasta: Tomato Sauce: 1 jar (24 oz) marinara sauce, 2 cups chicken stockCreamy Alfredo: 1 1/2 cups chicken stock, 1 cup whole milk, 1 jar (15-oz ) alfredo sauce, 1/2 cup grated Parmesan cheese(stir in to thicken sauce after cooking is complete)12 frozen jumbo shrimp425 F for 2–5 minutes*For thicker cuts of meat, add 2–3 minutes to cook time. Note that in doing this you may run the riskof overcooking the other meal components, so we recommend keeping meat thickness within the given guidelines.Questions? ninjakitchen.com33
Make a Steam & Crisp meal with Grains1. Start with the bottom layer2. Assemble middle layer3. Assemble top layerAdd grain, water, and additionalingredients per box directions.Cover the bottom layer of theDeluxe Reversible Rack withaluminum foil. Place the rack in thepot. Place prepared vegetableson top of the aluminum foil.Select a protein and season as desired. Slide the Deluxe Layer through the lower layer’s handles.Place protein on the top layer of the rack. Close lid, move slider to STEAMCRISP, and selectSTEAM & CRISP. Set time and temperature based on protein. Add finishing touches as desired.GRAIN2 cup white rice, rinsed4 cups water or stock2 tablespoons butter or oilVEGETABLEFresh and frozen1 lb sweet potatoes, cut in 1-inch pieces4 chicken breasts, boneless,skinless (6–8 oz each)2 cups Israeli couscous3 cups water or stock1 tablespoon butter or oil1 cup Arborio rice4 cups water or stock1 cup instant brown rice2 cups water or stockRice & beans, boxedCajun-style rice, boxed1 bunch asparagus, trimmedCRISPINGTEMPERATURE & TIMEFINISHING TOUCHES390 F for 10–15 minutesWhen cooking iscomplete, add finishingtouches by stirringcheese, spinach, arugulaor pesto into the grains.1 package seitan (8 oz),cut in 1-inch pieces390 F for 8–10 minutesJerk seasoningSeasoning salt425 F for 5–10 minutes2 small onions, peeled, cut in quarters1 package tempeh (8 oz),cut in 1/4-inch strips or1-inch cubesGarlic & herbseasoning24 oz butternut squash, cut in cubes6 portobella mushroom caps,6 (3 inches each) or3 (4 inches each)Fajita seasoning10 oz cauliflower florets4 frozen chicken breasts,boneless skinless(6–8 oz each)3 parsnips, cut in 1-inch pieces4 frozen breadedeggplant cutlets3 bell peppers, cut in 1-inch strips4 frozen breaded chickenbreast cutlets (5 oz each)12 frozen meatballsSeasoning of choice450 F for 5–10 minutes375 F for 10–15 minutes450 F for 8–10 minutesTIP Marinate proteinsup to 6 hours or buythem pre-marinated tosave time.450 F for 7–10 minutes375 F for 10–15 minutes1 head (10 oz) broccoli, cut in halfAdd water, seasoning,and oil per box instructions3 zucchini, cut in half lengthwise346 Italian sausages6 plant-based sausagesSpanish-style rice, boxedRice pilaf, boxedSEASONBBQ seasoning1 lb baby potatoes, cut in half2 cups quinoa, rinsed3 cups water or stockPROTEIN2 cups mix & match. Coat with 1 tbsp oil and season.6 frozen plant-based sausages400 F for 5–10 minutes12 frozen jumbo shrimp425 F for 2–5 minutesQuestions? ninjakitchen.com35
Bake a cake using your favoritecake batter and mix-ins1. Customize your cake2. Prepare batter & assembleMix and match cake mix, flavors,and mix-ins to get started.Prepare batter.Don't forget to add water to create steamand cook your food
Spanish Rice & Corn on the Cob 49 Teriyaki Glazed Chicken Breast & Rice 50 . Chocolate Chip Skillet Cookie 82 Bread Pudding with Bourbon Sauce 83 Vanilla Cheesecake with Berry Sauce 84 . away from recipes, tips and tricks, and helpful hints that will help you SteamCrisp meals, vegetables, proteins, breads, .