Transcription
1DisclaimerVisual Basic Made Easy- A Complete Tutorial for Beginnersis an independent publication and is not affiliated with, nor has itbeen authorized, sponsored, or otherwise approved by MicrosoftCorporation.TrademarksMicrosoft, Visual Basic, Excel, Access and Windows are eitherregistered trademarks or trademarks of Microsoft Corporation inthe United States and/or other countries. All other trademarksbelong to their respective owners.LiabilityThe purpose of this book is to provide a basic guide for peopleinterested in Visual Basic programming. Although every effortand care has been taken to make the information as accurate aspossible, the author shall not be liable for any errors as well asharm or damage arising from using the instructions given in thisbook by any person.
2Copyright 2006 Liew Voon KiongAll rights reserved. No Part of this e-book may be reproduced inany form or by any means, without permission in writing fromthe author.
3AcknowledgementI would like to express my sincere gratitude to many people whohave made their contributions in one way or another to thesuccessful publication of this book. My special thanks go to mychildren Xiang, Yi and Xun. My daughter Xiang edited this bookwhile my sons Yi and Xun contributed their ideas and evenwrote some of the sample programs for this book. I would alsolike to appreciate the support provided by my beloved wife KimHuang and my youngest daughter Yuan. I would also like tothank the millions of visitors to my Visual Basic TutorialWebsite at www.vbtutor.net ; especially those who contributedtheir comments, for their support and encouragement.About the AuthorDr. Liew Voon Kiong holds a bachelor's degree in mathematics,a master's degree in management and a doctoral degree inbusiness administration. He has been involved in programmingfor more than 30 years. He created the popular online VisualBasic Tutorial at www.vbtutor.net in 1996 and since then theweb site has attracted millions of visitors and it is one of the top
4searched Visual Basic Tutorial website in many search enginesincluding Google. To provide more support for the Visual Basichobbyists, he has written this book based on the Visual Basictutorial.ContentsCHAPTER 1 INTRODUCTION TO VISUAL BASIC141.1 A BRIEF DESCRIPTION OF V ISUAL B ASIC141.2 T HE V ISUAL B ASIC E NVIRONMENT15CHAPTER 2 BUILDING VISUAL BASIC APPLICATIONS 192.1 C REATING S IMPLE V ISUAL B ASIC A PPLICATIONS19Example 2.1 Print a Message22Example 2.2 Arithmetic Calculation23Example 2.3 Arithmetic Calculation24Example 2.4(a) Using 25Example 2. 4(b) Using &252.2 S TEPS IN B UILDING A V ISUAL B ASIC A PPLICATION26Example 2.5 Calculate the Volume of a Cylinder26Example 2.6 Designing a Calculator UI27CHAPTER 3 WORKING WITH CONTROLS313.1 T HE P ROPERTIES OF THE C ONTROLS313.2 H ANDLING SOME OF THE COMMON CONTROLS343.2.1 Text Box34
5Example 3.1 Adding Numbers in Two Text Boxes343.2.2 Label353.2.3 Command Button363.2.4 The Picture Box363.2.5 The Image Box363.2.6 The List Box37Example 3.2 Adding Items to a List Box373.2.7 The Combo Box37Example 3.3 Adding Items to a Combo Box383.2.8 The Check Box38Example 3.4 Using Check Boxes383.2.9 The Option Button39Example 3.5 Controlling Shapes with Option Buttons393.2.10 The Drive List Box403.2.11 The Directory List Box413.2.12 The File List Box41CHAPTER 4 WRITING THE CODES44Example 4.1 Using Label and Text Box45Example 4.2 Using Image Control45Example 4.3 Using Picture Box and Timer46Example 4.4 Text Concatenation47Example 4.5 Addition using Val47CHAPTER 5 VISUAL BASIC DATA50
65.1 T YPES OF V ISUAL B ASIC D ATA50a) Numeric Data50b) Non-numeric Data Types51c) Suffixes for Literals525.2 M ANAGING V ARIABLES52a) Variable Names53b) Declaring Variables53Example 5.1 Declaration of Variables54CHAPTER 6 MANAGING VISUAL BASIC DATA566.1 A SSIGNING V ALUES TO THE V ARIABLES566.2 A RITHMETIC O PERATORS IN V ISUAL B ASIC56Example 6.1 Concatenation of Strings57Example 6.2 Summation of Numbers58Example 6.3 Calculation Involving Currency58CHAPTER 7 CONTROLLING PROGRAM FLOW – PART I617.1 C ONDITIONAL O PERATORS617.2 L OGICAL O PERATORS627.3 U SING I F .T HEN .E LSEIF E LSE S TATEMENTS WITH O PERATORS 62Example 7.1 Using If Then Else to Check Outcome63Example 7.2 Using If Then Else to Check Password63Example 7.3 Guess a Number65Example 7.4 A Password Cracker66
7CHAPTER 8 CONTROLLING PROGRAM FLOW – PART II708.1 T HE S ELECT C ASE E ND S ELECT S TATEMENT70Example 8.1 To compute Examination Grades70Example 8.2 Examination Grades72Example 8.3 Examination Results73Example 8.4 Calculator74CHAPTER 9 LOOPING PART I779.1 D O L OOP77Example 9.1 A Counter77Example 9.2 Loop Until78Example 9.3 Do Until79Example 9.4 Loop While79Example 9.5 Summation799.2 E XITING THE D O L OOPExample 9.6 Exit Do9.3 T HE W HILE W END L OOP818283Example 9.7 Populating a List Box with While Wend Loop 83CHAPTER 10 LOOPING PART II10.1 T HE F OR .N EXT L OOP8686Example 10.1 A Counter86Example 10.2 Step Increment87Example 10.3 Decreasing Step87
8Example 10.4 Printing a Message Repetitively10.2 E XITING THE F OR N EXT L OOPExample 10.5 Exit For10.3 T HE N ESTED L OOPExample 10.6 Nested LoopCHAPTER 11 BUILT-IN FUNCTIONS88888990919411.1 I NTRODUCTION TO V ISUAL B ASIC F UNCTIONS9411.2 T HE M SG B OX ( ) F UNCTION94Example 11.1 Message Box96Example 11.2 Message Box with an Alert Icon9811.3 T HE I NPUT B OX ( ) F UNCTION99Example 11.3 Using an Input Box100CHAPTER 12 MATH FUNCTIONS10212.1 T HE R ND F UNCTION102Example 12.1 Generating Random Numbers102Example 12.2 Generating Random Integers103Example12.3: A password generator10512.2 T HE N UMERIC F UNCTIONSExample 12.4 Rounding Numbers12.3 T RIGONOMETRIC F UNCTIONSExample 12.5 Computing Trigonometric ValuesCHAPTER 13 FORMATTING FUNCTIONS13.1 T HE T AB FUNCTION106107108109112112
9Example 13.1 Using Tab to Generate Multiplication Table 112Example 13.2 Multiplication Table11313.2 T HE S PACE FUNCTION115Example 13.3 Generating Multiplication Table Using SpaceFunction11513.3 T HE F ORMAT FUNCTION116Example 13.4 Formatting Numbers using Format Function118Example 13.513.4 F ORMATTING D ATE AND TIME121122Example 13.6 Displaying Date and Time in Different Formats122Example 13.7 Displaying Time and Date in Various Formats125CHAPTER 14 STRINGS FUNCTIONS12814.1 T HE L EN F UNCTION12814.2 T HE R IGHT F UNCTION12814.3 T HE L EFT F UNCTION12914.4 T HE L TRIM F UNCTION12914.5 T HE R TRIM F UNCTION12914.6 T HE T RIM FUNCTION13014.7 T HE M ID F UNCTION13014.8 T HE I N S TR FUNCTION13014.9 T HE U CASE AND THE L CASE FUNCTIONS131
1014.10 T HE S TR AND V AL FUNCTIONS13114.11 T HE C HR AND THE A SC FUNCTIONS131Example 14.1 Using Various String Functions132CHAPTER 15 CREATING YOUR OWN FUNCTIONS134Example 15.1 A Function that Calculate Area of Triangle 134Example 15.2 A Function that Calculate Profit Margin135Example 15.3 Future Value Calculator137Example 15.4 Examination Grades Generator138Example 15.5 BMI Calculator140CHAPTER 16 CREATING FUNCTIONS FOR MS EXCEL 14316.1 C REATING U SER -D EFINED F UNCTIONS IN MS-E XCEL14316.2 U SING M ICROSOFT E XCEL V ISUAL B ASIC E DITOR144CHAPTER 17 ARRAYS14717.1 I NTRODUCTION TO A RRAY14717.2 D ECLARING A RRAYS147Example 17.1 Creating an Array of Names using Input Box149Example 17.2 Displaying an Array of Names using a List Box15017.3 T HE C ONTROL A RRAY151CHAPTER 18 TWO DIMENSIONAL ARRAYS153Example 18.1 Two-Dimensional Array154
11CHAPTER 19 GRAPHICS15819.1 T HE LINE AND S HAPE CONTROLS158Example 19.1 Selecting Shapes15919.2 T HE I MAGE B OX AND THE P ICTURE B OX162Example 19.2 Loading Images Randomly16319.3 PS ET , L INE AND C IRCLE D RAWING M ETHODS165Example 19.3 Graphics Drawing Tool168Example 19.4 The Picture Viewer171Example 19.5 An Advanced Picture Viewer173CHAPTER 20 CREATING MULTIMEDIA APPLICATIONS17820.1 C REATING A CD P LAYER17920.2 C REATING AN A UDIO P LAYER18220.3 C REATING A M ULTIMEDIA P LAYER189CHAPTER 21 ANIMATION-PART I196Example 21.1 Moving Jet196Example 21.2 Moving Jet Using Commands198Example 21.3 Moving Objects201Example 21.4 Zoom in and Out202CHAPTER 22 ANIMATION - PART II20522.1 A NIMATION USING A DRAG AND DROP PROCEDURE .20522.2 A NIMATION WITH COMPLETE MOTION207
12CHAPTER 23 ANIMATION - PART III23.1 A NIMATION USING TIMERS212212Example 23.1212Example 23.2 Animated Butterfly21323.2 A NIMATION USING THE M OVE M ETHOD216Example 23.3 Moving Object216Example 23.4 Creating Motion with Timer216CHAPTER 24 FUN AND GAMES –PART I21824.1 S NAKE C HESS21924.2 S LOT M ACHINE237CHAPTER 25 FUN AND GAMES - PART II24925.1 B OGGLE24925.2 R EVERSI25225.3 C ALCULATOR264CHAPTER 26 CREATING EDUCATIONAL PROGRAMS 27726.1 K ID ’ S M ATH27726.2 T HE M EMORY G AME29026.3 T HE S TAR W AR295CHAPTER 27 WORKING WITH FILES31127.1 I NTRODUCTION31127.2 C REATING A T EXT F ILE311
13Example 27.1 Creating a Text File27.3 R EADING A F ILE312312Example 27.2 Reading a text file313Example 27.3 A simple database management system313Example 27.4 Creating and Reading Text File with CommonDialog317CHAPTER 28 CREATING DATABASE APPLICATIONS 320Example 28.1 Simple Database Application320Example 28.2 Manipulating Database322CHAPTER 29 CREATING DATABASE APPLICATIONS 325WITH ADO CONTROLExample 29.1 An ADO Application325325CHAPTER 30 MANAGING DATABASE WITH DATAGRID334CONTROL334CHAPTER 31 SQL QUERIES34131.1 T HE SELECT K EYWORD34131.2 T HE WHERE K EYWORD346Example 31.1 Query based on Author347Example 31.2:Query based on year347Example 31.3350Example 31.4350
14CHAPTER 32 ELECTRONIC LIBRARY35232.1 T HE W ELCOME M ENU35332.2 T HE R EGISTRATION F ORM35432.3 T HE L OGIN M ENU35632.4 T HE E LECTRONIC L IBRARY358CHAPTER 33 ERRORS HANDLINGS363Example 33.1: Division by Zero364Example 33.2: Nested Error Handling Procedure366CHAPTER 34 CREATING MENUS36934.1 A DDING M ENU B AR WITH VB A PPLICATION W IZARD36934.2: A DDING M ENU B AR U SING M ENU E DITOR378CHAPTER 35 KEYBOARD HANDLING38435.1 ASCII38435.2 C OMMON K EY E VENTS C ONSTANTS .38635.3 W RITING CODE FOR THE KEY EVENTS387Example 35.1388Example 35.2388Example 35.3388Example 35.4389CHAPTER 36 PRINTING WITH THE PRINTER OBJECT 39036.1 P RINTING USING THE P RINTER OBJECT390
1536.2 F ORMATTING THE O UTPUT USING P RINTER O BJECT PROPERTIES 394CHAPTER 37 CREATING REPORTS39537.1 A BRIEF INTRODUCTION TO REPORTING TOOL IN VB639537.2 S TEPS IN BUILDING YOUR REPORT IN V ISUAL B ASIC 6395Step 1: Adding Data Report395Step 2: Connecting the report to database using DataEnvironment Designer396Step 3: Retrieving Information from the Database399CHAPTER 38 INTERNET AND WEB APPLICATIONS40438.1 T HE W EB B ROWSER40438.2 T HE FTP PROGRAM409CHAPTER 39 COMPILING AND DISTRIBUTING VBAPPLICATIONS42039.1 C OMPILING YOUR V ISUAL B ASIC P ROGRAM42039.2 D ISTRIBUTING Y OUR P ROGRAM424I NDEX429
16
17Chapter 1 Introduction to Visual Basic A brief description of Visual Basic Getting to know the Visual Basic environment1.1 A brief description of Visual BasicVISUAL BASIC is a high-level programming language evolvedfrom the earlier DOS version called BASIC. BASIC stands forBeginners' All-purpose Symbolic Instruction Code. The programcodes in Visual Basic resembles the English language. Differentsoftware companies produce different versions of BASIC, suchas Microsoft QBASIC, QUICKBASIC, GWBASIC, and IBMBASICA and so on.Visual Basic is an easy programming language to learn and it isfor anybody who is interested in programming but lackprofessional training in software engineering. Learning VB willhelp young children to improve their logical thinking skills anddevelop their minds. You can choose to program in VB purelyfor fun and enjoyment or you can create more advancedapplications such as educational courseware and commercialsoftware.
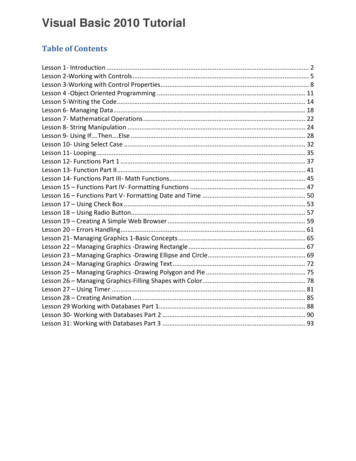
18VISUAL BASIC is a VISUAL and events driven ProgrammingLanguage. These are the main divergences from the old BASIC.In BASIC, programming is done in a text-based environment andthe program is executed sequentially. In VISUAL BASIC,programming is done in a graphical environment. In old BASIC,you have to write a text-based procedure to design the interface,but Visual Basic enables you to design the interface by draggingand resizing the objects as well as changing their colors, just likeany windows-based programs.Visual Basic is event-driven because users may click on a certainobject randomly, so each object has to be programmedindependently to be able to response to those actions (events).Examples of events are clicking a command button, entering textinto a text box, selecting an item in a list box etc. Therefore, aVISUAL BASIC Program is made up of many subprograms;each with its own program code which can be executedindependently and at the same time can be linked together in oneway or another.1.2 The Visual Basic EnvironmentUpon start up, Visual Basic 6.0 will display the dialog box asshown in Figure 1.1. You can choose to start a new project, open
19an existing project, or select a list of recently opened programs.A project is a collection of files that make up your application.There are various types of applications that can be created;however, we shall concentrate on creating Standard EXEprograms (EXE means executable program). Now, click on theStandard EXE icon to go into the VB programming environment,as shown in Figure 1.1.Figure 1.1 Visual Basic 6 Start-up Dialog Box
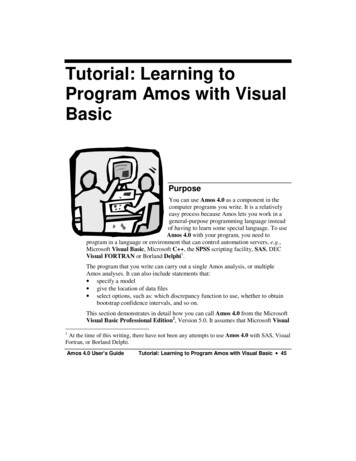
20Figure 1.2 Visual Basic 6 IDEIn Figure 1.2, the Visual Basic Environment consists of A blank form for you to design your application'sinterface. The project window which displays the files that arecreated in your application.
21 The properties window which displays the properties ofvarious controls and objects that are created in yourapplication.It also has a Toolbox that consists of all the controls essential fordeveloping a VB Application. The controls include text boxes,command buttons, labels, combo boxes, picture boxes, imageboxes, timers and other objects that can be dragged to and drawnon the form to perform certain tasks according to the eventsassigned to them. You may also add additional objects. First,click on the project item on the menu, then on the componentsitem on the drop-down list, and lastly select the controls youwant to use in your program. The controls for Standard.EXEwindow is shown in Figure 1.3.
22Figure 1.3: The controls available for a Standard.exe projectExercise 11. Write down the meaning of BASIC.2. Briefly explain the difference between VISUAL BASICand the old BASIC.3. List out all the controls in a Standard.exe Visual Basicproject.
23Chapter 2 Building Visual Basic Applications Creating simple Visual Basic Applications. Getting to know the steps in building a Visual BasicApplication.2.1 Creating Simple Visual Basic ApplicationsIn this section, we are not going into the technical aspects of VBprogramming; the purpose of this section is to let you get a feelfor it. Now, you can try out a few examples in this chapter.Example 2.1 is a simple program. First, you have to launchMicrosoft Visual Basic. Normally, a default form Form1 will beavailable for you to start your new project. Double click onForm1, and the source code window as shown in Figure 2.1 willappear. The top of the source code window consists of a list ofobjects (on the left) and their associated events or procedures (onthe right). In Figure 2.1, the object displayed is Form and theassociated procedure is Load.
24Figure 2.1 The Source Code WindowWhen you click on the object box, the drop-down list willdisplay a list of objects you have inserted into your form asshown in Figure 2.2. Here, you can see the form, the commandbutton with the name Command1, the Label with the nameLabel1 and the PictureBox with the name Picture1. Similarly,when you click on the procedure box, a list of proceduresassociated with the object will be displayed as shown in Figure2.3. Some of the procedures associated with the object Form areActivate, Click, DblClick (Double-Click) , DragDrop, keyPress
25etc. Each object has its own set of procedures. You can select anobject and write codes for any of its procedures to performspecific tasks.Figure 2.2 List of Objects
26Figure 2.3 List of ProceduresYou do not have to worry about the beginning and the endstatements (i.e. Private Sub Form Load.End Sub.); Just keyin the codes between the above two statements exactly as shownhere. When you run the program, don’t be surprised that nothingshows up. In order to display the output of the program, you haveto add the Form1.show statement like in Example 2.1 or you canjust use the Form Activate ( ) event procedure as shown inexample 2.2. The command Print does not mean printing using aprinter. Instead, it means displaying the output on the computerscreen. Now, press F5 or click on the run button to run theprogram and you will get the output as shown in Figure 2.4.
27Example 2.1 Print a MessagePrivate Sub Form Load ( )Form1.showPrint "Welcome to Visual Basic tutorial"End SubFigure 2.4 Out of Example 2.1You can also perform simple arithmetic calculations as shown inexample 2.2. VB uses * to denote the multiplication operator and/ to denote the division operator. The output is shown in Figure2.5, where the results are arranged vertically.
28Example 2.2 Arithmetic CalculationPrivate Sub Form Activate ( )Print 20 10Print 20 - 10Print 20 * 10Print 20 / 10End SubFigure 2.5 Output of Example 2.2Example 2.2 can also be written asPrivate Sub Form Activate ( )Print 20 10, 20 – 10, 20 * 10, 20 / 10
29End SubThe numbers will be arranged in a horizontal line separated byspaces as shown in Figure 2.6Figure 2.6 Output in a Horizontal LineExample 2.3 is an improved version of example 2.2 as it employstwo variables x and y and assigns initial values of 20 and 10 tothem, respectively. When you need to change the values of x andy, just change the initial values rather than changing everyindividual value which is more time consuming.Example 2.3 Arithmetic CalculationPrivate Sub Form Activate ( )
30x 20y 10Print x yPrint x - yPrint x * yPrint x / yEnd SubBesides, you can also use the or the & operator to join two ormore texts (string) together like in example 2. 4 (a) and (b)Example 2.4(a) Using Private SubForm Activate ()A "Tom "B "likes "C "to "D "eat "E "burgers."Print A B C D EEnd SubExample 2. 4(b) Using &Private Sub Form Activate ()A "Tom "
31B "likes "C "to "D "eat "E "burgers."Print A & B & C & D & EEnd SubThe output is as shown in Figure 2.7Figure 2.72.2 Steps in Building a Visual Basic Application
32There are three basic steps in building a VB application, asfollows:Step 1: Design the interfaceStep 2: Set the properties of the controls (Objects)Step 3: Write the events' proceduresExample 2.5 Calculate the Volume of a CylinderThis program is a simple program that calculates the volume of acylinder.Figure 2.8 A Program to Calculate Volume of a CylinderFirst of all, go to the properties window and change the formcaption to Volume of Cylinder, then drag and insert three labels
33into the form and change their captions to Base Radius, Heightand Volume respectively. After that, insert three text boxes andclear its text contents so that you get three empty boxes. Namethe text boxes as radius, hght and volume, respectively. Lastly,insert a command button and change its caption to O.K and itsname to OK. Now save the project as cylinder.vbp and the formas cylinder.frm. We shall leave out the codes now which youshall learn in the following chapters.Example 2.6 Designing a Calculator UIDesigning an attractive and user-friendly interface is the first stepin constructing a VB program. To illustrate this point, let us lookat the calculator program.
34Figure 2.9 CalculatorNow, follows the steps below to design the calculator interface. Resize the form until you get the size you are satisfiedwith. Go to the properties window and change the defaultcaption of the form to the caption you like, such asCalculator.
35 Change the other properties of the form, such asbackground color, foreground color, and border style.For this program, I recommend you set the followingproperties for Form1:BorderStyleFixed SingleMaxButtonFalseminButtonTrueThese properties will ensure that the users cannot resize ormaximize your calculator window, but able to minimize thewindow. Draw the Display Panel by clicking on the Label buttonand place your mouse on the form. Start drawing bypressing down your mouse button and dragging it. Click on the panel and the corresponding propertieswindow will appear. Clear the default label so that thecaption is blank. It is better to set the background colorto a brighter color while the foreground color should beof a darker color like black (for easy viewing). Change
36the name to display as I am going to use it later to writecodes for the calculator. Now draw the command buttons that are necessary tooperate a calculator. I suggest you follow exactly what isshown in the image above.Now run the project by pressing F5. If you are satisfied with theappearance, go ahead, and save the project.Exercise 21. Write down the list of procedures which are associatedwith the Form object.2. Write a program to display the sentence "I like VisualBasic".3. Write a program to compute the value of1500 1000-450*10 300 54. Using a value of x 9 and a value of y 13 , write aprogram to compute the values of 2x y, (x y) 2 and x 2 y
37
38Chapter 3 Working with Controls Setting the properties of the controls Learning how to work with the controls3.1 The Properties of the ControlsBefore writing an event procedure for the control to response to auser's input, you have to set certain properties for the control todetermine its appearance and how it will work with the eventprocedure. You can set the properties of the controls in theproperties window or at runtime.Figure 3.1 is a typical property window for a form. You canrename the form caption to any name that you like best. In theproperties window, the item which appears at the top part is theobject currently selected (in Figure 3.1, the object selected isForm1). At the bottom part, the items listed in the left columnrepresent the names of various properties associated with theselected object while the items listed in the right columnrepresent the states of the properties. Properties can be set byhighlighting the items in the right column and then changingthem by typing or selecting the options available.
39For example, to change the caption just highlight Form1 underthe name Caption and change it to other names. You may alsoalter the appearance of the form by setting it to 3D or flat. Youcan do other things like changing the foreground and backgroundcolor, changing the font type and font size, enabling or disablingthe minimize and maximize buttons and etc.
40
41Figure 3.1You can also change the properties at runtime to create specialeffects such as changing of colors, shape, animation effects andso on. For example, the following code will change the formcolor to red every time the form is loaded. VB uses hexadecimalsystem to represent colors. You can check the color codes in theproperties windows which are shown under ForeColor andBackColor .Private Sub Form Load()Form1.ShowForm1.BackColor &H000000FF&End SubAnother example is to change the control Shape to a shape atruntime by writing the following code. This code will change theshape to a circle at runtime. Later you will learn how to changethe shapes randomly by using the RND function.Private Sub Form Load()Shape1.Shape 3End Sub
42I would like to stress that learning how and when to set theobjects' properties is very important as it can help you to write agood program. Therefore, I advise you to spend a lot of timeplaying with the objects' properties. I am not going into thedetails on how to set the properties. However, I would like tostress a few important points about setting up the properties. You should set the Caption Property of a control clearlyso that the user knows what to do with that command.For example, in the calculator program, as all thecaptions of the command buttons such as , - , MC, MRare commonly found in an ordinary calculator, the usershould have no problem in manipulating the buttons. A lot of programmers like to use a meaningful name forthe Name Property because it is easier for them to writeand read the event procedure and easier to debug ormodify the programs later. However, it is not a must todo that as long as you label your objects clearly and usecomments in the program whenever you feel necessary. One more important property is whether the control isbeing enabled or not. Finally, you must also consider making the controlvisible or invisible at runtime, or when should it becomevisible or invisible.
433.2 Handling some of the common controls3.2.1 Text BoxThe text box is the standard control that is used to receive inputfrom the user as well as to display the output. It can handle string(text) and numeric data but not images or pictures. Strings in atext box can be converted to numeric data by using the functionVal(text). The following example illustrates a simple programthat processes the inputs from the user.Example 3.1 Adding Numbers in Two Text BoxesIn this program, two text boxes are inserted into the formtogether with a few labels. The two text boxes are used to acceptinputs from the user and one of the labels will be used to displaythe sum of two numbers that are entered into the two text boxes.A command button is also programmed to calculate the sum ofthe two numbers using the plus operator. The program creates avariable, ‘sum’, to accept the summation of values from Textbox1 and text box 2.The procedure to calculate and display theoutput on the label is shown below. The output is shown inFigure 3.1.Private Sub Command1 Click()
44'To add the values in Textbox 1 and text box 2Sum Val(Text1.Text) Val(Text2.Text)'To display the answer on label 1Label1.Caption SumEnd SubFigure 3.13.2.2 LabelThe label is used to provide instructions and guides to the users,it can also be used to display outputs. One of its most importantproperties is Caption . Using the syntax Label.Caption , it candisplay text and numeric data. You can change its caption in the
45properties window and also at runtime. Please refer to Example3.1 and Figure 3.1 for the usage of Label.3.2.3 Command ButtonThe command button is used to execute commands. It displaysan illusion that the button is pressed when the user clicks on it.The most common event associated with the command button isthe Click event, and the syntax for the procedure isPrivate Sub Command1 Click ()StatementsEnd Sub3.2.4 The Picture BoxThe Picture Box is the control that is used to handle graphics.You can load a picture during the designing phase by clicking onthe picture item in the properties window and select the picturefrom the selected folder. You can also load the picture at runtimeusing the LoadPicture method. For example, this statement willload the picture grape.gif into the picture box.Picture1.Picture LoadPicture ("C:\VBprogram\Images\grape.gif")You will learn more about the picture box in future chapters. Theimage in the picture box is not resizable.
463.2.5 The Image BoxThe Image Box is another control that handles images andpictures. It functions almost identically to the picture box.However, there is one major difference, the image in an ImageBox is stretchable, which means it can be resized. This feature isnot available in the Picture Box. Similar to the Picture Box, theLoadPicture method can also be used. For example, thisstatement loads the picture grape.gif into the image box.Image1.Picture LoadPicture ("C:\VBprogram\Images\grape.gif")3.2.6 The List BoxThe function of the List Box is to present a list of items wherethe user can click and select items from the list. To add items tothe list, we can use the AddItem method . For example, if youwish to add several items to List box 1, you can key in thefollowing statementsExample 3.2 Adding Items to a List BoxPrivate Sub Form Load ( )List1.AddItem "Chapter1"List1.AddItem "Chapter2"List1.AddItem "Chapter3"
47List1.AddItem "Chapter4"End SubThe items in the list box can be identified by the ListIndexproperty, the value of the ListIndex for the first item is 0, thesecond item has a ListIndex 1, and the second item has aListIndex 2 and so on3.2.7 The Combo BoxThe function of the Combo Box is also to present a list of itemswhere the user can click and select the items from the list.However, the user needs to click on the small arrowhead on theright of the combo box to see the items which are presented in adrop-down list. To add items to the list, you can also use theAddItem method . For example, if you wish to add several itemsto Combo box 1, you can key in the following statementsExample 3.3 Adding Items to a Combo BoxPrivate Sub Form Load ( )Combo1.AddItem "Item1"Combo1.AddItem "Item2"Combo1.AddItem "Item3"Combo1.AddItem "Item4"End Sub
483.2.8 The Check BoxThe Check Box control lets the user select or unselect an option.When the Check Box is checked, its value is set to 1 and when itis unchecked, the value is set to 0. You can include thestatements Check1.Value 1 to mark the Check Box andCheck1.Value 0 to unmark the Check Box, and use them toinitiate certain actions. For example, the program will change thebackground color of the form to red when the check box isunchecked and it will change to blue when the check box ischecked. You will learn about the conditi
searched Visual Basic Tutorial website in many search engines including Google. To provide more support for the Visual Basic hobbyists, he has written this book based on the Visual Basic tutorial. C o n t e n t s C H A P T E R 1 I N T R O D U C T I O N T O V I S U A L B A S I C 1 4 1.1 A B .