Transcription
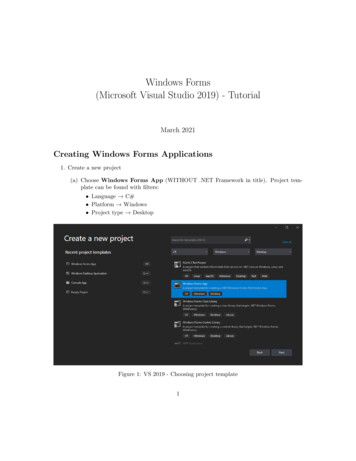
Windows Forms(Microsoft Visual Studio 2019) - TutorialMarch 2021Creating Windows Forms Applications1. Create a new project(a) Choose Windows Forms App (WITHOUT .NET Framework in title). Project template can be found with filters: Language C# Platform Windows Project type DesktopFigure 1: VS 2019 - Choosing project template1
(b) Choose name and location for your projectFigure 2: VS 2019 - Choosing project name(c) Switch Target Framework to .NET 5.0Figure 3: VS 2019 - Choosing Target Framework2
2. Compile and get familiar with generated files(a) Compile and run application. Note that one empty window will appear. Close it andcheck the generated files.(b) Investigate file ”Program.cs”. It contains the ”Main” method, the entry point foryour application.1234567static void cation.Run(new Form1());}The most important line is Application.Run(new Form1()), which starts applicationmessage loop and shows Form1 form.(c) Open file ”Form1.cs”. Note that instead of code you will see Form Designer. It allowsyou to add, remove, edit controls on your forms using graphics interface.Figure 4: VS 2019 - Window designer(d) Right-click ”Form1.cs” in solution explorer and click View Code. You will see ”Codebehind” of the form:3
public partial class Form1 : Form{3public Form1()4{5InitializeComponent();6}7}It’s a place where you should write logic for the form. Note, that Form1 class is derivedfrom the Form class – one of the fundamental classes of Windows Forms. Note alsothat Form1 class is marked partial.(e) Open ”Form1.Designer.cs” – under ”Form1.cs” tree. This file is used by FormDesigner. It’s second part of Form1 class. You should’t change this file, unless you knowwhat you are doing. All changes to this file will be lost after using Form Designer – sodon’t place your code here!123. Add controls to the form(a) Add controls to Form. Open Form Designer. Open Toolbox (View Toolbox). Youcan see there all available controls. Find and place on the Form the following controls:Label, Textbox, Button.(b) Show control properties. Right click on Label control and choose Properties. Inproperties box, you can adjust controls. Go through the list and make yourself familiarwith available options. Remember that this list may be different for different controls.(c) Change names of controls. The Name is common for all controls and it’s a name ofcontrol to use in ”Code-Behind”. Name of each control on the form must be unique. Set Name of Label to ”nameLabel” Set Name of Textbox to ”nameTextBox” Set Name of Button to ”goButton”(a) List of all controls in the window(b) Properties of the buttonFigure 5: Control’s properties4
(d) Set other properties: Change size of Form to 200x200. Use Size property or mouse in Form DesignerFigure 6: Form Size property Set Text of Form to ”Main Form” Set Text of Button to ”OK” Set Text of Label to ”Your name:”Note: Control’s text is automatically updated.(e) Run your application. You will see a window with control, however, pressing a buttondoes nothing. Close your application.Figure 7: MainForm window5
(f) Add code-behind. To respond to user’s interaction you must add event handlers to yourcontrols. To see all available events for a control, select it in the Form Designer, andclick Events button in the properties box.Figure 8: Button eventsNote: To see properties again, press Properties button.To create an event handler for button’s Click event, double click in Click event box.Your code-behind file opens and you will see a new empty method generated for you.123private void goButton Click(object sender, EventArgs e){}Note: Each control has its ”default” event. When you double click it in Form Designer it will automatically create a handler for this event. For Button its Click event.So instead of opening Events box you could just double click button in Form Designer.Put this line in the handler:1MessageBox.Show("Welcome " nameTextBox.Text);MessageBox.Show creates a message box with ”OK” button. Note that we use nameTextBox.Text to get Textbox input text(g) Run your application, write your name in textbox and press OK.6
Figure 9: Main form and message box(h) Adding error notification and Validation. Add Error Provider control to your form Name it ”nameErrorProvider”. Note: this component isn’t placed on your formbut it’s located bellow.Figure 10: Error provider(i) Add Validation event handler for nameTextBox (Events Focus Validating):7
private void nameTextBox Validating(object sender, CancelEventArgs e){3if (nameTextBox.Text.Length 0 nameTextBox.Text.Length 6)4{5nameErrorProvider.SetError(nameTextBox,6"Name must contain from 1 to 6 characters");7e.Cancel xtBox, string.Empty);11e.Cancel false;12}(j) Change your goButton Click method to the following:1212345private void goButton Click(object sender, EventArgs e){if (this.ValidateChildren())MessageBox.Show("Welcome " nameTextBox.Text);}(k) Run your application. Leave empty textbox and click ”OK”. Note that the messagebox doesn’t show up. Instead you can see error icon with error message next to textbox.Write something correct in textbox and see that icon hides and message box shows up.Figure 11: Textbox error icon(l) Disable AutoValidation. You may find impossible to close window when textbox isinvalid. To correct that set Form1 property AutoValidate to Disable (Properties Behavior AutoValidate).8
Using Controls – Calendar Manager1. Create new project, name it ”WinFormsCalendar”2. Create layout Set Form defaults– Set Size of the form to 800 x 500– Set StartPosition to Center Screen Add a Split Container to the form. Change its orientation to horizontal using menuin the top-right corner of the control. Rename it to ”splitContainer”.Figure 12: Split container Tasks Change color of the Split Container. Split container contains 2 panels and a splitterbetween them. It allows user to change size of the panels by moving the splitter. However,splitter’s color is the same as panels, so it is invisible. To change the color, do thefollowing:– Set splitContainer Back Color to LightSteelBlue. If you have problem selectingSplitContainer in the Designer, use menu at the top of properties box.9
Figure 13: Split container on control list and its properties Color of panels also changed. Now select first panel and change its back color to ControlLight, the same for the second panel. Run the application. You should see the splitter and be able to change its position.3. Anchoring controls Add two controls to the top panel: MonthCalendar and TextBox. Name them ”monthCalendar” and ”noteTextBox”, respectively Set Calendar properties– Set CalendarDimensions Width to 2 (Appearance CalendarDimensions)– Set MaxSelectionCount to 1 (Behavior MaxSelectionCount) Set TextBox properties– Set Multiline to True (Behavior Multiline) Set controls layout. Place Calendar in the top-left corner of the Panel. Resize theTextbox to fill the rest of it.10
Figure 14: Calendar window layout Start application. Try resizing window. Notice that the size of the textbox doesn’tchange. Go back to the Form Designer. Change noteTextBox Anchor property to Top Bottom Left Right. Start Application again and see that resizing works properly.4. Add collection control Bottom panel controls– Add 2 buttons and ListView to the bottom panel.– Name them ”addButton”, ”removeButton” and ”calendarListView”, respectively.– Place them as in the screenshot bellow.Figure 15: Window’s bottom panel layout11
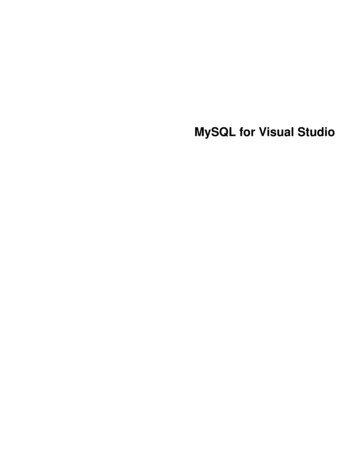
Set following properties(a)(b)(c)(d)(e)(f)addButton Text to ”Add”removeButton Text to ”Remove”removeButton Enabled to False (Behavior Enabled)calendarListView View to Details (Appearance View)calendarListView FullRowSelect to True (Appearance FullRowSelect)calendarListView Anchor to Top Bottom Left Right Start application again and see that resizing works properly. Select calendarListView.In properties box find Columns and click [. . . ] button. You will see List View columneditor. Add 2 columns:(a) Name: ”dateColumnHeader”; Text: ”Date”; Width: 120(b) Name: ”noteColumnHeader”; Text: ”Note”; Width: 200Figure 16: ListView columns’ definitions Compile and make sure everything looks fine.5. Add Logic to the application Adding item to ListView– Add Click event handler to addButton.– Fill it with following code:1private void addButton Click(object sender, EventArgs e)2{3string date string note noteTextBox.Text;5ListViewItem newItem new ListViewItem(new[] { date, note ox.Text "";8}12
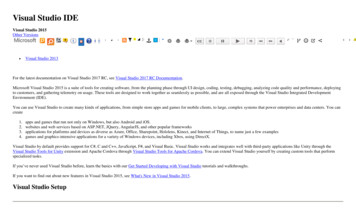
Note that to add item to the ListView you must create a ListViewItem object.Because we have 2 columns in our ListView, the ListViewItem should have 2values – date and note. Run application and try adding some items to our ListView.Figure 17: Calendar window Remove selected item from ListView.12345private void removeButton Click(object sender, EventArgs e){foreach (ListViewItem item in ems.Remove(item);}Remember that your removeButton is disabled. Add SelectedIndexChanged eventhandler to a calendarListView:1234private void calendarListView SelectedIndexChanged(object sender, EventArgs e){removeButton.Enabled calendarListView.SelectedItems.Count 0;} Start application and test adding and removing items.13
Figure 18: Removing items from Calendar6. Adding notify Icon Add NotifyIcon control named ”notifyIcon” to the Form– Set Text to ”Windows Forms Calendar”– Set Icon to any icon you can find on your computer– Set Visible to True Show a BallonTip. Modify your addButton Click method. Add at the end of it:1notifyIcon.ShowBalloonTip(1000, "Item added", "Added new event", ToolTipIcon.Info); Run application. You will see an icon on the taskbar and a notification after adding anitem.Figure 19: Calendar notification14
Context menu:– Add ContextMenuStrip control to our form, named ”notifyIconContextMenu”– Add Load Event Handler to Form1:private void Form1 Load(object sender, EventArgs e){notifyIconContextMenu.Items.Add("Exit", null, ExitContextMenu Click);}1234– Add Event handler for above menu item:private void ExitContextMenu Click(object sender, EventArgs e){Close();}1234– Set notifyIcon’s ContextMenuStrip property to notifyIconContextMenu Run application and right click on the notify icon.Figure 20: Menu icon Context MenuUsing Controls – WinFormsGallery1. Create new project, name it ”WinFormsGallery”2. Create layout Set Form defaults– Set Size of the form to 800 x 500– Set StartPosition to Center Screen– Set Locked to True Table Layout Panel:––––Add a Table Layout Panel to the form.Rename it to ”galleryLayoutPanel”.Set Anchor to Top, Bottom, Left, RightChange second column Width to 25%15
Figure 21: TableLayoutPanel columns and rows settings Run application and notice that nothing is visible. Table Layout Panel is just a container.We need to fill it with controls.3. Add Buttons Add Choose Image button to Top Right Panel– Change its Name to ”imageButton”– Change its Text to ”Choose Image”– Change its Dock to Fill Add Choose Color button to Bottom Right Panel– Change its Name to ”colorButton”– Change its Text to ”Choose Color”– Change its Dock to Fill16
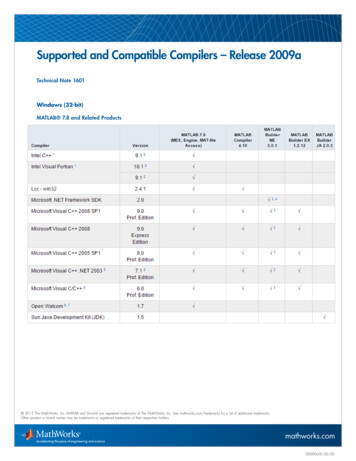
Figure 22: Application layout4. Add Color Button logic Add Click event to colorButton. We will change BackColor for bottom panels.– We will use ColorDialog to choose our color.– Add following code to colorButton Click:123456ColorDialog colorDialog new ColorDialog();if (colorDialog.ShowDialog() Position(1, 1).BackColor mPosition(0, 1).BackColor colorDialog.Color;} Run application and choose your color. You will see that System.NullReferenceExceptionis thrown. It is because TableLayoutPanel is just a container, and there is nothinginside Bottom Left panel. Add Empty Label to Bottom Left panel. Fill it to the container. Rerun application.17
Figure 23: ColorButton logic5. Add Image Button logic Add Empty Label to Top Left panel. Fill it to the container. We will use OpenFileDialog to fill Top Left label background image.– Create imageButton Click event and add following code:123456789OpenFileDialog fileDialog new OpenFileDialog();fileDialog.Filter "Image Files(*.BMP;*.JPG;*.GIF) *.BMP;*.JPG;*.GIF";if (fileDialog.ShowDialog() Position(0, 0).BackgroundImage new ControlFromPosition(0, 0).BackgroundImageLayout ImageLayout.Stretch;} Run application and choose an image.18
Figure 24: ImageButton logicUsing Controls – WinFormsGraphics1. Create new project, name it ”WinFormsGraphics”2. Create layout Set Form defaults– Set Size of the form to 800 x 600– Set StartPosition to Center Screen– Set Locked to True Picture Box:––––Add a PictureBox to the form.Rename it to ”Canvas”.Set Anchor to Top, Bottom, Left, RightSet Dock to Fill Prepare Drawing Area:– Add a Bitmap field to Form1:1private Bitmap drawArea;– Add following code in the Form1 constructor below InitializeComponent():19
drawArea new Bitmap(Canvas.Size.Width, Canvas.Size.Height);Canvas.Image drawArea;3using(Graphics g tBlue);6}– Alternatively, you can replace lines 3-6 with:1Graphics g lue);3g.Dispose();– Keep in mind that all GDI objects must be disposed after usage to prevent memoryleaks.12 Run the application, it should be filled with a light blue color.Figure 25: Application Layout3. Create some logic Add MouseDown event to the pictureBox. It will be used to draw some circles on thebitmap.20
Add a constant field in the Form1 class:1private const int RADIUS 10; Add following code to the event:12345678if(e.Button MouseButtons.Left){using (Graphics g s.White, e.X - RADIUS, e.Y - RADIUS, RADIUS * 2, RADIUS * 2);}Canvas.Refresh();} Run the application and press LMB in the window. Keep in mind that Canvas.Refresh()is necessary in order to be able to see changes on the bitmap.Figure 26: Logic - drawing circles4. Add an outline to the circles Create a Pen field in the Form1 class:1private Pen pen; Add following code in the Form1 constructor:1pen new Pen(Brushes.Black, 3); Modify the MouseDown event:21
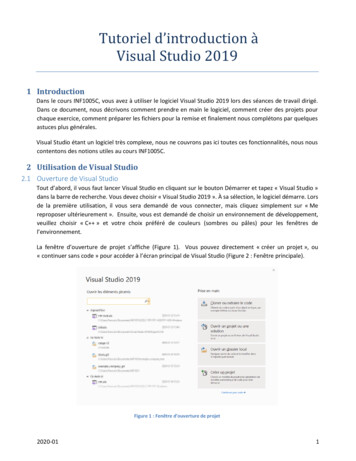
123456789if(e.Button MouseButtons.Left){using (Graphics g s.White, e.X - RADIUS, e.Y - RADIUS, RADIUS * 2, RADIUS * 2);g.DrawEllipse(pen, e.X - RADIUS, e.Y - RADIUS, RADIUS * 2, RADIUS * 2);}Canvas.Refresh();} Run the application and press LMB in the window. Circles should now have an outline.Figure 27: Logic - drawing outline5. Drawing dashed outline Create another Pen field in the Form1 class:1private Pen dashedPen; Add following code in the Form1 constructor:12dashedPen new Pen(Brushes.Black, 3);dashedPen.DashPattern new float[] { 2, 1 }; Add following code in the MouseDown event:if (e.Button MouseButtons.Right)123{using (Graphics g Graphics.FromImage(drawArea))22
{4g.FillEllipse(Brushes.White, e.X - RADIUS, e.Y - RADIUS, RADIUS * 2, RADIUS * 2);g.DrawEllipse(dashedPen, e.X - RADIUS, e.Y - RADIUS, RADIUS * 2, RADIUS * 2);56}Canvas.Refresh();789} Run the application and press some LMB and RMB in the window. LMB draws a circlewith a normal outline, RMB draws a circle with a dashed outline.Figure 28: Logic - dashed outline23
(Microsoft Visual Studio 2019) - Tutorial March 2021 Creating Windows Forms Applications 1.Create a new project (a)Choose Windows Forms App (WITHOUT .NET Framework in title). Project tem-plate can be found with lters: Language C# Platform Windows Project type Desktop Figure 1: VS 2019 - Choosing project template 1