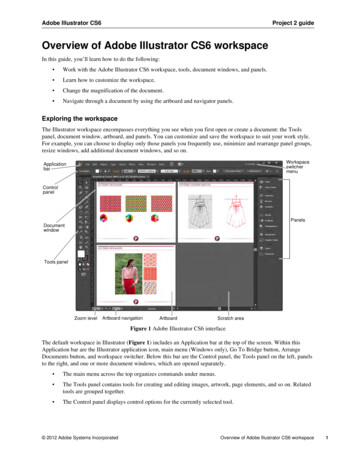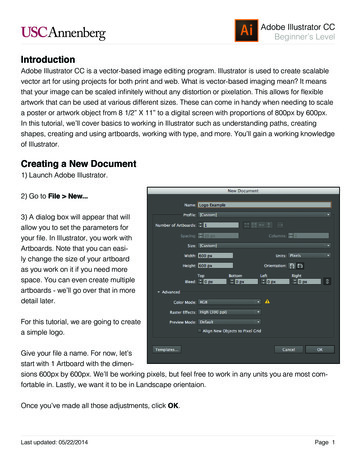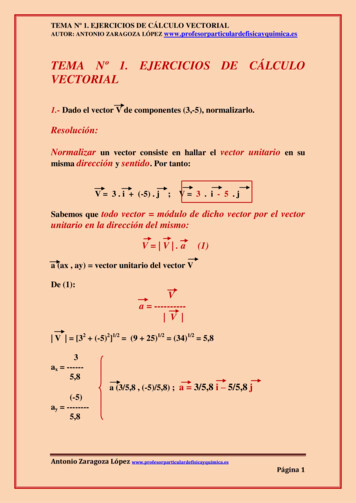
Transcription
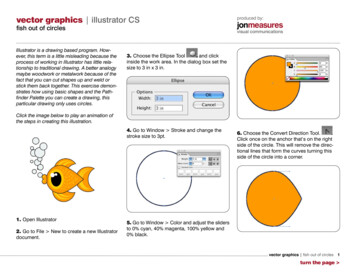
vector graphics illustrator CSfish out of circlesIllustrator is a drawing based program. However, this term is a little misleading because theprocess of working in Illustrator has little relationship to traditional drawing. A better analogymaybe woodwork or metalwork because of thefact that you can cut shapes up and weld orstick them back together. This exercise demonstrates how using basic shapes and the Pathfinder Palette you can create a drawing, thisparticular drawing only uses circles.produced by:jonmeasuresvisual communications3. Choose the Ellipse Tooland clickinside the work area. In the dialog box set thesize to 3 in x 3 in.Click the image below to play an animation ofthe steps in creating this illustration.4. Go to Window Stroke and change thestroke size to 3pt.1. Open Illustrator2. Go to File New to create a new Illustratordocument.6. Choose the Convert Direction Tool.Click once on the anchor that’s on the rightside of the circle. This will remove the directional lines that form the curves turning thisside of the circle into a corner.5. Go to Window Color and adjust the slidersto 0% cyan, 40% magenta, 100% yellow and0% black.vector graphics fish out of circles 1turn the page
7. Choose the Direct Selection Toolanddrag the anchor point to the right. This modified circle will form the body of our finished fish.9. Drag this circle to the right holding option,holding option will duplicate the object that youare dragging. Position this circle as shown below.Note: It’s often easier to create the shape youwant by modifying simple shapes rather thandrawing the shape.8. Choose the Ellipse Tooland drawanother circle that looks like this.10. Go to Window Pathfinder to open thePathfinder Palette. Select the two circles you justcreated, these will form the fin of the fish. Clickthe second icon in the top row of the PathfinderPalette called Subtract from Shape Area.and then expandthat was on the top has gone and where it overlapped the other circle has also be deleted. However, the two shapes are in fact still there. Whenyou click the expand button in the PathfinderPalette the objects have literally been changed.This is what the appearance looks like prior toexpanding when the objeccts are selected.Note: Before you click expand the Subtract fromShape Area option has changed the appearanceof the objects. It now looks as though the circleThis is what the fin looks like when the shapeshave been expanded.vector graphics fish out of circles 2 previous pageturn the page
11. With the shape of the fin still selected Goto Object Arrange Send to Back. To sendthe fin behind the body of the fish.Note: Every object you draw in Illustratoroccupies it’s own level within the layer. Thelast object you create is always on top ofanything already drawn. Object Arrangegives you the option to Send to Back, SendBackward, Bring to Front or Bring Forward.Understanding how to arrange you vector objects within the stacking order is an importantaspect to using Illustrator effectively.13. Choose the Rotate Tooland drag thebottom fin around as shown below.12. Hold the option key and drag the fin downto create a duplicate of the fin that you canplace at the bottom.14. Choose the Ellipse Tool again and drag outholding shift to constrain the ellipse to a circle.This circle will form the fish’s tail. Place it overthe pointed side of the body.15. With the Selection Tool select the circle youjust drew with the Selection Tool, hold optionand drag the circle to the right to create a duplicate of the circle that overlaps the first one likethe illustration below.16. With both circles you just drew selectedclick Subtract from Shape Area in the PathfinderPalette. Don’t forget to click Expand in thePathfinder Palette.vector graphics fish out of circles 3 previous pageturn the page
17. Using the Ellipse Tool draw a smallercircle that will form the fish’s lips, don’t forgetthat holding shift constrains the Ellipse Tool to acircle. Make a duplicate of this circle by dragging down holding option the two circles wantto slightly over lap.18. Select both these small circles in the Pathfinder Palette click the first icon which is calledAdd to Shape Area, then expand. Now thesetwo circles will be one shape.19. With the Minus Anchor Points Toolclick on the anchor point on the right side ofthe shape. This will change the shape of theobject to look like the illustration above.21. Draw another ellipse that is a bit smallerthan the yellow ellipse and color it black. Drawa couple of circles colored white that will represent highlights.20. Draw an ellipse for the eye, set the stroketo none and then adjust the color in the colorpalette. Here the yellow is 0% cyan, 20% magenta, 100% yellow and 0% black.22. The last stage of this illustration was madeby adding some highlights. All of thesevector graphics fish out of circles 4 previous pageturn the page
highlights are created as crescent shapes.The crescent shapes that are used for thescales and for the light areas on the fins andtail. These shapes are all made in the samemanner that the fin was created. You begin bydrawing a circle with the Ellipse Tool and thenduplicate it so that they overlap, select bothcircles and apply Subtract from Shape Area inthe Pathfinder Palette. The Bubbles are createdby simply drawing circles of different sizes thatare colored a very light blue.Note: This exercise is intended to demonstratehow using simple shapes and pathfinder youcan create a relatively complex illustration.Now try creating other illustrations that usesimple shapes as the basis for the drawing.Here is another example of an illustration createdusing the Ellipse Tool in Illustrator.For more examples and more exercises in PDFformat go to jonmeasures.comEducational materials and all artwork Jon Measuresvector graphics fish out of circles 5 previous pagereturn to start
strates how using basic shapes and the Path-finder Palette you can create a drawing, this particular drawing only uses circles. Click the image below to play an animation of the steps in creating this illustration. 1. Open Illustrator 2. Go to File New to create a new Illustrator document. 3. Choose the Ellipse Tool and click inside the work .