Transcription
Cisco Small BusinessModel SPA 303gUser GuideVersion 1
Table of ContentsGetting Started . 6About This Document . 6Organization . 7Overview of the Cisco Small Business 300 Series IP Phones . 8Getting to Know the Cisco SPA 303 . 9Installing Your Phone . 18Before You Begin . 18Installing Your Cisco SPA 303 IP Phone . 18(Optional) Mounting Your Cisco SPA 30X Phone to the Wall . 23Verifying Phone Startup. 31Obtaining Your Phone’sFirmware . 31Using Basic PhoneFunctions . 33Using Phone Hardware and Accessories (Cisco SPA 303) . 33Adjusting Call Volume andMuting. 35Placing or Answering a Call . 36Using Hold andResume . 38Ending a Call . 39Transferring Calls (CiscoSPA 303) . 40Redialing a Number. 42Viewing and Returning Missed Calls (Cisco SPA 303) . 43Forwarding Calls . 45SettingDo Not Disturb . 49Turning Call Waiting On and Off . 51Parking a Call . 52Placing a Three-Way Conference Call . 53Using the Phone Directories . 53Using the Call HistoryLists . 55Setting or Changing a Phone Password . 572
Accessing Voicemail . 57Using Advanced PhoneFeatures . 58Configuring Privacy and SecurityFeatures. 58Enabling Dial Assistance . 60Adding and Using Speed Dials . 60Monitoring/Accessing Another Phone from Your Phone . 63Customizing Your LCD Screen . 64Using Ring Tones . 67Configuring Date and Time Parameters on Your Phone . 68Advanced Procedures for Technical Support Personnel . 69Using the WebInterface. 71Logging in to the Web Interface . 71Setting Do NotDisturb . 72Configuring Call Forwarding . 73Configuring Call Waiting . 74Blocking Caller ID . 74Blocking Anonymous Calls . 75Using Your Personal Directory . 76Viewing Call HistoryLists . 76Creating Speed Dials . 77Accepting Text Messages . 77Adjusting Audio Volume . 78Changing the LCD Contrast . 78Configuring the Phone Screen Saver. 79Where to Go From Here . 80Product Resources . 803
Getting StartedThis chapter provides an overview of this document and basic information about your CiscoSmall Business IP phone.About This DocumentThis guide describes the concepts and tasks necessary to use and configure your Cisco SmallBusiness IP Phone.NOTE The Cisco Small Business IP Phone features vary, depending on the type of call controlsystem that you are using. This document describes using the Cisco Small Business IP Phones with aSIP phone system, such as the Cisco SPA 9000 Voice System or a BroadSoft or Asterisk system.6
OrganizationThis table describes the contents of each chapter in this document.Chapter 1TitleDescriptionGetting StartedA description of this book and anoverview of the Cisco SmallBusiness IP Phones.Chapter 2Installing Your PhoneHow to connect and install yourphone.Chapter 3Using Basic Phone FunctionsHow to perform basic phonetasks, such as placing andanswering calls, transferringcalls, setting up call forwarding,and picking up calls.Chapter 4Using Advanced PhoneHow to perform advanced phoneFeaturestasks, such as configuringprivacy and security features,speed dials, paging, and ringtones.Chapter 5Using the Web InterfaceHow to log in to and use thephone’s web user interface.Appendix AWhere to Go From HereLists of and links to relateddocumentation.7
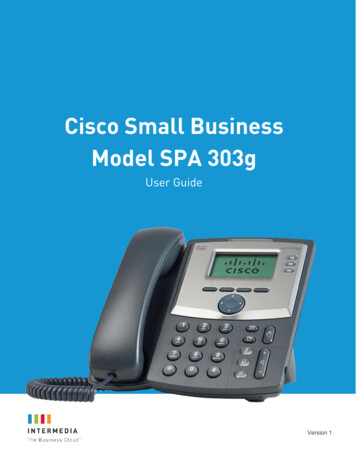
Overview of the Cisco Small Business 300 Series IPPhonesThe Cisco Small Business 300 Series IP Phones are full-featured VoIP (Voice over InternetProtocol) phones that provide voice communication over an IP network. The phones providetraditional features, such as call forwarding, redialing, speed dialing, transferring calls,conference calling and accessing voice mail. Calls can be made or received with a handset,headset or over a speaker.IP phones also have special features not available in traditional phones. The Cisco SmallBusiness 300 Series IP phones contain Ethernet ports, or ports that allow them to be linked tothe computer network. They also have additional Ethernet ports that allow a computer to beconnected to the network through the IP phone. Unlike traditional phones, Cisco SmallBusiness IP phones require a separate power source. Power the phones by connecting themto the included power adapter.The following table shows the Cisco Small Business 300 Series IP Phones covered in thisdocument and their respective features:Cisco SPA 301Cisco SPA 303ScreenNone128 X 64 monochrome LCDLines13SoftkeysNone4 dynamicNavigation ButtonNoneFour-way navigation keyCaring for Your PhoneThe Cisco Small Business IP phones are electronic devices that should not be exposed toexcessive heat, sun, cold or water. To clean the equipment, use a slightly moistened paper orcloth towel. Do not spray or pour cleaning solution directly onto the hardware unit.8
Getting to Know the Cisco SPA 303#Phone FeatureDescription1HandsetPick up to place or answer a call.2Message WaitingDisplays solid red when you have a new voice mailIndicatormessage. Flashes red during an incoming call or when thephone’s firmware is being updated.3LCD ScreenDisplays date and time, phone station name, line extensions,and softkey options.9
#4Phone FeatureDescriptionLine keysIndicates phone line status. When lit: Green: Line is idle.Red (steady): Line is active or in use. Red (blinking):Line is on hold.Orange: Line is unregistered and cannot be used.Line key colors depend on your phone system and can vary.These keys can also be programmed by your phone systemadministrator to perform functions such as speed dial, callpickup, or monitoring an extension.5Softkey buttonsPress a softkey button to perform the action shown on thelabel on the LCD screen above. Softkeys vary depending onyour phone system. See your phone user guide for moreinformation.6Navigation buttonPress an arrow to scroll left, right, up, or down through itemsshown on the LCD screen.7Messages buttonPress to access voice mail (must be set up by your phonesystem administrator).8Hold buttonPress to place a call either on hold or to resume.9Setup buttonPress to access a menu to configure features andpreferences (such as your directory and speed dials), accessyour call history, and set up functions (such as callforwarding).10Mute buttonPress to mute or unmute the phone. When phone is muted,the button glows red. A flashing mute button indicates thenetwork connection cannot be found.10
11Headset buttonPush to turn the headset on or off. When the headset is on,the button glows green.12Volume buttonPress to increase the volume and - to lower the volume ofthe handset, headset, speaker (when the handset is off thephone), or ringer volume (when the handset is on the phone).13Speaker buttonPush to turn the speaker on or off. When the speaker is on,the button glows green.14KeypadUse to dial phone numbers, enter letters, and choose menuitems.11
Softkey ButtonsThe softkey buttons on your phone display may vary depending on your phone model and thephone system setup. Press the Right Arrow or Left Arrow keys on the navigation button to viewadditional softkey buttons.Below is a partial listing of softkey buttons that may be available on your phone. You may nothave all of these softkey buttons on your phone, and you may have additional buttons that arenot listed here. For example, your phone administrator may also provide custom softkeybuttons on your phone, such as buttons that provide a speed dial to a company number, or thataccess a specialized program that runs on your phone. Contact your phone administrator formore information.ButtonFunction or Move left or right through an entry without deleting characters.activActivates screen saver mode.addAdd an entry.bxferPerforms a blind call transfer (transferring a call without speaking to theparty to whom you are transferring the call.)cancelCancels any changes you have made (press before ok or save).cfwdForwards all calls coming to your phone to a specified number.-cfwdClears call forwarding.confInitiates a conference call.confLxConferences active lines on the phone together.delChrDeletes the last number or letter.12
ButtonFunctiondeleteDeletes an entire item (for example, a number from the Call History list).dialDials a number.dirProvides access to phone directories.dndDo Not Disturb; prevents incoming calls from ringing your phone.-dndClears Do Not Disturb.editOpens an item so that you can edit numbers or letters, or enable ordisable a feature.grPickAllows you to answer a call ringing on an extension by discovering thenumber of the ringing extension.ignoreIgnores an incoming call.lcrDials the Last Call Received.missShows the Missed Calls list.parkPuts a call on hold at a designated “park” number. The call is parked onthe line until you unpark it or the caller disconnects. Must be configuredby your phone system administrator.pickupAllows you to answer a call ringing on another extension by enteringthe extension number.pholdPuts a call on hold on an active shared line.redialDisplays a list of recently dialed numbers.saveSaves your changes.selectSelects the highlighted item on the LCD screen.starcodeAllows you to enter a star code. See “Using Star Codes,”.unparkResumes a parked call.xferPerforms a call transfer.13
xferLxTransfers an active line on the phone to a called number.y/nEnters a submenu and when pressed, toggles between Yes or No toenable or disable an option.14
Screen IconsThe LCD screen displays various icons that tell you the status of your phone, or calls on thephone. The following screens show some of the icons used:In the figure above, the double arrow on the right of the screen indicates that a call is in progress.The offhook phone icon next to “SPA 303” indicates the handset is in use.In the figure above, the speaker icon next to “SPA 303” indicates the speaker is in use.15
In the figure above, the headset icon next to “SPA 303” indicates that the headset is being used.In the figure above, the right arrow on the right of the screen indicates that a call is on hold.16
Using Keypad ShortcutsWhen using the phone menus, you can use the keypad to enter the number shown next to themenu or sub-menu item on the LCD screen.For example, to obtain your IP address on the Cisco SPA 303, press the Setup button and dial 9.The IP address is displayed on the Network screen.NOTE Menus and options may vary.17
Installing Your PhoneThis chapter describes how to install your Cisco Small Business IP Phone and connect it to yournetwork. It contains the following sections:Before You BeginBefore you install and connect your phone, verify with your phone administrator (if applicable)that the network is ready for the phone, read the safety notices, and make sure you have all thephone parts and documentation available.Installing Your Cisco SPA 303 IP PhoneFigure 3CiscoSPA 303 Phone Connections18
Connecting the HandsetSTEP 1 Turn the phone body over to expose the ports on the back of the unit.STEP 2 Insert the long end of the phone cord into the handset port on the phone bodythat is marked with a phone symbol. (labeled 5 in Figure 3).STEP 3 (Optional) Route the phone cord through the cable slot (labeled 4 in Figure 3).STEP 4 Insert the other end of the phone cord into the port at the bottom of the handset(not shown).Connecting the PowerInsert one end of the power cord into an outlet and insert the other end of the power cord intothe power port on the phone body (labeled 6 in Figure 3).NOTE To power the phone through the Ethernet connection, use the optional Cisco POES5 5Volt Power Over Ethernet Splitter accessory. See the Cisco POES5 documentation onCisco.com for more information.Connecting Your Cisco SPA 303 to the NetworkSTEP 1 Insert one end of the Ethernet cable into the network port on the phone bodymarked “SW” (labeled 3 in Figure 3).STEP 2 Insert the other end of the Ethernet cable into the appropriate device, such as anetwork switch, on your network.19
(Optional) Connecting Your Cisco SPA 303 to the Wireless NetworkYou can use the Cisco WBP54G Wireless-G Bridge for Phone Adapters to connect the IP phoneto a Wireless-G network instead of the wired local network.NOTE Cisco does not recommend connecting a PC to the phone when it is operatingwirelessly.To connect your phone to the Cisco WBP54G:STEP 1 Configure the Cisco WBP54G using the Setup Wizard. See the instructions in theWireless-G Bridge for Phone Adapters Quick Installation Guide, available on cisco.com.STEP 2 During the Setup Wizard process, connect the Ethernet network cable of theWBP54G to the back of the IP phone base station into the slot marked “SW.STEP 3 Connect the power cable of the WBP54G to the power port on the IP phonebase.STEP 4 Plug the IP phone power adapter into the power port of the WBP54G.STEP 5 Plug the other end of the IP phone power adapter into an electrical outlet.(Optional) Installing the Cisco SPA 303 StandNOTE Do not attach the desk stand if you want to mount the phone to the wall.STEP 1 Connect the phone stand by lining up the tabs on the stand with the slots on thephone body.STEP 2 Slide the bottom tabs into the lower slots on the phone body (labeled 1 inFigure 3) and lightly press down on the stand. It should easily slide into the upper standslots. Do not force.20
(Optional) Connecting a PC to Your Cisco SPA 303To connect a PC to your phone (optional):NOTE Cisco does not recommend connecting a PC to the phone when it is operatingwirelessly.STEP 1 To provide network access to a PC, connect one end of an additional Ethernetcable (not provided) to the PC port on the back of the phone body (labeled 2 in Figure 3.STEP 2 Connect the other end of the Ethernet cable to the network port on your PC.21
(Optional) Connecting Wired and Wireless HeadsetsThe Cisco SPA 303 supports headsets from different manufacturers. For the latest supportedmodels, contact your reseller. Additional information can be found at the mhttp://www.jabra.comEach brand and type of headset may require different steps for connection. Consult thedocumentation for your particular headset for more information.In general, to connect a headset. connect the 2.5mm connector from the headset into theheadset port on the right side of the IP phone as shown in the following graphic:22
(Optional) Mounting Your Cisco SPA 30X Phone to theWallTo mount the phone to the wall, you must purchase the MB100 wall mount bracket kit.Figure 4MB100Wall Mount Kit23
STEP 1 To attach the Mounting Bracket (MB), align the two cleats on the MB with theholes in the phone’s base.STEP 2 Orient the MB such that the phone’s Ethernet and handset ports are accessibleafterinstallation.24
STEP 3 Push the MB onto the phone’s base. Slide the MB upwards to lock it in place.25
STEP 4 (Optional) If a Wi-Fi or PoE dongle is installed, place in the tray.26
STEP 5 Plug in the Ethernet and power cables.27
STEP 6 Hang onto screws mounted in the wall.28
Reversing the Handset Retention TabIf you mount the phone to a vertical surface, you must reverse the handset retention tab on thephone body so that the handset does not fall off the phone when it is placed on the cradle.Figure 5HandsetRetention Tab (Default Position)STEP 1 Insert a coin or object of similar width into the slot.STEP 2 Rotate the tab180 . (See Figure 6.) The tab now catches the slot in the handset whenthe handset is placed onto the cradle.29
Figure 6HandsetRetention Tab (Reversed)30
Verifying Phone StartupAfter receiving power and network connectivity, the phone executes a boot-up sequence.During this sequence, phones with screens display the Cisco logo and then “InitializingNetwork.” All of the lights on the phone will flash.After your phone is successfully connected to the network and receives a basic configuration,the extension number appears on the display screen (on models with a display screen) andthe phone has a dial tone.On models with screens, the phone displays the standard menu for the phone. The date, nameand number of the phone display on the top line of the LCD screen. At the bottom of the LCDscreen, softkeys are displayed over their associated soft buttons.On models with no screen, such as the Cisco SPA 301, you should hear a dial tone when pickingup the handset or pressing the speakerphone button.If the phone does not start, confirm your installation and connections. If these are correct, tryunplugging the phone and plugging it back in again. If you still don’t see the display, then contactyour phone administrator or Internet Telephony Service Provider (ITSP).Obtaining Your Phone’s FirmwareYour phone ships with pre-installed firmware. However, later firmware versions may be availablethat add features and fix problems with your phone. This will generally happen automatically whenprovisioning your device, however older devices with old firmware may have to be updated individually.31
!CAUTION If you are using your phone with an Internet Telephony Service Provider’s system,do not upgrade your phone’s firmware without consulting your service provider. Your providermay automatically upgrade your phones without any action on your part necessary.To upgrade your phone’s firmware, download the firmware from the Cisco website and install itfrom your PC. See the following section for instructions.Determining Your Current Firmware VersionSTEP 1 Press the Setup button.STEP 2 Scroll to Product Info and press select.STEP 3 Scroll to Software Version. The firmware version number is displayed.32
Using Basic PhoneFunctionsThis chapter provides instructions on using your phone’s basic functions.Using Phone Hardware and Accessories (Cisco SPA 303)Using the SpeakerphoneTo use the speakerphone, press the Speaker button (the handset can be either on or off hook).Using the Headset with Your IP PhoneInstall the headset as described in the “(Optional) Connecting Wired and Wireless Headsets”sectionNOTE Steps to use your headset with the IP phone may vary. Consult the user documentationfor your headset for more information.Press the Headset button on your phone and dial the number to place a call, or press theheadset button to answer a ringing call.Switching Between the Handset/Headset/Speakerphone During aCallAny of these audio devices can be used during a call. Only one device at a time can be used.The handset can be on the hook when using the speakerphone or headset function. Ifswitching from the handset to the speakerphone, make sure the speakerphone or headsetlight is illuminated before placing the handset back on the hook. (If you are switching from thehandset to a wireless headset, however, do not replace the handset or you will disconnect thecall.)33
Sending Audio to the Phone SpeakerChoosing this option sends audio to the speaker when the handset is lifted.STEP 1 Press the Setup button.STEP 2 Scroll to Preferences and press the select softkey.STEP 3 Scroll to Send Audio to Speaker and press the edit softkey.STEP 4 Press y/n to enable or disable the feature.STEP 5 Press the ok softkey.STEP 6 Press the save softkey.Choosing Your Preferred Audio DeviceThis option designates the headset or speaker phone as the preferred audio device when thehandset is not used.To choose your preferred audio device:STEP 1 Press the Setup button.STEP 2 Scroll to Preferences and press the select softkey.STEP 3 Scroll to Preferred Audio Device and press the edit softkey.STEP 4 Press the option softkey to view your choices. When the option you want isdisplayed, press the ok softkey.STEP 5 Press the save softkey.34
Adjusting Call Volume andMutingYou can also change call volume settings from your PC using the IP Phone Web Interface. See“Adjusting Audio Volume” section.Adjusting Call VolumeTo adjust the volume of the handset or speaker, lift the handset or press the Speaker button.Press on the Volume button to increase the volume, or press - to decrease the volume. Presssave.Adjusting the Ringer VolumeTo adjust the ringer volume, press the Volume button when the handset is on the phone and thespeaker button is off. Press save.Using MuteTo mute the phone microphone, speaker, or headset microphone, press the Mute button on thephone. The button glows red. Press the Mute button again to unmute.If no audio device is on, pressing the Mute key has no effect. When switching from the speakerphone to the handset, mute is turned off automatically.35
Placing or Answering a CallNOTE You may have to dial a number or numbers to reach an outside line. Ask your phoneadministrator.Basic techniques to answer a call: Pick up the handset. Press the Speaker button (Cisco SPA 303). Press the Headset button (Cisco SPA 303). Press a green line button to place a call or a red flashing line button to answer a call(Cisco SPA 303). Techniques to place a call without dialing a number (Cisco SPA 303): Press the redial softkey, then the dial softkey to dial the last number. If you have configured speed dials, press the assigned speed dial code and thenpress the dial softkey. To answer a call that is ringing on another phone in the phone system, press the pickupsoftkey. Then enter the extension number of the ringing phone.NOTE You also can place a call by choosing a number from a directory or from the Call History.See the “Using the Phone Directories (Cisco SPA 303)” section and the “Using the CallHistory Lists” section.36
Using Dial Assistance (Cisco SPA 303)If dial assistance is enabled, when placing calls, you’ll see a list of matching recently dialed orreceived phone numbers on the screen after you begin dialing.If you want to choose one of these numbers:STEP 1 Use the navigation button to scroll down and highlight a phone number on theLCD screen.STEP 2 Press the dial softkey to complete the call.See “Enabling Dial Assistance (Cisco SPA 303),” for more information on enabling this feature.37
Using Hold and ResumeTo put a call on hold, press the Flash button (Cisco SPA 301) or the Hold button/ Hold softkey(Cisco SPA 303). A series of beeps or music on hold (depending on the system configuration)plays for the caller to indicate that the call is on hold. On the Cisco SPA 303, the phone LCDshows a flashing right arrow indicating the line is on hold, as shown in the figure below.To resume a call:Press the flashing red line button for the call or the Hold button or the Resume sofkey. If you havemultiple calls, all calls are put on hold except the active call.If you are on a call and another call comes in:Do one of the following: Press the Answer or Ignore softkey. Press the Hold button/Hold softkey to place the call on hold and press the flashing redline button to answer the incoming call. To resume the first call, press the flashing red line button or the Hold button or theResume softkey.38
Switching Between Multiple Calls on Hold on a Single LineYou can have up to two calls on each phone line. If one or more calls on a line is on hold, theblack bar at the top of the screen shows the call that is on hold (indicated by the right arrow).The call information at the bottom of the screen shows the active call.To switch between two calls on a single line, press the flashing line button. If multiple calls areon hold on multiple lines, use the navigation button to scroll up or down and press the flashingline button for the call you have selected.Ending a CallTo end a call: If you are using the handset, hang up. If you are using the speakerphone, press the Speaker button (Cisco SPA 303). If you are using the headset, either press the Headset button (wired) or replace thereceiver (when using certain wireless models) - Cisco SPA 303.39
Transferring Calls (CiscoSPA 303)You can perform the following types of transfers: Attended Transfer—You call the person to whom you are transferring the call andeither: -transfer the call while the phone is ringing.-wait for the person to answer before transferring the call.Blind Transfer—You transfer the call without speaking to the other party to which youare transferring the call.Performing an Attended TransferSTEP 1 During an active call, press xfer. The call is placed on hold and a new line isopened to dial the number.STEP 2 Either: Enter the number to which you want to transfer the call, then press the dial softkey orwait a few seconds. Press the dir softkey and either choose a number from the personal directory or selectthe Corporate Directory, then press the dial softkey.If you hang up before the second call rings, the transfer fails and the first call isdisconnected. If you misdial, use the delChar, clear, or cancel softkey to make yourchanges before the call is transferred.STEP 3 Press the xfer softkey after the phone begins to ring, or at any time after the phoneis answered.40
Performing an Unattended (Blind) TransferSTEP 1 During an active call, press the bXfer softkey.STEP 2 Enter the number to which you want to transfer the call and press the dialsoftkey.The ca
Business 300 Series IP phones contain Ethernet ports, or ports that allow them to be linked to the computer network. They also have additional Ethernet ports that allow a computer to be connected to the network through the IP phone. Unlike traditional phones, Cisco Small Business IP phones require a separate power source.