Transcription
SYSPRO OrientationTraining GuideSYSPRO Version 6.1 Port 45
Copyright 2011 Syspro LtdPublished: 16 August 2011Revision: SYSPRO Version 6.1 Port 45All rights reserved. No part of this document may be copied, photocopied, or reproduced in any form or by any means withoutpermission in writing from Syspro Ltd. SYSPRO is a trademark of Syspro Ltd. All other trademarks, service marks, products orservices are trademarks or registered trademarks of their respective holders.Syspro Ltd reserves the right to alter the contents of this document without prior notice. While every effort is made to ensure that thecontents of this document are correct, no liability whatsoever will be accepted for any errors or omissions.This document is a copyright work and is protected by local copyright, civil and criminal law and international treaty. This documentfurther contains secret, confidential and proprietary information belonging to Syspro Ltd. It is disclosed solely for the purposes of itbeing used in the context of the licensed use of the Syspro Ltd computer software products to which it relates. Such copyright worksand information may not be published, disseminated, broadcast, copied or used for any other purpose. This document and allportions thereof included, but without limitation, copyright, trade secret and other intellectual property rights subsisting therein andrelating thereto, are and shall at all times remain the sole property of Syspro Ltd. 2011 Syspro Ltd. All rights reserved.
Table of ContentsIntroductionSYSPRO Orientation . ivThe Outdoors Company . vSetting up the training base data .viLogging into SYSPRO . ixMenusObjectives .2Menus .3SYSPRO menu .4The Ribbon Bar . 5The Home Tab . 6Favorites . 6Favorites menu tasks .7Personalization .9Personalization task .10Skins . 12Skin tasks .13The Setup Tab . 15Operator passwords .15Operator password tasks . 16Printing . 17Printer tasks . 18Print options task . 20The Query Tab . 21Quick find task . 22The Import Tab .23The SYSPRO Button . 24Run tasks . 25Running a SYSPRO program . 25Running the last program run . 25Menu Navigation .26Toolbars .27Toolbar addition task .28Adding a toolbar .28Summary . 29User interface of a SYSPRO programObjectives .31SYSPRO Programs . 32Windows .32Forms . 33Context sensitive menu .33Fields .33Field properties tasks .34 2011 Syspro Ltd. All rights reserved.Page i
Field properties for all task .36Resetting form tasks . 38Options task . 39Listviews .40Listview configuration task . 41Filtering task .42Autosum tasks . 43Conditional formatting tasks .46Optimized listview tasks .48Additional listview tasks . 50Docking Panes . 52Docking stickers task . 53SYSPRO Help .58Keyboard shortcuts . 59Form-related . 59Search-related . 59Printing-related .60Summary . 61ConclusionConclusion .63Related Topics . 63Certification . 63Support Zone . 63Comment Sheet . 63 2011 Syspro Ltd. All rights reserved.Page ii
Introduction
SYSPRO Orientation Training Guide: IntroductionSYSPRO OrientationWelcome to the SYSPRO Community. SYSPRO is a fully-integrated business software solution that providescomplete control over the planning and management of all facets of a business including accounting, manufacturingand distribution operations in a variety of industries.SYSPRO understands that when faced with new software it can be overwhelming to users when trying to navigatethrough the menus and programs. This guide will familiarize you with the SYSPRO menu and user interface. Tasksare provided so you can practice navigating through SYSPRO and customizing your screens.We have chosen key topics that you will find helpful as you continue to build your SYSPRO knowledge and skills.ObjectivesThis training guide aims to provide first time users or users of new versions a chance to become comfortable withthe SYSPRO menu and user interface. It is broken down into a number of objectives that provide you with specificgoals you will achieve by the end of each exercise.AudienceThis training guide is aimed primarily at first time users of SYSPRO. However, it can also be used if you arefamiliar with SYSPRO, but require a better understanding of new functions.PrerequisitesThere are no prerequisites for this course. 2011 Syspro Ltd. All rights reserved.Page iv
SYSPRO Orientation Training Guide: IntroductionThe Outdoors CompanyThe OUTDOORS Company is a fictitious company created especially for training. You will be working with datafrom The OUTDOORS Company in all tasks.The OUTDOORS Company was established in 2001. The company's initial operations covered manufacturing anddistribution of finished cycles, helmets and garden furniture products for resale to the trade and the general public.In recent times it has added a specialized projects division, whereby it supplies custom designed garden furniture,including installation of complex outdoor entertainment areas for commercial companies. This is geared to provide atotal solution to the customer from design, manufacture through to commissioning of the products on site.The company aims to meet stated customer service levels, produce high quality goods and deliver on time, whilemaking a profit.The Executive of the company has formulated the long-term strategy and objectives of the organization covering atwo year period in the future.The Marketing department analyzed the sales history for the past two years (including current trends, factorscreating demand seasonally and what the competition is doing) and generated a forecast of sales for the future ofexisting and new products.The Finance executives determined a reasonable financial plan by taking into account required return on investment,current financial and manufacturing resources as well as allowing for future growth. The company executives havedecided that a customer service level of 95% is acceptable. This means that 95 out of every 100 demands for eachitem must be met from stock. However, in terms of the projects division, the aim is to achieve close to 100% ofdemand.The OUTDOORS Company is also expanding its business to include their suppliers and customers in optimizingtheir supply chain. Through the use of ERP II functionality (Extending the Enterprise) the company allowscustomers to order via the Internet and the company orders from their suppliers via an automated processelectronically. Prospective buyers can view the models and parts availability via the company's corporate web pageand order online. Where the projects division is concerned, a very personalized service is given.In order to deliver the critical made-in components of the cycle assembly to the assembly floor, The OUTDOORSCompany is using SYSPRO Factory Scheduling functionality to deliver on time within quality standards. This alsoallows for the planning and delivery of products for the projects division, whether outsourced or made in.The Marketing executive also develops a closer customer relationship with their loyal clients. This is enabled by a360 view of their clients through Contact Management.The company is divided into three divisions: Manufacturing, Distribution and Projects. 2011 Syspro Ltd. All rights reserved.Page v
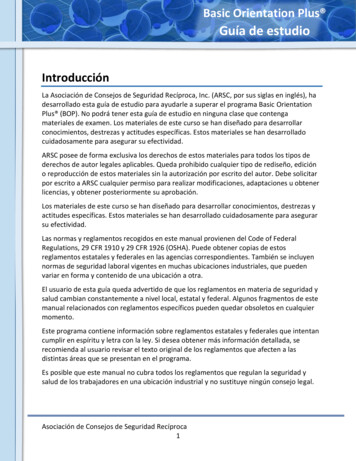
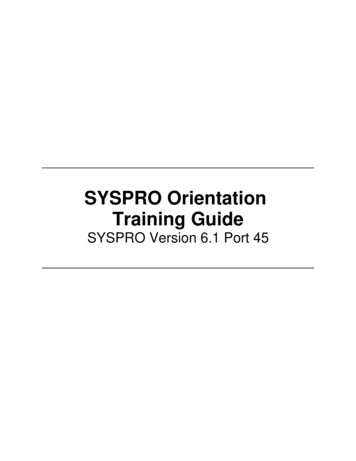
SYSPRO Orientation Training Guide: IntroductionSetting up the training base dataThe following steps describe how to download the training base data that is required for this trainingguide. Ensure that you have a valid login account to the SYSPRO Support Zone. Ensure that you are running on a Windows platform, as this is required to make use of the trainingdata. Ensure that you have Microsoft SQL Server 2008 R2 (as a minimum) installed, as this is required tomake use of the training data. Ensure that you do not install the training data on a live site, as important files will be overwritten.1. Log on to the SYSPRO Support Zone.The Support Zone home page is displayed.2. Navigate to the Training Data folder.a. Select SYSPRO Education Hub from the Discover pane.b. Select the Training link under the Training Material heading.c. Scroll down to the bottom of the page (Training Data) and select the link: Download the Training Datahere.3. Save the required file.a. Save the file in the SYSPRO61 folder (e.g. .\SYSPRO61\).4. Unzip the file.a. Execute the relevant executable file from your SYSPRO61 folder.b. Select Run if you are sure you want to run this software.c. Select Yes if you are sure that you are not installing data on a live system.d. Select Unzip.e. Ensure that the Overwrite files without prompting field is selected.f. Select OK.The required ISAM files will be saved in the correct directories. The SQL databases will be saved undera folder called SYSPRO SQL Databases.5. Attach the required databases using Microsoft SQL Server Management Studio.a. Open Microsoft SQL Server Management Studio.The following window will be displayed. 2011 Syspro Ltd. All rights reserved.Page vi
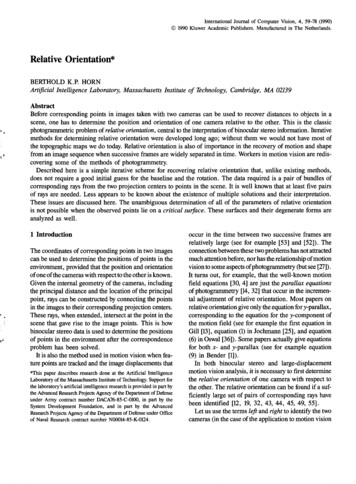
SYSPRO Orientation Training Guide: Introductionb. Connect to the Server.Accept Database Engine as the Server type.Select SQL Server Authentication at the Authentication field.Enter sa at the Login field.Enter syspro at the Password field.Select to Remember password.Select Connect.c. Attach the databases.Attach the following databases: Sysprodb TheOUTDOORSCompany0 TheOUTDOORSCompany1The following window shows the attached databases. 2011 Syspro Ltd. All rights reserved.Page vii
SYSPRO Orientation Training Guide: Introduction6. Exit the program. 2011 Syspro Ltd. All rights reserved.Page viii
SYSPRO Orientation Training Guide: IntroductionLogging into SYSPROThe following steps describe how to log into SYSPRO.1. Open SYSPRO.a. Select SYSPRO 6.1 from the start menu.The SYSPRO 6.1 Login window is displayed.2. Enter the login details.a. Enter a valid user name.Enter ADMIN.b. Enter a valid password.You are not required to enter a password to log in to the training database.c. Select Login. 2011 Syspro Ltd. All rights reserved.Page ix
SYSPRO Orientation Training Guide: Introduction3. Enter the company details.a. Enter the company id.Enter 0 at the Company field.b. Enter the company passwordYou are not required to enter a password to log in to the training database.c. Select OK. 2011 Syspro Ltd. All rights reserved.Page x
MenusChapter1
SYSPRO Orientation Training Guide: Chapter 1 - MenusObjectivesIn this chapter you will learn about the default user interface, the ribbon bar and SYSPRO button. You will learnhow to use the ribbon bar to customize SYSPRO and perform queries.By the end of this chapter you will be able to1. Navigate to the correct tab in the ribbon bar for the required function.2. Create a favorites menu.3. Change the look and feel of SYSPRO.4. Change printer options.5. Add or change an operator password.6. List the functions which can be performed using the SYSPRO button. 2011 Syspro Ltd. All rights reserved.Page 2
SYSPRO Orientation Training Guide: Chapter 1 - MenusMenusMenus are used to locate and run the programs that are required for you to perform your daily tasks.SYSPRO has built-in menus that provide access to the standard programs. In addition, there are menus that you cancustomize to include only the programs you run most frequently.Built-in menus include the following: SYSPRO menu (explorer-style treeview) Ribbon bar (Home, Setup, Import etc.) Toolbar (icons below menu bar)Customizable menus include the following: Favorites MyMenu Company, Operator, Group or Role specific menus 2011 Syspro Ltd. All rights reserved.Page 3
SYSPRO Orientation Training Guide: Chapter 1 - MenusSYSPRO menuThe SYSPRO menu uses an explorer-style design comprising both treeview and listview panes. The treeview panedisplays a hierarchy of folders and subfolders. Each subfolder can contain programs and other subfolders. Thelistview pane shows the programs and subfolders at the current level selected in the treeview.Customizing the SYSPRO menu allows you to adjust the look-and-feel of both the treeview and listview.Each operator can customize the look-and-feel of their menu. Changes are saved as preferences against the operator. 2011 Syspro Ltd. All rights reserved.Page 4
SYSPRO Orientation Training Guide: Chapter 1 - MenusThe Ribbon BarThe SYSPRO ribbon bar contains icons representing the various functions available in SYSPRO. The functions aregrouped together by tabs.The SYSPRO ribbon bar is an alternative to the traditional menu bar.You can display the ribbon bar using the Customize program within SYSPRO (SYSPRO menu Options Customize Environment Options tab).Alternatively, you can use the keyboard to display the ribbon bar by pressing ALT shortcut key (H for Home, Sfor Setup and so on) and all the menu items will be displayed with unique keyboard shortcuts.You can apply different styles to the ribbon bar from the Ribbon style field in the Personalize program withinSYSPRO (SYSPRO ribbon bar Home tab Personalize Environment Options).You can right-click on the Ribbon Bar tab to view other actions, for example adding items to the Quick Accesstoolbar. 2011 Syspro Ltd. All rights reserved.Page 5
SYSPRO Orientation Training Guide: Chapter 1 - MenusThe Home TabThe Home tab provides quick access to a number of functions within SYSPRO such as the Calendar, Notepad andFavorites. In addition to being able to launch these programs, you can personalize your desktop and programs usingoptions in the Personalize program.FavoritesThe Favorites menu is a user-defined list of programs that you frequently run. This provides quick access toprograms without having to navigate the SYSPRO menu.The programs in the Favorites menu are also shown in the SYSPRO Quick Launch menu, which is available fromwithin any program by pressing F8.When you initially show the Favorites menu (select Favorites from the toolbar) you will need to configure a list ofprograms. This can be done by either dragging a program from the SYSPRO menu treeview onto the Favoritesmenu, or you can right-click the Favorites menu and add a new program. You can also re-sequence this list ofprograms.Customization of the Favorites menu also allows you to adjust the look-and-feel of the listview. For example: youcan toggle the listview to show small icons, large icons or details by right-clicking within the listview.Each operator can customize the look-and-feel of their Favorites menu. Changes are saved as preferences against theoperator. 2011 Syspro Ltd. All rights reserved.Page 6
SYSPRO Orientation Training Guide: Chapter 1 - MenusFavorites menu tasksYou want to group a list of programs that you use most frequently in SYSPRO. You will create a favorites menuwith SYSPRO programs.1. While you can drag and drop programs onto the Favorites pane, you will add the SYSPRO program SupplierQuery (ARSPEN) using the Wizard.2. You have to access Excel frequently to change a spreadsheet. You will add Excel to your favorites menu inorder to be able to access Excel quickly within SYSPRO. Add the EXCEL.EXE using the Wizard.Creating a favorites menuThe following steps describe how to add a favorites menu of SYSPRO programs in SYSPRO.1. Open the Favorites pane (SYSPRO ribbon bar Favorites).The Favorites window is displayed.2. Add the required programs.a. Right-click on the Favorites window and select New.The Add New Shortcut Wizard window is displayed.b. Select the type of program you would like to add to the favorites menu.Select SYSPRO program.c. Select Next.d. Select the program you want to add to the favorites menu.Enter APSPEN (A/P Supplier Query).e. Select Next.f. Enter the name for the shortcut.Enter Supplier Query.g. Select Next.h. Select the icon that you would like to attach to the shortcut.Select the Information icon.i. Select Finish to end the process.The new program should now be visible in the favorites menu.Creating a favorites menu of third-party applicationsThe following steps describe how to create a favorites menu in SYSPRO that contains a shortcut to anotherapplication. 2011 Syspro Ltd. All rights reserved.Page 7
SYSPRO Orientation Training Guide: Chapter 1 - Menus1. Open the Favorites pane (SYSPRO ribbon bar Favorites).The Favorites window is displayed.2. Add the required programs.a. Right-click on the Favorites window and select New.The Add New Shortcut Wizard window is displayed.b. Select the type of program you would like to add to the favorites menu.Select Any other application.c. Select Next.d. Enter the path of the item for which you want to create a shortcut.Browse and select EXCEL.EXE from the Program Files Microsoft Office folder.e. Select Next.f. Enter the name for the shortcut.Accept the default.g. Select Next.h. Select the icon that you would like to attach to the shortcut.Select the Excel icon.i. Select Finish to end the process.The new program should now be visible in the favorites menu. 2011 Syspro Ltd. All rights reserved.Page 8
SYSPRO Orientation Training Guide: Chapter 1 - MenusPersonalizationYou can personalize your SYSPRO desktop by choosing your own skins, selecting to use the ribbon bar or menubar, changing the listview date format and more.You personalize the SYSPRO workspace using the Personalize program within SYSPRO (SYSPRO ribbon bar Home Personalize).The various options for Personalization are saved and applied for the current operator.You can override the operator personalization settings by using the System-wide Personalization program withinSYSPRO (SYSPRO ribbon bar Home Customization Tools System-wide Personalization).Any options applied using System-wide Personalization will take precedence over those entered by all operators intheir personal workspace preferences. In addition, any such options will disable the equivalent options in theCustomize dialog box. 2011 Syspro Ltd. All rights reserved.Page 9
SYSPRO Orientation Training Guide: Chapter 1 - MenusPersonalization taskYou now want to tailor your workspace, the environment options and how the tasks listview will look for theSystem Administrator operator.Below is a list of the customization you want to make to your desktop. Workspace Change the backdrop bitmap to Bluestone. Change the background color to light green. Environment options Deselect to show the treeview menu in the right hand pane. Message options Check for messages on start up. Delete any actioned messages which are older that 30 days. Refresh messages every one minute. Notify when a new message appears. Graph options Ensure there are multiple colors per data point.Customizing your desktopThe following steps describe how to customize your desktop in SYSPRO.1. Open the Customize program (SYSPRO ribbon bar Home Personalize).The Customize window is displayed.2. Specify your workspace options.Ensure that Display a bitmap image is selected from the Workspace backdrop field.Select BlueStone from the Select a bitmap field.Ensure that Background color is selected from the Main menu view field.Select Light Green.3. Specify your environment options.a. Select the Environment Options tab.b. Select the required options.Deselect Expand treeview when selecting folders in right hand pane from the Main menutreeview field.4. Specify the message options.a. Select the Messages tab.b. Select the required options 2011 Syspro Ltd. All rights reserved.Page 10
SYSPRO Orientation Training Guide: Chapter 1 - MenusSelect Check for messages from the On startup field.Select Delete actioned messages that are more than and select 30 from the days old field.Select Automatically refresh message inbox every and select 1 from the minutes field.Select Display a notification message when new messages arrive.5. Specify your graph options.a. Select the Graphs tab.b. Select the required options.Select Multiple colors per data point.6. Apply your changes.a. Select Apply.b. Select OK.You will need to log out and back in to SYSPRO in order for the changes to take place. 2011 Syspro Ltd. All rights reserved.Page 11
SYSPRO Orientation Training Guide: Chapter 1 - MenusSkinsSkins can be used to change the overall look of the SYSPRO product. You can select to apply a skin from thepre-defined skins menu or create your own skins and apply them.You can optionally decide to apply the selected skin to the current company. In this way you can have differentskins applied to different companies.User defined skins must be saved in the base\skinFramework folder on the client machine. You can also save yourskins in the \base\skinFramework folder on the application server and these will be automatically copied to theclient machine next time the user logs into SYSPRO.Skin files are typically suffixed with .msstyle and can be found on various web sites through the Internet.The skin framework requires an INI file to describe the user interface. These INI files reside beneath the .\basefolder in SkinFramework. 2011 Syspro Ltd. All rights reserved.Page 12
SYSPRO Orientation Training Guide: Chapter 1 - MenusSkin tasksThere are Skin templates available to use or you can create your own skin which represents your company colorsand style.1. You are an iTunes user and like the look and feel of the application. You have viewed the different skintemplates and would like to apply the Itunes Skin to your programs for the company you are working in. Dothis in the Personalize program.2. Your company has created a skin with the company colors. This user defined skin has been saved asBeOS.msstyles in the Skin Framework folder in the base directory. As System Administrator you have beentasked with applying this user defined skin to SYSPRO. Do this using the Personalize program in theEnvironment Options tab.3. If you do not want to continue working with the user defined skin, select the Office 2007 skin from theOverall theme for user interface field.Adding a skin for a specific companyThe following steps describe how to select a theme to be used against the company that you are logged into. This istypically used to make each company you work in visually unique.1. Open the Personalize program (SYSPRO ribbon bar Home tab Personalize).The Customize wi
The required ISAM files will be saved in the correct directories. The SQL databases will be saved under a folder called SYSPRO SQL Databases. 5. Attach the required databases using Microsoft SQL Server Management Studio. a. Open Microsoft SQL Server Management Studio. The following window will be displayed. SYSPRO Orientation Training Guide .