Transcription
Flask Documentation (1.1.x)Release 1.1.4PalletsFeb 21, 2022
CONTENTS1User’s Guide1.1 Foreword . . . . . . . . . . . . . . . . .1.2 Foreword for Experienced Programmers .1.3 Installation . . . . . . . . . . . . . . . .1.4 Quickstart . . . . . . . . . . . . . . . .1.5 Tutorial . . . . . . . . . . . . . . . . . .1.6 Templates . . . . . . . . . . . . . . . . .1.7 Testing Flask Applications . . . . . . . .1.8 Application Errors . . . . . . . . . . . .1.9 Debugging Application Errors . . . . . .1.10 Logging . . . . . . . . . . . . . . . . . .1.11 Configuration Handling . . . . . . . . .1.12 Signals . . . . . . . . . . . . . . . . . .1.13 Pluggable Views . . . . . . . . . . . . .1.14 The Application Context . . . . . . . . .1.15 The Request Context . . . . . . . . . . .1.16 Modular Applications with Blueprints . .1.17 Extensions . . . . . . . . . . . . . . . .1.18 Command Line Interface . . . . . . . . .1.19 Development Server . . . . . . . . . . .1.20 Working with the Shell . . . . . . . . . .1.21 Patterns for Flask . . . . . . . . . . . . .1.22 Deployment Options . . . . . . . . . . .1.23 Becoming Big . . . . . . . . . . . . . 2API Reference1692.1 API . . . . . . . . . . . . . . . . . . . . . . . . . . . . . . . . . . . . . . . . . . . . . . . . . . . . 1693Additional Notes3.1 Design Decisions in Flask . .3.2 HTML/XHTML FAQ . . . .3.3 Security Considerations . . .3.4 Unicode in Flask . . . . . . .3.5 Flask Extension Development3.6 Pocoo Styleguide . . . . . . .3.7 Upgrading to Newer Releases3.8 Changelog . . . . . . . . . .3.9 License . . . . . . . . . . . .3.10 How to contribute to Flask . .233233235239242244249252259275276i
Python Module Index279Index281ii
Flask Documentation (1.1.x), Release 1.1.4Welcome to Flask’s documentation. Get started with Installation and then get an overview with the Quickstart. Thereis also a more detailed Tutorial that shows how to create a small but complete application with Flask. Common patternsare described in the Patterns for Flask section. The rest of the docs describe each component of Flask in detail, with afull reference in the API section.Flask depends on the Jinja template engine and the Werkzeug WSGI toolkit. The documentation for these librariescan be found at: Jinja documentation Werkzeug documentationCONTENTS1
Flask Documentation (1.1.x), Release 1.1.42CONTENTS
CHAPTERONEUSER’S GUIDEThis part of the documentation, which is mostly prose, begins with some background information about Flask, thenfocuses on step-by-step instructions for web development with Flask.1.1 ForewordRead this before you get started with Flask. This hopefully answers some questions about the purpose and goals ofthe project, and when you should or should not be using it.1.1.1 What does “micro” mean?“Micro” does not mean that your whole web application has to fit into a single Python file (although it certainly can),nor does it mean that Flask is lacking in functionality. The “micro” in microframework means Flask aims to keep thecore simple but extensible. Flask won’t make many decisions for you, such as what database to use. Those decisionsthat it does make, such as what templating engine to use, are easy to change. Everything else is up to you, so thatFlask can be everything you need and nothing you don’t.By default, Flask does not include a database abstraction layer, form validation or anything else where differentlibraries already exist that can handle that. Instead, Flask supports extensions to add such functionality to your application as if it was implemented in Flask itself. Numerous extensions provide database integration, form validation,upload handling, various open authentication technologies, and more. Flask may be “micro”, but it’s ready for production use on a variety of needs.1.1.2 Configuration and ConventionsFlask has many configuration values, with sensible defaults, and a few conventions when getting started. By convention, templates and static files are stored in subdirectories within the application’s Python source tree, with the namestemplates and static respectively. While this can be changed, you usually don’t have to, especially when gettingstarted.1.1.3 Growing with FlaskOnce you have Flask up and running, you’ll find a variety of extensions available in the community to integrate yourproject for production. The Flask core team reviews extensions and ensures approved extensions do not break withfuture releases.As your codebase grows, you are free to make the design decisions appropriate for your project. Flask will continueto provide a very simple glue layer to the best that Python has to offer. You can implement advanced patterns in3
Flask Documentation (1.1.x), Release 1.1.4SQLAlchemy or another database tool, introduce non-relational data persistence as appropriate, and take advantage offramework-agnostic tools built for WSGI, the Python web interface.Flask includes many hooks to customize its behavior. Should you need more customization, the Flask class is builtfor subclassing. If you are interested in that, check out the Becoming Big chapter. If you are curious about the Flaskdesign principles, head over to the section about Design Decisions in Flask.Continue to Installation, the Quickstart, or the Foreword for Experienced Programmers.1.2 Foreword for Experienced Programmers1.2.1 Thread-Locals in FlaskOne of the design decisions in Flask was that simple tasks should be simple; they should not take a lot of code andyet they should not limit you. Because of that, Flask has a few design choices that some people might find surprisingor unorthodox. For example, Flask uses thread-local objects internally so that you don’t have to pass objects aroundfrom function to function within a request in order to stay threadsafe. This approach is convenient, but requires a validrequest context for dependency injection or when attempting to reuse code which uses a value pegged to the request.The Flask project is honest about thread-locals, does not hide them, and calls out in the code and documentation wherethey are used.1.2.2 Develop for the Web with CautionAlways keep security in mind when building web applications.If you write a web application, you are probably allowing users to register and leave their data on your server. Theusers are entrusting you with data. And even if you are the only user that might leave data in your application, youstill want that data to be stored securely.Unfortunately, there are many ways the security of a web application can be compromised. Flask protects you againstone of the most common security problems of modern web applications: cross-site scripting (XSS). Unless you deliberately mark insecure HTML as secure, Flask and the underlying Jinja2 template engine have you covered. But thereare many more ways to cause security problems.The documentation will warn you about aspects of web development that require attention to security. Some of thesesecurity concerns are far more complex than one might think, and we all sometimes underestimate the likelihood thata vulnerability will be exploited - until a clever attacker figures out a way to exploit our applications. And don’t thinkthat your application is not important enough to attract an attacker. Depending on the kind of attack, chances are thatautomated bots are probing for ways to fill your database with spam, links to malicious software, and the like.Flask is no different from any other framework in that you the developer must build with caution, watching for exploitswhen building to your requirements.1.3 Installation1.3.1 Python VersionWe recommend using the latest version of Python 3. Flask supports Python 3.5 and newer, Python 2.7, and PyPy.4Chapter 1. User’s Guide
Flask Documentation (1.1.x), Release 1.1.41.3.2 DependenciesThese distributions will be installed automatically when installing Flask. Werkzeug implements WSGI, the standard Python interface between applications and servers. Jinja is a template language that renders the pages your application serves. MarkupSafe comes with Jinja. It escapes untrusted input when rendering templates to avoid injection attacks. ItsDangerous securely signs data to ensure its integrity. This is used to protect Flask’s session cookie. Click is a framework for writing command line applications. It provides the flask command and allows addingcustom management commands.Optional dependenciesThese distributions will not be installed automatically. Flask will detect and use them if you install them. Blinker provides support for Signals. SimpleJSON is a fast JSON implementation that is compatible with Python’s json module. It is preferred forJSON operations if it is installed. python-dotenv enables support for Environment Variables From dotenv when running flask commands. Watchdog provides a faster, more efficient reloader for the development server.1.3.3 Virtual environmentsUse a virtual environment to manage the dependencies for your project, both in development and in production.What problem does a virtual environment solve? The more Python projects you have, the more likely it is that youneed to work with different versions of Python libraries, or even Python itself. Newer versions of libraries for oneproject can break compatibility in another project.Virtual environments are independent groups of Python libraries, one for each project. Packages installed for oneproject will not affect other projects or the operating system’s packages.Python 3 comes bundled with the venv module to create virtual environments. If you’re using a modern version ofPython, you can continue on to the next section.If you’re using Python 2, see Install virtualenv first.Create an environmentCreate a project folder and a venv folder within: mkdir myproject cd myproject python3 -m venv venvOn Windows: py -3 -m venv venvIf you needed to install virtualenv because you are using Python 2, use the following command instead:1.3. Installation5
Flask Documentation (1.1.x), Release 1.1.4 python2 -m virtualenv venvOn Windows: \Python27\Scripts\virtualenv.exe venvActivate the environmentBefore you work on your project, activate the corresponding environment: . venv/bin/activateOn Windows: venv\Scripts\activateYour shell prompt will change to show the name of the activated environment.1.3.4 Install FlaskWithin the activated environment, use the following command to install Flask: pip install FlaskFlask is now installed. Check out the Quickstart or go to the Documentation Overview.Living on the edgeIf you want to work with the latest Flask code before it’s released, install or update the code from the master branch: pip install -U r.gz1.3.5 Install virtualenvIf you are using Python 2, the venv module is not available. Instead, install virtualenv.On Linux, virtualenv is provided by your package manager:# Debian, Ubuntu sudo apt-get install python-virtualenv# CentOS, Fedora sudo yum install python-virtualenv# Arch sudo pacman -S python-virtualenvIf you are on Mac OS X or Windows, download get-pip.py, then: sudo python2 Downloads/get-pip.py sudo python2 -m pip install virtualenvOn Windows, as an administrator:6Chapter 1. User’s Guide
Flask Documentation (1.1.x), Release 1.1.4 \Python27\python.exe Downloads\get-pip.py \Python27\python.exe -m pip install virtualenvNow you can return above and Create an environment.1.4 QuickstartEager to get started? This page gives a good introduction to Flask. It assumes you already have Flask installed. If youdo not, head over to the Installation section.1.4.1 A Minimal ApplicationA minimal Flask application looks something like this:from flask import Flaskapp Flask( name )@app.route('/')def hello world():return 'Hello, World!'So what did that code do?1. First we imported the Flask class. An instance of this class will be our WSGI application.2. Next we create an instance of this class. The first argument is the name of the application’s module or package.If you are using a single module (as in this example), you should use name because depending on ifit’s started as application or imported as module the name will be different (' main ' versus the actualimport name). This is needed so that Flask knows where to look for templates, static files, and so on. For moreinformation have a look at the Flask documentation.3. We then use the route() decorator to tell Flask what URL should trigger our function.4. The function is given a name which is also used to generate URLs for that particular function, and returns themessage we want to display in the user’s browser.Just save it as hello.py or something similar. Make sure to not call your application flask.py because this wouldconflict with Flask itself.To run the application you can either use the flask command or python’s -m switch with Flask. Before you can dothat you need to tell your terminal the application to work with by exporting the FLASK APP environment variable: export FLASK APP hello.py flask run* Running on http://127.0.0.1:5000/If you are on Windows, the environment variable syntax depends on command line interpreter. On Command Prompt:C:\path\to\app set FLASK APP hello.pyAnd on PowerShell:PS C:\path\to\app env:FLASK APP "hello.py"Alternatively you can use python -m flask:1.4. Quickstart7
Flask Documentation (1.1.x), Release 1.1.4 export FLASK APP hello.py python -m flask run* Running on http://127.0.0.1:5000/This launches a very simple builtin server, which is good enough for testing but probably not what you want to use inproduction. For deployment options see Deployment Options.Now head over to http://127.0.0.1:5000/, and you should see your hello world greeting.Externally Visible ServerIf you run the server you will notice that the server is only accessible from your own computer, not from any otherin the network. This is the default because in debugging mode a user of the application can execute arbitrary Pythoncode on your computer.If you have the debugger disabled or trust the users on your network, you can make the server publicly available simplyby adding --host 0.0.0.0 to the command line: flask run --host 0.0.0.0This tells your operating system to listen on all public IPs.1.4.2 What to do if the Server does not StartIn case the python -m flask fails or flask does not exist, there are multiple reasons this might be the case.First of all you need to look at the error message.Old Version of FlaskVersions of Flask older than 0.11 used to have different ways to start the application. In short, the flask commanddid not exist, and neither did python -m flask. In that case you have two options: either upgrade to newer Flaskversions or have a look at the Development Server docs to see the alternative method for running a server.Invalid Import NameThe FLASK APP environment variable is the name of the module to import at flask run. In case that module isincorrectly named you will get an import error upon start (or if debug is enabled when you navigate to the application).It will tell you what it tried to import and why it failed.The most common reason is a typo or because you did not actually create an app object.1.4.3 Debug Mode(Want to just log errors and stack traces? See Application Errors)The flask script is nice to start a local development server, but you would have to restart it manually after eachchange to your code. That is not very nice and Flask can do better. If you enable debug support the server will reloaditself on code changes, and it will also provide you with a helpful debugger if things go wrong.To enable all development features (including debug mode) you can export the FLASK ENV environment variable andset it to development before running the server:8Chapter 1. User’s Guide
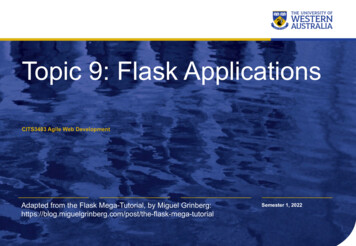
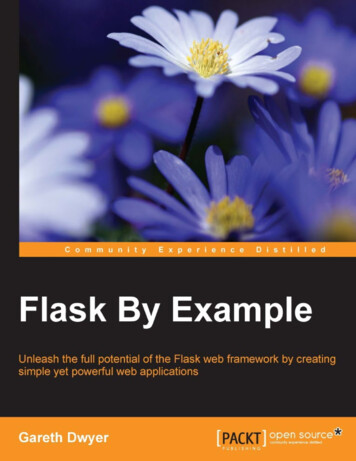
Flask Documentation (1.1.x), Release 1.1.4 export FLASK ENV development flask run(On Windows you need to use set instead of export.)This does the following things:1. it activates the debugger2. it activates the automatic reloader3. it enables the debug mode on the Flask application.You can also control debug mode separately from the environment by exporting FLASK DEBUG 1.There are more parameters that are explained in the Development Server docs.AttentionEven though the interactive debugger does not work in forking environments (which makes it nearly impossible to useon production servers), it still allows the execution of arbitrary code. This makes it a major security risk and thereforeit must never be used on production machines.Screenshot of the debugger in action:1.4. Quickstart9
Flask Documentation (1.1.x), Release 1.1.4More information on using the debugger can be found in the Werkzeug documentation.Have another debugger in mind? See Working with Debuggers.1.4.4 RoutingModern web applications use meaningful URLs to help users. Users are more likely to like a page and come back ifthe page uses a meaningful URL they can remember and use to directly visit a page.Use the route() decorator to bind a function to a URL.@app.route('/')def index():return 'Index Page'@app.route('/hello')(continues on next page)10Chapter 1. User’s Guide
Flask Documentation (1.1.x), Release 1.1.4(continued from previous page)def hello():return 'Hello, World'You can do more! You can make parts of the URL dynamic and attach multiple rules to a function.Variable RulesYou can add variable sections to a URL by marking sections with variable name . Your function then receivesthe variable name as a keyword argument. Optionally, you can use a converter to specify the type of theargument like converter:variable name .from markupsafe import escape@app.route('/user/ username ')def show user profile(username):# show the user profile for that userreturn 'User %s' % escape(username)@app.route('/post/ int:post id ')def show post(post id):# show the post with the given id, the id is an integerreturn 'Post %d' % post id@app.route('/path/ path:subpath ')def show subpath(subpath):# show the subpath after /path/return 'Subpath %s' % escape(subpath)Converter types:stringintfloatpathuuid(default) accepts any text without a slashaccepts positive integersaccepts positive floating point valueslike string but also accepts slashesaccepts UUID stringsUnique URLs / Redirection BehaviorThe following two rules differ in their use of a trailing slash.@app.route('/projects/')def projects():return 'The project page'@app.route('/about')def about():return 'The about page'The canonical URL for the projects endpoint has a trailing slash. It’s similar to a folder in a file system. If youaccess the URL without a trailing slash, Flask redirects you to the canonical URL with the trailing slash.The canonical URL for the about endpoint does not have a trailing slash. It’s similar to the pathname of a file.Accessing the URL with a trailing slash produces a 404 “Not Found” error. This helps keep URLs unique for theseresources, which helps search engines avoid indexing the same page twice.1.4. Quickstart11
Flask Documentation (1.1.x), Release 1.1.4URL BuildingTo build a URL to a specific function, use the url for() function. It accepts the name of the function as its firstargument and any number of keyword arguments, each corresponding to a variable part of the URL rule. Unknownvariable parts are appended to the URL as query parameters.Why would you want to build URLs using the URL reversing function url for() instead of hard-coding them intoyour templates?1. Reversing is often more descriptive than hard-coding the URLs.2. You can change your URLs in one go instead of needing to remember to manually change hard-coded URLs.3. URL building handles escaping of special characters and Unicode data transparently.4. The generated paths are always absolute, avoiding unexpected behavior of relative paths in browsers.5. If your application is placed outside the URL root, for example, in /myapplication instead of /,url for() properly handles that for you.For example, here we use the test request context() method to try out url for().test request context() tells Flask to behave as though it’s handling a request even while we use aPython shell. See Context Locals.from flask import Flask, url forfrom markupsafe import escapeapp Flask( name )@app.route('/')def index():return 'index'@app.route('/login')def login():return 'login'@app.route('/user/ username ')def profile(username):return '{}\'s profile'.format(escape(username))with app.test request context():print(url for('index'))print(url for('login'))print(url for('login', next '/'))print(url for('profile', username 'John Doe'))//login/login?next //user/John%20DoeHTTP MethodsWeb applications use different HTTP methods when accessing URLs. You should familiarize yourself with the HTTPmethods as you work with Flask. By default, a route only answers to GET requests. You can use the methodsargument of the route() decorator to handle different HTTP methods.12Chapter 1. User’s Guide
Flask Documentation (1.1.x), Release 1.1.4from flask import request@app.route('/login', methods ['GET', 'POST'])def login():if request.method 'POST':return do the login()else:return show the login form()If GET is present, Flask automatically adds support for the HEAD method and handles HEAD requests according to theHTTP RFC. Likewise, OPTIONS is automatically implemented for you.1.4.5 Static FilesDynamic web applications also need static files. That’s usually where the CSS and JavaScript files are coming from.Ideally your web server is configured to serve them for you, but during development Flask can do that as well. Justcreate a folder called static in your package or next to your module and it will be available at /static on theapplication.To generate URLs for static files, use the special 'static' endpoint name:url for('static', filename 'style.css')The file has to be stored on the filesystem as static/style.css.1.4.6 Rendering TemplatesGenerating HTML from within Python is not fun, and actually pretty cumbersome because you have to do the HTMLescaping on your own to keep the application secure. Because of that Flask configures the Jinja2 template engine foryou automatically.To render a template you can use the render template() method. All you have to do is provide the name of thetemplate and the variables you want to pass to the template engine as keyword arguments. Here’s a simple example ofhow to render a template:from flask import render template@app.route('/hello/')@app.route('/hello/ name ')def hello(name None):return render template('hello.html', name name)Flask will look for templates in the templates folder. So if your application is a module, this folder is next to thatmodule, if it’s a package it’s actually inside your package:Case 1: a module:/application.py/templates/hello.htmlCase 2: a package:1.4. Quickstart13
Flask Documentation (1.1.x), Release 1.1.4/application/ init .py/templates/hello.htmlFor templates you can use the full power of Jinja2 templates. Head over to the official Jinja2 Template Documentationfor more information.Here is an example template: !doctype html title Hello from Flask /title {% if name %} h1 Hello {{ name }}! /h1 {% else %} h1 Hello, World! /h1 {% endif %}Inside templates you also have access to the request, session and g 1 objects as well as theget flashed messages() function.Templates are especially useful if inheritance is used. If you want to know how that works, head over to the TemplateInheritance pattern documentation. Basically template inheritance makes it possible to keep certain elements on eachpage (like header, navigation and footer).Automatic escaping is enabled, so if name contains HTML it will be escaped automatically. If you can trust a variableand you know that it will be safe HTML (for example because it came from a module that converts wiki markup toHTML) you can mark it as safe by using the Markup class or by using the safe filter in the template. Head over tothe Jinja 2 documentation for more examples.Here is a basic introduction to how the Markup class works: from markupsafe import Markup Markup(' strong Hello %s! /strong ') % ' blink hacker /blink 'Markup(u' strong Hello <blink>hacker</blink>! /strong ') Markup.escape(' blink hacker /blink ')Markup(u'<blink>hacker</blink>') Markup(' em Marked up /em » HTML').striptags()u'Marked up \xbb HTML'Changed in version 0.5: Autoescaping is no longer enabled for all templates. The following extensions for templates trigger autoescaping: .html, .htm, .xml, .xhtml. Templates loaded from a string will have autoescapingdisabled.1.4.7 Accessing Request DataFor web applications it’s crucial to react to the data a client sends to the server. In Flask this information is providedby the global request object. If you have some experience with Python you might be wondering how that objectcan be global and how Flask manages to still be threadsafe. The answer is context locals:Context LocalsInsider Information1Unsure what that g object is? It’s something in which you can store information for your own needs, check the documentation of that object(g) and the Using SQLite 3 with Flask for more information.14Chapter 1. User’s Guide
Flask Documentation (1.1.x), Release 1.1.4If you want to understand how that works and how you can implement tests with context locals, read this section,otherwise just skip it.Certain objects in Flask are global objects, but not of the usual kind. These objects are actually proxies to objects thatare local to a specific context. What a mouthful. But that is actually quite easy to understand.Imagine the context being the handling thread. A request comes in and the web server decides to spawn a newthread (or something else, the underlying object is capable of dealing with concurrency systems other than threads).When Flask starts its internal request handling it figures out that the current thread is the active context and binds thecurrent application and the WSGI environments to that context (thread). It does that in an intelligent way so that oneapplication can invoke another application without breaking.So what does this mean to you? Basically you can completely ignore that this is the case unless you are doingsomething like unit testing. You will notice that code which depends on a request object will suddenly break becausethere is no request object. The solution is creating a request object yourself and binding it to the context. The easiestsolution for unit testing is to use the test request context() context manager. In combination with the withstatement it will bind a test request so that you can interact with it. Here is an example:from flask import requestwith app.test request context('/hello', method 'POST'):# now you can do something with the request until the# end of the with block, such as basic assertions:assert request.path '/hello'assert request.method 'POST'The other possibility is passing a whole WSGI environment to the request context() method:from flask import requestwith app.request context(environ):assert request.method 'POST'The Request ObjectThe request object is documented in the API section and we will not cover it here in detail (see Request). Here is abroad overview of some of the most common operations. First of all you have to import it from the flask module:from flask import requestThe current request method is available by using the method attribute. To access form data (data transmitted in aPOST or PUT request) you can use the form attribute. Here is a full example of the two attributes mentioned above:@app.route('/login', methods ['POST', 'GET'])def login():error Noneif request.method 'POST':if valid ord']):return log the user in(request.form['username'])else:error 'Invalid username/password'# the code below is executed if the request method# was GET or the credentials were invalidreturn render template('login.html', error error)1.4. Quickstart15
Flask Documentation (1.1.x), Release 1.1.4What happens if the key does not exist in the form attribute? In that case a special KeyError is raised. You cancatch it like a standard KeyError but if you don’t do that, a HTTP 400 Bad Request error page is shown instead. Sofor many situations you don’t have to deal with that problem.To access parameters submitted in the URL (?key value) you can use the args attribute:searchword request.args.get('key', '')We recommend accessing URL parameters with get or by catching the KeyError because users might change theURL and presenting them a 400 bad request page in that case is not user friendly.For a full list of methods and attributes of the request object, head over to the Request documentation.File UploadsYo
Flask Documentation (1.1.x), Release 1.1.4 Welcome to Flask's documentation. Get started with Installation and then get an overview with the Quickstart. There . "Micro" does not mean that your whole web application has to fit into a single Python file (although it certainly can), nor does it mean that Flask is lacking in functionality .