Transcription
Section 1 – How to Lookup a RecordIntroductionJPAS was developed so that a person’s eligibility, access, and investigation type could beverified. Within JPAS, you will be able to lookup anyone and determine whether or not theyhave a current eligibility as long as you have their Social Security Number (SSN).Instructions1. Log in as a User.2. Click on “Select Person” (Column on left).Print Screen 1-13. Enter the person’s SSN.4. Click the “Display Person Summary” radio button.5. Click the gray “Display” button.
Print Screen 1-26. The person’s Personal Summary screen should appear with the person’s name printed at thetop. The Person Summary Screen will display a person’s:
a. Current Eligibility (Clearance Level)b. Current Investigation (Type/Date)c. Citizenshipd. Date of Birthe. Place of Birth (State only)7. The second section of the Person Summary screen, called the “Person Category” section,will display all the different categories that are assigned to that particular person. You canlook at all the different categories that are assigned to that individual by clicking on thedrop down menu and selecting one of the different Person Categories assigned to thatindividual.8. For each category you select, the “Person Category” section will change to provide youwith the information associated with that particular category. Some of the types ofinformation you will see when you change a category are: the Organization assigned tothat category, the non-SCI SMO and/or SCI SMO for that category, Separation status, etc.9. At the bottom of the Person Summary screen, you will find the investigation summary andthe adjudication summary of the person.10. To get out of the Person Summary screen, you will have to make a new selection from themain menu.11. Make sure you are making the appropriate changes in the correct category (Categorypull down).
Section 2 – How to Establish a PersonnelSecurity Management Network (PSM Net)IntroductionEstablishing and validating your PSM Net is probably the most important and time-consumingpart of JCAVS. Your PSM Net is basically a validation list.Before you initially begin establishing your PSM Net, it is highly recommended that you startwith an accurate listing of all cleared personnel. It is also recommended that this list be inalphabetical order.Instructions1. Log in as a User for the SMO you want to establish your PSM Net.2. Click on “PSM Net” (column on left).Note: The first time you access your PSM Net, it will more than likely be empty and notcontain any names listed under the “Person Category.” Once you start “adding”personnel to your PSM Net, they will be listed in alphabetical order under PersonCategory.3. Before you begin, check to make sure that the correct SMO and level are indicated in thetop left corner under “JCAVS Maintain PSM Net.”a. If not, click on the gray “Select SMO” button.b. Under the “SMO Code” column, click on the correct SMO from the list provided.Note: The SMO will be blue if it has not been clicked during this session or it will bemaroon if it has been clicked earlier during this session.c. Once you click on the correct SMO, it should take you back to the “JCAVS MaintainPSM Net” page.4. Again, make sure that you have the correct SMO/Level indicated at the top before youproceed.Note: It is vital that you have the correct SMO/Level listed before you proceed.5. Now to search the JPAS database, click on the radio button for the “Persons Category byOrganization.”6. Click the gray “Add” button.7. You should now be on the “PSM Net Add Organization Person Categories” page.8. Click on the gray “Select” button.9. You should now be on the “Organization Search” page.10. Within the “Search” section, there is a pull-down menu right next to “Organization'sService/Agency.” Click on the pull-down menu and scroll down until you see yourappropriate Service/Agency.
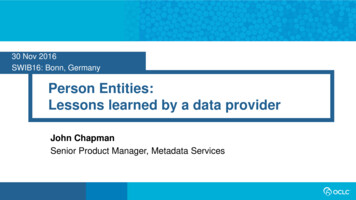
11. In the “Organization UIC/RUC/PASCODE/CODE” box, type in the Code (All IndustryCage codes will be followed by “-I”) for which you are establishing the PSM Net. Anasterisk (*) can be used for wild card searches when using 3 or more characters.Screen Print 2.112. Click the gray “Search” button.13. Under the “Select Organization Search Results” section, you should see the organizationcode for which you are establishing the PSM Net.
Screen Print 2.214. Click on the organization code listed. The organization code will populate in theSelected Organization field.15. Click on the gray “OK” button.16. This should take you to the “PSM Net Add Organization Person Categories” page. Theorganization code you selected should now be listed after “Organization.”
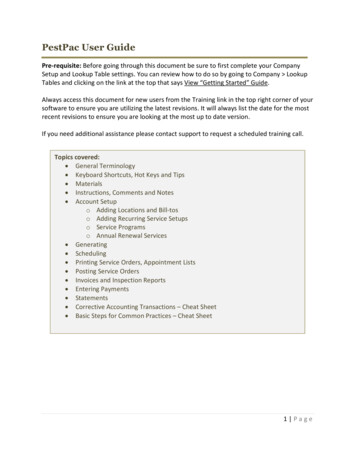
Screen Print 2-317. Click the gray “Search” button.18. Under the search results section, you will see everyone that, according to the JPASdatabase, belongs to the organization code you selected.19. Using your list of cleared personnel, you have two options to add personnel to your PSMNet.a. Option 1- Click on the “Add All” button at the bottom of the screen. This addsall categories associated to that personnel record.b. Option 2- Check the “Add” box at the far right after each name. Once you havecompleted a page, click on the “Add” button at the bottom of the page.Note: Make sure you click the “Add” button at the bottom of each page BEFORE youmove to the next page – if you do not, the names are unchecked by the system.
After you click the “Add” button at the bottom of the page, the same page will“refresh” and add the equivalent number of new names at the bottom of the page thatyou added to your PSM Net. For example, if you are on the 1st page and you “add” ten(10) people from that page to your PSM Net, when the page refreshes itself, there willbe 10 “new” names listed at the bottom of the page that came from the top of the 2ndpage. If you add three of those names to you PSM Net, when the page refreshes, therewill be three new names at the bottom of the page.Once you have added everyone you want from the 1st page, continue on with theremaining page(s) until you have added everyone within your PSM Net.Option 1Option 2Screen Print 2-420. If you did not find everyone on your list during this process, most likely it is because themissing personnel are not assigned a category containing your organization. What youhave to do now is “add” those missing records to your PSM Net.21. Go to Section 3 – “How to Add a Record.”
Section 3 – How to Add a RecordIntroductionIf you attempt to “lookup” a person’s record in JCAVS and receive an error message that the person does not exist, then there is no record withinJPAS for that person. First make sure you entered the correct SSN. If you are sure you entered the correct SSN and still received the errormessage that the person does not exist, you will have to create a record within JPAS for this person.Examples: A person is being submitted for his/her initial investigation and eligibilityFor Industry personnel, if you have a Letter of Consent (LOC) for a person, and there is not a record in JPAS, you willhave to establish a JPAS record. Then you will have to “in-process” (Section 5) this record into your PSM Net so you cansubmit a Request to Research Upgrade Eligibility (RRU) (Section 11) to the Defense Industrial Security Clearance Office(DISCO) to inform them of the existing LOC.Instructions1. Log in as a User2. Click on “Select Person” (Column on left)3. Enter the person’s SSN4. Click the “Display Add/Modify Non-DoD Person” radio button5. Click the gray “Display” button6. The “Add/Modify Non-DoD Person” screen will appear.7. Enter all the information on the person in the blank fields
Screen Print 3.18. Create a “category” for the person (Section 4).9. Click the gray “Save” button.Note: If you are submitting the person for their initial investigation and eligibility, thenenter the date you submitted their EPSQ (Section 10). If the person already has a currenteligibility, then “in-process” (Section 5) the person and submit an RRU (Section 11) to theappropriate CAF.
Section 4 – How to Add a CategoryIntroductionIf you want to add a record to your PSM Net, the first thing you need to ensure is that the record has the correct “category” that you want to addto your PSM Net. If the record does not have the correct “category,” then you will need to add a new category to the person’s record.Instructions1. Log in as a User.2. Click on “Select Person” (Column on left).3. Enter the person’s SSN.4. Click the “Display Add/Modify Non-DoD Person” radio button.5. Click the gray “Display” button.6. In the “Available Category Types” pull-down, make sure you choose the proper category.Examples: Red Cross, Seasonal Employees, Industry2, Industry3, Industry4, etc.7. Click “Add Category” button.8. In the “Category Classification” pull-down, select one of the three options. In most casesyou will select “Contractor” with the exception of an FSO where you will select “KeyManagement Personnel (KMP).” Other employees that are listed on your organization’sKMP list must also be listed as a KMP in JPAS.9. Click on the gray “Modify Organization” box.10. In the “Organization's Service/Agency” pull-down box, scroll down until you reach theappropriate organization.11. In the “Organization UIC/RUC/PASCODE/CODE” box, type in the organization code.An asterisk (*) can be used for wild card searches when using 3 or more characters.
Screen Print 4.112. Click the gray “Search” button.13. Under “Select Organization Search Results” section, you should see the Organizationcode based on your search.
Screen Print 4.214. Click on the appropriate organization code hyperlink. This will populate in the “SelectedOrganization” field.15. Click on the gray “OK” button.16. The organization code you selected should now be listed in the“Organization/Company/Agency” section.
Screen Print 4-317. Click on the gray “Save” button.18. Check to see if the newly established code is displayed in the “Person Category” pulldown. If not, click on the pull down menu and highlight the newly established code.19. Click on the “Person Summary” hyperlink at the bottom of the page.
Section 5 – How to Modify a CategoryIntroductionIf an employee transfers from one organization to another organization within the same company (Multiple Facility Transfer), instead of creatinga new category for the new gaining organization, you can simply “modify” their existing category for the losing organization. This process isonly used if both the losing and gain organizations are within the same company. This process can be performed by either the losing organizationor the gain organization.Instructions20. Log in as a User.21. Click on “Select Person” (Column on left)22. Enter the person’s SSN23. Click the “Display Add/Modify Non-DoD Person” radio button24. Click the gray “Display” button25. In the “Person Category” pull-down, ensure you choose the category for the organizationfor which you are going to modify. This is a critical step – you must ensure that thecorrect category is showing before you proceed.
Screen Print 5.126. In the “Category Classification” pull-down, make sure the correct option is displayed. Inmost cases you will select “Contractor” with the exception of an FSO where you’ll select“Key Management Personnel (KMP).” Other employees that are listed on yourorganization’s KMP list must also be listed as a KMP in JPAS.27. Click on the gray “Modify Organization” box.28. In the “Organization's Service/Agency” pull-down box, scroll down until you reach theappropriate organization.29. In the “Organization UIC/RUC/PASCODE/CODE” box, type in the organization codefor the new organization. An asterisk (*) can be used for wild card searches whenusing 3 or more characters.
Screen Print 5.230. Click the gray “Search” button.31. Under “Select Organization Search Results” section, you should see the Organizationcode based on your search.
Screen Print 5.332. Click on the appropriate organization code hyperlink. This will populate in the “SelectedOrganization” field.
Screen Print 5.433. Click on the gray “OK” button.34. The organization code you selected should now be listed in the “Organization/Company/Agency” section.
Screen Print 5-535. Click on the gray “Save” button.36. Check to see if the newly established code is displayed in the “Person Category” pulldown. If not, click on the pull down menu and highlight the newly established code.
Screen Print 5-537. Click on the “Person Summary” hyperlink at the bottom of the page.
Section 6 – How to In-ProcessIntroductionWhen you in-process a person, you are adding them to your SMO. There are several instanceswhen you will in-process a person into your SMO and PSM Net, such as: When you first establish your PSM Net. When an employee transfers from one SMO to another SMO. When a new hire or current employee requires access.The most important thing to remember when in-processing an employee is to make sure you in-process the correct category. If not, andyou enter an “In Date” for this person, you will assign the wrong category to your PSM Net.Instructions1. Log in as a User for the SMO where you are adding the employee.2. Click on “Select Person” (Column on left).3. Enter person’s SSN.4. Click the Person Summary radio button.5. Click the gray “Display” button.6. When the Person Summary appears, make sure the appropriate category isdisplayed.7. Click the “In/Out Process” hyperlink.8. Enter today’s date in the “In Date” box, or click the calendar, and choose the date.(Format: YYYY MM DD)9. Under the “Relationship,” click the “Owning” or “Servicing” radio box.10. Click the gray “Save” button.11. Under the “View/Modify Active Relationship(s)” section, the newly establishedorganization code should be listed with the “Enter Date” filled.
Screen Print 5-112. Click the gray “Save” button.
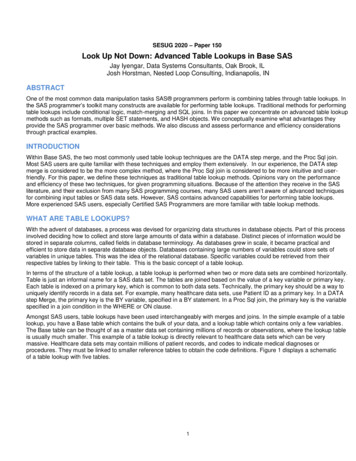
Section 7 – How to IndoctrinateIntroductionThe term “indoctrinate” within JPAS means you are going to assign an “access” level to acleared employee. For example, if you want to give a person who currently possesses a finalSSBI access to Top Secret information, you will need to “indoctrinate” that person at the TopSecret access level. Once a person is indoctrinated at an access level, they will remain at thatlevel until you debrief them.Each person within your PSM Net can be indoctrinated at an access level once they haveeligibility, or an interim approval.Note: Just because a person has a current final SSBI, does not mean you have toindoctrinate them at the Top Secret level. It all depends on the level of information theyare going to be accessing in the performance of their job. You can always raise theiraccess level, if required.Instructions - Non-SCI Indoctrination1. Log in as a User for the SMO where you are indoctrinating the employee.2. Click on “Select Person” (column on left).3. Enter the person’s SSN.4. Click on the “Person Summary” radio button.5. Click on the gray “Display” button.6. Make sure the category box located within the “Person Category” section is displayingthe correct SMO. If the correct SMO is not being displayed, click on the drop down boxand scroll down and highlight the correct SMO.Note: When the “Person Summary” screen first appears and you get an error messagethat says “The Person Category does not have any Owning/Servicing Relationship andno Notification based on Owning/Servicing Relationship will be sent,” then most likelythe default SMO listed is not the correct SMO.7. Scroll down to the maroon “Non-SCI Access” section. Under this section you will seeseveral “caveats” listed: US, CNWDI, PRP, SIGMA 16, IT, NATO, SIOP and RestrictedData. If you see Top Secret, Interim Top Secret, Secret, Interim Secret or Confidentiallisted next to “US” access, then that person has already been indoctrinated at that level.If the “US” access is blank, then that person has not been indoctrinated at any level andyou will be required to indoctrinate that person.Note: As a minimum, a person must have a “US” access before that person can beindoctrinated into any other caveat.8. To indoctrinate a person, click on the “Indoctrinate” hyperlink.
Note: If the “indoctrinate” link does not appear, then most likely the person you aretrying to indoctrinate has not been in-processed into your SMO. To add a person to yourSMO go to
Section 5 – “How to In-Process.” Once you have added the person to your SMO, theindoctrinate link should appear.Screen Print 6-19. In the upper center of the screen, you will see: *A NdA was signed on:Entry FieldIf there is a date already populating the entry field, then the person has already signed aNon-Disclosure Agreement (NdA) and the NdA is already on file with the appropriateagency. However, if the entry field is blank, you will need to have the person sign a nondisclosure agreement and enter the date that they signed in the blank entry field.Note: There must be a date in the NdA block before JPAS will allow you to grant aperson any level of access.
Screen Print 6-210. Below the NdA data field, you will see four (4) tabs identified as “US,” “NATO,”“SIOP” and “Nuclear.” If you click on any one of these tabs, the entry fields for thatparticular tab will appear. For example, when you click on the “US” tab, you will beprovided with the entry fields that are appropriate for that tab based on that person’seligibility. In another example, if the person has a final SSBI investigation, you will seeentry fields labeled “Attestation,” “Confidential,” “Secret” and “Top Secret.” However,if the employee only has a final NACLC, you will NOT see an entry field for “TopSecret.”11. If a person has been briefed to Restricted Data (RD) or Critical Nuclear Weapon DesignInformation (CNWDI) click on the “Nuclear” tab and enter the date briefed.Just because an employee has a current SSBI investigation, does not mean you have toindoctrinate them for Top Secret access; you should indoctrinate them commensurate withthe classification level of information required by them to do their job.Once you have decided on what “access” level you want to indoctrinate a person, enter thedate you are granting the access.
Screen Print 6-312. Once you have entered the date, click on the “Save” button.13. The “entry field” where you entered the date should go away (become solid). Once youclick the “Save” button, the only way you can change this date is to “debrief” this personfrom that access level (see “How to Debrief).14. Click on the gray “Cancel” button and this will take you back to the “Person Summary”screen. If you scroll down to the “Non-SCI Access” section, you will see the accesslevel.
Screen Print 6-415. You can use this same process for indoctrinating personnel who have been briefed toNATO, CNWDI, SIGMA 16, SIOP or Restricted Data.Instructions - SCI Indoctrination1. Log in as a User for the organization where you are indoctrinating the employee.(SCI Indoctrination requires the User to be logged in as a Level 2 or Level 3).2. Click on “Select Person” (column on left).3. Enter the person’s SSN.4. Click on the “Person Summary” radio button.5. Click on the gray “Display” button.
6. Make sure the category box located within the “Person Category” section is displayingthe correct category. If the correct category is not being displayed, click on the dropdown box and scroll down and highlight the correct category.Note: When the “Person Summary” screen first appears and you get a dialog box thatsays “The Person Category does not have any Owning/Servicing Relationship and noNotification based on Owning/Servicing Relationship will be sent” appears, then mostlikely the default category listed is not the correct category.7. Scroll down to the maroon “SCI Access” section. Under the SCI Access section you willsee “SPA, Access and Access Number” listed. If you are logged in as a Level 2, 3 or 8User, and the person has been indoctrinated into SCI compartmented, then you will seethe compartmented acronyms listed next to “Access.” If you are logged in at any otherUser level, then you will only see “Yes” listed next to “Access.” If there is an “N/A” or a“No” listed next to “Access,” then that person has not been indoctrinated into any SCIcompartmented programs and you will be required to indoctrinate that person.No IndoctrinationsIndoctrination LinkScreen Print 6-5
8. To indoctrinate a person, click on the “Indoctrinate” hyperlink.Note: If the “indoctrinate” hyperlink does not appear, the person you are trying toindoctrinate has not been assigned to your SMO or does not meet eligibilityrequirements. To add personnel to your SMO go to Section 5 – “How to In-Process.”Once you have added the person to your SMO, the Indoctrinate hyperlink should appear.9. Once at the “Indoctrination SCI Access” screen, before you can indoctrinate a person intoany SCI compartmented you must first ensure that the person has signed both the “NonDisclosure Agreement” (NdA) and the “Non-Disclosure Statement” (NdS). Enter thedates in which the person signed both the NdA and the NdS in the appropriate entry field.*An NdA was signed on:Entry Field*An NdS was signed on:Entry FieldIf there is a date already populating the appropriate entry fields, then both the NdA and theNdS have already been registered. If the appropriate entry field is blank, you will need tohave the person sign an NdA and NdS before you can continue.Screen Print 6-6
10. Below the NdA & NdS data field, you will see SCI compartmented designators listed.Each designator has an entry field immediately to the right.11. Enter the date in the entry field for the compartments for which the person has beenbriefed.Screen Print 6-712. Once you have entered the date, click on the “Save” button.13. The “entry field” where you entered the date should go away (become solid). Once youclick the “Save” button, the only way you can change this date is to “debrief” this personand then re-indoctrinate (see “How to Debrief).Click on the gray “Cancel” button to return to the “Person Summary” screen. If you scroll downto the “SCI Access” section, you will see immediately to the right of “Access” thecompartmented designators indicating that the person has been briefed.
Section 8 – How to DebriefIntroductionThe term “debrief” within JPAS means you are going to remove the person’s level of “access.”For example, if a person no longer requires access to Top Secret information and only requiresaccess at the Secret level, you will “debrief” that person from the Top Secret access level andthen indoctrinate that person at the Secret level.Instructions (Debrief-Non-SCI Accesses)1. Log in as a User for the SMO where you are debriefing the employee.2. Click on “Select Person” (column on left).3. Enter the person’s SSN.4. Click on the “Person Summary” radio button.5. Click on the gray “Display” button.6. Make sure the category box located within the “Person Category” section is displayingthe correct organization. If the correct organization is not being displayed, click on thedrop down box and scroll down and highlight the correct organization.Note: When the “Person Summary” screen first appears, if you see the error message“The Person Category does not have any Owning/Servicing Relationship and noNotification based on Owning/Servicing Relationship will be sent,” then most likely thedefault organization listed is not the correct organization.7. Scroll down to the maroon “Non-SCI Access” section. Under the Non-SCI Accesssection you will see several “caveats” listed: US, CNWDI, PRP, SIGMA 16, IT, NATO,SIOP and Restricted Data. If you see Top Secret, Interim Top Secret, Secret, InterimSecret or Confidential listed next to “US” eligibility, then that person is indoctrinated atthat level and needs to be debriefed.8. To debrief a person, click on the “Debrief” hyperlink. If there were no accesses assigned,this hyperlink will not appear.
Screen Print 7-19. A list will appear containing all the “accesses” for which the person is currentlyindoctrinated.
Screen Print 7-210. Enter a “Debrief Date” and select a “Reason for Debrief” from the drop down box. Ifyou do not select a reason for the debriefing, you will receive a dialog box indicating thesystem will not perform the debriefing.Note: You will notice that the choices listed in the Reasons for Debrief drop down boxare generally more applicable for those in the military. For example, there is noreason code for Multiple Facility Transfer (MFT), however the “Permanent Change ofStation” could be used as a work around.11. Click the gray “Save” button and the access is removed.12. Click on the gray “Cancel” button and it will return you to the person’s “PersonSummary” screen.13. Make sure you have the correct industry category showing in the “Person Category”section. If not, click on the drop down box, scroll down and highlight the correctcategory.14. You will see under the “Non-SCI Access” section that the person no longer has anyaccesses.
Instructions (Debrief-SCI Accesses)1. Log in as a User for the SMO where you are debriefing the employee.2. Click on “Select Person” (column on left).3. Enter the person’s SSN.4. Click on the “Person Summary” radio button.5. Click on the gray “Display” button.6. Make sure the category box located within the “Person Category” section is displaying thecorrect organization. If the correct organization is not being displayed, click on the dropdown box and scroll down and highlight the correct organization.Note: When the “Person Summary” screen first appears, if you see the error message“The Person Category does not have any Owning/Servicing Relationship and noNotification based on Owning/Servicing Relationship will be sent,” then most likely thedefault organization listed is not the correct organization.7. Scroll down to the maroon “SCI Access” section. Under the SCI Access section you will seeseveral areas listed: SPA, Access and Access Number.– If you are logged on as a Level 2 or 3 User, you will see the compartmented caveatslisted next to the “Access” field for the program in which the person is briefed. Ifthe person is not briefed to any compartmented caveats, you will see “N/A.”– If you are logged in as a Level 4 User or lower, you will see “Yes” in the “Access”field. If the person is not briefed to any compartmented caveats, you will see“N/A.”8. To debrief a person, click on the “Debrief” hyperlink. If there were no accesses assigned,this hyperlink will not appear.
Screen Print 7-39. A list will appear containing all the “accesses” for which the person is currentlyindoctrinated.
Screen Print 7-410. Enter a “Debrief Date” and select a “Reason for Debrief” from the drop down box. If youdo not select a reason for the debriefing, you will receive a dialog box indicating the systemwill not perform the debriefing.11. Click the gray “Save” button and the access is removed.12. Click on the gray “Cancel” button and it will return you to the person’s “Person Summary”screen.13. Make sure you have the correct industry category showing in the “Person Category” section.If not, click on the drop down, scroll down and highlight the correct category.14. You will see under the “SCI Access” section that the person no longer has any accesses.
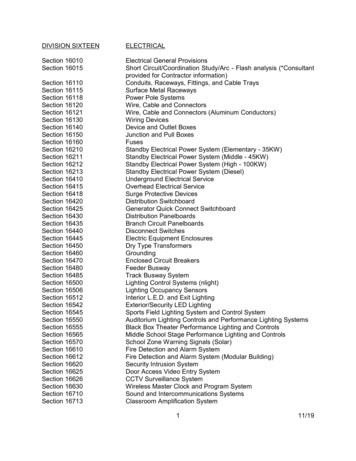
Section 9 – How to Out-Process(Removal from PSM Net)IntroductionWhen a person is no longer assigned to your SMO, you will need to “debrief” them from any accesses they are indoctrinated in; then “outprocess” that person from your SMO.Note: For industry if the person is terminating from your company you will also berequired to enter a separation date for the person. Section 9 will show you how to“separate” an employee.There are two ways in which you can “out-process” a person. The first is by selecting theperson by their SSN and then using the “in/out process” hyperlink from the Person Summaryscreen. The second way is to out-process them through your PSM Net. Both ways work aboutthe same, but if you have several people to out-process, then using the PSM Net method would bethe easier.The first method we will discuss involves using the “Select Person” method.Instructions (Person Summary Method)1. Log in as a User for the SMO that you are going to out-process the person from.2. Click on “Select Person” (Column on left).3. Enter the person’s SSN.4. Click the “Display Person Summary” radio button.5. Click the gray “Display” button.6. Make sure the correct category is displayed in the “Person Category” pull-down. If not,click on the pull down menu and highlight the correct category.
Print Screen 8-17. Click the “In/Out Process” hyperlink and the “View/Modify In/Out” Screen willpopulate.
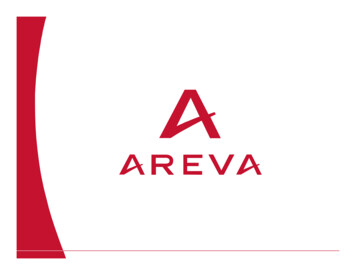
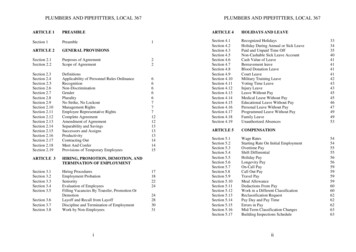
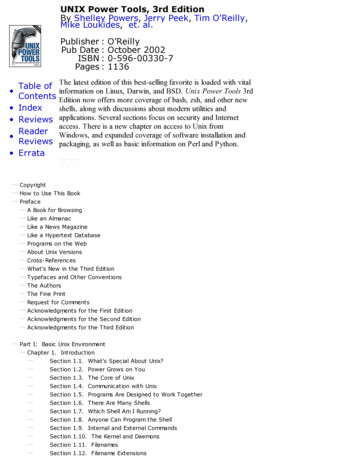
8. Enter the date in the “Out Date” box or click on the calendar and choose the appropriatedate. (Format: YYYY MM DD)Print Screen 8-29. Click on the gray “Save” button and the screen will refresh with the out-process dateappearing solid.10. Click the gray “Cancel” button and it will take you back to the “Person Summary”screen.11. Now if you click on your PSM Net and lookup that person, the phrase “PendingRemoval” will appear under the “Remove” heading in the far right column. The systemwill update at midnight EST and the “Pending Removal” notation will be removed.
PendingRemovalPrint Screen 8-3
Instructions (PSM Net Method)1. Log in as a User for the SMO that you are going to out-process the person from.2. Click on “PSM Net” (column on left).3. Locate the person within your PSM Net.4. Click on the far right check box under the “Remove” column.5. Click the gray “Save” button at the bottom of the page. When the screen refreshes, youwill see “Pending Removal” under the “Remove” column for the person you want toremove.Note: The system will update at midnight EST and the “Pending Removal” notation willbe removed.
Section 10 – How to Enter a Separation DateIntroduction"Separation Date" Text Box: Enter the separation date for a Person in the YYYY MM DD orYYYYMMDD format. An en
Jan 29, 2006 · 9. At the bottom of the Person Summary screen, you will find the investigation summary and the adjudication summary of the person. 10. To get out of the Person Summary screen, you will have to make a new selection from the main menu. 11. Make sure you are making the appropri