Transcription
ESI eSIP Evolution SerieseMobile User Guide for AndroidThis guide is an introduction how to install and configure eMobile on ESI eSIP Evolution Series Server and how to use theeMobile client. This guide is for both the ESI eSIP Evolution Series Administrator and the eMobile client users. This guideis based on eMobile mobile client version 1.8.29 and eMobile server version 1.8.29.ContentsIntroduction 3Standard Telephone Features 3Specifications 3eMobile Server Settings 4Installing and Enabling eMobile 4Assigning eMobile Login Information 5Port Forwarding and NAT Settings 6Getting Started 8Installing eMobile on Android Phone 8Network Settings 8Logging into eMobile 8Personal Information 11Calling with eMobile 12Outgoing Calls 12Incoming Calls 12Established Calls 12Making a Call from Extension List 13Call a Mobile Number 14Making a Call from Contacts 15Making a Call from the Dial Pad/Call History 16Handling an Established Call 17Attended Call Transfer 17Blind Transfer 19Call Waiting 20Page 1 of 370455-0219 Rev A
Number Rewriting 22Step 1. Create an outbound route for adding prefix digits. 22Step 2. Choose the outbound route on eMobile to call out as instructed below. 22Call from Call History 24CONFERENCE 25Adding a New Conference 26During a Conference 27Re-inviting a Contact 27Mute/Unmute Contacts 28Adding/Deleting a Contact 29Rejoining a Conference 30Contacts 31Extensions 32Call History 33Creating a Contact from History 34Voice Mail & Recordings 35Settings 36Call Options 36Audio Options 37Advanced Options 37Page 2 of 370455-0219 Rev A
IntroductioneMobile is a VoIP Mobile Client coordinated with ESI eSIP Evolution Series Server. eMobile makes your mobile phone anoffice extension and links you and your colleagues and customers anywhere anytime. Make and receive calls throughcorporate phone network to slash call costs and enhance efficiency with consistent in-office experience.If you are an eMobile client user, you can skip the chapter eMobile Sever Settings.Standard Telephone Features Call DisplaySpeakerphone and MuteHold & ResumeCall WaitingDo Not DisturbCall HistoryAccess to ESI eSIP Evolution Series DirectoryNative Contacts IntegrationContact AvatarsAudio Call ConferenceSpecifications Android Phone Requirement: Android 4.4 or laterServer Requirement: ESI eSIP Evolution Series Server firmware version 30.8.29.8.19 or laterNetwork: 2G/3G/4G or Wi-FiProtocol: SIP RFC3261Codec: iLBCNetwork Protocol: TCP/IP/UDP, RTP/SRTP/RTCP, HTTP/HTTPSDTMF: Inband, RFC4733 (RFC2833)Page 3 of 370455-0219 Rev A
eMobile Server SettingsThis chapter is for the eMobile Administrator. It introduces how to configure the eMobile server on ESI eSIP EvolutionSeries Server. If you are an eMobile client user, you can skip this chapter.Installing and Enabling eMobileeMobile is supported on ESI eSIP Evolution Series Server firmware version 30.8.29.8.19 or later. Please upgrade theServer firmware before using eMobile if necessary.STEP 1. Log into ESI eSIP Evolution Series Server GUI interface. Go to the App Center and install eMobile.STEP 2. Click on theicon and you can see the installed eMobile App.STEP 3. Click “eMobile” iconto configure it.STEP 4. Check the “Enable” box to enable eMobile on the Server.STEP 5. Select the extensions to use eMobile and click “Enable”.Notes: For eMobile security, the extension users’ default “User Password” MUST be changed, or the system will not allowyou to enable eMobile for the extension users. We suggest that you set up robust passwords that include a combination of numbers, upper letters, and lowercaseletters.STEP 6. Click “Apply”Page 4 of 370455-0219 Rev A
Assigning eMobile Login InformationESI eSIP Evolution Series Server provides an easy way to help theadministrator to assign eMobile login information to extension users.Follow the steps below to assign eMobile login information.STEP 1. In the eMobile App, click the “Sever Settings” tab to configurethe eMobile server. The system will generate a QR code and login linkusing the server settings. Local Hostname/IP: the Servers local hostname or IP address.eMobile Local Port: eMobile local port. The default port is 59111.External Hostname/IP: the Servers external hostname or IPaddress.eMobile External Port: the forwarded eMobile port.SIP Remote Registration Port: set the port according to your Servers network settings:oIf eMobile remote registration is through the Servers network interface which is configured with a private IP, andthe Server is behind a router, you need to forward the SIP registration port (default 5060) on your router, andenter the forwarded port here.oIf eMobile remote registration is through the Server network interface which is configured with a public IP, thenenter the local SIP registration port (default 5060) here.oIf the eSIP Server and eMobile client are connected via VPN tunneling, you do not need to do port forwardingand enter the local SIP registration port (default 5060) here. When you finish the configuration, click “Save”.STEP 2. In the eMobile App, click the “Email Template” tab to modify the email subject and contents. When you finish theconfiguration, click “Save”.Page 5 of 370455-0219 Rev A
STEP 3. In the eMobile App, select the desired extensions to which you want to send the email and click on the “SendEmail” tab.Note: Please make sure the selected extensions have an email address and have eMobile enabled.STEP 4. If the system failed to send emails, you can see the email failure status on the eMobile settings page. Click“Failure sending email” to resend the email or ignore the status.Port Forwarding and NAT SettingsNAT enables private IP internetworks that use nonregistered IP addresses to connect to the internet. If eMobilecommunicates with the ESI eSIP Evolution Series Server through the network interface which is configured with a privateIP, and the Server is behind a router, you need to do port forwarding and configure NAT on your ESI eSIP Evolution SeriesServer.Page 6 of 370455-0219 Rev A
In this situation, you need to forward the following ports to make eMobile work properly in remote network.PortDefault ValueConfiguration PatheMobile Service Port59111eSIP Evolution Series eMobile Port SettingsSIP UDP Port5060eSIP Evolution Series Settings PBX General SIPRTP Ports10000-12000eSIP Evolution Series Settings PBX General SIPGo to eSIP Evolution Series Settings PBX General SIP NAT to configure NAT settings.1. Choose a NAT Type.2. Enter the External IP Address or domain and enter the forwarded SIP UDP port.3. Enter Local Network Identification.4. Set NAT Mode to “Yes”.5. Click “Save” and “Apply”.Page 7 of 370455-0219 Rev A
Getting StartedInstalling eMobile on Android PhoneThe eMobile app must run on Android version 4.4 or higher. Users can download the application from the QR code scanor search in the Google Play Store to download the application.Network SettingsBefore using eMobile, please make sure that the network settings on your phone are configured correctly. You canchoose Wi-Fi network or cellular data for your phone. Enabling both Wi-Fi and cellular data is a better choice so thateMobile will keep working through the cellular data if you are not in the Wi-Fi zone.Note We strongly recommend that you perform your initial setup from within a “known” network, such as in your companyor in your home, but not in a public network such as an internet café.Logging into eMobileOnce eMobile has been downloaded and installed on your phone, you can see theto launch eMobile.icon on your phone. Tap the iconNote: For the first-time login:oPlease allow eMobile to send notifications when the application is in the background.oYou need to confirm whether to allow eMobile to access Contacts from your phone. If you allow this action,eMobile will continually synchronize with your Server. contacts.Page 8 of 370455-0219 Rev A
You have three ways to log into eMobile mobile client.1. Scanning QR CodeIf you have received an eMobile Login email on your computer, you can choose to log in to eMobile via the QR code. Tapthe QR code button on eMobile login page and scan the QR code to log in.2. Copying Login LinkIf you have received an eMobile Login email on your MOBILE PHONE, you can choose to log into eMobile via the link.Copy the link, then open the eMobile mobile client and tap OK to log in.Note: The QR code and link are only valid for 24 hours and can only be used once.Page 9 of 370455-0219 Rev A
3. Logging in ManuallyYou can also tap “Server Settings” on the eMobile mobile client login page, and enter the server IP address and portmanually to log in.1. Enter the local hostname/IP of ESI eSIP Evolution SeriesServer.2. Enter eMobile service localport.3. Enter the external hostname/IP of ESI eSIP Evolution SeriesServer.4. Enter eMobile service externalport.5. Tap OK.6. Enter extension number.7. Enter extension userpassword.Tap to change serversettings.8. Tap LoginPage 10 of 370455-0219 Rev A
Personal InformationAfter login, you can edit your profile by taping theicon on the bottom of the screen.Tap to view the profile.Tap to edit the profile.Tap to save the changes.Tap to change image.Page 11 of 370455-0219 Rev A
Calling with eMobileInteraction between eMobile &Server PhoneOutgoing Calls You can make a Server call regardless of the state of eMobile.Calls from eMobile can be made if not on a Server call.Incoming Calls An incoming call to your extension will ring eMobile if you are not on a Server call.Established Calls If you accept an incoming Server call, you cannot handle the call by eMobile.If you make a call from eMobile, you can record the call or transfer the call on eMobile.Page 12 of 370455-0219 Rev A
Making a Call from Extension ListAccess the ESI eSIP Evolution Series Server extension list by tapping theChoose the extension number and tap theicon at the bottom of the screen.icon to call the extension number directly.Tap to view the extension user’s information.Tap to call the extension number.Page 13 of 370455-0219 Rev A
Call a Mobile NumberUsers can also call a person’s mobile phone on eMobile. The bill is charged to the ESI eSIP Evolution Series Server. Thenumber you want to call should match the outbound routes or the call will fail.Tap to call the mobile number.Page 14 of 370455-0219 Rev A
Making a Call from ContactsAccess eMobile Contacts by tapping thewith your Server contacts.icon at the bottom of the screen. The contacts are continually synchronizedTap to view the contact information.Tap to call the mobile number.Page 15 of 370455-0219 Rev A
Making a Call from the Dial Pad/Call HistoryTap theicon at the bottom of the screen. A dial pad appears and displays all the call history and missedcalls. Tap thedial pad again.icon to hide the dial pad. You can check all the call history at this point. Tap theEnter a number on the dial pad and tapicon to show theto call, or you can call from the history.Tap to call the contact.Type number in this area.Tap to start calling.Page 16 of 370455-0219 Rev A
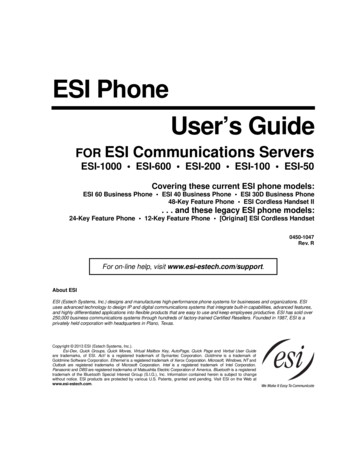
Handling an Established CallWhen you are on a call, the screen shows several call options.Attended Call TransferTap theicon during the call and you can make an attended transfer. It dials a number and you can talk to the personwho has picked up the call before transferring the caller over to him/her.User A and User B are on the phone. User B is on eMobile and wants to transfer the call to User C.1. Tap theicon and the screen will be switched to the Transfer Screen.2. Input User C’s number on the screen and then tap3. User B talks to User C and the call between A and B is put on hold.to call User C.4. User B tapsto finish the call between B and C.t5. The call between A and C is established once B ends the call.Page 17 of 370455-0219 Rev A
2. Tap to choose AttendedTransfer.3. Type the number you wantto transfer.1. Tap to transfer the call.4. Tap to call the input number.Tap to cancel transfer and back tothe former call.5. Tap to finish the transfer.Page 18 of 370455-0219 Rev A
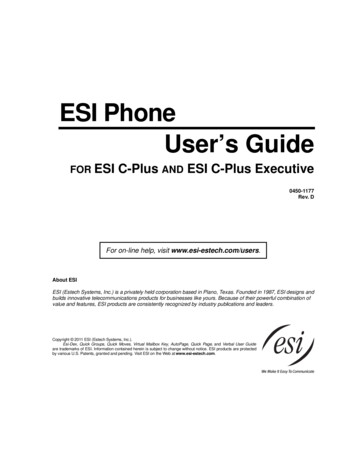
Blind TransferTap theicon during the call and you can choose to make a blind transfer.User A and User B are on the phone. User B is on eMobile and wants to transfer the call to User C.1. Tapand the screen will be switched to the Transfer Screen.2. Switch the transfer type to “Blind”.3. Input User C’s number on the screen then tap4. The call between A and C is established immediately.to call User C.2. Tap to chooseBlind Transfer.3. Type the number youwant to transfer.1. Tap to transfer the call.4. Tap to call the input number.Page 19 of 370455-0219 Rev A
Call WaitingCall Waiting is a feature that allows you to receive a call while you are already on the line with someone else.User A and User B are on the phone. User C makes an incoming call to User A.Tap theicon and User B will be disconnected. User A and User C will establish the call immediately.User C.Tap to answer incoming call(User C) and end the currentcall with User B.Page 20 of 370455-0219 Rev A
Tapicon and User C will be disconnected. User A and User B will continue to talk.After you decline incoming call you willcontinue taking with User B.Incoming call from User C.Tap to decline incoming callfrom User C and continue callwith User B.Page 21 of 370455-0219 Rev A
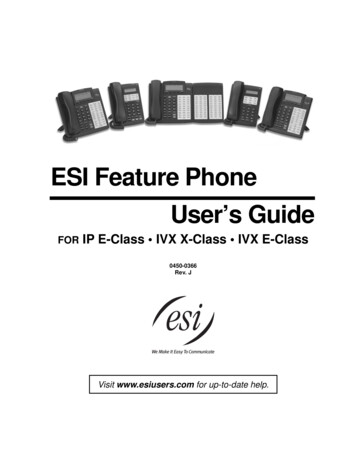
Number RewritingNumber rewriting is a feature that allows you to manipulate the numbers dialed from eMobile. With the Number Rewritingfeature, you can utilize your Server contacts or call history numbers without having to add new entries.From eSIP Server GUI, go to Settings PBX Call Control Outbound Routes.Step 1. Create an outbound route for adding prefix digits.For example, we need to add the digit 0 before the long-distance mobile phone numbers, so we need to create anoutbound route and set the patterns as “0.” (do not forget the dot).Step 2. Choose the outbound route on eMobile to call out as instructed below.The system will automatically add prefix 0 and match an available outbound route to call out.Call from Contact NumbersFrom eMobile on your android phone, perform a long press on theicon and choose Dial through PBX. Choose theoutbound route with the appropriate prefix created in Step 1, The system will add the prefix 0 automatically and call out.(See next page for sample screen captures)Page 22 of 370455-0219 Rev A
Long press the icon.Choose dialingthrough PBX.Choose the newly created outbound route.Page 23 of 370455-0219 Rev A
Call from Call HistoryPerform a long press the number in Call History that you want to dial. Choose dialing through PBX. Choose the outboundroute with the appropriate prefix created in Step 1, the system will add the prefix 0 automatically and call out.Long press the number.Choose DialThrough PBX.Choose the newly created outbound route.Page 24 of 370455-0219 Rev A
CONFERENCEeMobile client supports up to 9-way conferencing. Tap thelist. Tap theicon on the bottom of the screen to enter the conferenceicon to create a new conference or choose to tap an existing conference.Tap to create anew conference.Tap to create a newconference member.Tap to view the detail.Tap to delete the contactfrom this conference.Tap to start the conference.Page 25 of 370455-0219 Rev A
Adding a New ConferenceTap theandicons to add a new conference.Tap to switch to Contacts list.Search a contact.Tap to add acontact.Tap to add the contact.Tap to save.Enter a contact’snumber.Enter the conference name.Tap to add the entered number.Tap to start the conference.Page 26 of 370455-0219 Rev A
During a ConferenceWhen the conference is established, the conference administrator can manage the conference in the following ways: Re-invite contacts to the conference.Mute/unmute the conference members.Delete the conference members.End the conference.Conference Member Status: The member answered the conference call.: The member’s phone is ringing.: The member didn’t answer the conference call, or the member lost the connection.Re-inviting a ContactThe conference administrator can re-invite a contact if the contact didn’t answer the conference call or if the contact lostconnection.Long tap thecontact.Tap to call the contact again.Page 27 of 370455-0219 Rev A
Mute/Unmute ContactsThe conference administrator can mute or unmute the conference members.Long tap.Longtap.Tap to mute the member.Tap to mute/unmute yourself.Tap to mute all the members.Page 28 of 370455-0219 Rev A
Adding/Deleting a ContactLong tap.Tap to add a contact.Tap to delete the contact fromthe conference.Page 29 of 370455-0219 Rev A
Rejoining a ConferenceDuring a conference, if the members have lost connection, the administrator can re-invite them to the conference. If theadministrator lost connection of an on-going conference, the conference would be continued, and the administrator couldrejoin the conference.Tap to join the on-going conference.Page 30 of 370455-0219 Rev A
ContactseMobile provides two phonebooks: Extensions and Contacts. Extensions: All the ESI eSIP Evolution Series extensions are displayed on the Extensions page.Contacts: Contacts on eMobile are continually synchronized with your Server contacts.Tap to view Contactslist.Search by name ornumber.Tap to view detail.Tap to call.Tap to send SMS.Page 31 of 370455-0219 Rev A
ExtensionsExtension Status The user is logged into eMobile. The user is logged into eMobile and is busy on a call. The user is not logged into eMobile.Tap to viewExtensions list.Search by name ornumber.Tap to view detail.Tap to call.Tap to send SMS.Tap to send email.Drag down to update extensions.Page 32 of 370455-0219 Rev A
Call HistoryTap theicon at the bottom of the screen. A dial pad appears and displays all the call history and missed calls. Tap theicon to hide the dial pad and then you can check all the call history.Tap to see allmissed calls.Tap to view call detail.Page 33 of 370455-0219 Rev A
Creating a Contact from HistoryYou can create a contact from a history item.Tap the icon.Tap to add the number to an existing contact.Tap to create a new contact.Page 34 of 370455-0219 Rev A
Voice Mail & RecordingseMobile users can check their voicemail files and recording files on the eMobile client. Tap theicon on the bottomof the screen. Tap Recording to check the recording files and tap Voicemail to check the voicemail files. Click Clickto download the recording/voicemail file.to listen to the recording/voicemail.Page 35 of 370455-0219 Rev A
SettingsFor the first time using eMobile, tap theicon on the bottom of the screen and go to Settings to configure eMobile.Tap to view andconfiguresettings.Call Options Ring StrategySet the ring strategy for your office phone (where your extension is registered) and eMobile.oRing Simultaneously: the office phone and eMobile will ring simultaneously.oRing Extension Only: only the office phone will ring.oRing eMobile Only: only the eMobile will ring.oRing Extension First: the office phone rings first, then the eMobile rings.oRing eMobile First: the eMobile rings first, then the office phone rings. Call ForwardingCalls can be forwarded in any of these 3 conditions. Choose one condition and choose the forward destination.oAlways: Always forward the call and never rings the user.oNo Answer: Only call forward when the user does not answer.oWhen Busy: Only call forward when the user is on a call.
Ring TimeoutSet the ring timeout in seconds. The phone will stop ringing after the time defined. Call WaitingIf call waiting is enabled, the user will hear a call waiting alert when the second call comes in. You can choose to: (A)answer the new call and end the current call, (B) decline the new call or (C) answer the new call and hold the currentcall. DNDIf DND is enabled, the user will not receive any calls.Audio Options Echo CancellationIf there is an echo during the call, enable this feature to get better sound quality. TX GainAdjust the transmitting volume. RX GainAdjust the receiving volume. Dial Pad TonesEnable or disable dial pad tones.Advanced Options Clear CacheTap this setting to clear downloaded recording files on your mobile phone. DebugBy default, eMobile debug is disabled. If you have a problem on the eMobile client, please follow the steps below toreport your bugs to ESI:1.2.3.4.5.Enable Report Bugs.Duplicate the problem.Tap Send Report.Enter the description of your problem, click OK.Edit your Email contents and click Send. The email will be sent to ESI.
ESI eSIP Evolution Series . eMobile User Guide for Android . This guide is an introduction how to install and configure eMobile on ESI eSIP Evolution Series Server and how to use the eMobile client. This guide is for both the ESI eSIP Evolution Series Administrator