Transcription
TRX Suspension Training Anchoring Solution: TRX MultiMount 2010 Fitness Anywhere, Inc. San Francisco, California. All rights reserved. May not be reproduced or transmitted in any form byany means, electronic, mechanical, photocopy, recording or otherwise without written permission of the publisher.
TRX Suspension Training Anchoring Solution: TRX MultiMount
TRX Suspension Training Anchoring Solution: TRX MultiMount
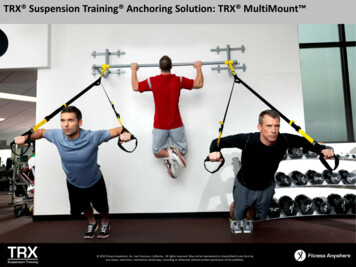
TRX Suspension Training Anchoring Solution: TRX MultiMount TRX MultiMount ProductsMake the most out of your training facility with theTRX MultiMount , a versatile anchoring solution that’s perfectfor any fitness club or workout space.The MultiMount is a wall-mounted anchoring system that allowsfacilities to offer small to large group training in a variety ofspaces. Perform hundreds of TRX exercises on the MultiMount,which also accommodates other tools like ropes, stretch bandsand heavy bags.TRX MultiMount Best for personal trainers and small studios Industrial steel construction with a powder coated finish Supports up to 2 Suspension TrainersTRX Double MultiMount Perfect for group training in small-to mid-sized facilities Supports up to 3 Suspension Trainers Allows for pull-ups and other hanging exercisesTRX Triple MultiMount Ideal for mid-to large-sized facilities Allows for group training and classes Supports up to 6 Suspension TrainersTRX MultiMount Extension Kit Existing MultiMount users can extend a MultiMount systemwith this Kit that adds 3-4 users (depending on originalMultiMount setup).*Each MultiMount is meant to support the bodyweight of up to three largeusers. Professional installation is recommended.
TRX Suspension Training Anchoring Solution: TRX MultiMount Important Installation & Safety Information30 inches Distance from wallto end of O-ringWall Brace 22 inches wide21.86 inches distance from topof L-Beam tobottom ofMounting Bracket18 inches distance from topof top MountingBracket to bottomof bottommounting bracket20.36 inches distancefrom top of L-Beam tobottom of L-BeamMultiMount Kit Example2 MultiMounts & 1 Cross Bar (MMBXAR)MMXBAR 78.5 inches long (6.5 ft)L-Beam positioncan be up ordown.
TRX Suspension Training Anchoring Solution: TRX MultiMount Important Installation & Safety Information1. Be Safe! Professional Installation Is Strongly RecommendedIt is important that your MultiMount be properly and securely attached to a wall that can bear the weight of the exercisers whowill use it. A MultiMount that is not securely attached to a load-bearing wall could separate from the wall and cause seriousinjury. We strongly recommend that MultiMounts be professionally installed.2. Required MaintenanceCheck regularly the tightness of the bolts used to assemble the MultiMount and anchor it to the wall. Tighten with a wrench ifnecessary.3. Anchoring to Steel Beams or Walls with Metal StudsAnchoring your MultiMount to a steel beam or to a wall with metal studs will require different tools and anchoring hardware.Please consult a professional.4. Required tools:1. Hammer2. Socket wrench (3/8” and 1/2”)3. Allen wrench4. Drill and one 1/4” wood drill bit, or one 1/2” concrete drill bit, depending on wall type5. Pencil6. Level7. Measuring tape8. Stud Finder9. LadderImportant steps before starting installation:1. Find a helper. Installing a MultiMount is a two-person job.2. Find the right location.Select a load-bearing wall strong enough to bear the weight ofthe MultiMount and the exercisers who will use it. Make sure there is enoughopen space around the MultiMount for Suspension Training .Single MultiMount
TRX Suspension Training Anchoring Solution: TRX MultiMount Important Installation & Safety InformationStep 1: Mark the appropriate placement1. Mark on the wall the appropriate height for the top Wall Brace. The L-Beam O-ring should be 7-9 feet off the ground. The L-Beam can be positioned so that the O-ringpoints up [A] or down [B] depending on ceiling height and the amountof free space on your wall.2. With a helper, hold the upper Wall Brace horizontally and lay thetwo Mounting Brackets over it. Check Wall Brace alignment using alevel. [C.]3. Mark the four Mounting Bracket holes with a pencil. [C.]For wood stud walls, use a stud finder to locate adjacent studs andmake sure the Mounting Brackets are set in the center of each stud. [D.]
TRX Suspension Training Anchoring Solution: TRX MultiMount Important Installation & Safety InformationStep 2: Loosely attach top two Mounting Brackets to wallFor wood stud walls, drill the four previously marked holes using the 1/4”wood drill bit [A], then loosely attach the top two Mounting Brackets through the topholes only using provided 3/8” lag bolts and washers. [B].For concrete walls, drill the four previously marked holes using a 1/2” concrete drill bit[A], then tap a 1/2” sleeve stud anchor into each hole [C1] until the sleeves are flushwith the wall. [C2]. Tighten each nut [C3] until the screw thread extends approximatelyone inch from the wall. Remove the washer and nut from all four sleeve stud anchors,leaving the screw threads exposed [C4]. Add the two Mounting Brackets into place.Loosely hand-tighten the top two washers and nuts only. [C4].For all wall types, the Mounting Brackets should have just enough freedom of motion toallow the L-Beam/Wall Brace assembly to slide into place.
TRX Suspension Training Anchoring Solution: TRX MultiMount Important Installation & Safety InformationStep 3: Affix MultiMount to wall1. On the floor, attach the L-beam to the two Wall Braces using the two 1/2” bolt/nut sets.[A.] Use a socket wrench to tighten. Do not fully tighten until MultiMount is affixed to wall.2. Tightly attach top Wall Brace.Lift L-Beam/Wall Brace assembly to the wall and slide the top Wall Brace underneath the looselyattached top two Mounting Brackets.For wood stud walls, add the bottom two 3/8” lag bolts and washers.Tighten with a socket wrench.For concrete walls, slide a washer and nut over the exposed bottom twoscrew threads. Tighten with a socket wrench.3. Tightly attach bottom Wall Brace.Check alignment of bottom Wall Brace with a level. [B.]Lay the Mounting Brackets over the bottom Wall Brace and repeat theprocedure described above to anchor the Mounting Brackets securely tothe wall.4. Tighten L-Beam/Wall Brace assembly bolts and nuts with socket wrench.
TRX Suspension Training Anchoring Solution: TRX MultiMount Important Installation & Safety InformationStep 4: Weight test and maintenance1. Hang the TRX Suspension Trainers A single MultiMount will accommodate two users.2. Conduct a Weight TestAlways weight-test the MultiMount to ensure correct installation before starting to train.Attach a Suspension Trainer (after following proper Set-up & Use instructions) and pull hardto weight-test your installation. All of the nut/bolt sets should be tight, without movement.The MultiMount should look and feel securely attached to the wall.3. Required maintenanceRegularly check the tightness of the bolts used to assemble and anchor the MultiMount.Tighten the bolts with a wrench if necessary.
TRX Suspension Training Anchoring Solution: TRX MultiMount Important Installation & Safety InformationTwo MultiMount Installation: 2 MultiMounts & 1 Cross Bar1. Install the first MultiMount by following the installation instructionsprovided with your MultiMounts. Be sure to use a level.2. Install the second MultiMount at precisely the same height as the firstMultiMount. Space the MultiMounts 72.5 inches apart (measuring fromthe O-rings), so that three inches of Cross Bar will extend from eachMultiMount O-ring when installed.3. Install the Cross Bar. Use an Allen wrench to loosen the MultiMountO-rings, then slide the Cross Bar into place. The Cross Bar should extendno more than three inches past each O-ring. Fully tighten the O-ringscrews once the Cross Bar is in place.4. Weight-Test. Always weight-test to ensure correct installation beforestarting exercise. All of the nut/bolt sets and screws should be tight andnot allow any movement. The MultiMounts and Cross Bar should look andfeel securely attached to the wall.You must install a MultiMount O-ring within three inches of each CrossBar end or Cross Bar junction. Installing a Cross Bar junction more thanthree inches from a MultiMount O-ring can cause the bars to separate.
TRX Suspension Training Anchoring Solution: TRX MultiMount Important Installation & Safety Information. Step 3: Affix MultiMount to wall. 1. On the floor, attach the L -beam to the two Wall Braces using the two 1/2” bolt/nut sets. [A.] Use a socket wrench to tighten.