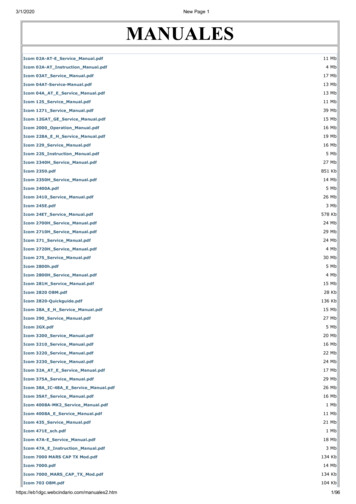
Transcription
PDF CREATIONGUIDEYOUR GUIDE TO CREATING ANDEXPORTING USING ADOBEINDESIGN OR PHOTOSHOP
Welcome to PDF CreationThis manual includes all of the steps necessary to create a fantastic yearbook by submitting your yearbook filesin PDF format. PDFs eliminate many of the problems associated with delivering print-ready desktop publishingfiles. Programs such as Adobe InDesign and Adobe Photoshop easily export documents into this format andhave been cornerstones of professional printing.Please read and follow the instructions very carefully to avoid delays in the delivery of your yearbooks.Previous experience with page layout software is highly recommended for this plan.If you are using other versions that are not supported in this manual, please contact us atgraphics@walterspublishing.com.Inside: D containing cover templates, document templates and our preferred export & color settings filesC DVD containing artwork and fonts Step-by-step instructions for loading our PDF export and color settings to your Adobe software Step-by-step instructions for creating your PDF files Helpful tips on using provided artwork and fonts to create a theme for your book Information about submitting your finished bookAdobe, the Adobe logo, Photoshop and InDesign are either registered trademarks or trademarks of Adobe Systems Incorporated in theUnited States and/or other countries. All other trademarks are the property of their respective owners.
table ofcontents2-3quickstart instructions4-5setup6-7what you need to know8-9submitting your files1
QUICKSTARTquickstart instructions adobe indesign and adobe photoshopsee pages 4-7 for in-depth information on book creation and submission. Step 1 Install The Color ProfileInsert the PDF Creation CD into your Computer’s OpticalDrive. If your computer does not have a CD or DVD driveyou can download all the files you’ll need atwww.pictavo.com/pdf-downloads.On your computer, navigate to: PDF Creation CD / ColorProfile / GRACol2006 Coated1v2.iccWindows Explorer finder windowIn Windows, right-click the .icc file on the PDF CreationCD and select Install Profile.Alternatively, copy the profiles into:WINDOWS\system32\spool\drivers\color folder.In Mac OS, copy the .icc file on the PDF Creation CD to:/Library/ColorSync/Profiles or/Users/[username]/Library/ColorSync/Profiles.Mac finder windowAfter installing color profiles, be sure to restart yourAdobe applications.Step 2 I nstall COLOR SETTINGSA. Open Adobe InDesign or Photoshop.Be sure all documents are closed.B. Choose Edit Color Settings to open the AdobeColor Settings Dialog Window.C. Click the Load button in the Color Settings Windowand navigate to: PDF Creation CD / Color Settings File /Book ColorSettings.csfD. Make sure the new Book ColorSettings.csf setting isselected at the top of the Color Settings DialogWindow and click OK (the window will close).Adobe Photoshop Color Settings window (Mac)Step 3 I nstall PDF Export PresetA. Open Adobe InDesign or Photoshop.Be sure all documents are closed.B. In Photoshop Choose Edit Adobe PDF Presets toopen the PDF Presets Dialog Window.In InDesign Choose File Adobe PDF Presets Define. to open the PDF Presets Dialog Window.C. Click the Load button in the PDF Presets Window andnavigate to: PDF Creation CD / PDF Export Preset /Book PDF.joboptions.2D. Click Done to close the PDF Presets Window.Adobe PDF Presets window for Photoshop (Mac)Note: The dialogue windows may appear differently on your computer but should offer similar content.
A. In InDesign or Photoshop, go to File Open and thenchoose a program template from the loaded CD.PDF TEStthis step is very important!B. I nclude the final page count in thedocument and save the file as either.indd (InDesign) or .psd (Photoshop).quickstartStep 4 Create Your documentdesign 2- 4 pages for a PDF test.Make sure to include text, images and a bleed(see page 5 for information on bleeds).PDF test pages are due at least four weeks prior tothe book submission date and must be approved beforethe book will be accepted for submission.Step 5 Create and send pdf test filesIn Adobe Photoshop:A. Click File Save As to open the Save As dialog window.B. In the Format: drop-down menu choose: Photoshop PDF.Adobe Save As window for Photoshop (Windows)C. Name your file as follows: jobnumber pagenumber(s).pdf.(ie. 65003 018.pdf, or 65003 001-098.pdf for multiplepages).D. Make sure Embed Color Profile is checked, and click Save.E. If a color setting warning box appears, click OK to load theSave Adobe PDF Window.F. In the Adobe PDF Preset: drop-down menu choose:Book PDF then click Save PDF.In Adobe InDesign:A. Click File Export to open the Export window.B. Name your file as follows: jobnumber pagenumber(s).pdf.(ie. 65003 018.pdf, or 65003 001-098.pdf for multiplepages).Adobe Save As PDF window for Photoshop (Mac)C. Choose Adobe PDF (Print) from the Format drop-downmenu and click Save to open the Export Adobe PDF window.D. In the Adobe PDF Preset: drop-down menu choose:Book PDF, then click Export.Email your test PDF tographics@walterspublishing.comIf your PDF files are too large to email, FTP instructions can berequested by contacting graphics@walterspublishing.com.Submitting a PDF test can prevent preflight problems inyour final book. If problems are found at submission, youwill be notified and your book will be placed on hold. Thiscould delay the delivery of your book.3Adobe Export PDF window for InDesign (Mac)
setupcreating your BookOnce your PDF test pages have been approved, start designing your book.Have fun with it—be creative!book covercustom coversbook interiorpage countCreate your very own Custom Cover or select adesign from the Art & Font CD. Use one of theprovided templates that coordinates with yourbinding type, book size, paper weight, boardthickness and page count.The book page count must be divisible by 4. SmythSewn books must have a page count divisible by 16.Your total page count does not include the outsidecover, the inside front or inside back cover; onlyinterior pages.stock coversbleeds and page marginsStock covers allow you to print your cover title in thecolor shown for free. See the Stock Cover Guide forchoices. Please note: stock cover art cannot be altered.Follow the guides in the provided templates. Forartwork that goes to the edge of the page, it isimportant to fully extend this to the outside edge ofthe bleed area.design the inside of the cover too!Working within the provided page margin in thetemplate leaves a ‘safe zone’ of .5" around the edgeof the page. This will ensure that important text,photos and elements don’t get trimmed off the pageor lost in the binding.Inside cover printing is a fun way to add extrapersonality to a book and is available for all softcover books. Endsheets on hard cover books can beupgraded from the standard white to either a solidcustom color or can be printed with a custom design.page numbersPlease note that some options may incur an additionalfee. Contact your sales representative for details.Each page in your book must include a page number.If page numbers are not in the submitted PDF files,we will contact you for permission to include them.Cover deadlines are:FEbruary 1stfor books shipping before june 30thall Interior pages should be submittedat the same time.contact your sales representative forthe book submission deadline.june 1stfor books shipping july 1st to december 30th.find additional information about covers andcover submission on page 8find book submission instructions on page 8find coordinating covers, backgrounds, clip art and fonts, all for your use on the Art & Font cd.4EastCloverHighSchool
setuptemplatesuse our preset templates for page layout (recommended) or create your own using our guidelines.pagemarginpage edge(trim)bleedareaTwo-page spread template for use with Adobe InDesign. 8.5" x 11" book. Page layout templates (Program Templates) areincluded for both 8.5" x 11" and 9" x 12" books.The built-in yellow border around the edge isthe bleed area. Photos, backgrounds or graphicelements meant to print to the edge of the pageshould be extended to the outside edge of thebleed area. The bleed area extends .125" beyond the pageon all sides. The page margin creates a .5"buffer around each page.Example for an 8.5" x 11" page:To make a full-page background with a bleedon all four sides the artwork needs to be8.75" x 11.25".we highly recommend using the templates and backgrounds provided on the Art & Font cd—these already include the correct bleed allowance.5correct bleedincorrect bleed
what you need to knowsoftwareAcceptable ProgramsWe offer instructions in this guide that detail the procedures used to create PDF files with thefollowing programs: dobe InDesign CS3-Creative Cloud (or newer) A A dobe Photoshop CS3-Creative Cloud (or newer)If you’re attempting to use other page layout programs or older versions than those listed above, we cannotguarantee that your files will reproduce the way you’ve created and viewed them on your screen. We do not offerassistance for any unlisted programs and do not supply software. If you have questions about your software andhow it creates PDF documents, please contact the manufacturer of your software.You should be familiar with your hard drive, the programs you are using, and how and where to save images.Knowledge of Photoshop is required if you plan to edit or resize images. Other programs may be used to createPDF files but we support only the programs listed above. If you are using another program to create your files,contact our graphics department with questions and to submit a test at graphics@walterspublishing.com.book optionshard cover bindingsThere are two types of hard cover bindings available. Smyth binding is strongly recommended for books thathave photos or text that span across two pages or that have text and/or images that are less than 1/4” fromthe trim line on the interior (gutter) side of the book. Standard Hard Cover binding works best when a bookhas been designed with all text and images at least 1/2” from the trim lines.autograph and current event pagesYou can add Stock Autograph Pages (extra charge) or Current Events pages to your yearbook. Indicate yourdesign and placement selections on the Production Form. Stock Autograph pages are not included in your totalpage count and are not numbered. Current Events pages should be included in your total page count,but will not be numbered. Current Events pages will be added to the back of your book, unless otherwisespecified on the Production Form. Current Events pages will not be billed separately. Your yearbook price will bebased on total page count (including Current Events pages).two-page spreadsIf you choose to include two-page spreads in your book, create your book as facing pages and create singlepage PDF files when you export your book. Check your PDF files before submitting to make sure that they splitcorrectly and that the bleeds extend on all four sides.we’re here to helpWe will gladly help you with questions regarding preferences, requirements, artwork,templates and image quality. Contact:graphics@walterspublishing.comHowever, we offer limited computer support and are not staffed to instruct first-timeprogram users. For questions about computer programs, it’s best to seek help on theinternet or in your program’s user guide.6If you have non-technical questions about your book, please contact Customer Care at1-800-447-3274. We are happy to help!
Fonts are provided on the Artwork DVD for your unlimited use. If you choose to use custom fonts, includethem with your files when the job is submitted or submit your book as PDF files with all fonts embedded.install fonts on a MacCopy all fonts from the Artwork DVD into your System Fonts folder. Restart your computer to activate them.install fonts on A Windows PCGo to the Start menu, choose Control Panel, and open the font folder inside. Install all fonts from the ArtworkDVD into the font folder by choosing File and Import New Font until all yearbook fonts have been loaded.Do not use font menu styles ON A Windows COMPUTERYou may bold or italicize a font ONLY if you have the bold or italic version of that font.imagesIMAGE RESOLUTIONFor high-quality reproduction, images should have a resolution between 250 and 300 pixels per inch (ppi) andshould be the same dimensions that you plan to print it in your yearbook. Images from the web will have alow resolution of 72 dpi and will print poorly, therefore, we do not recommend their use. In addition, mostimages found on the internet are copyright protected.saving and naming imagesImages should be saved in a folder on your computer and each image should have a unique name for linkingpurposes. File names should not be changed unless you relink the images after the name change. Renamingimages or moving them to a different folder or CD could cause missing link problems later on when you areexporting your PDF files.what you need to knowfontsIMAGE color spaceFiles converted from RGB to CMYK experience very little change in color. For the best representation of thefinal print output, create your book in CMYK color space. Files created in RGB will be converted to CMYKthrough the PDF output settings process.File FormatsJPEG (.jpg), TIFF (.tif), PNG (.png) and EPS (.eps) are all acceptable file formats to use in your book. Choose theformat when you save your images in the scanning or image editing software. JPEG files should be saved at ahigh-quality setting (less compression 10–12) and are favored because of their small size. TIFF files must besaved with no compression.Stock artwork is provided on the Artwork DVD found on the inside back cover of this guide. Backgrounds areprovided as .jpg files and clip art is provided as .png files. Clip art (.png files) may not be compatible with allversions of publishing software.Copyrighted materialWalter’s Publishing reserves the right to refuse to print any materials provided by its customers for any reason,including, but not limited to, materials determined by Walter’s Publishing, at its discretion, to be offensive,illegal, or in violation of any copyright or other proprietary rights. By submitting an order and providing photos,trademarks, tradenames, images or other content (collectively, the “Customer Content”) to Walter’s Publishing,the Customer represents that it has the right to have the order printed, with the inclusion of the CustomerContent, and that printing of the order by Walter’s Publishing, and the use of the Customer Content, will notinfringe the intellectual property right of any third party. Customer will defend, indemnify and hold harmlessWalter’s Publishing from any claims, costs, losses, and liability (including reasonable attorney’s fees and expenses)arising out of or related to the Customer Content or the production of the Order as directed by the Customer.We are not responsible for the quality (resolution or color) of your digital yearbook images oncethey have been submitted as PDF files.7
submitting your fileshow to submit yourcoverSubmit a single CD/DVD/USB Drive containing yourcustom cover with the completed Custom CoverForm by February 1st for books shipping before June30th, or June 1st for books shipping July 1st toDecember 31st.Our custom cover templates must be used forcustom cover submission. See the Custom CoverInstruction Guide for further information.What to include: A PDF file of your cover (and endsheets ifapplicable) Custom Cover FormWhere to send:Please refer to your book provider for theappropriate mailing address to send the CustomCover Form and cover PDF files.how to submit your bookSubmit a single CD/DVD/USB drive containing yourinterior page files along with the completedProduction Form.If you use a different computer to generate your PDFfiles or the applications have been reinstalled, youwill need to follow the steps on page 2 to reset thePDF settings and resubmit a new PDF test for approval.PDF SIZE AND naming conventionsA PDF book may be submitted in whatever sectionsizes you would like (1 page, 4 page, 16 page, entirebook). PDF files should be named in a manner thatclearly indicates the job number and page number;e.g., jobnumber 001-016.pdf.What to include: PDF files of your interior pages A completed and signed Production Form If you have copyrighted information in your book,submit written, verifiable permission for use withyour Production Form.8Where to send:Please refer to your book provider for theappropriate mailing address to send the ProductionForm and interior page PDF files.questionS?If you have questions about your book, contact us at 1-800-447-3274
9
Copyright Walter’s Publishing 2016WP7311
and navigate to: PDF Creation CD / Color Settings File / Book_ColorSettings.csf D. Make sure the new Book_ColorSettings.csf setting is selected at the top of the Color Settings Dialog Window and click OK (the window will close). step 3 Instal l PDF Export Preset A. Open Adobe In