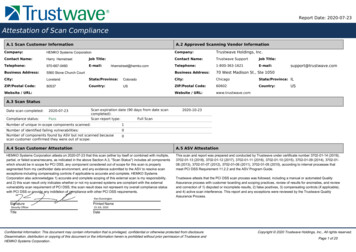
Transcription
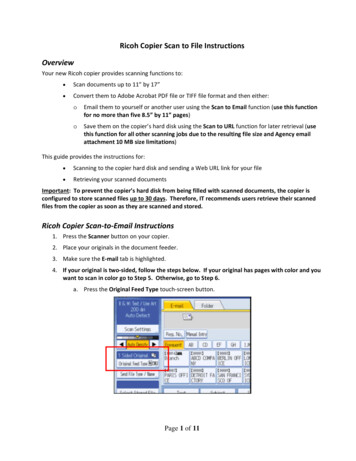
Ricoh Copier Scan to File InstructionsOverviewYour new Ricoh copier provides scanning functions to: Scan documents up to 11” by 17” Convert them to Adobe Acrobat PDF file or TIFF file format and then either:oEmail them to yourself or another user using the Scan to Email function (use this functionfor no more than five 8.5” by 11” pages)oSave them on the copier’s hard disk using the Scan to URL function for later retrieval (usethis function for all other scanning jobs due to the resulting file size and Agency emailattachment 10 MB size limitations)This guide provides the instructions for: Scanning to the copier hard disk and sending a Web URL link for your file Retrieving your scanned documentsImportant: To prevent the copier’s hard disk from being filled with scanned documents, the copier isconfigured to store scanned files up to 30 days. Therefore, IT recommends users retrieve their scannedfiles from the copier as soon as they are scanned and stored.Ricoh Copier Scan‐to‐Email Instructions1. Press the Scanner button on your copier.2. Place your originals in the document feeder.3. Make sure the E‐mail tab is highlighted.4. If your original is two‐sided, follow the steps below. If your original has pages with color and youwant to scan in color go to Step 5. Otherwise, go to Step 6.a. Press the Original Feed Type touch‐screen button.Page 1 of 11
b. In Original Settings, select 2 Sided Original.c.In Page Opening Orientation, select Top to Top or Top to Bottom according to the bindingorientation of the originals.d. Press the OK touch‐screen button.5. Color originals: If the original contains color pages and you want it to scan in color, you will need touse either a Ricoh MP 5001SP copier or a Savin 9050 copier. To scan in color:a.Press the Scan Settings button on the touch screenPage 2 of 11
b. Press the Full Colour: Text/Photo button on the Scan Settings touch screen. Press the OKbutton to return to the main touch screen.c. Press the OK touch‐screen button.6. Change Scan Resolution: Press the Scan Settings button on the touch screena. Press on the Resolution touch‐screen tabb. Select [100 dpi], [200 dpi], [300 dpi], [400 dpi], or [600 dpi] as the scanning resolution.c. Press the OK touch‐screen button.Page 3 of 11
7. Select Scan Receivers: Select the receiver(s) of your scan either by: Selecting them from the copier’s address book; or Entering the e‐mail address manuallya. Selecting the receivers from copier address book:i. In the address book, press the touch‐screen button for the desired receiver name.Result: The key of the selected destination is highlighted in gold, and the destinationappears in the destination field at the top of the screen.ii. If the receiver name does not appear, press the [ ] or [ ] buttonsb. Entering the e‐mail address manually:i. Press the Manual Entry touch‐screen buttonii. Enter the receiver’s email address using the touch screen keyboardiii. When done, press the OK buttonPage 4 of 11
8. Select the Scan Sender: You must select a sender for every scan‐to email. To select yourself and/or someone else:a. Press the Sender Name touch‐screen buttoni. In the address book, press the touch‐screen button for the desired sender name(s)including yourself.Result: The key of the selected destination is highlighted in gold, and the destinationappears in the destination field at the top of the screen.ii. If the sender name does not appear, press the [ ] or [ ] buttonsiii. When done, press the OK button9. Entering the E‐mail Subject Line: You can specify the subject for an e‐mail when sending a file by e‐mail.a. Press the Subject touch‐screen button.Page 5 of 11
b. Press the Text Entry touch‐screen button; enter the subject line using the touch‐screenkeyboard.c. When done, press the OK touch‐screen button10. When you have completed setting up your original and selected your receivers and senders, pressthe Start button to begin the scan.11. Check your e‐mail inbox to see if you received your scan. If you did not receive it, contact one ofyour receivers to see if he/she received it. If they did not receive it, contact your departmentRecords Manager to assist.Page 6 of 11
Ricoh Copier Send and Store Scan‐to‐File Instructions1. Press the Scanner button on your copier.2. Press the Store File button on the touch screen.3. Press the Send & Store button. This will store your scanned document on the copier and send youa web URL link to your email account. Click the OK button.4. If your original is two‐sided,a. Press [Original Feed Type] screen button on the touch screen.b. In Original Settings, select 2 Sided Original.Page 7 of 11
c. 3. In Page Opening Orientation, select Top to Top or Top to Bottom according to thebinding orientation of the originals.5. If the original contains color pages and you want it to scan in color, you will need to use either aRicoh MP 5001SP copier or a Savin 9050 copier. To scan in color:a.Press the Scan Settings button on the touch screenb. Pres the Full Colour: Text/Photo button on the Scan Settings touch screen. Press the OKbutton to return to the main touch screen.6. Select your Receiver (To:) email addressee by pressing the on‐screen button containing the desiredname or enter a different address manually by pressing the Manual entry button.Page 8 of 11
7. Select your Sender (From:) addressee by pressing the Sender on‐screen button, the press the on‐screen button containing the desired name, or enter a different address manually by pressing theManual entry button.8. Load your document into the scanner tray and press the Start button.Scan‐to‐File Retrieval InstructionsTo retrieve a file:1.In the e‐mail message you receive, click the URL for your scanned document1. The copier’s Web Image Monitor starts and shows all the current documents scanned to the copier.Find your document and click the PDF link. An Adobe PDF image of your document is displayed. (Ifyou need to store it in TIFF format, click the TIFF link.)Page 9 of 11
2. To save your document to a shared network folder, click the diskette icon.and select the desired storage location on a network drive folder.3. Please delete the original file from the copier.a. Fill in the checkbox by the scanned file name, then click the Delete iconPage 10 of 11
b.Click the Delete File button.c. A confirmation screen is displayed. Click the OK button and close the screen.Page 11 of 11
Page 2 of 11 b. In Original Settings, select 2 Sided Original. c. In Page Opening Orientation, select Top to Top or Top to Bottom according to the binding orientation of the originals. d. Press the OK touch‐screen button. 5. Color originals: If the original contains color