Transcription
En4K IP Smart Deterrence BulletSecurity CameraE893AB SeriesQuick Start Guidelorex.com
Welcome!Thanks for choosing the Lorex4K IP Smart Deterrence Bullet Camera.Here’s how to get started.
Contents1Dimensions.2Safety precautions.3Disclaimers.4Important installation guidelines.51. Optimizing person and vehicle detection.62. Optimizing face and mask detection.7Installing the camera.10Connecting the camera. 12Using the RJ45 cable gland.14Using deterrence features.15Audio settings.18Troubleshooting.19Package contents.
Package contents 4K IP smart deterrence bullet security cameraMounting kit*Ethernet extension cable with pre-attached RJ45 cable gland**Per camera in multi-camera packs.ATTENTION: It is recommended to connect the camera to the NVR or an external PoE switch.If using a DC power adapter (not included) with the camera, a REGULATED power supply is REQUIREDfor use with this camera. Use of a non-regulated, non-conforming power supply can damage thisproduct and voids the warranty.User-supplied tools Drill (drill bit size 3/16”)Philips screwdriver1
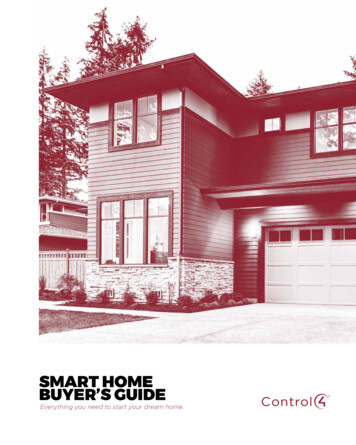
Dimensions2.87”73mm6.87” / 175mm2.76”70mm2
Safety precautions Read this guide carefully and keep it for future reference. Follow all instructions for safe use and handling of the product. Use the camera only with compatible Lorex NVRs. Do not disassemble the camera. Use the camera within given temperature, humidity and voltage levels noted in the camera’sspecifications. Do not point the camera directly towards the sun or a source of intense light. Install the camera where vandals cannot easily reach. Secure cabling so that it is not exposed or easily cut. This camera is rated for outdoor use. Installation in a sheltered location is recommended. Use only a regulated power supply with the product. Use of a non-regulated, non-conformingpower supply can damage the product and voids the warranty. Periodic cleaning may be required. Use a damp cloth only. Do not use any harsh,chemical-based cleaners. Check the packaging of the included cable to verify the cable grade based on the model number.CBL605U: The supplied cable is rated for surface and in-wall mounting. CBL100C5: The suppliedcable is rated for surface mounting only. Cables for in-wall and floor-to-floor installations aresold separately (CMR type). These and other cables are available at lorex.com.3
Disclaimers For a full list of compatible NVRs, visit lorex.com/compatibility. To ensure that you are viewing camera video in full 4K resolution (4K monitor required), checkthe video output resolution of your NVR. For full instructions, see your NVR’s documentation atlorex.com. Not intended for submersion in water. Installation in a sheltered location recommended. This camera includes an Auto Mechanical IR Cut Filter. When the camera changes betweenDay/Night viewing modes, an audible clicking noise may be heard from the camera. This clickingis normal, and indicates that the camera filter is working.4
Important installation guidelinesThe optimal installation location, including the height and angle of your camera, will depend onthe type of detection settings that you want to enable. Since the optimal angle for person and vehicledetection is different from the optimal angle for face detection, you will need to select one approach.Based on your detection preference choose between:1. Optimizing person and vehicle detection accuracy, see page 62. Optimizing face and mask detection accuracy, see pages 7-9Note: You cannot enable both face detection and person and vehicle detection at the same time.5
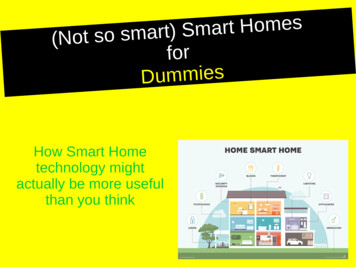
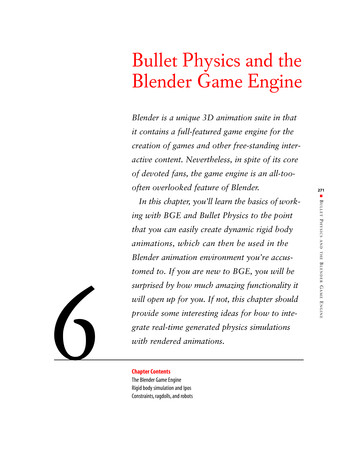
1. Optimizing person and vehicle detection accuracy Choose a location where objects of interest will be no further than 50ft (15m) from the camera.Install the camera between 8-16ft (2.5-5m) off the ground.Angle the camera between 30-60 down from the level position.Optimal accuracy for objects of interest appear in the bottom ⅔ of the camera image.Point the camera where there is the least amount of obstructions (i.e. tree branches).Accuracy of person and vehicle detectionAccuracy will be influenced by multiple factors, such as theobject’s distance from the camera, the size of the object, andthe height and angle of the camera. Night vision will alsoimpact the accuracy of detection.n dow30-608-16ft50ft6
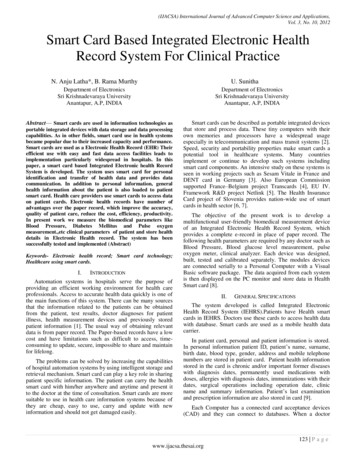
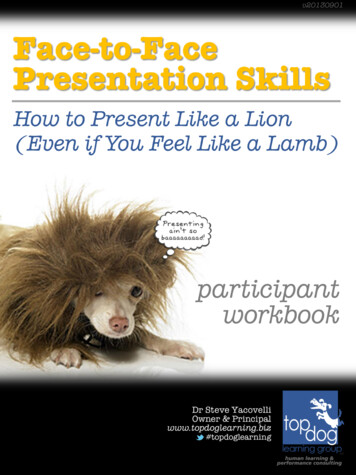
2. Optimizing face and mask detection accuracy Install in a bright area and avoid facing direct sunlight with strong backlights and dark shadows.Choose a location where objects of interest will be no further than 15ft (4.5m) from the camera.Position the camera 10ft (3m) off the ground to detect the full proportion of a face.Angle the camera around 15 down from the level position.Point the camera directly where objects of interest will be facing.ATTENTION: Facial recording without consent is illegal incertain jurisdictions. Lorex Technology does not assume liability forany use of its product that fails to conform with local laws.n15 dow10ft15ft7
2. Optimizing face and mask detection accuracyHigh accuracy Vs. low accuracy face detectionAccuracy will be influenced by lighting conditions and the distance/angle of a person’s face to thecamera. To distinguish facial features, the camera must be positioned head on with a clear viewof a person’s face. Obscured and partially/fully covered faces will not be accurately captured.To improve the range of face detection in low light conditions, color night vision will switch toblack & white. If you cannot meet these requirements for installation, it may be best to follow theguidelines for person and vehicle detection instead.8
Mask detectionWith face detection enabled, you can set thealarm type to detect if a person is not wearinga mask. A person not wearing a mask orimproperly wearing a mask will be captured inthe face preview sidebar and a notification willbe sent through the Lorex Home app. Enablethe Mask Detect auto-response to remind anon-mask wearer to: “Please wear your facemask”.Notes: You can enable face detection without using mask detection. Face detection is disabled by default. For more information on face detection setup andconfiguration, refer to your NVR’s manual at lorex.com. Face detection and mask detection are compatible with certain Lorex NVRs. For a list ofcompatible NVRs, please visit lorex.com/compatibility.9
IMPORTANT!Before Installing Test your camera prior to selecting apermanent mounting location bytemporarily connecting the cameraand cable to your NVR. Review “Important installation guidelines”page 4 before choosing a permanentmounting location.Figure 1Cable notch Decide whether to run the cables throughthe wall/ceiling (drilling required) or alongthe wall/ceiling. If you run the cablesalong the wall/ceiling, you must run thecable through the cable notch located onthe base (see Figure 1). This will keep thecamera base flush to the surface whenmounted.10
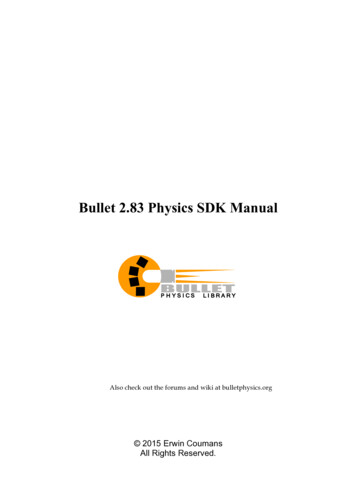
Installing the cameraFigure 21. Use the included mounting templateto mark holes for the screws.2. Use a 3/16” drill bit to drill holes for themounting screws. Insert the includeddrywall anchors if you are installing thecamera in drywall.Adjustment screw3. Connect cables as shown in “Connectingthe camera” pages 12-13.4. Feed the cable through the mountingsurface or cable notch and mount thecamera stand to the surface using theincluded screws.5. Use a Philips screwdriver to loosen theadjustment screw and adjust the cameraposition as needed (see Figure 2).Tilt the camera onthe stand up to 90 6. Tighten the adjustment screw to securethe position.7. Remove the vinyl film from the cameralens when your installation is complete.Twist the cameraaround the stand 360 11
Connecting the cameraConnect the cameras and cables to your NVR using one of the following two setup methods.1. Connect cameras directly to the NVR (recommended).Connect the Ethernet cable to the camera and then connect the other end of the Ethernet cableto the NVR’s PoE ports. The camera may take a minute to power on after being connected.Ethernet cableCamera’s Ethernet connectorNVR’s PoE portsNotes: The smart deterrence camera is only compatible with select NVRs. For a list of compatibleNVRs, visit lorex.com/compatibility. You must connect the camera to a supporting H.265 NVR to take advantage of H.265compression. For instructions on enabling H.265 compression, visit lorex.com, andsearch “How do I enable H.265 compression?”.12
ATTENTION: A 12V DC power adapter (model#: ACCPWR12V1, not included) is only requiredif connecting the camera’s Ethernet cable to a router or switch that does not support PoE.2. Connect cameras to a PoE switch or router on your network (not included).Connect the Ethernet cable to the camera and then connect the other end of the Ethernet cableto a router or switch on your network. See your NVR manual for details on connecting thecamera to your NVR using a router or switch.12V DC powerEthernet cableORCamera’s Ethernet connectorPoE switchRouter LAN port13
Using the RJ45 cable gland (optional)The pre-attached RJ45 cable gland covers both the camera’s Ethernet connector and the RJ45 plugto provide weather-resistance and protection from dust, dirt and other environmental contaminants.To use the RJ45 cable gland, twist the RJ45 cable gland barrel securely onto the camera’s Ethernetconnector.RJ45 Cablegland barrelCamera EthernetconnectorTip: The RJ45 cable gland isweather-resistant. Seal the capwith silicone and/or electrical tapefor additional sealing if it will beexposed to precipitation regularly.Cable extension optionsYou can extend the Ethernet cable run for your camera up to 300ft (91m). To extend the cable runbeyond 300ft (91m), a switch will be required (sold separately). Use an RJ45 coupler or a networkswitch (not included) to connect male ends of Ethernet cables together. We recommend usingUL CMR approved cables available at lorex.com.Cable typeMax. cable run distanceMax. number of extensionsCAT5e (or higher) Ethernet cable300ft (91m)314
Using deterrence featuresAutomatic deterrence settingsTo enable the automatic warning light from the NVR:1. From the camera’s live view, right-click and then click Main Menu.2. Enter the system user name (default: admin) and password.3. Click EVENTS Event Settings Motion Smd/Deterrence.4. Under Camera, select the channel connected to the smart deterrence camera.5. Check Person and/or Vehicle to enable each type of smart detection.6. Click Set Area under each detection type you have enabled to set the active areas.7. Click Set Schedule to set the weekly schedule.15
Using deterrence featuresAutomatic deterrence settings8.9.For Duration, choose how long the warning light will stay on when motion is detected.Select Warning Light for a solid white light, or Strobe for a flashing light. If you select strobe, sethow quickly the light will flash under Strobe Frequency.10. Click Apply to save.16
Manually activate deterrence featuresTo manually activate the warning light and/or siren features:Prerequisite: Connect to your Lorex system using the app specified in your NVR’s documentation.1. Launch the Lorex app and tap your NVR to view connected channels.2. Tap a connected smart deterrence camera to open it in single-channel view.3. Tapto activate the warning light, or tapto activate the siren.To activate deterrence features on all connected cameras, push and hold the front panelpanic button on the NVR for 3 seconds.Note: For full instructions on using the deterrence features, refer to the NVR’s manual onyour product page at lorex.com.17
Audio settingsATTENTION: Audio recording and listen-in audio are disabled by default. Audio recordingand/or use of listen-in audio without consent is illegal in certain jurisdictions. Lorex Corporationassumes no liability for use of its products that does not conform with local laws.To enable audio recording and listen-in audio from the NVR:1. From the camera’s live view, right-click and then click Main Menu.2. Enter the system user name (default: admin) and password.3. Click Camera and select Recording.4. Under Channel, select the channel connected to the audio-capable camera.5. Under Main Stream, click on the button More Setting.6. In the the pop-up window:A. Enable Audio Encode for audio recordingand listen-in audio. (Note: Listen-in audiorequires a monitor with speakers or speakersconnected to the NVR.)B. Select the Audio Format that will be usedto record audio. ACC is recommended.7.Click OK to save changes.18
Troubleshooting1.No picture/signal. Ensure the camera is connected to a compatible NVR. For full compatibility, visit lorex.com/compatibility. The camera may take up to 1 minute to power up after being connected to the NVR. Wait two minutesbefore following the steps below. Ensure the camera is connected to your NVR or to your local network. If you are not using PoE, you must connect the camera to a 12V DC power adapter (not included). If the camera is connected to the LAN, you must search your network for cameras using the NVR. See theNVR’s instruction manual. Ensure your NVR is properly connected to a monitor. There may be an issue with your extension cable run. Connect the camera to the NVR using a differentEthernet cable.2.Picture does not appear to be 4K. To ensure that you are viewing camera video in full 4K resolution (4K monitor required), check the videooutput resolution of your NVR. For full instructions, see your NVR’s documentation at lorex.com.3.Picture is too bright. Ensure your camera isn’t pointed directly at a source of light (e.g., sun or spot light). Move your camera to a different location. Check the brightness and contrast settings on the NVR.19
Troubleshooting4.Picture is too dark. Check the brightness and contrast settings on the NVR.5.Night vision is not working.6.Bright spot in video when viewing camera at night.7.Picture is not clear. The night vision activates when light levels drop. The area may have too much light. Night vision reflects when pointing a camera through a window. Move the camera to a different location. Check the camera lens for dirt, dust, spiderwebs. Clean the lens with a soft, clean cloth. Make sure that the cable run is within the limitations specified in the section ‘Cable Extension Options’. Remove the vinyl film from the camera lens when your installation is complete.8.Picture is in color in in dark conditions. This camera’s image sensor is extra sensitive to light, meaning that the camera stays in color mode atlow-light conditions. For instructions on how to make your camera switch to night mode, visit lorex.com,and search for “How do I make my camera switch to night mode?”.9.The camera warning light is not switching on automatically. Ensure that you have enabled and configured white light deterrence using a compatible NVR. See yourNVR’s documentation for full instructions. Ensure the active areas and schedule for white light deterrence are set properly. The default schedule forthe warning light is night times (between 5PM and 7AM).20
10.The camera siren is not switching on automatically. The camera siren cannot switch on automatically. You can control the camera siren manually using acompatible Lorex NVR or app. Refer to your NVR’s documentation for full instructions.11.No audio. Audio is only supported on Lorex NVRs. For a list of compatible NVRs, visit lorex.com/compatibility. Ensure NVR volume is turned on / turned up. Ensure audio function on camera is turned on (see ‘Audio Settings’). Ensure audio is turned up on viewing device.12.Two-way talk not working.from the Use the Lorex app specified in your NVR documentation to activate two-way talk. Tapcamera’s live view, then speak into the microphone on your mobile device. Tap again when finishedspeaking.21
Need help?Visit help.lorex.com for up-to-date information and resources: Download product guides Watch how-to-videos Find related troubleshooting tips & FAQsRegister your productPlease see our full Terms of Service and Limited Hardware Warranty Policy atlorex.com/warranty.Copyright 2021 Lorex CorporationAs our products are subject to continuous improvement, Lorex reserves the right to modify product design,specifications and prices, without notice and without incurring any obligation. E&OE. All rights reserved.E893AB QSG TRILINGUAL R2
FrCaméra de sécurité ogivalede dissuasion intelligente IP 4KSérie E893ABGuide de démarrage rapidelorex.com
Bienvenue!Merci d’avoir choisi la caméra de sécuritéogivale de dissuasion intelligente IP 4K Lorex.Voici comment bien démarrer.
Contenu1Dimensions.2Mesures de sécurité.3Clauses de non-responsabilité.4Directives d’installation importantes.51. Optimisation de la détection des personnes et des véhicules.62. Optimisation de la détection des visages et des masques. 7Installation de la caméra.10Branchement de la caméra.12Utilisation du presse-étoupe RJ45. 14Utilisation des fonctionnalités de dissuasion.15Paramètres audio.18Dépannage.19Contenu de l’emballage.
Contenu de l’emballage Caméra de sécurité ogivale de dissuasion intelligente IP 4KTrousse d’assemblage*Câble de rallonge Ethernet avec presse-étoupe RJ45 préinstallé** Par caméra dans les emballages multicaméras.ATTENTION : Il est recommandé de brancher la caméra au NVR ou à un commutateur PoEexterne. Si vous utilisez un bloc d’alimentation CC (non inclus) avec la caméra, une alimentationRÉGULÉE est NÉCESSAIRE pour l’utilisation de cette caméra. L’utilisation d’un bloc d’alimentation nonrégulé et non conforme peut endommager ce produit et annuler la garantie.Outils à fournir par l’utilisateur Perceuse (taille de la mèche 3/16 po)Tournevis cruciforme1
Dimensions73 mm(2,87 po)175 mm(6,87 po)70 mm(2,76 po)2
Mesures de sécurité Lisez attentivement ce guide et gardez-le pour consultation ultérieure. Veuillez suivre les directives pour assurer une utilisation et une manipulation sécuritaires du produit. N’utilisez la caméra qu’avec des NVR Lorex compatibles. Ne démontez pas la caméra. Utilisez la caméra à la température donnée, aux niveaux d’humidité et de tension mentionnés dans lesspécifications de la caméra. Ne pointez pas votre caméra vers le soleil ou une source intense de lumière. Installez la caméra à un endroit que les vandales auront du mal à atteindre. Protégez le câblage afin qu’il ne soit pas exposé ou coupé facilement. Cette caméra est conçue pour être utilisée à l’extérieur. Installez-la préférablement dans un emplacementcouvert. N’utilisez que l’alimentation régulée fournie avec le produit. L’utilisation d’un bloc d’alimentation non stabiliséeet non conforme peut endommager le produit et annuler la garantie. Un nettoyage périodique peut s’avérer nécessaire. Utilisez uniquement un linge humide. N’utilisez pas denettoyants à base de produits chimiques abrasifs. Vérifiez l’emballage du câble fourni pour vous assurer de la qualité du câble en fonction du numéro de modèle.CBL605U : Le câble fourni est conçu pour un montage en surface et encastré.CBL100C5 : Le câble fourni est conçu uniquement pour un montage en surface. Les câbles pour installationsencastrées et verticales sont vendus séparément (type CMR). Ces câbles ainsi que d’autres types de câblessont disponibles sur lorex.com.3
Clauses de non-responsabilité Pour la liste complète des NVR compatibles, visitez lorex.com/compatibility. Pour vous assurer que vous visionnez la vidéo de la caméra en pleine résolution 4K (moniteur4K requis), vérifiez la résolution de sortie vidéo de votre NVR. Pour des instructions complètes,consultez la documentation de votre NVR sur lorex.com. N’immergez pas dans l’eau. Installation recommandée dans un emplacement abrité. Cet appareil comprend un filtre IR mécanique autonome. Lorsque la caméra passe du mode diurneau mode nocturne, un bruit de clic provenant de la caméra peut être entendu. Ce clic est normal etindique que le filtre de la caméra fonctionne.4
Directives d’installation importantesL’emplacement d’installation optimal, y compris la hauteur et l’angle de votre caméra, dépendra dutype de paramètres de détection que vous souhaitez activer. Étant donné que l’angle optimal pourla détection des personnes et des véhicules est différent de l’angle optimal pour la détection desvisages, vous devrez sélectionner une approche.En fonction de votre préférence de détection, choisissez entre :1. Optimisation de la précision de détection des personnes et des véhicules, voir page 62. Optimisation de la précision de détection des visages et des masques, voir pages 7-9Remarque : Vous ne pouvez pas activer la détection des visages et la détection des personnes etdes véhicules en même temps.5
1. Optimisation de la précision de la détection des personnes et des véhicules Choisissez un endroit où les objets d’intérêt ne se trouveront pas à plus de 15 m (50 pi) de la caméra. Installez la caméra entre 2,5 et 5 m (8 et 16 pi) du sol. Orientez la caméra entre 30 et 60 vers le bas par rapport à la position de niveau. La précision optimale pour les objets d’intérêt apparaît dans les ⅔ inférieurs de l’image de la caméra. Pointez la caméra dans la direction où il y a le moins d’obstruction (par exemple, branches d’arbres).Précision de la détection des personnes et des véhiculesLa précision sera influencée par de multiples facteurs, tels que ladistance entre l’objet et la caméra, la taille de l’objet, la hauteur etl’angle de la caméra. La vision nocturne influence également laprécision de la détection. vers30-60sle ba2,5 à 5 m(8-16 pi)15 m(50 pi)6
2. Optimisation de la précision de détection des visages et des masques Installez dans un endroit lumineux et évitez de faire face à la lumière directe du soleil avec de fortsrétroéclairages et des ombres sombres. Choisissez un endroit où les objets d’intérêt ne se trouveront pas à plus de 4,5 m (15 pi) de la caméra.Positionnez la caméra à 3 m (10 pi) du sol pour détecter toute la proportion d’un visage.Orientez la caméra à environ 15 vers le bas par rapport à la position de niveau. Pointez la caméra directement à l’endroit où les objets d’intérêt seront tournés.ATTENTION : L’enregistrement facial sans consentement est illégalsur certains territoires. Lorex Technology décline toute responsabilité quant àune utilisation de son produit non conforme aux lois.15 versle bas3m(10 pi)4,5 m(15 pi)7
2. Optimisation de la précision de détection des visages et des masquesLa détection des visages de haute précision par rapport à la détection desvisages de faible précisionLa précision sera influencée par les conditions d’éclairage et la distance/l’angle du visage d’une personnepar rapport à la caméra. Pour distinguer les traits du visage, la caméra doit être positionnée de face avecune vue claire du visage d’une personne. Les visages obscurcis et partiellement/entièrement couverts neseront pas capturés avec précision. Pour améliorer la précision de la détection des visages dans desconditions de faible luminosité, la vision nocturne basculera vers un mode noir et blanc. Si vous nepouvez pas remplir les conditions d’installation, il vaut peut-être mieux suivre les directives de détection despersonnes et des véhicules à la place.8
Détection des masquesLorsque la détection de visages est activée, vouspouvez définir le type d’alarme pour détectersi une personne ne porte pas de masque. Unepersonne qui ne porte pas de masque ou quiporte un masque de manière incorrecte seracapturée dans la barre latérale d’aperçu duvisage et une notification sera envoyée parl’application Lorex Home. Activée la réponseautomatique de détection de masques pourrappeler à un utilisateur qui ne porte pas demasque le message suivant : « Veuillez portervotre masque ».Remarques : Vous pouvez activer la détection des visages sans toutefois utiliser la fonction de détection demasques. La fonction de détection des visages est désactivée par défaut. Pour plus d’informations surl’installation et la configuration de la détection des visages, consultez le manuel de l’utilisateurde votre NVR sur lorex.com. La détection des visages et la détection des masques sont compatibles avec certainsNVR Lorex. Pour une liste des NVR compatibles, veuillez visiter lorex.com/compatibility.9
IMPORTANT!Avant d’installer la caméra Testez la caméra avant de sélectionnerun emplacement de montage permanenten branchant de façon temporaire la caméraet le câble à votre enregistreur vidéo réseau(NVR). Consultez la section « Directives d’installationimportantes » à la page 4 avant de choisir unemplacement de montage permanent.Figure 1Encoche du câble Décidez s’il faut passer les câbles dans lemur ou le plafond (perçage requis) ou le longdu mur ou du plafond. Si les câbles passentle long du mur ou du plafond, vous devezfaire passer le câble à travers l’encochede câble située sur la base (voir Figure 1).Cela maintiendra la caméra à niveau sur lasurface, lorsque montée.10
Installation de la caméra1.Utilisez le gabarit de montage fourni pour marquerl’emplacement des trous des vis de montage.2.Utilisez une mèche de 3/16 po pour percer lestrous aux endroits des trous des vis de montage.Installez les chevilles pour cloisons sèchesincluses si vous installez la caméra sur unecloison sèche.3.Branchez les câbles tel qu’illustré dans la section« Branchement de la caméra » aux pages 12 et 13.4.Passez le câble par la surface de montage oul’encoche et fixez le socle à la surface en utilisantles vis fournies.5.Utilisez un tournevis cruciforme pour desserrer lavis de réglage et ajuster la position de la caméra sinécessaire (voir Figure 2).6.Serrez les vis de réglage pour fixer la position.7.Retirez le film de protection en vinyle de la lentillede la caméra une fois l’installation terminée.Figure 2Vis de réglageInclinez la caméra à90 sur le supportTournez la caméra de360 sur le support11
Branchement de la caméraBranchez les caméras et les câbles à votre NVR en utilisant l’une des deux méthodes de configurationsuivantes.1.Connectez les caméras directement au NVR (recommandé).Connectez le câble Ethernet à la caméra, puis connectez l’autre extrémité du câble Ethernet auxports PoE du NVR. La mise en marche de la caméra peut prendre jusqu’à une minute après avoir étéconnectée.Câble EthernetConnecteur Ethernet de la caméraPorts PoE du NVRRemarques : La caméra de dissuasion intelligente est compatible uniquement avec les NVR sélectionnés.Pour une liste des NVR compatibles, visitez lorex.com/compatibility. Vous devez connecter la caméra à un enregistreur vidéo réseau compatible H.265 pour profiterde la compression H.265. Pour des instructions concernant l’activation de la compression H.265,visitez lorex.com, et recherchez dans la section « Comment puis-je activer la compressionH.265? ».12
ATTENTION : Un bloc d’alimentation 12 V CC (numéro de modèle : ACCPWR12V1, non fourni) n’estnécessaire que lorsque le câble Ethernet de la caméra est branché à un routeur ou un commutateur qui neprend pas en charge la PoE.2.Connectez les caméras à un commutateur PoE ou à un routeur sur votre réseau(non fournis).Connectez le câble Ethernet à la caméra, puis connectez l’autre extrémité du câble Ethernet à unrouteur ou à un commutateur de votre réseau. Consultez votre manuel d’instructions du NVR pourplus de détails sur le branchement de votre caméra à votre NVR.Alimentation 12 V CCCâble EthernetOUConnecteur Ethernet de la caméraCommutateur PoEPort LAN du routeur13
Utilisation du presse-étoupe RJ45 (en option)Le presse-étoupe RJ45 pré-fixé couvre à la fois le connecteur Ethernet de la caméra et la fiche RJ45 pour lesprotéger des intempéries, de la poussière, de la saleté et des autres contaminants de l’environnement.Pour utiliser le presse-étoupe RJ45, tournez fermement le barillet du presse-étoupe RJ45 sur le connecteurEthernet de la caméra.Conseil : Le presse-étoupe RJ45 estrésistant aux intempéries. Veuillezsceller le capuchon avec du silicone ouavec du ruban électrique pour assurerune étanchéité accrue s’il est exposéBarillet du presseConnecteur Ethernetrégulièrement aux précipitations.étoupe RJ45de la caméraOptions de câble de rallongeVous pouvez augmenter la longueur du câble Ethernet jusqu’à
Prerequisite: Connect to your Lorex system using the app specified in your NVR’s documentation. 1. Launch the Lorex app and tap your NVR to view connected channels. 2. Tap a connected smart deterrence camera to open it in single-channel view. 3. Tap to