Transcription
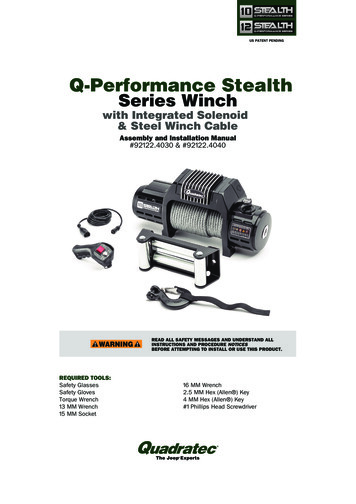
US PATENT PENDINGQ-Performance StealthSeries Winchwith Integrated Solenoid & Steel Winch Cable Assemblyand Installation Manual#92122.4030 & #92122.4040READ ALL SAFETY MESSAGES AND UNDERSTAND ALL INSTRUCTIONS AND PROCEDURE NOTICESBEFORE ATTEMPTING TO INSTALL OR USE THIS PRODUCT.REQUIRED TOOLS:Safety GlassesSafety GlovesTorque Wrench13 MM Wrench 15 MM Socket 16 MM Wrench 2.5 MM Hex (Allen ) Key 4 MM Hex (Allen ) Key#1 Phillips Head Screwdriver
-Performance Series self-recoveryQwinch. Individual safety messagesand sections of this manual may bepreceded by the safety alert symbol ---and one of three signal words:A Few Words About Product Safety:Your safety and the safety of others isvery important. To help you avoid risksand make informed decisions this manualcontains safety messages about yourA HAZARDOUS SITUATION WHICH, IF NOT AVOIDED, COULD RESULT IN DEATHOR SERIOUS INJURY. YOU CAN BE KILLED OR SERIOUSLY HURT IF YOU DONOT FOLLOW INSTRUCTIONS.A HAZARDOUS SITUATION WHICH, IF NOT AVOIDED, COULD RESULT INMINOR OR MODERATE INJURY. YOU CAN BE MODERATELY HURT AND ALSOMAY SUFFER PROPERTY DAMAGE IF YOU DO NOT FOLLOW INSTRUCTIONS.CAREFUL ATTENTION IS REQUIRED TO THIS INSTRUCTION OR OPERATION BUTDOES NOT GENERALLY RELATE TO PERSONAL INJURY. DAMAGE TO YOURQUADRATEC PRODUCT OR OTHER PROPERTY MAY RESULT IF YOU DO NOTFOLLOW INSTRUCTIONS.Unpacking:When unpacking, check to make sure all parts are included. If any part is missing orbroken, please call Quadratec Customer Service at 800-745-6037 as soon as possible.Winch Power ButtonRemote ControlPlug CoverWinch AssemblyClutchHandleHawse FairleadWinchLine FairleadHardwareRemoteControllerWinchMounting HardwareWinch HookWinch Hook Strap2RemoteCable
Assembly and InstallationFIRE/ELECTRICAL SPARK/CHEMICAL BURN HAZARDS: CONNECTING WINCH TO BATTERY AND WINCH OPERATION MAY CAUSEELECTRICAL ARCS. NEVER INSTALL OR USE WINCH WHERE GASOLINELEAKS, VAPORS OR OTHER FLAMMABLES ARE PRESENT.ALWAYS WEAR EYE PROTECTION & REMOVE JEWELRY WHENWORKING WITH BATTERY OR INSTALLING WINCH ELECTRICAL CABLES.PLAN CONNECTIONS TO AVOID FUEL LINES, HOT OR ROTATING PARTS.NEVER ROUTE ELECTRICAL CABLE OR WINCH CONTROLLER ACROSSSHARP EDGES, DOORS OR OTHER PINCH POINTS.ALWAYS USE SUPPLIED TERMINAL BOOTS, INSULATE ANY OTHEREXPOSED CONNECTIONS AND NEATLY SUPPORT ALL WIRING.DEPENDING ON YOUR LEVEL OF KNOWLEDGE REGARDING ELECTRICALWIRING, YOU MAY WISH TO HAVE THIS PROCEDURE PERFORMED BY AQUALIFIED TECHNICIAN.Motor Stator Cable YellowMotor RotatorCable RedMotor Stator Cable GreenSolenoid GroundWire (See below)Negative Ground Cable Black Tip(To Negative Terminal on Battery)Positive Cable Red Tip (To Positive Battery Terminal)Electric Cable Connection A ttachthe black (negative) ground cable tomotor terminal and black solenoidground wire with brass bolt. Tighten thebrass bolt onto terminal using a 13mmwrench. Then attach positive andnegative cables to their correspondingbattery terminals.Motor &Solenoid Ground WiresDO NOT OVER TIGHTEN.3
Assembly and Installation (Continued)BATTERY CABLES SHOULD NOT BE DRAWN TAUT. LEAVE SLACKFOR SOME CABLE MOVEMENT. THE BATTERY CABLES SHOULD BESECURE, OUT OF THE WAY OF MOVING PARTS, ROAD DEBRIS, OR ANYPOSSIBILITY OF BEING DAMAGED BY OPERATION OR MAINTENANCEOF VEHICLE. FOR EXAMPLE, THE BATTERY CABLES MAY BE ROUTEDUNDER THE VEHICLE, ATTACHING THEM TO THE FRAME USINGSUITABLE FASTENERS SUCH AS CABLE TIES (NOT INCLUDED).DO NOT ATTACH BATTERY CABLES TO THE EXHAUST SYSTEM, DRIVESHAFT, EMERGENCY BRAKE CABLE, FUEL LINE, OR ANY OTHERCOMPONENTS WHICH MAY CAUSE DAMAGE TO THE BATTERY CABLESTHROUGH HEAT OR MOTION, OR CREATE A FIRE HAZARD. IF AHOLE IS DRILLED THROUGH THE BUMPER OR ANY OTHER PART OFTHE VEHICLE, MAKE SURE TO INSTALL A RUBBER GROMMET (NOTINCLUDED) IN THE HOLE TO PREVENT FRAYING OF THE BATTERYCABLES AT THAT POINT. THE USE OF AT LEAST A 650 COLD CRANKINGAMPS (CCA) BATTERY IS HIGHLY RECOMMENDED.There are machined pockets at each ofthe four inside base corners that fit aflange head whiz nut. Place a nut intoeach pocket and center the winch overthe mounting base holes. Tip: A touchof bearing grease can hold the 4 nuts inplace prior to fastening the flange headwhiz bolts. In some rare mounting situations drilling for bolt holes may berequired. Using a 15mm socket, threadthe four 10mm x 1.5 x 35mm boltsthrough the bottom of the winch mountplate or bumper and into the whiz nuts.FlangeHead Nut(10mm x1.5mm)Flange Head Whiz Bolt(10mm x 1.5mm x 35mm)Winch MountPlate or BumperWinch Mounting:Mount the supplied Hawse Fairlead tothe Mounting Frame (not included) usingsupplied Bolts and Nuts.Use a torque wrench and 10mm socketand torque each mounting bolt to50 Ft-lbs.The winch MUST be properly secured toa winch mount bumper or an approvedwinch mount plate with the included10mm nuts and bolts (qty 4/each).4
Assembly and Installation (Continued)Winch LineCotter PinWinch HookAttach the Winch Hook to Steel WinchLine:Attach as shown using the includedcotter pin through the clevis pin. Spreadthe cotter pin ends to secure the hook. Besure to keep the safety latch clean andlubricated at all times.CAREFULLY STUDY WINCH USER GUIDE SUPPLIED WITH YOUR WINCH.Learn to Winch Properly:Your winch should add greater utility andenjoyment to your off-road adventures.Keep in mind, however, the weight ofyour vehicle and the forces required tomove it create certain hazards. Self recovery that is safe for you, bystandersand the environment requires productknowledge, planning and practice.your knowledge by studying thesupplied glovebox-sized Q Series WinchOperator’s Guide Manual and also bylearning from more experienced off-roadenthusiasts. The broad conditions wherewinch-based self-recovery are requiredare discussed in the supplied gloveboxsized guidebook. Keep the suppliedbooklet in the winch installed vehicleglovebox after winch installation as ahandy reference. Develop and rely onyour own good judgment at all times.Be aware there are specific techniquesand hazards associated with recoverywinching. Begin by understanding ALLSafety Information found in this winchinstallation manual and then supplement5
Remote Controller SetupRubber remoteplug coverSecuring Collar"D" ShapedRemotePlug EndRemoteHandleCordPlug capFor Wired Operation:There is no need to turn on the winchwith the Power Button (the button mustbe out for wired operation). Unscrew theremote plug cap. Plug the 12’ long remotecord into the handheld remote controller.Make sure that you align the cord withthe three indexing notches in the remotehandle. Thread the securing collar ontothe remote handle to ensure a proper connection. Next, loosen the RubberPlug Cover on the right hand side of thewinch. Plug the “D” shaped end of theRemote Cord into the correspondingreceptacle on the right hand side of thewinch. Be sure that the plug is fullyengaged onto the winch as shown.Rubber PowerButton CoverBlue "Wired"Indicator LightRedRockerSwitchWinch PowerButtonWIRELESS MODEWIRED MODEIn the event of an emergency, the winchPower Button can be pressed to stopwinch rotation. It will stay depressed andthe drum light will blink indicating thatthe winch is in safe mode and will notrotate. Press the Power Button again torestart, wired operations (it will remainout).Your winch will automatically power upand be fully functional once the controlleris connected to the winch. The amberLED Winch Drum light will illuminatealong with the blue “wired” indicatorlight on the remote. With the winchin Free Spool, test both the OUT andIN functions of the winch using the redrocker switch on the remote with a shortpress of the switch. The winch will staypowered up as long as the remote isplugged in. The winch will automaticallypower down as soon as the cord isunplugged.For Wireless Operation:First, loosen the rubber Power ButtonCover on the left-hand side of the winchto expose the Power Button. Pressthe Power Button and it will begin to6
Remote Controller SetupRemoteControlPower ButtonRed “Wireless”Indicator LightRocker SwitchWIRELESS MODEblink. While the Winch Power Buttonis blinking, press and hold the silverRemote Control Power Button. The red“WIRELESS” light on the remote willilluminate on the controller, then after afew seconds it will start to blink. At thistime the remote control is paired and youcan release the Remote Control PowerButton. The red light will remain lit whileit is wirelessly paired to the winch. If thered light on the controller begins blinkingwhile operating the winch, the controlleris out of range or it has lost wirelessconnection. Move the controller closer tothe winch until the light stops blinking.THE POWER BUTTON MUST BE OUT FOR WIREDCONTROL OF THE WINCH.THE POWER BUTTON MUST BE IN FOR WIRELESSCONTROL OF THE WINCH.PRESSING AND RELEASING THE POWER BUTTONWHILE THE WINCH MOTOR IS ROTATING WILLIMMEDIATELY STOP ROTATION.wireless remote control or the wiredremote control until the power switch onthe winch is turned off and back on.The Wireless Remote is paired with thewinch every time you use it, so there is noneed to clear a paired remote.While the winch is in Free Spool, test boththe “OUT” and “IN” functions using therocker switch. The winch is now readyfor use.NOTE: The wireless remote will workwithin a range of 10 feet from thewinch but may work farther distancesdepending on physical obstructions andother conditions. We do not recommendusing the wireless feature from the cab ofyour vehicle. If you choose to winch fromthe cab, please use the wired option forsafety and consistency.NOTE: Wireless handheld remotecontroller will automatically shut offafter 2 minutes of inactivity and the redindicator light will no longer be lit. If thishappens, just turn the remote on again.Also, the winch itself is designed toautomatically stop receiving commandsafter 10 minutes of inactivity. The winchamber drum light will blink continuouslyuntil the winch is turned off. The winchwill not receive commands from the7
Remote Controller Battery ReplacementRemove 3 PhillipsHead ScrewsBattery Replacement Procedure:Remove the three (#1 size) Phillips headscrews that attach the winch controllerhalves.NOTE: The presence of a battery is NOTrequired whenever using a“WIRED” remote controller. But, a charged batteryis necessary when using a “WIRELESS”remote controller. If the wireless modeis not functioning properly, the batterymay need replacement.Carefully remove the old CR123A orCR123 Lithium battery and replace withnew. Gently align and position the winchcontroller halves together and fasten thethree Phillips head screws. Do not overtighten! Test the winch “OUT” and “IN”functions on the remote to ensure thatthe remote is functioning properly. Positive Battery EndCR123ALithium Battery8
Winch Clutch Operation DetailsEngagedFree SpoolThere are two positions of the clutchhandle. The Clutch is either “engaged” or“free spooling”. Clutch allows operatorto manually engage or disengage thespooling drum from the gearset using theclutch lever.NEVER ENGAGE OR DISENGAGE CLUTCH IF THE WINCH IS UNDERLOAD, THE WINCH ROPE IS UNDER TENSION OR THE SPOOL ISMOVING IN ANY WAY.9
Clutch Handle Removal (Optional)NOTE: Our Patent Pending removableClutch Handle doubles as a “key”that can be temporarily removed todeter winch line theft, vandalism andpranksters.Once the Clutch Handle is removed, itcan be stored in the vehicles glove boxor console and used only when winching.Clutch handle removal is optional.Rotate Clutch Handle to the “FREESPOOL” position to reveal the set screwthat holds the handle in place. Using a2.5 MM Allen wrench, back out the setscrew until the Clutch Handle lifts off butdo not remove the handle at this time.Rotate the clutch selector to the“ENGAGED” position. You may removethe Clutch Handle now and keep it ina safe place. We suggest keeping theClutch Handle somewhere in the vehicle,Note: If the handle is not present whenwinching is needed, a standard 3/8” drivesocket wrench extension can be used torotate the clutch selector mechanism.DO NOT KEEP THECLUTCH HANDLEON THE WINCH UNLESS THE SET SCREW ISFULLY ENGAGED TO SECURE THE HANDLE INPLACE.US PATENT PENDING10
Winch Care and Maintenance:Winch Care and Cleaning:Do not direct very high-pressure water atyour winch. Use low-pressure (normal)car wash soap and water to cleanyour winch. With the remote controldisconnected and the protective bootscovering the remote control socket andPower Button sockets, wash normallywith your vehicle. During winter exposureto road salt, wash the winch as soon aspossible to avoid corrosion. Always washper the recommendations above.Battery Requirements:Our powerful series wound motorsand class-leading low gear ratiosgive fast line speeds with a “BatteryFriendly” low current draw that willget the most winching time from yourbattery's available charge state. A fullycharged battery and good connectionsare essential to the proper operation ofyour winch. The minimum requirementfor a 12 volt automotive DC batteryis 650 Cold Cranking Amps. Ask yourQuadratec sales representative for detailsabout heavy-duty batteries and terminalsfor your vehicle.been lubricated at thefactory using hightemperature lithiumgrease. No internallubrication is required. Check batterycables and electrical connections atregular 3 month intervals to be certainthey are clean and tight at all connectionpoints.Inspect winch line before & aftereach winching operation.General Maintenance:All moving parts within the winch have11
SPECIFICATIONSQ10 Performance Stealth Winch with Steel Winch CableRated Line Pull (Single Line)10,000 lbs (4536 kgs)Gear Reduction Ratio210:1Motor (Series Wound)12 Volt / 4.9 hp (3.65 kW)Drum Size2.64” x 8.35” (67mm x 212mm)Steel Winch Cable3/8” x 82’Overall Dimension21” x 6.375” x 10” (533.4 mm x 162 mm x 254 mm)Net Weight85.0 lbs (38.55 kgs)Mounting Bolt Pattern10” x 4.5” (254mm x 114.3mm)Q12 Performance Stealth Winch with Steel Winch CableRated Line Pull (Single Line)12,000 lbs (5443 kgs)Gear Reduction Ratio294:1Motor (Series Wound)12 Volt / 4.9 hp (3.65 kW)Drum Size 2.64” x 8.35” (67mm x 212mm)Steel Winch Cable3/8” x 82’Overall Dimension 21” x 6.375” x 10” (533.4 mm x 162 mm x 254 mm)Net Weight85.0 lbs (38.55 kgs) Mounting Bolt Pattern10” x 4.5” (254mm x 114.3mm)12
TROUBLESHOOTINGProblemPossible CauseWhen remotecontrol switchis activated, aclicking sound Battery is inadequateor defective.occurs andwinch doesnot operate in either the powerin or powerout mode.Winch LacksPower, pullsslower than normal, stallsor does not runat all.Possible SolutionReplace battery with 650 cold cranking amprating or greater.Battery is not fullycharged.Charge the battery.Faulty battery cableor connections.Clean and tighten all battery connections.Poor electricalgrounding of thermorelay wire.Be sure connections are clean and tight.Worn or damagedmotor brushes.Replace winch motor.Vehicle not running.Start vehicle & keep running during winching.Ground and powercables are looselyconnected to batteryor winch terminals.Be sure connections are clean and tight.Battery is not fullycharged.Charge the battery.Battery is inadequateor defective.Replace battery with 650 cold cranking amprating or greater.Battery terminals arecorroded.Clean battery terminals.Vehicle not running.Start vehicle & keep running during winching.13
TROUBLESHOOTINGProblemWhen winchcontrol isactivated, thewinch operatesonly in onedirection.Possible CauseRemote control isdamaged.Ground and powercables are looselyconnected to batteryor winch terminals.Winch doesnot holda load.Possible SolutionCheck remote control and its cable. Check allconnections and replace if n ecessary.Be sure connections are clean and tight.Battery is not fullycharged.Charge the battery.Battery is inadequateor defective.Replace battery with 650 cold cranking amprating or greater.Battery terminals arecorroded.Clean battery terminals.Solenoids inside thecontrol pack is stuckor damaged.Replace Solenoid Module.Vehicle not running.Start vehicle & keep running during winching.Winch line is spooledonto winch drum inthe wrong direction.Winch line must exit from the bottom of thedrum. Re-Spool in the proper direction.Load exceeds winchrating.Do Not exceed the line pull rating shown in theID label on the winch motor. Refer to the winchoperators manual for correct rating.Brake inside thewinch drum is badlyworn or broken.Replace entire drum and brake assembly.14
TROUBLESHOOTINGProblemWinch Linehas difficultyspooling off thewinch drum byhand.Possible CausePossible SolutionBent drum sideflange.Replace Drum.Worn drum bearingsurfaces.Replace motor sub-assembly and/orclutch sub-assembly.Free spool clutch isdamaged.Remove and inspect gear carrierassembly. Inspect output gear,intermediate gear, input gear, sun gearring and gear ring output. Removeburns with file.Winch is notmounted correctly orsquare on the winchplate.Check mounting hole measurements forconsistency and squareness. Be surethat mounting surface is flat andmounting bolts are tight.Internal damageto ring gear.Disassemble gear assembly, inspect fordamage, clean and grease or replaceworn or damaged parts.15
Quadratec Limited Warranty for Q-Performance Series Self-Recovery Winches emedy Limited to Repair/Replacement:RThe exclusive remedy provided hereundershall, upon Quadratec inspection andat Quadratec’s option, be either repair orreplacement of product or parts (new orrefurbished) covered under this LimitedWarranty. Customers requesting warrantyconsideration on Q-Performance Series winchesshould first contact Quadratec to obtain a RGAnumber (610-701-3336). All labor, removal, shippingand installation costs are customer’s responsibility.Your Q-Performance Series self-recovery winch iscovered by the following Limited Warranty provided exclusively by Quadratec, Inc., 1028Saunders Lane West Chester PA 19380. This Limited Warranty is the only warranty madein connection with purchase. Quadratec neitherassumes nor authorizes any vendor, retailer orother person or entity to assume for it any otherobligation or liability in connection withthis product or Limited Warranty.What is Covered:LIFETIME MECHANICAL & 1 Year ElectricalSubject to the terms, exclusions and limitationsherein and with respect only to winches firstsold in the United States, Quadratec warrantsto the initial retail purchaser only that yourwinch shall be free of defects in material andworkmanship: (a.) for so long as your winchis owned by the initial retail purchaser withrespect to mechanical and other non-electricalcomponents and (b.) for a period of 1 year fromdate of purchase with respect to all electricalcomponents (ex: motor, solenoid & control). Allother warranties are hereby disclaimed, except tothe extent prohibited by applicable law in whichcase any implied warranty of merchantability orfitness for a particular purpose on this productis limited to 1 year from date of initial retail sale.Quadratec reserves the rights to: (a.) requireinvoice or other proof your winch is within theterms of this Limited Warranty as a condition ofwarranty service and, (b.) make future revisions tothis product and Limited Warranty without priornotice or obligation to upgrade your winch.Other Limitations - Exclusion ofDamages - Your Rights Under State Law:In consideration of the purchase price paid, neitherQuadratec nor any independent Quadratec distributor/licensee are responsible for any timeloss, rental costs, or for any incidental,consequential, punitive or other damages youmay have or incur in connection with any partor product purchased. Your exclusive remedyhereunder for covered parts is repair/replacementas described above.This Limited Warranty gives you specific rights.You may also have other rights that vary from stateto state. For example, some states do not allowlimitations of how long an implied warranty lastsand/or do not allow the exclusion or limitationof incidental or consequential damages, so thelimitations and exclusions herein may not apply toyou.Instructions Part# 12999.1052 A4 Quadratec, Inc. 2021. All Rights Reserved.Version 12.18.20US PATENT PENDINGWhat is Not Covered:Your Quadratec Limited Warranty does notcover products or parts Quadratec determinesto have been damaged by or subjected to: (a.)installation damage, alteration, modification,failure to maintain or attempted repair or serviceby anyone not authorized by Quadratec , (b.)normal wear & tear, cosmetic damage or damagefrom moisture or water immersion, (c.) Acts of God,accidents, misuse (including overload & continuouspulls), negligence, inadequate mounting or impact with vehicle(s), obstacles or other aspects of the environment, (d.) theft, vandalism orother intentional damage.16
Button. The red light will remain lit while it is wirelessly paired to the winch. If the red light on the controller begins blinking while operating the winch, the controller is out of range or it has lost wireless connection. Move the controller closer to the winch until the light st