Transcription
Georgia State UniversityCIS 8630 - Business Computer Forensics and Incident ResponseWorkshop ProtocolIntroduction To EnCase 7David McDonald(with special thanks to Richard Baskerville)Acknowledgement:Parts of this protocol are based on Encase 7.04 User’s Guide Copyright 2012 GuidanceSoftwareVersion 2.37 September 2013Department of Computer Information Systems35 Broad St., NW. POB 4015Atlanta, GA 30302-4015USA
EnCase7 Introductory WorkshopTable of ContentsCreating a Case . 1Starting a New Case . 1Copying Evidence Files . 2Case Management . 3The Encase Evidence File . 6Cyclical redundancy check (CRC). 6Evidence File Format . 6Compression . 7Automatic Verification . 7Navigating the Case View . 8Basic Layout . 9Tree Pane (Left Pane) . 9Table Pane (Right Pane) . 11View Pane (Bottom Pane) . 11The GPS . 15Searching the Case . 16Using Keywords for a Raw Search All . 16Finding the Location of the Original File . 19Modifying, Reusing, or Importing Raw Search All Keyword Groups . 21Using Keywords for an Indexed Search . 21Setting up the Case Processor for Indexed Searching . 22Using Indexed Searching . 24Bookmarking Your Findings . 27Overview . 27Working with Bookmark Types. 27Raw Text Bookmarks - Highlighted Data or Sweeping Bookmarks . 27Data Structure Bookmarks . 29Single Notable File Bookmarks . 31Multiple Notable Files Bookmarks or File Group Bookmarks . 31Table Bookmarks . 33Transcript Bookmarks . 35Notes Bookmarks . 36Viewing Notes Bookmarks . 36Bookmarking Pictures in Gallery View . 37Working with Bookmark Folders . 38Bookmark Template Folders. 38Creating New Bookmark Folders . 39E-Mail . 41Viewing Compound Files . 41Searching and Viewing Emails . 42Viewing email messages . 43Viewing Attachments. 43Searching emails . 44CIS 8630 - Business Computer Forensics and Incident Response - 2
EnCase7 Introductory WorkshopAdding Raw Images to EnCase . 46Copying and Verifying Raw Images . 46Adding Devices or Raw Images . 47Acquiring Evidence . 49Table of FiguresFigure 1 - New case dialog box . 1Figure 2. Imaging record accompanying evidence file. . 2Figure 3. Creating folder structure, . 3Figure 4. Home screen. . 4Figure 5. Adding an evidence file to a new case. . 4Figure 6. Initial meta-data screen for the new case. . 5Figure 7. Evidence file organization . 6Figure 8. Using the drop-down Viewing menu to change to between Evidence and Entryviews . 8Figure 9. View of the three panes. . 9Figure 10. Highlighting tree pane affects table pane. . 10Figure 11. "Home Plate" expansion of right pane. . 10Figure 12. Tree view item chosen.table view displays contents of the chosen folder . 11Figure 13. View pane with Text tab chosen (note the sub-menus). . 12Figure 14. View pane with the Picture tab chosen (note no sub-menus). . 12Figure 15. View pane using the Hex tab (note the sub-menus). . 13Figure 16. Default text view in view pane . 13Figure 17. Creating or editing a new text style . 14Figure 18. Deleted files and folders (restored automatically by EnCase). . 15Figure 19. Location of status bar "GPS". . 15Figure 20. Rename the Raw Search keywords file . 17Figure 21. Creating a Raw Search All Search Expression. 17Figure 22. Search results . 18Figure 23. Finding the Original Location of a File of Interest. 20Figure 24. Use the "Viewing" drop down to toggle between the Entry view and theSearch view . 20Figure 25. Modifying or Reusing Prior Searches . 21Figure 26. The Case Processor Dialog Box . 23Figure 27. First step to perform an Indexed Search . 24Figure 28. The results for an Indexed Search on the word "dry" . 25Figure 29. Documents containing both the words "dry" and "ice" . 26Figure 30. Viewing the contents of a document to create a bookmark. 28Figure 31. The Raw Text bookmark dialog box . 28Figure 32. Placing a bookmark in a folder . 29Figure 33. Using the Decode tab to interpret a data structure . 30Figure 34. Selecting a Notable File bookmark . 31Figure 35. Selecting a File Group to bookmark . 32Figure 36. Creating a File Group bookmark folder . 333 – CIS 8630 - Business Computer Forensics and Incident Response
EnCase7 Introductory WorkshopFigure 37. First step to create a Table bookmark. 34Figure 38. Step two to create a Table bookmark . 34Figure 39. Step three to create a Table bookmark . 35Figure 40 . Adding a Notes bookmark . 36Figure 41. Using the Bookmarks tab to show a Notes bookmark . 37Figure 42. Bookmark a graphic . 38Figure 43. Using the Case Processor for emails and compound files . 42Figure 44. Examining emails . 43Figure 45. Creating a complex, indexed search term. 44Figure 46. Verifying the image hash. 47Figure 47. Shortcut for acquiring any media . 48Figure 48. Acquiring a Floppy Disk Image . 48Figure 49. Processing added evidence . 49Protocol NotationIn the workshop protocol that follows, an arrow ( ) at the beginning of a paragraphdenotes an instruction that the participant should execute as part of their activities duringthe workshop.CIS 8630 - Business Computer Forensics and Incident Response - 4
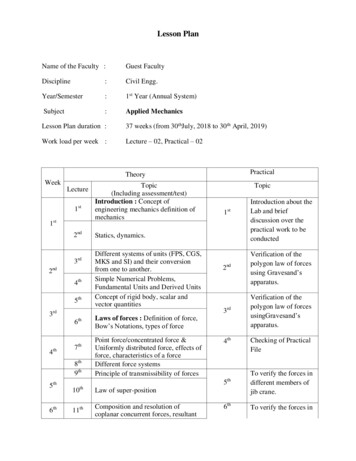
Creating a CaseStarting a New Case Log on to your EnCase lab computer. On the Home screen click on: “New Case”under the “Case Files” heading. The following Options dialog box will open:Figure 1 - New case dialog box Provide a Name (Under Name and location) to this case for identificationpurposes. In figure 1 above, this name is “Workshop4.”For now, use the default Template (i.e., “#1 Basic). Under the Case Information section, highlight the Case Number row and clickon “Edit” in the mini-toolbar. Define a value for Case Number, ExaminerName, and Description. Click OK, and then OK again to any dialog boxes which may pop-up pertainingto Encase default file locations1 – CIS 8630 - Business Computer Forensics and Incident Response
EnCase7 Introductory WorkshopCopying Evidence Files Most course resources are found in the C:\Dayspace\Lab Evidence Files folder onthe VM web site. For this lesson, the following two files are required:1. EnCaseWrkshp4E.E012. EnCaseWrkshp4E.E01.txtEnCaseWrkshp4E.E01 is an EnCase evidence file created from a thumb drive using theFTK imager available on the Helix CD. This imager records hash verificationinformation in the file EnCaseWrkshp4.E01.txt Because the file includes caseinformation and block CRC codes, a simple hash of the evidence file, outside of theEnCase utilities will NOT produce a matching hash. The hash for EnCase evidence filescan only be calculated by EnCase.Figure 2. Imaging record accompanying evidence file.CIS 8630 - Business Computer Forensics and Incident Response - 2
EnCase7 Introductory WorkshopCase ManagementBefore starting investigation and acquiring media, consider how to access the case once ithas been created. It may be necessary for more than one investigator to view theinformation simultaneously. In such a case, the evidence file should be placed on acentral file server and copies in case file placed on each investigator's computer (sincecase files cannot be accessed by more than one person at a time).With Encase7, the necessary folders are created by default under: c:\MyDocuments\Encase\Cases (see figure 3). Open the Workshop4 folder you just created and notice the sub-foldersautomatically created.Figure 3. Creating folder structure,The EnCase forensic methodology strongly recommends that the examiner uses a secondhard drive, or at least a second partition on the boot hard drive, for the acquisition andexamination of digital evidence. It is preferable to wipe an entire drive or partition,rather than individual folders, to ensure all of the temporary, suspect related data isdestroyed. This will aid in deflecting any claims of cross contamination by the opposingcounsel if the forensic hard drive is used in other cases.3 – CIS 8630 - Business Computer Forensics and Incident Response
EnCase7 Introductory Workshop On the EnCase home screen, click on Add Evidence found under the Evidenceheading (see figure 4).Figure 4. Home screen. On the Add Evidence screen (figure 5), click on Add Evidence File.Figure 5. Adding an evidence file to a new case. Navigate to: c:\Dayspace\Lab Evidence Files and open “EncaseWrkShp4E.E01”file.The WrkShp4E evidence file is now loaded into the case you’ve created. Thumb Drive#3 should appear under Evidence on the left-side of the screen. Encase initially providesthe user with a number of meta-data items on the right-side of the screen the mostCIS 8630 - Business Computer Forensics and Incident Response - 4
EnCase7 Introductory Workshopimportant of which is the MD5 hash value (see figure 6). This view of the case is called“Evidence view.” Notice the top tab is labeled “Evidence .”The “Split Mode” dropdown allows togglingbetween table, tree-table,traeble, and tree panesScroll until you find theAcquisition MD5 columnFigure 6. Initial meta-data screen for the new case. Scroll to the right and select the value for “Acquisition MD5” Right-click and Copy. Warning! If you do not do this step first, the “Acquisition MD5” column willempty when processing a new case. If you do not obtain this information now, adifferent sequence of steps will be necessary. Use Notepad to open the “EnCaseWrkshp4E.E01.txt” file in the Dayspace, LabEvidence folder (see Figure 2). Locate the MD5 original acquisition hash value and click Enter to place yourcursor just under the original MD5 hash. Paste the value you copied from theEncase meta-data screen. Are they the same?5 – CIS 8630 - Business Computer Forensics and Incident Response
EnCase7 Introductory WorkshopThe Encase Evidence FileThe central component of the EnCase methodology is the evidence file with the extension“.E01” or “EX01” (for evidence files created in Encase 7). The E stands for an Encasefile, just as .docx indicates a MS Word file. This file contains three basic components(the header, checksum, and data blocks) to work together to provide a secure and selfchecking description of the state of the computer disk at the time of analysis. On largecapacity drives, the evidence files created will begin with .E01 and continue with .E02,E03, E0n until all the data has been acquired.Cyclical redundancy check (CRC)The cyclical redundancy check is a variation of the checksum, and works much the sameway. The advantage of the CRC is that it is order sensitive. That is, the string "1234"and "4321" will produce the same checksum, but not the same CRC. In fact, the oddsthat two sectors containing different data will produce the same CRC is roughly one in abillion.Most hard drives store one CRC for every sector. When a read error is generated from adisk, this usually means that the CRC value of the sector on the disc does not match thevalue that is recomputed by the drive hardware after the sector is read. If this happens, alow level read error occurs.Evidence File FormatEach file is an exact, sector by sector copy of a floppy or hard disk. When a file iscreated, the user supplies information relevant to the investigation. EnCase archives ofthis and other information inside the evidence file along with the contents of the disc.Every byte of the file is verified using a 32-bit CRC, making it extremely difficult, if notimpossible, to tamper with the evidence once it has been acquired. This allows theinvestigators and legal team to confidently stand by the evidence in court.Rather than compute a CRC value for the entire disk image, EnCase computes a CRC forevery block of 64 sectors (32 KB) written to the evidence file. This provides a goodcompromise between integrity and speed. A typical disk image will have many tens ofthousands of CRC checks. The investigator will be able to identify the location of anyerror in the file and disregard that group of sectors if necessary.Figure 7. Evidence file organizationCIS 8630 - Business Computer Forensics and Incident Response - 6
EnCase7 Introductory WorkshopCompressionCompression technology allows EnCase to store data from a large disk in a relativelysmall file. It uses an industry-standard compression algorithm that achieves an averagesize reduction of 50%. If most of the disc is unused, the compression ratio may be muchhigher. This can result in great savings in this storage space. Compressed evidence filestake longer to generate because of the additional processing time required to compressthe information. Compression never has any effect on the final evidence, andcompressed blocks are checked for validity in the same way as uncompressed ones.Automatic VerificationWhenever an evidence file is added to a case, EnCase will begin to verify the integrity ofthe entire disk image in the background. This is usually quite fast for a small evidencefile but can take a long time for hard disk files. During the verification process, theinvestigator can continue working on the case normally. If the case is saved in closedwhile verification process is runni
CIS 8630 - Business Computer Forensics and Incident Response - 6 The Encase Evidence File The central component of the EnCase methodology is the evidence file with the extension “.E01” or “EX01” (for evidence files created in Encase 7). The

![project2 Encase.pptx [Read-Only]](/img/12/project2-encase.jpg)