Transcription
Microsoft Office Publisher 2013Getting StartedUniversity Information Technology ServicesTraining, Outreach, Learning Technologies & Video Production
Copyright 2015 KSU Division of University Information Technology ServicesThis document may be downloaded, printed, or copied for educational use without further permission of theUniversity Information Technology Services Division (UITS), provided the content is not modified and thisstatement is not removed. Any use not stated above requires the written consent of the UITS Division. Thedistribution of a copy of this document via the Internet or other electronic medium without the writtenpermission of the KSU - UITS Division is expressly prohibited.Published by Kennesaw State University – UITS 2015The publisher makes no warranties as to the accuracy of the material contained in this document andtherefore is not responsible for any damages or liabilities incurred from UITS use.
University Information Technology ServicesMicrosoft Office: Publisher 2013Getting StartedTable of ContentsIntroduction . 4Learning Objectives. 4The Publisher 2013 Interface . 5The Backstage View . 5The Ribbon . 7Customizing the Ribbon . 8The Quick Access Toolbar . 10The Mini Toolbar . 12The Status Bar . 13Starting a New Publication. 14To begin a new Publisher publication from a template: . 14Inserting Text Boxes . 16Formatting Text. 16Adjusting your Text Box . 17Resizing your Text Box . 17Linking Text Boxes . 18Navigating Between Linked Text Boxes . 19Moving your text box . 19Adding a Drop Cap to your Text Box . 20Inserting Graphics . 21Insert Pictures . 21Inserting Online Pictures . 22Resizing a Picture . 23Inserting Shapes . 23Modifying Shapes with Drawing Tools . 24
Resizing a Shape . 24Reshaping . 24Inserting a Table. 24Page Navigation . 26Adding Pages . 27Deleting Pages. 27Using the Scratch Area . 28Creating Master Pages . 29Adding Master Pages . 30Adding Headers/Footers . 31Adding Page Numbers. 32Business Information . 33Edit your Business Information . 33Adding your Business Information to a Publication . 35Review your Publication . 38Spell checker . 38Design Checker. 39Saving your Publication . 42Save as a PDF . 44Print your Publication . 47Additional Help . 48
IntroductionMicrosoft Publisher 2013 is a powerful tool that can help you create professional looking flyers,brochures, and other forms of print publications. It is much more versatile than using Word orPowerPoint to create these types of documentations, and a number of ready-made templates can befound online to help you get started with your project.This booklet is the companion document to the Publisher 2013: Getting Started workshop. Thebooklet will give users an introduction to the Publisher 2013 interface, and show you how to getstarted with creating a simple newsletter flyer.Learning ObjectivesAfter completing the instructions in this booklet, you will be able to: Understand the Publisher 2013 layout Create a new publication from scratch or from a template Insert and adjust text boxes, pictures, shapes, and tables Understand the scratch area Create master pages and update business information Review the publication, save, and printRevised 8/28/2015Page 4 of 48
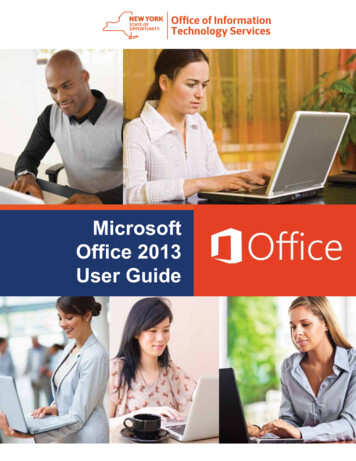
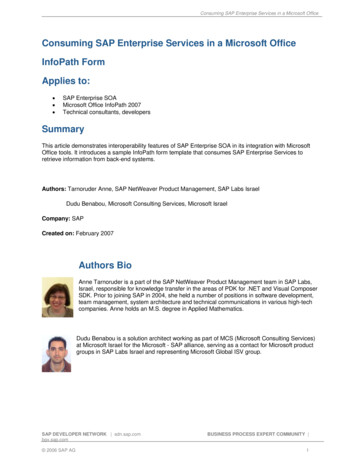
The Publisher 2013 InterfaceThe Publisher 2013 interface is very similar to other Office 2013 products. The following sections give anoverview of the Publisher 2013 interface.The Backstage ViewWhen first opening Publisher 2013, the user will be presented with options to open recent publications, start anew blank publication, or select from a number of templates (see Figure 1).Figure 1 - Backstage View (First opening Publisher 2013)To enter the Backstage view after creating your publication:1) Click the File tab (see Figure 2).Figure 2 - Access Backstage via File TabPage 5 of 48
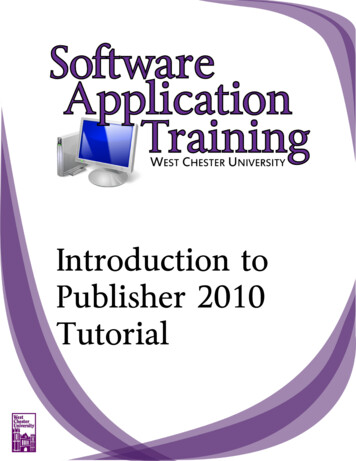
2) The Backstage view will appear (see Figure 3).Figure 3 - Backstage View3) From the Backstage View, you can perform the following actions: Obtain information about your publications Create new publications and templates Open existing publications Save and close publications Print publications and see a preview of your publication Access your Microsoft Office 2013 account information Obtain help Close Publisher 20134) To leave the Backstage View and return to your publication, click on the arrow button above Info(see Figure 4).Figure 4 - Leave Backstage ViewPage 6 of 48
The RibbonThe Ribbon (see Figure 5) is a panel that contains functional groupings of buttons and dropdown listsorganized by tabs. Each product in the Office Suite has a set of tabs that pertain to the functionality of thatapplication. Each tab is further divided into groups such as the Font and Paragraph groups shown in Figure 5.Figure 5 - The RibbonAt the bottom right-hand corner of some groups, there is a diagonal arrow called a Dialog Box Launcher(see Figure 6). Clicking this button opens a dialog box for that group containing further option selections forthe group.Figure 6 - Dialog Box LauncherThe Ribbon also contains several context sensitive tool tabs (see Figure 7) that will appear once a relatedobject has been selected within your publication (e.g. a graphic, textbox, or picture). These tool tabs provideyou with additional options for formatting objects within your publication.Figure 7 - Contextual TabPage 7 of 48
Customizing the RibbonYou can hide/unhide tabs that you do not use, or create your own tab of favorite tools. The following explainshow to customize the Ribbon to build your own tabs and groups.1) Right-click in an empty section within the ribbon.2) A dialog box will appear. Select Customize the Ribbon (see Figure 8).Figure 8 - Customize the Ribbon3) The Customize Ribbon window will appear. Click the New Tab button (see Figure 9).Figure 9 – Creating a New TabPage 8 of 48
4) A New Tab has been added in the list of Main Tabs. Under New Tab, you will see New Group is alreadyselected for you (see Figure 10).Figure 10 - New Tab & New Group5) From the column on the left, select a command from the list under Choose commands from: to add tothe New Group (see Figure 11).Figure 11 - Select Command to Add6) Click the Add button.7) The command will be added to your new group (see Figure 12).Figure 12 - Command Added8) To rename the tab or group, right-click on the New Tab or New Group.9) Select Rename (see Figure 13).Figure 13 - Rename Tab/GroupPage 9 of 48
10) To hide a tab, remove the check-mark next to the name of the tab (see Figure 14).Figure 14 - Hide TabThe Quick Access ToolbarThe Quick Access Toolbar is located in the upper-left part of the main Publisher 2013 window, above the Fileand Home tabs. It provides easy access to commands that you may use often and be customized to yourpreferences.To customize the Quick Access Toolbar:1) Click on the dropdown arrow in the Quick Access Toolbar (see Figure 15).Figure 15 - Quick Access Toolbar Drop Down2) The Customize Quick Access Toolbar menu will appear. Click the command(s) you wish to add orremove from your Quick Access Toolbar (see Figure 16).Figure 16 - Customize Quick Access Toolbar3) To customize the Quick Access Toolbar with more commands, click More Commands (see Figure 17).Figure 17 - More CommandsPage 10 of 48
4) The Customize Quick Access Toolbar window will appear. From the column on the left, select acommand from the list under Choose commands from: to add to your Quick Access Toolbar(see Figure 18).Figure 18 - Adding Commands to the Quick Access Toolbar5) Click the Add button.6) The command will be added to the Quick Access Toolbar (see Figure 19).Figure 19 - Command Added to Quick Access Toolbar7) To add more commands, repeat steps 4 and 5.Page 11 of 48
8) To reorganize commands in your Quick Access Toolbar, select the command underneath CustomizeQuick Access Toolbar and click the arrows to the right to move the command up or down(see Figure 20).Figure 20 - Order Arrows9) When finished customizing the Quick Access Toolbar, click the OK button.The Mini ToolbarThe Mini Toolbar is a toolbar that appears when you select text. The Mini Toolbar provides quick access tosome commonly used formatting tools, such as font, font size, bold, italics, and more (see Figure 21).Figure 21 - Mini ToolbarTo turn off the Mini Toolbar:1) Click the File tab. The Backstage View will appear.2) Click Options. The Publisher Options window will appear.3) Under General, click the checkbox next to Show Mini Toolbar on selection (see Figure 22).Figure 22 - Turning Mini Toolbar Off4) The Mini Toolbar is now disabled. To enable, follow steps 1-4.Page 12 of 48
The Status BarThe Status Bar is located at the bottom of the Office application window and gives you an “at a glance”snapshot of important information regarding your current publication (e.g. number of pages, objectsposition, object size, etc.). Figure 23 shows the default Status Bar for Publisher.Figure 23 - Status BarYou can customize the Status Bar to display the specific information that you want to see:1) Right-click on the Status Bar. The Customize Status Bar menu will appear (see Figure 24).Figure 24 - Customize Status Bar2) Click on an option to add it to the Status Bar (see Figure 25).Figure 25 - Add an Option to the Status Bar3) When finished, click anywhere outside the Customize Status Bar window to close.Page 13 of 48
Starting a New PublicationPublisher is a powerful tool that can help you create professional looking flyers, brochures, and otherforms of print publications. For example, the tools in Publisher can help you create a newsletter that isorganized and neat that would be difficult to recreate in Word.To begin a new Publisher publication:1) After opening Publisher 2013, select blank 8.5 x 11 (see Figure 26).Figure 26 - Creating a New Publisher Publication2) The blank publication will open.To begin a new Publisher publication from a template:1) After opening Publisher 2013, click the Built-In tab (see Figure 27).Figure 27 - Built-In TabPage 14 of 48
2) A list of Publication Categories will appear. one of the publication categories (e.g. Newsletters)(see Figure 28).Figure 28 - Newsletter Templates3) A list of built in templates will appear. Double-click on a template to open it (see Figure 29).Figure 29 - Select a Newsletter Template4) The template will open and you can begin creating your publication.Page 15 of 48
Inserting Text BoxesWhen working with publications in Publisher, you will need to insert a text box to be able to type yourtext. Text boxes can be inserted to contain your information, which will make it easier to adjust thespacing and positioning of your text during development.To add a text box to your publication:1) Under the Home tab, click on Draw Text Box (see Figure 30).Figure 30 – Draw Text Box2) Your mouse cursor will change into a crosshair. On your page, left-click & drag to create a textbox (see Figure 31).Figure 31 - Drawing a Text Box3) Release the mouse button to create your text box.4) You can now begin typing text into your text box.Formatting TextCharacter and paragraph formatting commands are found on the Home tab of the Ribbon(see Figure 32). To apply any of the formatting options, first select the text and then click the buttonfor the option(s) that you want to apply.Figure 32 - Text FormattingNote: Clicking the dialog box launcher will bring up additional formatting options. See The Ribbonsection for more information on accessing the dialog box launcher.Page 16 of 48
Adjusting your Text BoxOnce placed within your publication, your text box can be resized and moved within your publication.When selected, a text box will display sizing handles that can be used to reposition and resize the textbox (see Figure 33).Figure 33 - Sizing HandlesWhen there is not enough space within the text box to display all the text, it will be partially cut off andthe sizing handles will turn red (see Figure 34). This can be fixed by resizing your text box, or linking thetext box to another text box.Figure 34 - Not Enough Space in Text BoxResizing your Text Box1) Click on the text within your text box. The sizing handles will appear around the border of thetext box (see Figure 35).Figure 35 - Sizing Handles2) To resize the text box, place your mouse over one of the sizing handles, click and drag.Note: The sizing handle at the top of the text box allows you to rotate it (see Figure 36).Figure 36 - Rotate Text BoxPage 17 of 48
Linking Text BoxesLinking text boxes can create a connection between one or more text boxes, allowing your text to flowfrom one box to another.To link two text boxes together:1) Select the text box where your text will begin.2) Under the Text Box Tools tab, click on Create Link (see Figure 37).Figure 37 - Create Link3) Your cursor will turn into a pitcher pouring letters. Left-click on the text box you want to linkbetween (see Figure 38).Figure 38 - Linking Text Boxes4) The text boxes will be linked and text will flow from the origin box into the newly linked box(see Figure 39).Figure 39 - Text Boxes Linked5) You can continue linking boxes using the same method outlined above.Page 18 of 48
Note: You can also link text boxes by clicking on theicon that appears when there is no space in thetext box (see Figure 40). Once clicked, the pitcher pouring letters icon will appear to initiate the link.Figure 40 - Linking Text Boxes by EllipsisNavigating Between Linked Text BoxesTo navigate between linked text boxes, click on the arrow that appears when your text box is selected(see Figure 41).Figure 41 - Navigating Between Text BoxesMoving your text boxTo move your text box:1) Click on the text within your text box. The sizing handles will appear around the border of thetext box (see Figure 42)Figure 42 - Sizing Handles2) Hover the mouse cursor in between the sizing handles. The cursor will change to a crosshair(see Figure 43).Figure 43 - Moving the Text Box3) Left-click and drag the text box to its new location.Page 19 of 48
Note: When moving objects in Publisher (e.g. text boxes, pictures, etc.), red guidelines will appear toindicate when the edges of the selected object lines up with another object in your publication(see Figure 44).Figure 44 – Red GuidelinesAdding a Drop Cap to your Text BoxA Drop Cap is a formatting style used to mark the opening paragraph of a publication by making thefirst letter of the paragraph larger. To add a drop cap to your text box:1) Click within a paragraph that you wish to add a drop cap to.2) On the Text Box Tools tab, click on Drop Cap (see Figure 45).Figure 45 - Text Box Tools: Drop Cap3) The drop cap menu will appear. Click on a drop cap style (see Figure 46).Figure 46 - Select a Drop Cap StylePage 20 of 48
4) The drop cap will be applied to the paragraph in your selected text box (see Figure 47).Figure 47 - Drop Cap AppliedInserting GraphicsThe use of graphics will enhance your publications and allow you to provide the reader with additionalinformation in the form of a visual aid. The following will explain how to insert pictures and shapes to youpublication.Insert Pictures1) Under the Insert tab, click on the Pictures button (see Figure 48).Figure 48 - Insert Pictures2) The Insert Picture dialog box will appear. Select the picture you wish to insert from yourcomputer (see Figure 49).Figure 49 - Insert Picture Dialog Box4) Click the Insert button. The picture will be added to your publication.Page 21 of 48
Inserting Online PicturesThe Online Pictures tool provides access to online picture resources such as Microsoft Clipart and BingImage Search. The following explains how to insert online pictures into your Publisher publication froma variety of internet sources.1) Under the Insert tab, click on the Online Pictures button (see Figure 50).Figure 50 - Insert Tab2) The Insert Pictures window will open. In the search box next to Bing Image Search, type a wordor phrase that describes the desired image (see Figure 51).Figure 51 – Bing Image Search3) Press Enter.4) A list of your search results will appear. Select the desired picture you wish to add and click theinsert button (see Figure 52).Figure 52 – Bing Image Search Results5) The picture will be added to your publication.Page 22 of 48
Resizing a PictureSimilar to resizing a text box, a picture can be resized by using the sizing handles that appear when thepicture is selected. Refer to the Resizing your Text Box section for more information.Inserting ShapesThe following explains how to insert a variety of predefined shapes into your Publisher publication.1) Under the Insert tab, click on the Shapes button (see Figure 53).Figure 53 - Insert Tab2) A dropdown window will appear with a library of shapes to choose. Click on a shape to select it(see Figure 54).Figure 54 - Select a Shape3) Your cursor will change to a crosshairand you will be ready to insert your selected shape.4) To draw your selected shape within your publication, hold the left mouse button and drag thecursor to draw your shape (see Figure 55).Figure 55 - Click and Drag to Draw Shape5) Release the left mouse button when you are finished drawing your shape. The shape will beadded to your publication.Page 23 of 48
Modifying Shapes with Drawing ToolsYou can modify shapes in a number of ways. The following describes some of the ways that shapes canbe changed:Resizing a ShapeRe-sizing a shape is similar to re-sizing a text box. Refer to the Resizing your Text Box section for moreinformation.ReshapingAfter clicking on a shape, the shaping handles will appear (along with the sizing handles) as yellowsquares. A two-dimensional shape can be altered by clicking and dragging the yellow squares to alter acertain aspect of the shape (see Figure 56).Figure 56 - Re-shaping a 2D ShapeInserting a TableTables can be used to aid with the layout and alignment of content within the publication. A table givesyou a group of cells into which you can type text and insert images. Once you have inserted your table,you can access the formatting options to further modify the table.1) From the Insert tab, click on Table (see Figure 57).Figure 57 - Click on TablePage 24 of 48
2) A dropdown will appear. Select the number of rows and columns that you would like in your table. Youcan do this by dragging your mouse vertically and horizontally down the boxes (see Figure 58).Figure 58 - Inserting Tables3) Click on your selection to confirm. The table will appear in your workspace page (see Figure 59).Figure 59 - Table has been inserted into Page4) Move and adjust your table by using the four point arrow which is visible when you mouse over theborder of your table (see Figure 60).Figure 60 - Moving your Table5) You can now click in the cells of the table and either type text or insert pictures (see Figure 61).Figure 61 - Editing Contents of your TablePage 25 of 48
Note: The Table Tools Contextual Tab will appear on the menu bar when your table is selected and providesadditional formatting options for your table (see Figure 62).Figure 62 - Table Tools Contextual TabsPage NavigationThe Page Navigation bar is located to the left of your workspace, and provides a thumbnail view of all pageswithin your publication (see Figure 63). You can use the Page Navigation bar to see what page you are on, andto easily navigate between the pages in your publication by clicking on the thumbnails.Figure 63 - Page NavigationPage 26 of 48
Adding PagesYou can add more pages to your publication as it develops. To add a page to your publication:1) Under the Insert tab, click on the Page button (see Figure 64).Figure 64 - Insert Tab: Page Button2) The new page will be added to your publication (see Figure 65).Figure 65 - New Page AddedDeleting PagesTo delete a page from your publication:1) On the Page Navigation bar, right-click on the page you wish to delete (see Figure 66).Figure 66 - Select a Page to DeletePage 27 of 48
2) A pop-up menu appears. Click on Delete (see Figure 67).Figure 67 - Delete Page3) The page will be deleted from your publication.Using the Scratch AreaThe Scratch Area is the space outside the borders of your publication that is useful for creating orholding any objects (e.g. pictures, text boxes, etc.) that you don’t currently want on any page. Objectsplaced in the scratch area can be viewed and accessed across all pages of your publication. Whenprinting, items left in the scratch area will not print.To add an object to the scratch area:1) Select an object in your publication (e.g. picture, text box, table, etc.) and drag it into thescratch area (see Figure 68).Figure 68 - Adding to the Scratch AreaPage 28 of 48
2) The object is now in the scratch area. You can still make changes to the object while it is in thescratch area.3) To add the object back into your publication, simply drag the object into your publication.Creating Master PagesMaster pages contain the elements that you want to repeat on multiple pages in a publication. Byusing master pages for these common elements, you can give your publication a more consistentappearance.To create a Master Page:1) Under the View menu, click on Master Page (see Figure 69).Figure 69 - Master Page2) The Master Page toolbar will appear and display the current Master Page (see Figure 70).Figure 70 - Edit Master Page Tool Bar3) From here, you can edit the master page as desired. All content added to the master page willrepeat on all pages throughout your publication.Page 29 of 48
4) When finished editing the master page, click on Close Master Page under the Master Page tab(see Figure 71).Figure 71 - Close Master PageAdding Master PagesTo create additional master pages for your publication:1) Under the View menu, click on Master Page (see Figure 72).Figure 72 - Master Page2) The Master Page toolbar will appear. Click on Add Master Page (see Figure 73).Figure 73 - Add Master PagePage 30 of 48
3) The New Master Page window will appear. Click on OK (see Figure 74).Figure 74 - New Master Page WindowNote: Check the Two-page master box to create a two-page master page.4) A new master page will be created.Adding Headers/FootersEditing the header/footer of your publication will allow you to place text that repeats every page (e.g.adding an issue number to the bottom of your page). The following will explain how to add a footer toyour publication:1) On the Insert tab, click on Footer (see Figure 75).Figure 75 - Insert Tab: Footer2) The Master Page toolbar will appear and the footer section of the publication will be selected(see Figure 76).Figure 76 - Footer SelectedPage 31 of 48
3) Add your text to the footer, and then click Close Master Page (see Figure 77).Figure 77 – Edit Footer4) The footer will be added to your publication.Note: The process for adding a Header is similar.Adding Page NumbersThe following explains how to add page numbers to your publication:1) On the Insert tab, click on Page Number (see Figure 78).Figure 78 - Insert Tab: Page Number2) A dropdown menu will appear. Select a location to insert a page number (see Figure 79).Figure 79 - Select a Location3) The page number will be inserted into your document.Page 32 of 48
Business InformationYou can have Publisher 2013 store contact information that can later be inserted into your publicationas either the complete contact information, or selected parts.Edit your Business InformationYou can edit existing business information, or create multiple entries. To edit your businessinformation:1) Click on the File tab (see Figure 80).Figure 80 - File Tab2) The Backstage View will appear. Click on Edit Business Information (see Figure 81).Figure 81 - Edit Business InformationPage 33 of 48
3) The Create New Business Information Set wind
The Publisher 2013 Interface The Publisher 2013 interface is very similar to other Office 2013 products. The following sections give an overview of the Publisher 2013 interface. The Backstage View When first opening Publisher 2013, the user will be pr