Transcription
MODEL 150 BOTTOM FEED, DUAL ACTION,INTERNAL MIXINSTRUCTIONBOOKThis airbrushbody and designare registeredtrademarks ofBadgerAir-Brush Co.
SPECIAL NOTE: Read instructions for proper care in handling and operation. Use in wellventilated area to remove fumes, dust or overspray. Always read and follow Cautions andWarnings on materials being sprayed. See back page for further information.The Model 150 bottom feed is one of Badger’s“Legendary” airbrushes. It is used by Fine Artists,Illustrators, Fabric Designers, Custom AutomotivePainters and Professional Model Makers.It can spray properly reduced artist acrylics, acrylicenamel and lacquers, gouache, fabric colors, inks anddyes, ceramic colors and glazes, water colors and ofcourse, Air-Opaque airbrush colors.SPRAY CHARACTERISTICS OF HEAD ASSEMBLIESOF INTERNAL MIX AIRBRUSHES: F has the smallest opening for extra fine detailingand will spray from a pencil line thickness to 1 (25.4 mm) wide. It is designed for use withmaterials of a low viscosity–very thin acrylics, watercolors, gouaches, inks and dyes. M has a medium opening for fine detailing and willspray a line from 1/16 (1.55mm) to 1-1/2 (38mm)wide spray pattern. It will spray twice the amount ofmaterials as the F. This head will handle suchviscosities as thinned down acrylics, hobbylacquers, enamels, etc. L has the largest opening and will spray 4 times theamount of fluid as the F. It will spray a line from 1/8 (3.2mm) to 2 (50.8 mm) wide.The L is designed tobe used with materials of higher viscosity(automotive paint, ceramic glazes, acrylics, etc.)We at Badger Air-Brush Co. are extremely proud ofour people and our products. Our continued growthand success is based upon stressing quality andcraftsmanship in the manufacture of our products. AtBadger Air-Brush Co. there is a sense of pride anddedication to you that extends throughout our entireorganization.Each airbrush is carefully machined, inspected, andassembled by hand, then tested in actual use to besure it matches Badger’s high standards of quality.This dedication to excellence enables us to standbehind all of our products and offer the followingwarranty on all of our airbrushes.WARRANTYYour Badger airbrush is warranted against allmanufacturing defects of both material andworkmanship for a period of one year from thedate of purchase. Any part or material that isdefective or worn so as not to be useable withinthis period will be repaired or replaced at ourexpense. This warranty does not cover damagecaused by negligence, accident or units whichhave been abused or altered in any way. ThePTFE needle bearing carries a lifetime warrantyand free replacement.READ INSTRUCTIONS CAREFULLY BEFORE OPERATINGTO OPERATE1) Attach hose to air supply (compressor, aerosol propellant can, or CO2 tank). A compressor or CO2 tankis more suitable for larger jobs or prolonged spraying. Holding air hose in hand, attach airbrush to airhose, at hose end opposite air source, by gently turning in clockwise motion onto fitting. Finger tightenair hose snugly onto airbrush.2) Air pressure should be set between 15 to 50 p.s.i. (15 to 90 p.s.i. when using a braided airhose suchas 50-2011). The most efficient operating pressure for airbrushing is approximately 30 p.s.i. BADGERoffers an air regulator w/pressure gauge and moisture trap (50-054) that can be connected to anycompressor to allow for proper air pressure setting. BADGER offers a moisture trap only (50-051) forusage when airbrushing in high humidity environments.3) Attach jar or color cup, containing material to be sprayed, to the airbrush. Attach by inserting stem ofjar adapter or color cup into the jar connector tube located on the bottom front of the airbrush body.Give the stem a slight counter clockwise turn to snug the jar/color cup securely into place. To removejar/color cup when finished pull down and rotate in a clockwise direction.Once your air source is on, and your airbrush is properly connected and set up, you are ready to beginairbrushing.4) To begin operation of the airbrush depress the trigger. This will generate air flow through the airbrush.Then, by drawing back on the trigger, paint (or whatever material is being sprayed) will be released.The further the trigger is pulled back the larger the amount of paint that will be sprayed. The size ofline the airbrush will create is determined by the amount of paint being sprayed (how far the trigger isbeing pulled back) and at what distance the airbrush is being held from the surface being sprayed . A2
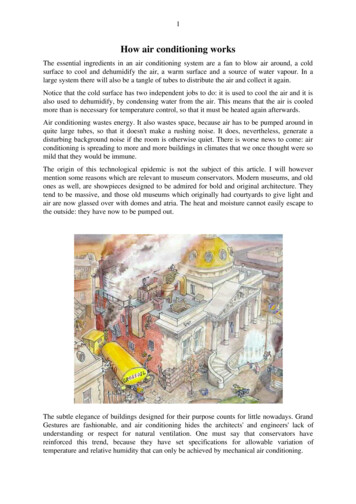
fine line or small dot is achieved by working very close to the surface while releasing a very smallamount of paint. A broad spray pattern is achieved by moving the airbrush back from the work surfaceand pulling back further on the trigger to release a larger amount of paint. The proper mechanics fortriggering the airbrush are – press down to start air flow, pull pack to begin and increase paint flow,push forward to lessen or stop paint flow, release (or up) to stop air flow.LEARN TO TRIGGERBest results are achieved with the Model 150 by airbrushing with a good constant motion. Start motionbefore pressing trigger, follow through motion after releasing trigger. Do not hesitate while spraying or youwill create what is called the Barbell RIGGERBACKKEEP STEADYMOTIONAND SPRAYDON’T ARCIf airbrush motion in uneven,paint finish will be uneven.MOVERELEASETRIGGER TRIGGERFORWARDFOLLOWTHRUMOTIONTHE MOST COMMON PROBLEMRuns and sags are caused by one or more of thefollowing errors.SURFACE1. “Freezing” or forgetting to release trigger at theend of the stroke.2. Holding airbrush still or moving too slowly.3. Holding airbrush too close to surface.BUILD-UPARCING MOTIONMAINTENANCE AND CLEANING OF YOUR AIRBRUSHCareful cleaning and maintenance of your airbrush is essential if it is to continue to work effectively. Thesmall passages inside the airbrush can become blocked easily by dried paint if the airbrush is not cleanedafter each use. If there is still a useable amount of color in the color cup or reservoir when you have finished spraying, pour the remainder back into the original paint bottle. Operate the airbrush, spraying on ascrap piece of paper until the color is gone and only air is sprayed. Take a clean color cup or jar full ofappropriate cleaner. Insert it into the airbrush, spray some cleaner through the airbrush at broad and smallpatterns until it comes out colorless. After removing color cup or jar, carefully remove needle and clean offany paint residue off needle. Before inserting needle into airbrush apply Regdab (airbrush lubricant #122)the the front of needle. Unscrew and clean internal area of regulator (50-0372) then reinstall. Always cleanthe airbrush every time you finish spraying as some types of paint can dry remarkably fast, and may causeyour airbrush to clog if not cleaned properly.Another method of cleaning the airbrush is back flushing using a closed container such as a jar assembly.Take a soft cloth and cover the spray regulator – depress and pull back on the trigger. This will cause backpressure which induces a bubble action inside the airbrush and in the container which helps to clean the fluidpassages. Never use an open color cup for this procedure as color will blow out. Take away the cloth andspray and repeat this procedure several times. After this is done you should remove the needle for cleaning.If the paint is allowed to dry inside the airbrush you may not be able to dissolve it with clean water.Cleaning with solvent is the next step. If cleaning with solvent does not dissolve the blockage, you willhave to disassemble the airbrush, by first removing the needle and then the head. Soak the tip in warmsoapy water or appropriate solvent for ten minutes. Then take a tooth pick and gently remove the dried paintfrom inside the fluid tip. This procedure may have to be repeated. Be careful during disassembly not to loseany small parts. NOTE: Periodically the head seal (50-055) will need to be replaced, as repetitivedisassembly may cause the head seal to leak air creating a pulsating effect. If only water based paints areused, a head seal (51-099) will last an extended period of time.Replacing the TipBegin by removing head (50-038) from the body of the brush. Place 3-cornered reamer (50-061) throughcenter post of head as you would position the needle. Grasping head, turn reamer counter-clockwise toremove damaged tip. Place new tip on pointed end of reamer. Place a small amount of beeswax (50-050)to threads of tip. Hold tip in place with index finger while gently pushing head up to meet tip. Slowly turnhead counter-clockwise until tip is seated firmly in head and there is no visible gap between head and tip.With a lighted match melt wax while turning head so as to seal the joint. After wax has hardened(approximately 10 seconds), gently remove excess with fingertips. Remove 3-cornered reamer. Returnhead to body of brush.3
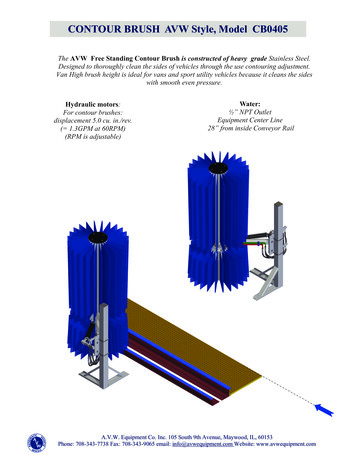
Removing or Replacing the NeedleIt is not necessary to completely disassemble theneedle assembly.1) Remove the handle (50-033) from the back ofthe airbrush.2) Turn the needle chuck (51-010) counter-clockwise.3) Draw the needle out and wipe it clean. (If stuck,see step 7).4) Care should be taken that the needle point is notbent. A bent needle will damage the tip andcause a rough spray pattern. If bent or damagedreplace needle.TRIGGER TENSIONYour Model 150 airbrush has been set withmaximum trigger tension which should be suitablefor most users. If less return spring back pressure isdesired, the spring screw (50-031) can be partiallyunscrewed to lessen the spring pressure. Do notunscrew the entire tube shank (50-030) assembly torelease pressure on the Model 150 . If the tubeshank is not seated firmly in the body of theairbrush, it may spin when trying to loosen the needlechuck.Removing the Tube Shank Assembly, Trigger andBack Lever5) Slowly glide the needle into the airbrush whileholding the trigger (50-019) in place, until theneedle stops. Do not apply pressure or force theneedle.1). Remove handle,loosen the needlechuck (51-010), withdraw needle. Removetrigger (50-019),unscrew tube shank(50-030) assembly.6) Once the needle is in position, tighten the needlechuck (51-010), replace handle (50-033).7) If in step 3 the needle is stuck in the airbrush,carefully grasp the end of the needle with a pairof pliers and twist in a counter-clockwise direction to release the needle and remove.8) Inspect the hardened paint, which causes theneedle to bind. If there is a residual stain on theneedle, it can be polished off using a pink eraser.Hold the needle flat on a worktable. Run the pinkeraser slowly by rolling it towards yourself andrepeat the process. Be careful not to be bend thetip. Remove all eraser particles by running theneedle between your thumb and forefinger.Repeat steps 4 through 6.Spray regulator should be cleaned using a soft bristle brush. Insert into the cavity of the spray regulator and rotate until the paint is removed.A bent needle will prevent you from airbrushing afine line and will cause an erratic direction of spray.A bent needle does not always have to be discarded. Place the needle on a firm surface at the angleof the tip. Straighten the bent needle by runningyour fingernail across it on a firm surface while youturn the needle slowly. Run your fingernail from thebody of the needle outwards toward the tip.Figure 12). Insert winged back lever (50-042) into“T” slot at top of airbrush body and moveforward (fig 1). Make sure back lever isbehind the air chamber(as shown in fig 2).Screw in tube shank andentire assembly.TOP VIEWFigure 23). To reinsert trigger, pull backon winged back leverand insert triggerinto place. Makesure the trigger isproperly seated.After inserting trigger, insert needle by gently pushingforward with index finger until needle stops at the painttip, tighten needle chuck (51-010), and replace handle(50-033).PAINTING PROCEDURE FOR THREE DIMENSIONAL OBJECTSPrepare the object to be painted, masking off anyarea that should not be painted (be sure object isclean and free of dust, grease, etc.). Small objectssuch as models, etc. should be hung or placed on apedestal so all areas to be sprayed can be easilyreached (a stand may be fashioned from anordinary wire coat hanger or bottle etc.). Hold thetip of the airbrush about 4 to 6 inches from thesurface. Use short strokes, moving the airbrushconstantly at a steady rate parallel to the surface.Don’t spray too heavily. Apply a light coat, let dry,then apply another coat and continue until thedesired coverage is achieved.4
REPLACEMENT PARTS/MODEL 150 3650-2011 Hose can be used withcompressor fitting or propel valve50-2025 (Optional)50-2014 01 Five Foot Air Hose50-0011 Eight Foot Air Hose(includes 50-023)50-0211 10 Ft. Braided Air Hose(swivel connection both ends)50-2025 10 Ft. Braided Hosew/transparent inline drainable water oisture Trap (only)Needle ChuckValve CasingPlunger & “O” Ring“O” RingValve ScrewF Head 50-03350-03550-036TriggerPlunger SpringAirbrush HolderProtective CapTube ShankSpring ScrewNeedle TubeHandleShell (150) (w/needle bearing)Valve Assemblycomplete (50-013-014-0141-015-020)complete (50-0371-3081-3091-50-055)50-0162 M Head Assemblycomplete (50-0372-0382-0392-50-055)50-0163 L Head Assemblycomplete 038150-038250-038350-039150-0392F RegulatorM RegulatorL RegulatorF Head & TipM Head & TipL Head & TipF TipM 250-208L TipF Needle (1 Ring)M Needle (2 Rings)L Needle (3 Rings)Back LeverNeedle Tube SpringPTFE Needle Bearing1/4 oz. Color Cup (150)Airbrush Case (SPECIFY MODEL)Prepared Beeswax3/4 oz. Jar w/Cover2 oz. Jar w/CoverPTFE Head WasherCoupling NutCoupling Nipple33 mm Jar Adaptor*The PTFE needle bearing carries a lifetime warrantyand free replacement at the factory onlyEXERCISE ONE/FREE HAND CONTROLLED EFFECTThe exercise shown in fig. 1 is accomplished by practicing the triggering technique explained on page 3.Pull back slightly on the trigger, while air is on, to create a fine line. Approximately half way through yourstroke motion push trigger forward to discontinue paint flow. While continuing your stroke motion slightlypull trigger back again to re-create your fine line pattern. This exercise will enable you to draw straightlines without forming dots or puddles at the beginning and end of each line. Fig. 2 is parallel line graduating from narrow to broad. These are made by releasing more color and at the same time, lifting the airbrush away from the surface. Practice daily to develop trigger action control. Fig. 3, layout in pencil 1/2inch squares. Airbrush the dots as small as possible and connect dots with straight lines of even tone.Practice every lesson carefully before proceeding to the next one.5
EXERCISE TWOOn a board or paper, lightly pencil in a number of 1/2 inch squares. Hold the airbrush about 1/2 inch from thesurface and spray small dots on the intersecting lines, as shown in fig. 4. When you are able to place the dotsaccurately, begin enlarging the size of the dots by allowing more color to flow through the airbrush. At thesame time increase the distance between the airbrush and the paper or board. If the airbrush is held tooclosely to the paper with the trigger pulled all the way back and down, “puddles” will form and spread. Aimfor accuracy not speed and continue practicing until you can spray any size dot exactly where you want it.This simple lesson will give you control of position and density of dots or shapes you require, which areimportant for touch-ups and fill-in work.MASKING OFFIn the next several exercises you will need to mask off a square area.Make a mask from 4 pieces of scrap paper (fig. 8). These masks areheld in place by masking tape, keeping the atomized material fromcreeping into the margins around the area. When using masks sprayover the edge.FIG. 8EXERCISE THREE/EVEN TONESFIG. 9FIG. 10FIG. 11To accomplish a flat tone, we will airbrush a fine consistency of paint from left to right at the top of thetaped area. Hold the airbrush about four inches from the surface of the sheet. Be sure to spray a portion ofthe tape so that no light line shows when the masking tape is removed. Use the trigger technique on page3 throughout this lesson. Now airbrush from right to left, overlapping the previously airbrushed strokes.Continue down the entire sheet, trying not to create a line pattern with the airbrush. Overspray the tape,both right and left and top and bottom. Begin at the top again and spray the entire page. Repeat the exercise until you reach the desired smooth coverage of the entire area. Do not attempt to cover the entiresheet with a heavy tone at one time. Build the tone gradually (figs. 9-11). Make sure the work and tape aredry before removing the masking tape. This should be done carefully to avoid tearing the surface of thepaper it is adhered to. If your first results are not satisfactory, repeat the lesson until you are satisfied.EXERCISE FOUR/VARYING SHADESThis lesson is similar to the previous one.This time you will start at the top and gradually fade into white (fig. 12). Do not fadeabruptly and do not carry the tone furtherthan 2/3 or 3/4 of the page. Remember, youmust stop your tone shorter each time, sincethe overspray will build up. Fig. 13 is a combination of masking and varying shades. Theimportant thing in this exercise is to trainyour eye so that all the small squares havethe same tone value.FIG. 126FIG. 13
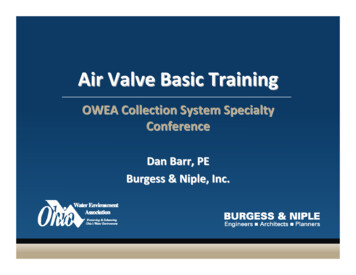
TECHNIQUES TO USEMasking or frisket is used mostly to create a sharp edge or when more than one color is applied. A newfrisket is cut for each color and covers any area that should notbe sprayed. Badger’s Foto/Frisket Film is specially formulatedfor use on all surfaces commonly used for airbrushing.A flat surface mask can be cut from Foto/Frisket Film. For asharp edge, hold the mask flat in position. For a softer edge,elevate the mask slightly by resting on a ruler or other flat object.For contour masking (models, ceramics, etc.) liquid frisket isrecommended.STENCILS/TEMPLATESStencils/templates are used when a design needs to beduplicated, as in posters and decorating. Cut from stiff paper,FOTO/FRISKET FILM or NO-TACK Stencil Film, hold thestencil firmly in position and spray starting with the edgesand work inward. A reverse (negative) stencil can also beused, spray along the stencil edge.POSITIVEREVERSE (negative)EXERCISE FIVE/THREE DIMENSIONAL EFFECTS USING MASKS OR FRISKETRendering these basic forms will provide instruction and sequence in shading and tone gradiation createdwith airbrush for three dimensional effect and realism. In airbrushing these shapes, it is a general rule tohave the light source coming from the upper left hand corner at about a 45 degree angle.SPHERE Place a frisket on the board making sure the remaining portion of theboard is not exposed to airbrushing overspray. Use a compass knife and cut yourcircle and remove. Gradually airbrush lightly around the entire edge of the circle ina curved, rocking, back and forth motion. Next, start from the bottom right handportion of the circle and airbrush upwards towards the center not quite reachingthe center. Allow a highlighted circular portion of the sphere near the upper lefthand portion. Continue until the sphere takes on a three dimensional appearance.CUBE Make a line drawing lightly about twice the size of the above illustration. Cuta frisket for the outline and dividing lines of the separate sides. At this time remove the frisket from the side farthest from the lightsource (lower right). Gradually airbrush a tone from the upper left corner to thelower right hand corner. Repeat the gradual dark tone asnecessary, then remask the finished side and start the othersides until the desired effect is achieved.CYLINDER Note how the light varies on the cylinder andmakes the top flat surface different from the curved area.The frisket is cut along the curved line and while the top ismasked, the side is sprayed. Then the side is masked and the top is sprayed. Onlypractice will enable you to know how dark to paint one side of the subject while theother is masked.TROUBLESHOOTING YOUR AIRBRUSH1) Grainy spray. Caused by paint being too thick. Add thinner sparingly to the mixture and check the needle and regulator tip for dried paint. Also check the air supply to make sure airbrush is being operated at the proper pressure.2) Buckling paper. Paint may be too thin or you may be applying paint in too heavy a coat.3) Paint blobs at the ends of the stroke. You are spraying paint before moving your hand and stopping the movements before shutting off the paint flow.4) Flared ends. Caused by turning the wrist while airbrushing. The whole forearm should move evenly across thepaper.5) Centipedes. Caused by spraying too much paint too close to the paper. If a fine line is desired, lightly pull back onthe front trigger.6) Splattering. Caused by permitting the needle to snap back into tip. Always release the trigger gently. Check fordried paint on needle or tip. Also may be caused by triggering, see page 3 for proper triggering.7) Curved stroke. Caused by arcing arm too close to the paper. Arm should always be parallel to the work, unless this7
effect is desired.8) Bubbles through the color cup. The spray regulator might be turned out too far, or the head may be loose. Checkboth and tighten if necessary.9) Color spray cannot be shut off. Tip may be clogged. This is recognized by a “spongy” feel when needle is set intotip. Remove the head from the airbrush and clean the tip – see Maintenance and Cleaning, page 3.10) Pulsating. This is caused by the head being loose or the tip not seated properly. See page 3, Replacing the Tip.The only other reason that the airbrush may begin to pulsate is if the needle bearing wears down or falls out. There is a life-timewarranty on this part because the owner cannot replace this part. If this occurs send back to factory for no-charge service (seewarranty page 2).PLEASE READ CAREFULLY BEFORE USING YOUR BADGER AIR-BRUSHYour new BADGER airbrush should provide you with many hours of enjoyment. However, because of the nature of airbrushing and ofthe composition of materials which you may use in your airbrush, we are providing you with information about potential hazards.Many materials commonly used in arts and crafts projects (such as lacquers, varnishes, adhesives, fixatives, powders, acrylics andsolvents) can be extremely hazardous. Not all of these materials will be used in your airbrush, but may be used in some other phaseof your project. We recommend that you always find out what is in the material you use. We suggest that when using any chemicalsubstance that you request a copy of the manufacturer’s Material Safety Data Sheet from your art supply dealer. This will give yousome indication of the dangers posed and some of the precautions you need to take.ALWAYS READ AND FOLLOW LABEL DIRECTIONS CAREFULLY.CHILDREN Hazardous materials pose an even greater risk to children due to their lesser body weight and frequent lack of care in following directions. CHILDREN SHOULD ALWAYS BE SUPERVISED WHEN USING AN AIRBRUSH OR ART MATERIALS (unless thematerials have been certified by the Crayon, Watercolor and Craft Institute). An airbrush is not a toy. It should not be pointed at anyone or at oneself. Airbrushes are not recommended for use by children 12 or under without direct adult supervision. GOOD HYGIENE IS IMPORTANT ANYTIME YOU ARE WORKING WITH ART MATERIALS.Do not smoke, eat or drink while airbrushing.Avoid putting your fingers in your mouth while working on art projects.Be sure to clean your fingernails and wash your hands when you are finished.Be especially careful of the materials you use if you have cuts or open sores.STOP WORK AT THE FIRST SIGN OF DIZZINESS, NAUSEA, HEADACHE, BLURRED VISION, OR SKIN IRRITATION. Seek fresh airimmediately, and call a doctor if the symptoms persist or are severe.VENTILATION An open window does not provide adequate ventilation when working with hazardous art materials. When working withthese materials, you should have an exhaust ventilation system (one which removes vapors, dusts, etc., from the area in which youare working and vents to the outside). A general ventilating system dilutes toxic vapors with fresh air to lower their concentration to asafer level.Many factors have to be considered to determine the kind of ventilating system you should have. We suggest that you contact theNational Institute for Occupational Safety & Health, (NIOSH), Robert A. Taft Laboratories, 4676 Columbia Parkway, Cincinnati, Ohio45226 for publications which they have dealing with ventilating systems.RESPIRATORS A respirator may pose more of a hazard than a help unless: you get one designed to filter out the specific hazardous substance you are working with one that fits properly you keep it properly cleaned and maintained.We suggest you buy only a NIOSH* approved respirator and read and follow carefully the instructions which come with it.A respirator may not be suitable for some people with heart or breathing problems. Information on respirators is also available fromNIOSH at the address above.RESOURCES In addition to NIOSH, you might want to read Health Hazards Manual for Artists by Michael McCann, PhD (published bythe Foundation for the Community of Artists, 280 Broadway, Suite 412, New York, New York 10007) or contact the ConsumerProducts Safety Commission, Washington, D.C. 20207.BA319 Made and Printed in U.S.A. 11/09iHOBBY EXPO9128 W. BELMONT AVE FRANKLIN PARK, IL 60131www.badgerairbrush.com BACo.2009
air hose snugly onto airbrush. 2) Air pressure should be set between 15 to 50 p.s.i. (15 to 90 p.s.i. when using a braided airhose such as 50-2011). The most efficient operating pressure for airbrushing is approximately 30 p.s.i. BADGER offers an air regulator w/pressure gaug