Transcription
PREMIER 2 Create,PREMIER 2 Font Create &PREMIER 2 SketchUser’s GuideWindows The software to which this User’s Guide relates is subject to change without notice. All efforts havebeen made to ensure the accuracy of the contents of this User’s Guide.The software described in this book is furnished under a license agreement and may be used onlyin accordance with the terms of the agreement.Permission is hereby granted to the licensee of the software to which this guide is related toreproduce and distribute copies of this guide for nonprofit educational purposes. The copyrightstatement on this page must be included on any copy of this work.Windows is a registered trademark of Microsoft Corporation. Acrobat , the Adobe PDF logo and Reader areeither registered trademarks or trademarks of Adobe Systems Incorporated in the United States and/or othercountries. Facebook and the “f” logo are registered trademarks of Facebook and its affiliate companies.Google and the Google icon are registered trademarks of Google Inc. YouTube and the YouTube socialicon are registered trademarks of YouTube, LLC, which is a Google company. Instagram and the Camera logoare trademarks of Instagram, LLC in the United States and elsewhere. Twitter and the Twitter bird logo aretrademarks of Twitter, Inc. Flickr is a trademark of Yahoo! Inc. Other product names mentioned in this guidemay be trademarks or registered trademarks of their respective companies and are hereby acknowledged.QuickStitch is a registered trade mark in the US.VIKING, PFAFF, PREMIER and 6D are trademarks of Singer Sourcing Limited LLCHUSQVARNA is the trademark of Husqvarna AB.All trademarks are used under license by Singer Sourcing Limited LLC. 2017 Singer Sourcing Limited LLCAll rights reserved (Version A)
Contents1Chapter 1: Getting Started withPREMIER 2 Create & Font Create38Parts of the Software WindowPREMIER 2 Create Terms and Conventions10Chapter 2: The Design Creation Process111212131414The ExpressDesign WizardUsing Existing DesignsWhat Makes a DesignPicturesPictures as BackgroundsCreate Petals with the ExpressDesign Wizard17Chapter 3: Viewing Designs171820View ModeDesign PanelFilmStrip21Chapter 4: Creating Design Elements2122293031343535Quick CreateCreating with Freehand Create and Precise CreateFill Area and Line PropertiesColumn PropertiesObject PropertiesGlobal PropertiesChange Properties for Selected ObjectsDesign Size and Creating Embroideries36Chapter 5: Editing a Design363737384243Select ObjectsInsert CommandsChange Objects’ SequenceEdit Lines and AreasSelect a Block of ObjectsMultiple Select and Groups45Chapter 6: Creating a Drawing464950Choose Drawing ColorsEditing DrawingsSelecting Objects53Chapter 7: Motifs, Machine Stitches and Stamps5355Using MotifsMachine StitchesPREMIER 2 Create Contentsi
5657Creating StampsMake an Anchor Stamp from a Picture58Chapter 8: Creating a Painting61 Chapter 9: Getting Started withPREMIER 2 Sketchii6162Parts of the Software WindowPREMIER 2 Sketch Terms and Conventions63Chapter 10: Load Design Wizard63Load Design Wizard Pages66Chapter 11: Drawing Stitches6666697073Insert ModeStitch DrawingStop CommandsFree Motion ModeStitch Drawing ExamplesPREMIER 2 Create Contents
1Getting Started withPREMIER 2 Create & Font CreateWelcome to PREMIER 2 Create, the software that helps you create wonderfulembroideries. Turn your favorite pictures into embroideries and see them on the screenexactly as you will sew them. Work with images from your favorite social media sites,scanner or digital camera, and use clipart or create your own pictures with the built-indrawing or painting tools.Use PREMIER 2 Font Create to create beautiful fonts and SuperDesigns for PREMIER 2Embroidery. Create fonts using most TrueType /OpenType computer fonts, or digitizecharacters and SuperDesigns over scanned or clipart pictures.ExpressDesign WizardPREMIER 2 Create includes the ExpressDesign Wizard. Use it to automatically createdesigns from a picture, load pictures for new designs, open an existing design or start anew design with no picture. The ExpressDesign Wizard can create designs to fit a hoop, fita size you specify or fit an area you select. Choose from three design types:Express Embroidery createsa standard embroiderydesign using satin, fill areasand outlining.Express Trace traces outlinesin a picture to create, forexample, redwork, quiltstencils and so on.Express Border creates satin border,appliqué, running stitch, triplestitch or motifs around the edges ofsolid color areas in the picture.Creating PicturesCreate your pictures using the drawing or painting tools and MiniPics. Filter and improveyour pictures, or add interesting effects. Save drawings or pictures or send them to theExpressDesign Wizard. Convert vector drawings to objects automatically.Quick Create and Shape FeaturesThe Quick Create features QuickStitch and QuickTrace are alternatives to theExpressDesign Wizard for creating sections of your design.With QuickStitch , click in an area and stitches are produced automatically in an instant!Choose to embellish your designs with motifs, running, double or triple outline stitches,motif lines, borders with any combination of straight lines and curves or appliqué,creating a fill area, line, or satin area.PREMIER 2 Create Getting Started with PREMIER 2 Create & Font Create1
The QuickTrace feature automatically creates stitches that follow a continuous line. Createa Double trace, Quadruple trace , Satin lineor Motif linetrace.Also in Quick Create, create one of 75 shapes automatically as a fill area or line.Freehand and Precise Create FeaturesThe Freehand Create and Precise Create features allow you to work with your stitches indetail. Draw an outline, place points, or draw Bezier curves around an area of the picture,and the stitches appear with your choice of pattern. Include a satin stitch or other lineborder if you wish, and set the angle of stitching to any degree. Insert holes where youchoose.Choose Satin Column(including over 250 patterns, and multigradient and multicolorgradient options for color blending), Satin Areasor constant width Satin Linesandemboss them with needle point highlights. Create Feathered Satinand texture eitheror both edges of a satin stitch for special embroidery effects on fur or flowers. Createcolumns of Tapered Motifs .Make cutwork designs easily with Richelieu Barsand Running Stitch with cutworkneedle lines. Use other features such as Double Zigzag stitch, Crosshatch FillandCurved Crosshatch Fillto create free-standing lace.Add individual stitches in straight or curved lines of Running, Double and Triple Stitchfrom 1 to 12mm.Design ChoicesAdjust designs using easy editing features: Navigate around the design with the Filmstrip,change easily between lines, fills, stitch types and patterns and so much more. Appliquéoptions offer four stitchout methods including export for automatic needles or fabriccutters.Fill patterns and techniques are amazing – choose from over 250 fill patternsor makeyour own. Emboss patterned fill or satin areas, or columns, with personal highlights. Setthe start and end of fill areas if desired and use up to 500 holes. Use single gradient densityto produce beautiful shading effects, and multicolor gradient density to produce gradualshimmering color changes.Beautiful fill types include Radial, Spiral, ShapeFill with 75 shape options andmotif options, QuiltStipple, Contour, CrosshatchFill. MultiWaveFill createsflowing waves of stitching with motif options. EchoFill repeats any area with shadoweffects. Curved Crosshatch Fillprovides wonderful intersecting patterns for threedimensional effects.Choose from machine stitch Motifs or Universal Motifs such as the beautiful Hand Stitchesfor MotifFill areas. Even create your own motifs!Insert existing designs, embroideries, lettering or SuperDesigns into your project.Grouping features allow you to keep smaller parts of your design together.2PREMIER 2 Create Getting Started with PREMIER 2 Create & Font Create
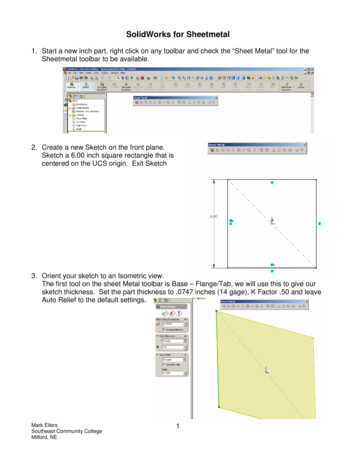
Finding InformationUser’s Guide and Reference GuideThe User’s Guide and Reference Guide show how to start the module and provide a quicktour of the main screen. This is followed by information on key features, together withshort ’How-To’ examples, which will help you learn how to use the module. The ReferenceGuide additionally contains full reference information. The Reference Guide is supplied inPDF format , ready for printing.To find all the Reference and Sample Guides for your PREMIER 2 Embroidery Systemsoftware, in Windows 10 and 8 select the Desktop tile on the start screen. Then inWindows 10, 8 or 7, double-click the PREMIER 2 Embroidery System shortcut on yourdesktop, and double-click Reference Guides or Sample Guides. Select the desired guide.Sample FilesSamples are included that are shown in the ’How-To’ examples and tutorials. The samplefiles will be installed to subfolders of Documents\Premier 2\Samples\Create or the folderof your choice.Starting PREMIER 2 Create and PREMIER 2 Font CreateTo open PREMIER 2 Create, in PREMIER 2 Embroidery, click the PREMIER 2 Createiconon the QuickLink toolbar. PREMIER 2 Create will start.To open PREMIER 2 Font Create, in PREMIER 2 Embroidery, click Accessoriesonthe QuickLink toolbar, then click PREMIER 2 Font Create.Parts of the Software WindowTitle BarThe title bar at the top of the window is highlighted if PREMIER 2 Create is active. TheQuick Access toolbar gives icons for the following frequently used features: Insert, Save,Save As, Export, Print, Change Hoop, Undo, Redo, Life View and Design Player.If more than one instance of PREMIER 2 Create is open, each open window will showthe name of the embroidery file.Ribbon BarThere are 9 tabs on the ribbon: File, Home, Quick Create, Freehand Create, Precise Create,Edit, Draw or Paint, View and Help.Either the Draw or Paint tab is available for each design. The options on the File menu are different whenyou use the Draw or Paint window. Only the Paint tab is available in PREMIER 2 Font Create.An alternative way to access ribbon options is to press the Alt key, then the highlighted letter of the tab,followed by the highlighted letter of the tab item, e.g. Alt, H, M, S. Some functions are available by pressingthe Ctrl key and another key at the same time. These shortcuts are shown in the tooltip for the function.Use the Home tab to select, copy, Group, move, resize and rotate parts of a design; to add,change and remove points in object outlines; to insert designs, embroideries, letters,ExpressDesigns and SuperDesigns; to change the hoop, and to display embroideries withLife View and Design Player.PREMIER 2 Create Getting Started with PREMIER 2 Create & Font Create3
Resize and rotate the selected blockUse a selection tool to select objectsView the design as it will be stitched outInsert a designChoose a hoopGroup and Ungroup objectsCut, copy, paste or delete selected objects Move, add, delete & convert the points for an objectUse the Quick Create tab QuickStitch and QuickTrace features to create fills, lines andsatin areas automatically by clicking color areas in the picture. Use the Shape features tocreate fill or line shapes instantly in the design area, ready for resizing.Add Color changesSelect a Shape and create it as a line or fill areaCreate a fill area or line automaticallySet the properties for the stitch typesTrace a picture as a line of stitchesSelect stitch types and appliquéCut a hole in a fill areaEmboss a line on a fill area or columnDraw a wave line in a MultiWave Fill areaCreate a Satin AreaUse the Freehand Create tab to draw the outlines for lines, satin and fill areas with a pen ona graphics tablet, or by dragging with the mouse. Draw to add holes, emboss lines andMultiWave lines to fill areas. Place points to create Satin Columns, Feathered Satin,Richelieu Bars and Tapered Motif columns.Add Color changes, Single & Alignment stitches, and Stops Set the properties for the stitch typesSelect stitch types and appliqué Draw a fill area or linePlace points for a ColumnCut a hole in a fill areaDraw a Satin AreaEmboss a line on a fill area or column Draw a wave line in a MultiWave Fill areaUse the Precise Create tab to place a series of points or Bezier curves that define theoutline of lines, fills and satin areas. Place points or Bezier curves to add holes to fill areas,and to create Satin Columns, Feathered Satin, Richelieu Bars and Tapered Motif columns.Place points to add emboss lines and MultiWave lines to fill areas.Add Color changes, Single & Alignment stitches, and Stops Set the properties for the stitch typesSelect stitch types and appliqué Create a fill area or lineCreate a ColumnCut a hole in a fill areaCreate a Satin AreaUse Bezier ModeEmboss a line on a fill area or column Draw a wave line in a MultiWave Fill area4PREMIER 2 Create Getting Started with PREMIER 2 Create & Font Create
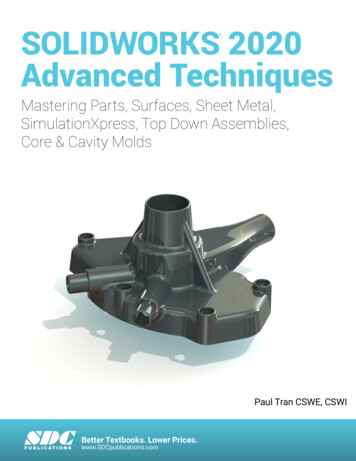
Use the Draw tab to load or create a vector drawing for your design. Modify a drawing asdesired, or make your own drawing. Alternatively, load a raster image to use as abackground. Create motifs, or stamps for PREMIER 2 Modify, too.Use the Paint tab to load, scan or create a background picture for your design in the Paintwindow. Modify a picture as desired, or draw your own picture.Use the View tab to adjust the Grid, measure the design, show and fade the backgroundpicture, show the FilmStrip, and change the view mode or hoop.WindowsPREMIER 2 Create uses three windows: Design, Draw and Paint. Switch betweenwindows by clicking the tabs at the top of the window or with Ctrl Tab. All the tabs of theribbon bar use the Design Window except for the Draw or Paint tab.Design WindowQuick Access ToolbarFilmStripRibbon Bar TabsWork AreaTitle BarRibbon BarStatus BarDesign PanelUse the Design window to add new areas, lines and columns of stitching, as well ascommands, to your design, and to change the properties of stitching.Create stitch areas and lines using the QuickStitch , QuickTrace, Freehand and PreciseCreate features on the ribbon bar tabs. Choose colors, and select a line or fill type for stitchlines or borders such as single, running, double, double zigzag, triple, satin or motif lines;for fills such as pattern fill, motif fill, shape fill and crosshatch fill; for Richelieu bars andtapered motifs, and for satin columns and areas. The Design window shows a 3D, 2D orObject outline representation of the stitches in the design. To see the stitches with noobjects selected, use Life Viewor Design Player.The points are shown on the work area for the currently selected object. Fill areas, satinareas and columns have markers that show where they startand end. Some typesPREMIER 2 Create Getting Started with PREMIER 2 Create & Font Create5
of fill areas also have an originalso markers for Color Changesthat affects the position of the stitch effects. There are, Stop Commandsand Alignment Stitches.To the left of the Design window work area is the FilmStrip, and to the right of the workarea is the Design Panel. Use the Create tabs to create stitches, and the Edit tab, theFilmStrip and the context (right-click) menu to edit your design.The Design Panel contains the color worksheet, notes and settings for the design, and theClipboard and Overview window.The Font Tab and PREMIER 2 Font CreateOpen or save the font or SuperDesign setSet the recommended sizeChange the font or SuperDesign propertiesCopy multiple characters, e.g. upper to lower caseInsert extra points on straight or curved linesUse a Windows system font as a background for each characterAdjust the Font Grid & Guidelines, and place Navigation objectsUpdate the thumbnails when the font or set is savedSelect a Character SetView other pages of characters within the fontSelect a character to edit (digitized characters are green)Open or save a thumbnail picture for the selected SuperDesignSelect the Nearest Point position for the current characterAdjust the size for previewing the font or SuperDesign setThe Font Tab in the PREMIER 2 Font Create Design Panel contains functions foropening, saving, exporting, and editing a font or SuperDesign set, and for viewing andpositioning the font grid, guidelines and background characters. Choose a backgroundfont and a character set, then select a character or SuperDesign for editing. Set the NearestPoint positions for fonts, and load and save thumbnail pictures for SuperDesigns. Previewthe font or SuperDesign set at varying sizes.To create a font or SuperDesign set, start PREMIER 2 Font Create, and in the Create orEdit Font dialog box select Font, or SuperDesign set, and either edit an existing font or set,or set the Name, type and size for your new font or SuperDesign set.Use the Font Tab and the shared PREMIER 2 Create and PREMIER 2 Font Createfunctions to add characters or designs to your font or SuperDesign set.To use PREMIER 2 Font Create, you will need a good working knowledge of the stitch types, conceptsand tools used in PREMIER 2 Create.For more information on creating fonts and SuperDesign sets, see the PREMIER 2 Font Create ReferenceGuide.6PREMIER 2 Create Getting Started with PREMIER 2 Create & Font Create
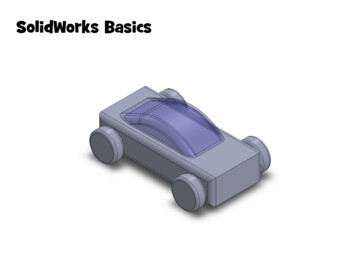
Paint WindowQuick Access ToolbarRibbon Bar TabsWork AreaTitle BarRibbon BarControl PanelStatus BarUse the Paint window to load, scan or create a background picture for your design. Loadpictures from many social media sites. Modify a picture, or draw your own picture.Draw WindowQuick Access Toolbar Ribbon Bar Tabs Title Bar Ribbon BarFilmStripWork AreaControl PanelStatus BarUse the Draw window to load or create a vector drawing for your design. Modify a drawingas desired, make your own drawing to create a motif or stamp, or load a raster image touse as a background.PREMIER 2 Create Getting Started with PREMIER 2 Create & Font Create7
PREMIER 2 Create Terms and ConventionsOn-screen PointersThe pointer is most commonly shown as an arrowon the screen.If it is positioned over a text box it changes to an I-barNotes dialog box in the Design Panel.and you can type, such as the EditIf Zoom To Rectangleis chosen, the Zoom In pointerappears. If the Pan feature isused to move around the screen, the Pan cursor appears. If Get Lengthis chosen theMeasure pointerappears.In the ExpressDesign Wizard Rotate and Crop Picture page, the pointer becomes a doubleheaded arrowwhen you move the crop lines or a four-headed arrowwhen youmove the crop area. Also, for an Express Embroidery, the pointer becomes aneyedropperto pick colors from a picture for thread colors or pick a background color.In the Freehand Create tab, if the Freehand Create functions are used the pointer becomesa pen.In the Precise Create tab, if the Precise Create functions are chosen the pointer becomes acircle , and in Bezier Mode when lines are drawn the pointer becomes a Bezier Modepointer. In Bezier Mode, when points are coverted to Symmetric the pointer becomesthe Convert Points to Symmetric pointer , when points are coverted to Smooth thepointer becomes the Convert Points to Smooth pointer , and when points are covertedto Corner points the pointer becomes the Convert Points to to Corner pointer .When node points on Point Lines or Bezier Lines are adjusted, or the Fabric handleused to adjust a fabric, the pointer becomes a small cross(a Move pointer).If Insert ExpressDesignWhen a Pick Coloris chosen, the Draw Rectangle pointerfunction is selected, the eyedropper pointerisappears.appears.The Box Select , Freehand Selector Freehand Point Select pointerappears whenthe associated Select function is chosen. The Ellipse Selectpointer or Magic Wandpointer appears when these functions are chosen in the Paint window.The diagonal double-headed arrow pointer appears when the mouse pointer is over asquare corner handle . The horizontal double-headed arrowpointer appears whenthe mouse pointer is over the Flip Horizontal handle. The vertical double-headedarrow pointer appears when the mouse pointer is over the Flip Vertical handle . Thepointer becomes a four-headed arrow(a move pointer) when it is over a selection boxIn the Paint window the pointer changes to the paint bucketwhen Flood Fillisselected, the brush pointerwhen Paintbrushis selected, and the calligraphypointerwhen Calligraphyis selected.The Create Cursoris not a mouse pointer, but is a marker that shows the positionwhere the next object will be added if it is at the end of the design. These cursors onlyappear when at least one object has been digitized on the current character orSuperDesign, and one of the Create tools is selected.8PREMIER 2 Create Getting Started with PREMIER 2 Create & Font Create
When objects will be added at the end of the design, the cursor is pink.When objects are to be inserted (i.e. the selected object is not the last object in thedesign), the marker showing the final point of the selected object is orange.When objects are to be inserted, a blue markerthe next object in the design.shows the position of the first point inPicture FilesPREMIER 2 Create can load any of the following picture file formats: Windows or OS2Bitmap (.bmp), JPEG-JFIF Compliant (.jpg, .jif, .jpeg), Portable Network Graphics (.png),Tagged Image File Format uncompressed (.tiff, .tif ), 4QB (.4qb), QuiltSewClever / QuiltArtist / Shirley Stitcher QCC (*.qcc), Windows Meta File (.wmf ), Windows Enhanced MetaFile (.emf ), CorelDraw (.cdr version 7-13, .cmx), Encapsulated PostScript File (*.eps),Scalable Vector Graphics (.svg), HPGL (*.hp and *.plt), PC Quilter (*.txt), Statler Stitcher(*.qli), AutoCAD (*.dxf ), CompuQuilter (*.cmd and *.cqp), Handi Quilter (*.hqf ),IntelliQuilter (*.iqp) and Windows Icon (.ico). In addition, the ExpressDesign Wizard canload .4dq files produced by the Grace Company PatternCAD module.PREMIER 2 Create can save a picture in any of the following picture file formats:Windows or OS2 Bitmap (.bmp), JPEG Low Quality (.jpg), JPEG High Quality (.jpg), TaggedImage File Format uncompressed (.tif ) and Portable Network Graphics (.png). A drawingmay be saved in 4QB (.4qb) format and used to create a motif, or a stitch for certain sewingmachines, or a stamp for PREMIER 2 Modify. The picture or drawing is also saved as partof the design outline (.edo) file.PREMIER 2 Create can upload pictures and videos of embroidery designs from DesignPlayer and Life View to Facebook , Flickr , Twitter and YouTube .Design FilesPREMIER 2 Create loads and stores embroidery designs (design outlines) in files withthe extension .edo. When a design is saved, the picture is saved with it.PREMIER 2 Create can insert a .can outline file (from 5D Design Creator), without the picture.Embroidery File FormatsPREMIER 2 Create can insert any of the following embroidery file formats: Bernina (.artversion 1, 2, 3), Brother/Babylock/Bernina PEC (.pec), Brother/Babylock/Bernina PES (.pesversion 2 - 10), Compucon/Singer PSW (.xxx), Husqvarna Viking / Pfaff (.vp4, .vp3 and .vip),Husqvarna (.hus, .shv and .dhv), Janome (.jef and .sew), Melco (.exp), Pfaff (.pcs), Tajima(.dst) and Toyota (.10*).PREMIER 2 Create exports the following embroidery formats: Husqvarna Viking / Pfaff(.vp4 and .vp3), Brother/Babylock/Bernina PEC (.pec), Brother/Babylock/Bernina PES (.pesversion 2 - 10), Compucon/Singer PSW (.xxx), Husqvarna Viking / Pfaff (.vip), Husqvarna(.hus, .shv), Janome (.jef, .sew), Melco (.exp), Pfaff (.pcs), Tajima (.dst) and Toyota (.10*).The preferred file format for exporting embroideries is .vp4 format as this will preserve the separate parts ofmultipart designs. It also preserves hoop, background and appliqué information, thread colors and notes.PREMIER 2 Create Getting Started with PREMIER 2 Create & Font Create9
The Design Creation Process2PREMIER 2 Create is used to create designs for embroideries.You can use a design made in PREMIER 2 Create to create an embroidery at any time, and can use thesame design to create otherwise identical embroideries for different hoops.There is no need to directly manipulate individual stitches.Start with a picture.View and create objects in the design inthe Create tabs.Use the ExpressDesign Wizard to create adesign.View and edit objects as 3D, 2D or outlines.Add areas, for example tapered motifs orRichelieu Bars, or insert new elements.10PREMIER 2 Create The Design Creation ProcessEdit areas, for example to specialty fills.
There are three ways to make a new design:Create a design automatically with the ExpressDesign Wizard. The wizard requires apicture to convert to a design.Load or draw a picture, then make a design by following the picture automatically withthe QuickStitch and QuickTrace features in the Quick Create tab. Additional designelements can be added using the Freehand Create (drawing outlines with a mouse or on atablet) or Precise Create (placing points) functions, as well as Shapes and columns.Create a free-form design with no background picture, mainly using the Freehand Create,Precise Create, column, Shape and command features.Use File, New, or File, New Windowto start a new design with the ExpressDesignWizard. In the wizard you can create a new design automatically, load a picture for a newdesign, load an existing design or start a new design with no picture. On the main screen,you can Inserta design, or in the File menu Opena design, Open Recent or Load aDesign with Drag and Drop. Use Insert to load a .can design outline file.Use a Picture as a BackgroundWhen starting from a blank design, you may simply choose a hoop, and start creating yourdesign with the Freehand, Precise, Command and Column features. However, it is morecommon to follow a picture when creating a design. Create your own picture using thefunctions in the Draw and Paint windows. Open an existing drawing with OpenDrawingor Insert Drawing . Open an existing painting with Open Picture , InsertPicture , or use From Scanner or Camerato load a picture from a scanner or digitalcamera.To open an embroidery as a design, use File, Newpicture, and Insert Embroideryor File, New Windowto start a design with noto convert an embroidery to a design.After creating or editing your picture as desired, it is recommended to save it. Then eithersend the picture to the ExpressDesign Wizardfrom the File menu, or go to the Designwindow and start creating your design with QuickStitch , Freehand and Precise features.Insert existing designs, embroideries, lettering or SuperDesigns into your project. Savefinished designs with Saveor Save As , then create an embroidery with Export.The ExpressDesign WizardUse the ExpressDesign Wizard to create new designs automatically from pictures. Thereare three design types that can be created in the ExpressDesign Wizard: ExpressEmbroidery, Express Trace and Express Border.From a picture.PREMIER 2 Create The Design Creation Process. to a complete design and embroidery.11
There are three ways to start the ExpressDesign Wizard to create a new design.Use File, New, or File, New Window , to clear the PREMIER 2 Create screen andcreate a new design.In the Draw or Paint window, use File, Send To Wizard to send the current picture to theExpressDesign Wizard.Use Insert ExpressDesignto create a new design in the ExpressDesign Wizard that fitsproportionally in a rectangle you draw, or to fit the current hoop.Additionally, when started with File, New , or File, New Window , the ExpressDesignWizard can be used to load a picture for a new design, load an existing design or start anew design without a picture.Using Existing DesignsAny design can be used as the starting point for a new design. This includes a design youmay have just created with the ExpressDesign Wizard, which you can modify andembellish as desired.For example, a design might be changed dramatically by adding or removing a border,changing the fill type, or changing the pattern in a fill area. Also, for a design that you wishto use at a different size, you could change line types from satin to running, triple or motifstitch. Any line or area can be changed to appliqué.Use existing designs, and designs created in the ExpressDesign Wizard, to create newdesigns and design collages.What Makes a DesignA design in PREMIER 2 Create is composed of areas, lines, columns and commands.Fill Areas and LinesThe area features are used to create many different types of filled or stitch areas in whichfills, for example Pattern fill, (and holes) can be placed. Also create Running stitch,Double stitch , Double zigzag, Triple stitchmay be created alone or to border an area., Satinor Motif lines. LinesLines are defined by points, which can be moved to change the shape of the line, or an area it encloses.ColumnsThe column features are used to create Satin ColumnBarsand Tapered MotifsCommands, Feathered Satin.Commands are instructions such as a change of thread Coloror a Stop, Richelieu, an alignment stitch.The term ’object’ is used to refer to any or all of these.When an embroidery is created from a design, each line or area is converted to stitches,and the stitch order is controlled by the order of the objects in the design.You can see the order of objects in the FilmStrip.There are several ways to add objects to a design:12PREMIER 2 Create The Design Creation Process,
Use the ExpressDesign Wizard to create a whole design, with all the necessary lines,areas and commands. Edit or add to the design as desired. Use the Create tabs to add new objects to a design which can be based on a pictureshown in the background, and to change the properties of those objects. Use the Home tab to insert complete design elements, embroideriescharacters, SuperDesigns, font, or to copy and paste selections.PicturesMost designs are based on pictures, either by using the ExpressDesign Wizard or by usingthe functions of the Create tabs to follow
To find all the Reference and Sample Guides for your PREMIER 2 Embroidery System software, in Windows 10 and 8 select the Desktop tile on the start screen. Then in Windows 10, 8 or 7, double-click the PREMIER 2 Embroidery System shortcut on your desktop, and double-click Ref