Transcription
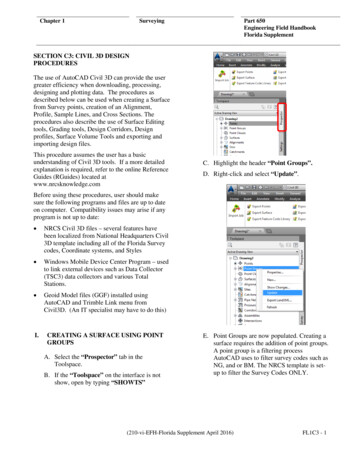
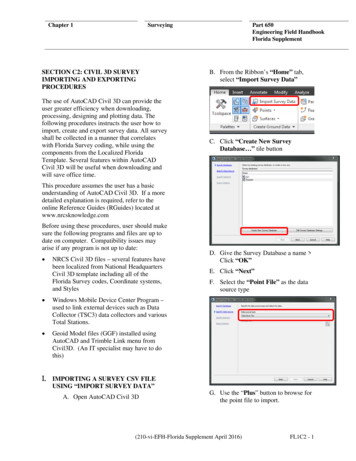
Chapter 1SurveyingSECTION C2: CIVIL 3D SURVEYIMPORTING AND EXPORTINGPROCEDURESThe use of AutoCAD Civil 3D can provide theuser greater efficiency when downloading,processing, designing and plotting data. Thefollowing procedures instructs the user how toimport, create and export survey data. All surveyshall be collected in a manner that correlateswith Florida Survey coding, while using thecomponents from the Localized FloridaTemplate. Several features within AutoCADCivil 3D will be useful when downloading andwill save office time.Part 650Engineering Field HandbookFlorida SupplementB. From the Ribbon’s “Home” tab,select “Import Survey Data”C. Click “Create New SurveyDatabase ” tile buttonThis procedure assumes the user has a basicunderstanding of AutoCAD Civil 3D. If a moredetailed explanation is required, refer to theonline Reference Guides (RGuides) located atwww.nrcsknowledge.comBefore using these procedures, user should makesure the following programs and files are up todate on computer. Compatibility issues mayarise if any program is not up to date: NRCS Civil 3D files – several features havebeen localized from National HeadquartersCivil 3D template including all of theFlorida Survey codes, Coordinate systems,and Styles Windows Mobile Device Center Program –used to link external devices such as DataCollector (TSC3) data collectors and variousTotal Stations. Geoid Model files (GGF) installed usingAutoCAD and Trimble Link menu fromCivil3D. (An IT specialist may have to dothis)I.IMPORTING A SURVEY CSV FILEUSING “IMPORT SURVEY DATA”A. Open AutoCAD Civil 3DD. Give the Survey Database a name Click “OK”E. Click “Next”F. Select the “Point File” as the datasource typeG. Use the “Plus” button to browse forthe point file to import.(210-vi-EFH-Florida Supplement April 2016)FL1C2 - 1
Chapter 1SurveyingH. Browse to CSV survey file, select it,and click “Open”I.Under Specify Point Format choosethe format “PNEZD” as this istypical of survey data imported as aCSV or TXT file.Part 650Engineering Field HandbookFlorida SupplementL. Give the new network a name anddescription (Date) in the value box. Click “OK”M. Click “Next”N. From the “Import Survey Data –Import Options” dialog box –make sure that “Insert SurveyPoints” is toggled to “Yes”J.Click “Next”K. Click on the “Create NewNetwork ” buttonFL1C2 - 2(210-vi-EFH-Florida Supplement April 2016)
Chapter 1SurveyingO. Hit “Finish” and the Survey willimport into the drawing.P. A Survey Database will be createdand the survey may be imported intoany new or existing drawing.II.IMPORTING A SURVEY FIELDBOOKFILE USING “IMPORT SURVEYDATA”A. Open Civil 3DB. From the Ribbon’s “Home” tab,select “Import Survey Data”.Part 650Engineering Field HandbookFlorida SupplementF. Importing a Fieldbook, click on the“Browse” icon and locateFieldbook, and “Click “Open”G. The Fieldbook will highlight withinthe “Import Survey Data” dialogbox, Click “Next”H. Click the “Create New Network”tile button on the bottom.I.Give Network a “Name” and a“Description” and Click “Ok”J.Click “Next”K. Make Sure all Import Information iscorrect and Click “Finish”L. Survey will be imported into theModel Space of Civil 3D.C. Click “Create New SurveyDatabase ” tile button.D. Give the Survey Database a nameand click “OK”III. CONVERTING A TSC3 DATACOLLECTOR JOB FILE TO A CSVFILEName DatabaseClick “OK”A. On the Trimble Device home pageselect the “General Survey” iconB. Click on the “Jobs” iconC. In the “Jobs” folder select the“Import/Export” tile.E. Specify data source as “Field BookData”.D. Click on the “Export FixedFormat” tile.E. In the “Export Custom Format”window make sure the file format is(210-vi-EFH-Florida Supplement April 2016)FL1C2 - 3
Chapter 1SurveyingPart 650Engineering Field HandbookFlorida SupplementNote: There will be two devices, onementioned above and a connectiondevice that allows the data collector touse a different Trimble Communicationscable to the computers COM1 portcalled “Survey Controller on COM1”.“Comma Delimited (*.CSV,*.TXT)” and open the correct filethat is needed.F. Click the “Accept” tileIV. CONVERTING A TSC3 DATACOLLECTOR JOB FILE TO AFIELDBOOK FILEA. On the Trimble device home pageselect the “General Survey” tile.B. Click on the “Jobs” tile.C. In the “Jobs” folder select the“Import/Export” tile.D. Click on the “Export CustomFormat” tile.E. In the “Export Custom Format”window make sure the file format is“FBK file” and open the correct filethat is needed.F. Once the device is selected, a list ofjobs within that device will bedisplayed.F. Click the “Accept” tileV.IMPORTING A TSC2 JOB FILE INTOCIVIL 3D USING TRIMBLE LINKA. Open and save a new drawing in Civil3D. Place in the proper project folderand give it a file name.B. Plug the TSC2 Data collector into thecomputer.C. MS Active Sync will sync Datacollector with the computer and willbring up a dialog box notifying theconnection between the computer andthe Data collector.G. Select the job to be imported and click“Open”D. In Civil 3D select “Import Job” fromthe “Trimble” menu.H. The Job file will then be RECEIVED,and then CONVERTED. Note: if awarning message opens select “Yes”to continue.E. From the list of Devices, select“Survey Controller on Activesync”.I.FL1C2 - 4This will open a “Check In” dialogbox, to view the point number FeatureCode, Rod Height, and sometimes(210-vi-EFH-Florida Supplement April 2016)
Chapter 1SurveyingAntenna Type and Antenna method.Click “OK” to accept. See Figure B5.Note: if you have two survey job files inone survey database, this is a greatplace to renumber the survey pointsbefore you import them into thedrawing. Using the “Renumber ”button to perform this. This eliminatesthe duplicate point issue.J.In the Import survey dialog box select“Create New Survey Database” andname the survey database. The nameof the project will do.Part 650Engineering Field HandbookFlorida SupplementAdding points to an existing surveyselect “Add to an Existing SurveyNetwork” select the network or surveyjob to add the points to. (Two different.job files same project). You may haveto renumber the points with the use ofthe Check-in to avoid duplicate pointnumbers.L. Check all three boxes under “Surveynetwork storage”.M. Leave “Survey Equipment Details”as is.N. Select the figure prefix database“NRCS Figure prefix” or a figureprefix database that was lined out bythe State Office.O. Click “OK” the points will import.P. Two things will happen, the JOB filewill convert to an AutoCADFieldbook (FBK file, and thefieldbook file will be imported.Q. Trimble Link will inform the user ofsurvey data imported. Select “OK” toclose the window.K. Select “Add a New SurveyNetwork” for new surveys. Input aname for the new survey network.(210-vi-EFH-Florida Supplement April 2016)FL1C2 - 5
Chapter 1SurveyingPart 650Engineering Field HandbookFlorida SupplementR. Perform zoom extents.IX.IMPORTING A TSC3 JOB FILE INTOCIVIL 3D USING TRIMBLE LINKA.Open and save a new drawing inCivil 3D. Place in the properproject folder and give it a filename.B.Plug the TSC3 Data collectorinto the computer.C.MS Active Sync will sync Datacollector with the computer andwill bring up a dialog boxnotifying the connectionbetween the computer and theData collector.D.In Civil 3D select “ImportJob” from the “Trimble Link”Ribbon.E.A pop-up window will appeardiscussing “Communicationswith a Trimble Device” if thisis the first time importing a jobfrom the TSC3. Uncheck the“show this information nexttime” box to forgo this step infuture import jobs and then click“Close”FL1C2 - 6F.From the list of Devices, select“General Survey” and click“Open”.G.If General Survey is not listedclick on the “Create NewDevice” icon. Scroll down to“General Survey” and leftclick on it. Click “OK”(210-vi-EFH-Florida Supplement April 2016)
Chapter 1SurveyingPart 650Engineering Field HandbookFlorida SupplementL.H.Once the device is selected, alist of jobs within that devicewill be displayed.I.Select the job to be importedand click “Open”J.If a “Confirm File Replace”pop-up window appears askingto replace the NRCS Codes.fxlselect “Yes”.Note: if you have two survey job files inone survey database, this is a greatplace to renumber the survey pointsbefore you import them into thedrawing. Using the “Renumber ”button to perform this. This eliminatesthe duplicate point issue.M.K.The Job file will then beRECEIVED, and thenCONVERTED. Note: if awarning message opens select“Yes” to continue.This will open a “Check In”dialog box, to view the pointnumber Feature Code, RodHeight, and sometimes AntennaType and Antenna method.Click “OK” to accept. SeeFigure B-5.An “Import OperationDetails” pop-up window willappear directing the user onwhere to find the Field BookFile which was just created fromthe step above if this is theuser’s first time using thisimport method. Uncheck the“Show this information nexttime” box and then click“Close”.(210-vi-EFH-Florida Supplement April 2016)FL1C2 - 7
Chapter 1N.O.FL1C2 - 8SurveyingIn the Import survey dialog boxselect “Create New SurveyDatabase” and name the surveydatabase. The name of theproject will do. Click “OK” andthen click “Next”.On the Import Survey DataSpecify Data Source dialog boxmake sure the Data Source typeis set to “Field Book File”.Click on the Browse icon tosearch for the Field Book Filethat was created for the surveyjob when imported in theprevious steps. The Field bookFile will be on the Computer’shard drive. Once the file path isfound click “Next”.Part 650Engineering Field HandbookFlorida SupplementP.On the Import Survey DataSpecify Network select “CreateNew Network” for newsurveys. Input a name for thenew survey network and thenclick “OK”. Once the surveynetwork appears in the pop-upwindow click “Next”.Adding points to an existing surveyselect “Add to an Existing SurveyNetwork” select the network or surveyjob to add the points to. (Two different.job files same project). You may haveto renumber the points with the use ofthe Check-in to avoid duplicate pointnumbers.(210-vi-EFH-Florida Supplement April 2016)
Chapter 1SurveyingPart 650Engineering Field HandbookFlorida SupplementV.Q.On the Import Survey DataImport Options check the“Process linework duringimport”, “Import figureobjects”, and “Import surveypoints” boxes.R.Leave “Current equipmentdatabase” and “Currentequipment” as is.S.Select the current Florida’sLocal Figure Prefix DatabaseT.Select the current “Linework”code setU.Click “Finish” the points willimport.Perform zoom extents to seesurvey data.(210-vi-EFH-Florida Supplement April 2016)FL1C2 - 9
Chapter 1SurveyingTHIS PAGE IS INTENTIONALLY LEFT BLANKFL1C2 - 10(210-vi-EFH-Florida Supplement April 2016)Part 650Engineering Field HandbookFlorida Supplement
CIVIL 3D USING TRIMBLE LINK A. Open and save a new drawing in Civil 3D. Place in the proper project folder and give it a file name. B. Plug the TSC2 Data collector into the computer. C. MS Active Sync will sync Data collector with the computer and will bring up a dialog box notifying the c