Transcription
User Guideecobee3 2014 ecobee250 University Ave Suite 400Toronto Ontario M5H 3E5Canada Toll free 1.877.932.6233www.ecobee.come3-UG-R003a1
Table of ContentsVentilator/HRV/ERV (if installed) . 13Adjusting Sensor Modes . 14Smart Home/Away . 14Follow Me . 14Adjusting Comfort Settings . 14Setting Your Weekly Schedule . 15Going on Vacation . 16Overview . 4Getting Help . 4Touch Screen . 4Web Portal . 5Guided Setup Process . 5Caring for your Thermostat . 17Step 1. Wiring Configuration. 5Step 2. Accessory Confirmation . 5Step 3. Temperature Preference Setup . 6Step 4. Equipment Configuration . 6Heat Pumps . 6Furnaces/Boilers . 6Fans . 6Humidifier . 6Dehumidifier . 6Ventilators (ERV/HRV) . 7Step 5. Name Your Thermostat . 7Step 6. Configure Ideal Temperatures . 7Step 7. Select Current HVAC System Mode . 7Step 8. Configure Sensor Settings . 7Step 9. Wi-Fi Configuration . 7Wireless Accessory Configuration . 8Manual Configuration . 8Step 10. Date & Time . 8Step 11. Web Portal/Mobile App Registration . 9Home Screen . 9Standby Screen . 10Adjusting the Temperature . 10Main Menu . 10Quick Changes . 11Weather . 11System Icons . 12Selecting System Operation Mode . 12HVAC System . 12Fan . 12Humidifier (if installed). 13Dehumidifier (if installed) . 13Cleaning . 17Rebooting . 17Resetting the Thermostat . 17Troubleshooting . 18Reminders & Alerts . 18Viewing Reminders . 18Viewing Alerts . 18Configuring Reminders & Alert Preferences . 19HVAC Maintenance . 19Furnace Filter . 19Ventilator Filter (if installed) . 19UV Lamp . 19Low Temp Alert . 19High Temp Alert . 19Aux Heat Runtime Alert . 20Aux Outdoor Temp Alert . 20Low Humidity Alert. 20High Humidity Alert . 20Display Alerts on Thermostat . 20Enable Heating/Cooling Alerts . 20Lost Communication With Sensor/Low Battery Alerts . 20Customizing Your Thermostat . 21Date & Time . 21Temperature Display. 21Heating/Cooling Ranges . 21Thermostat Name . 21Screen Brightness . 21Active to Standby Screen Timer . 22Hold Action Duration . 222
Smart Recovery . 22Access Control . 22Compressor Stage 1 Max Runtime. 29Compressor to Aux Temp Delta . 30Compressor to Aux Runtime . 30Temperature Correction. 30Installer Code . 30Test Equipment . 30Configuring Wi-Fi Settings . 23Wi-Fi Radio . 23Network . 23Advanced Settings . 23Diagnostics. 24Wiring Diagrams . 31Conventional heating and cooling . 31Heat Only. 31Heat and Cool . 31Heat and Cool (2 Stage Heat) . 31Heat pumps . 32Air or Geothermal Heat Pump with Auxiliary Heat . 32Air or Geothermal Heat Pump (2 Stages) with Auxiliary Heat. 32Boiler or radiant systems . 32Boiler or Radiant System with Air Handler and ConventionalCooling or Heat Pump . 32Boiler or Radiant System (2 stages) with Air Handler andConventional Cooling or Heat Pump . 33Accessory devices . 33PEK thermostat wiring . 33Configuring HomeKit . 24Using Siri . 24Registering . 25Making Changes to Your Account . 25Moving to New House . 25Changing Thermostat Owner . 25Installation Settings . 25Equipment Wiring . 25Equipment Settings . 25Heat Pump . 25Furnace. 26Humidifier . 26Dehumidifier . 26Ventilator . 27Reconfiguring Equipment . 27Thresholds . 27Auto Heat/Cool . 27Heat/Cool Min Delta . 27Compressor Min Cycle Off Time. 27Compressor Min Outdoor Temp . 28AC Overcool Max . 28Aux Heat Max Temp . 28Heat Differential Temp. 28Heat Dissipation Time . 28Heat Min On Time. 28Cool Differential Temp . 29Cool Dissipation Time . 29Cool Min On Time . 29Compressor Reverse Staging. 29Compressor Stage 2 Temp Delta . 29Icon Reference . 34Home Screen . 34System Operation . 34Menus . 34Comfort Settings . 34Weather. 34Wi-Fi Connectivity . 34Menu Reference . 34Approvals . 36FCC Compliance Statement . 363-Year Limited Warranty . 37End User Software License Agreement . 383
OverviewTouch ScreenYour ecobee3 has a touch screen, similar to that used insmartphones and tablets.Do you hear that?That’s the sound of hundreds of thousands of ecobee-erswelcoming you to the hive.Touch items to select or activate them. Formenus with a , this will expand the menu todisplay additional options or submenus.Congratulations on the purchase of your new ecobee3 smarterwi-fi thermostat with remote sensor. This guide will provide anoverview of the features and capabilities of the new productand will help you get up and running.Swipe up and down to display additionalinformation. Swiping on a temperature bar willalso adjust the settings up or down.Make sure you also take a look at the Quick Start Guide and theInstallation Guide that come in the box with your ecobee3. Remote sensors – Deliver the right temperature in therooms that matter most as well as detect when theserooms are occupied.Smart – Your ecobee3 understands your home’s uniqueenergy profile and the weather outside, making sureyou’re comfortable at all times.Intuitive – With its 3.5" full color touch display, yourecobee3 has intuitive controls just like your smartphone.Accessible from anywhere – Monitor and control thetemperature in your home anytime, anywhere, on yoursmartphone, tablet, or computer.Swipe left and right to scroll horizontal lists thatcontain multiple items to choose from.Exit or gobackGetting HelpIf you have any questions, we have answers. Visithttps://www.ecobee.com/faqs/ecobee-3 for tutorials, how-tovideos and FAQs.Technical support is also available by email or by phone:support@ecobee.com1.877.932.6233 (North America)1.647.428.2220 (International)4To exit a submenu, touch .To close the main menu, touch.
Guided Setup ProcessWeb PortalOnce registered (page 9), you can log in to your web portaland manage your ecobee3 from your computer or tablet.The Installation Guide that ships with your ecobee has thenecessary instructions to wire up and install your device. Afterinstalling your ecobee3 thermostat on the wall and powering itup, you will be guided through the first-run process. Completethese steps to get it configured and connected online so youcan make use of all its smart features.This will take you through the following steps: Wiring configuration and equipment configurationSetting your preferencesWi-Fi configurationRegistering your ecobee3If you make a mistake at any time or want to review a setting,you can touch Back to display the previous screen.From the web portal, you can: Step 1. Wiring ConfigurationControl current temperature and operationAdjust your scheduleSet vacation periodsView the weather forecast for your areaSet thermostat preferencesManage all your ecobee thermostatsSave energy with HomeIQ and insightsYour ecobee3 automatically detects and displays which wiresare connected to it when it first powers on. It will warn you ifyou’ve wired a configuration that it doesn't recognize.If the reported connections are different than what you haveactually connected, call ecobee support for guidance.Touch Next to continue.To access your customized web portal, visit ecobee.com andclick on the Login link.Step 2. Accessory ConfirmationTo select a tile, touch or click on it. To close a tile and returnback to the main screen, touch or click(top-right corner).Your ecobee3 will ask if you have any accessories likehumidifier, dehumidifier, or ventilator connected to it.Touch Yes if you have one of these devices; otherwise touchNo.If you selected Yes, you will need to specify if the accessory isinternally powered: 5Touch Yes if your accessory is externally powered(i.e. the ecobee3 does not provide power to it). This is thecase if there are connected to both ACC and ACC-.
Touch No if your accessory receives power from yourecobee3. There will be a single wire to ACC .2. Configure the heater type: Need Help? See page 33 for information on how to determineyour accessory device's power configuration. Touch Next to continue.Furnace: Optimizes ecobee3 for systems using forcedairBoiler: Optimizes your ecobee3 for systems usingradiators or in-floor heat.3. Touch Next. You will be returned to the Equipmentconfiguration menu.Step 3. Temperature Preference SetupYour ecobee3 will ask you to select Fahrenheit or Celsius as yourpreferred temperature units. Touch Next to continue.FansIf your furnace uses forced air, you may configure fanoperation:Step 4. Equipment ConfigurationYour ecobee3 will ask you to configure your equipment.Depending on your wiring, different options will be available.These options will configure basic system operation as well asoptimize the system for your specific type of equipment.1. Select Fan menu.2. Select Fan operation: Review the list to see if any devices require additionalconfiguration ("Configuration needed") and if the defaultsettings are valid. Thermostat: Your ecobee3 thermostat controls the fanduring heat and cool cycles.HVAC: Your equipment controls the fan during heatand cool cycles (typical configuration).3. Touch Next. You will be returned to the Equipmentconfiguration menu.Once you are done, touch Next to continue.Heat PumpsHumidifierIf you have a heat pump installed:If you have a humidifier installed:1. Select the heat pump menu.2. Select Air to Air or Geothermal depending on the type ofyour heat pump system3. Specify what the heat pump runs when the O/BReversing Valve is engaged: On Cool runs cooling whenO/B engages (most cases), or On Heat runs heatingwhen O/B engages.4. Touch Next. You will be returned to the Equipmentconfiguration menu.1.2.3.4.Select Accessory menu.Select Humidifier.Touch Next.Select the type of humidifier you have: Evaporative orSteam. If unsure, select Evaporative.5. Touch Next. You will be returned to the Equipmentconfiguration menu.DehumidifierIf you have a dehumidifier installed:Furnaces/Boilers1. Select Accessory menu.2. Select Dehumidifier.If you have a furnace or boiler installed:1. Select the heating menu.6
3. Touch Next.4. Select Open if the dehumidifier is active when the relay isopen; otherwise select Closed. If unsure, select Closed (ifthe dehumidifier runs when it shouldn't, you can changethis option in the Equipment Configuration menu (page25).5. Touch Next. You will be returned to the Equipmentconfiguration menu.Step 6. Configure Ideal TemperaturesNext, slide the set-point bubble up and down to select thepreferred, normal temperature for your home during winter andsummer (touch Next after each). This setting will be used togenerate the default comfort settings.Step 7. Select Current HVAC System ModeSelect the operating mode of your HVAC equipment. Forexample, if you want to set your HVAC system to heat, selectHeat. If you do not want the system to run, select Off.Ventilators (ERV/HRV)If you have a ventilator (ventilator, ERV or HRV) installed:1.2.3.4.5.6.7.8.9.Touch Next to continue.Select Accessory menu.Select Ventilator.Touch Next.Select the type of ventilator you have installed:Ventilator, Energy Recovery Ventilator or Heat RecoveryVentilator.Touch Next.Select the preferred minimum runtime (min/hr) when yourhome is occupied and the runtime for when your home isunoccupied. If unsure, keep the default 20 min/hr valueor contact a professional.For HRVs, select whether or not you would like to use it tuse it to dehumidify in winter.For Ventilators, select whether or not you would like toenable free cooling.Touch Next. You will be returned to the Equipmentconfiguration menu.Step 8. Configure Sensor SettingsYour ecobee3 includes sensors that can determine when youare home. You can have your thermostat automatically go intoenergy savings mode when you are away. For a detaileddescription of how the settings work, see page 14.1. Enable or disable Smart Home/Away setting.If enabled, your ecobee3 senses when you are homeduring a scheduled Away period, or away during ascheduled Home period, and will automatically overrideyour scheduled settings to maximize comfort andsavings.2. Touch Next to continue.Step 9. Wi-Fi ConfigurationTo get the most out of your ecobee3, it needs to connect toyour home's Wi-Fi network.Step 5. Name Your ThermostatTouch Next to configure your network settings. If you do notwant the ecobee3 to connect to the Internet, touch Skip andconfirm the action by pressing Next.After configuring your equipment, you will be prompted to giveyour ecobee3 a name. Select a name from the list or enter yourown using the on-screen keyboard.There are two ways to configure your Wi-Fi networks settings. Ifyou have an Apple iPod, iPhone, iPad or a Mac computer, youcan use the Wireless Accessory Configuration to setup your Wi-Fipassword. If you do not, you can still find your network andsetup the password manually.This name will appear in your web portal, so pick a name thatmakes it easy to identity your thermostat (this is especiallyimportant if you have more than one in your house).Touch Next to continue.7
2. This will take you through the manual Wi-Fi set-up processwhere you will have to enter in information about yournetwork such as if it’s a DHCP or a static IP, the networkSSID name, the encryption, the password etc.3. After connecting to the Internet, your ecobee3 willregister itself with the ecobee servers and provide youwith a 4-digit code.4. Write down the 4-digit code. You will need it whenregistering your ecobee3 (You can register from eitherecobee's Mobile App or Web Portal).Wireless Accessory ConfigurationWAC is very convenient as it does not require remembering theWi-Fi password or typing it in. From the Wi-Fi Configurationscreen, choose the first option Use iPhone, IPad or iPod.Then follow the instructions displayed on the thermostat. Oncethe setup is complete, you will see the Connection Completedscreen on the thermostat and the Setup Complete screen onthe phone. You will now be connected to the same Wi-Finetwork as the phone, typically your home Wi-Fi network.Touch Next to continue.Step 10. Date & TimeThe Date & Time screen lets you configure your time zonesettings. If you didn't configure Wi-Fi in the previous step, youmay need to reconfigure the current time and date. Thesesettings are required in order for the scheduling features of yourecobee3 to work properly.Manual ConfigurationWhen configuring your network settings, your ecobee3 willdisplay a list of all visible Wi-Fi networks along with their signalstrength. If your network has weak signal strength, try movingyour router closer to the ecobee3.If Wi-Fi is configured:1. Touch Time zone.2. Select your country from the list and touch Next.3. Select your time zone by picking the name of the nearestcommunity from the list.4. Touch Next.5. Touch Next to continue.If your network appears in the list1.2.3.4.Select your network from the listTouch Next.Enter your password, if prompted.After connecting to the Internet, your ecobee3 willregister itself with the ecobee servers and provide youwith a 4-digit registration code.5. Write down the 4-digit code. You will need it whenregistering your ecobee3 (You can register from eitherecobee's Mobile App or Web Portal).If Wi-Fi is not configured:1. Touch Date.2. Slide up and down to set the current date and touchSave3. Touch Time.4. Slide up and down to set the current time and touchSave.5. Touch Time zone.6. Select your country from the list and touch Next.7. Select your time zone by picking the name of the nearestcommunity from the list.If it's not listed, select My network is not visible and touch Next(you will have to enter your network parameters manually,including the SSID).1. If your network is password-protected, enter thepassword.8
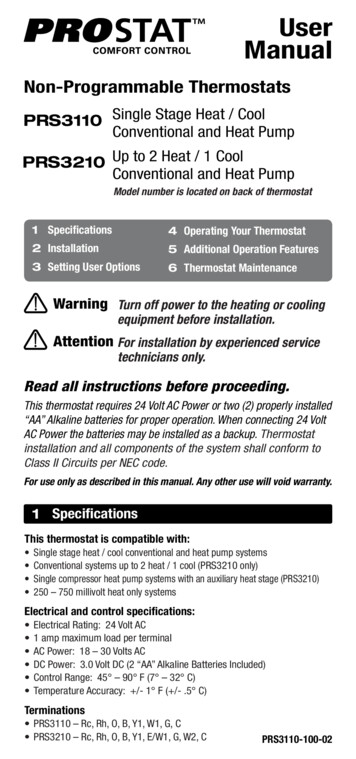
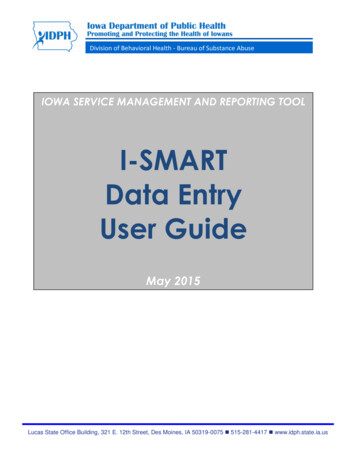
8. Touch Next.9. Touch Next to continue.Basic FunctionsThe bright, easy-to-read touch screen on your ecobee3thermostat makes it simple to review and adjust settings anytime you want.Step 11. Web Portal/Mobile App RegistrationAfter setting up Wi-Fi on your ecobee3 and obtaining theregistration code, you need to configure your account fromeither the ecobee3 Mobile App or the Web Portal.Home ScreenYour ecobee3 will automatically display the home screen whenyou approach it.To register from the Web Portal:1. From a web browser, visit www.ecobee.com2. Click on the Register link.3. Follow the on-screen instructions to register your account.To register from the Mobile App:1. Download the app to your iPhone or Android devicefrom the respective app store.2. Launch the ecobee3 app.3. Follow the on-screen instructions to register your account.If you have already registered one thermostat and are addinga subsequent HomeKit enabled thermostat using the iOS mobileapp, the process is very simple.1. Locate your thermostat on the list, using its name.2. To identify which thermostat you are seeing, press Say Hiand a message will show up on the thermostat allowingyou to identify it.3. Then select Add.4. Enter the code from the thermostat on the phone andpress OK.5. Select the room for the thermostat and say Next.6. The thermostat has been added & registered.91Current system mode and any equipmentcurrently running2Current relative humidity3Current indoor temperature4Messages indicating any special operatingmode or state (e.g. resume, temperaturehold, etc)5Main menu. If a dot appears on the icon,you have important message(s) to read.6Weather forecast7Quick Change menu
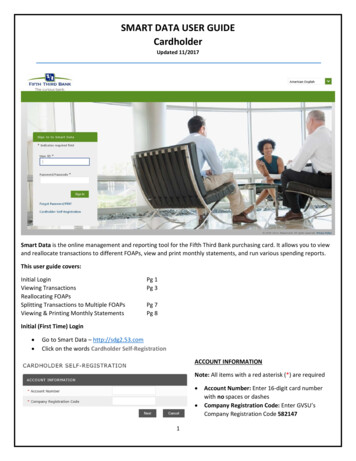
8Adjustable heat and cool set points. If theSystem Mode is set Auto, both aredisplayed; otherwise only heat or cool isdisplayed.The new desired temperature will be the set point used for theHold. The duration of the Hold is the last configured value (thedefault value is Until I change it, meaning it keeps the valueindefinitely, until you choose to revert to the schedule orchange it). You can adjust the default Hold time in thePreferences menu (page 22).Standby ScreenTo cancel the current Hold, touch the Hold message boxdisplayed on the Home screen. You can touch the boxanywhere and not just the X displayed on the box.The standby screen activates whenever the thermostat is not inuse. It shows the current indoor temperature and outdoorweather conditions.Main MenuTo show the main menu, touch the screen and touch.Registration Registers your ecobee3. This menu itemdisappears after you have registered.1 Current indoor temperature2 Current outdoor weather andtemperatureThe standby screen is configurable. You can adjust: Standby screen activation time (page 22)Standby screen brightness (page 21)SystemSelects mode of operation:heat/cool/auto, fan on/off, and anyaccessory (page 12)SensorsManages sensors and lets you adjust SmartHome/Away and Follow Me settings (page14)ScheduleManages temperature according to timeand day (page 15)ComfortSettingsManages temperature for different climatestates (Away, Home, Sleep) (page 14)VacationManages thermostat settings for a vacationperiod (page 16)Reminders& AlertsDisplays any reminder or alert messages(page 18)SettingsAdjusting the TemperatureYou can override the scheduled temperature by moving thebubble on the temperature slider up or down. The blue numberrepresents the cool set point; the orange number represents theheat set point.About10Manages display preferences ( F/ C,date, brightness), Wi-Fi, and equipmentoperating parameters (thresholds,sensors, etc) (page 21)Displays technical information about your
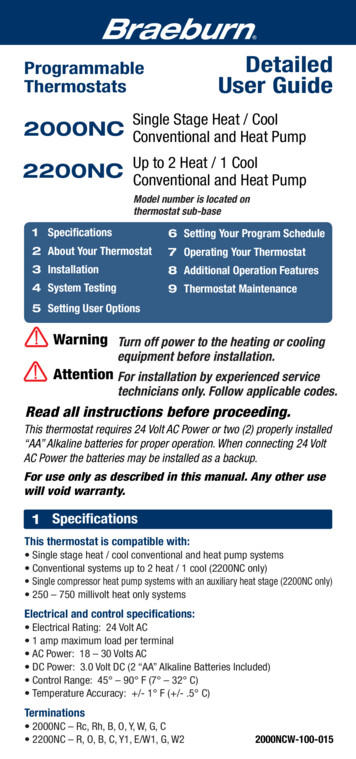
thermostat (page 18).6Quick ChangesThe Quick Changes screen lets you quickly adjust the operationof the ecobee3 and your equipment.Internet connection and ecobee serverconnection status. If this icon is red, you cancontact our technical support team for help(page 4).Hint: You can also apply quick changes from the web portal byclicking on the Fan or Quick Changes tiles.WeatherTouch the Weather icon to display a local weather forecast forthe week as well as a detailed daily forecast.1Current time and date display2Home and Away buttons. Touch these buttonsto override your programmed schedule. Tocancel this action, touch the message box onthe Home screen.3Toggle fan between Auto and On. Touch Onto run the fan continuously. Touch Auto to runthe fan according to the Minimum Runtime perHour setting (page 25).45If you have a ventilator, ERV or HRV installed,touch On to run the device for 20 minutes(page 27)1Current weather conditions2Current outdoor temperature3Probability of precipitation (POP), relativehumidity, and daily high/low temperature424-hour weather forecastNote: To receive the local weather forecast, you must firstregister your thermostat (page 23). For a complete list ofweather icons, see page 34.Icons indicate if heat, cool, fan, and anyaccessories are actively running (see page 11for icon descriptions)11
System IconsThe icons on the Home screen and Quick Changes menu showinformation about the status of your HVAC system.HeatCoolFanAuto An orange heat icon indicates that yourthermostat is calling for heat. A white heaticon indicates that your system is in heat orauto mode but is not currently calling for heat.On Thermostat and Mobile:Select Main Menu System HVAC SystemA blue cool icon indicates that yourthermos
Smart – Your ecobee3 understands your home’s unique energy profile and the weather outside, making sure you’re comfortable at all times. Intuitive – With its 3.5" full color touch display, your ecobee3 has intuitive control