Transcription
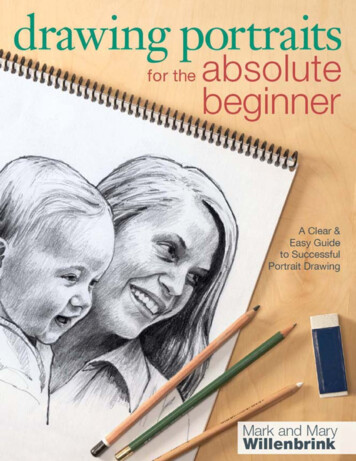
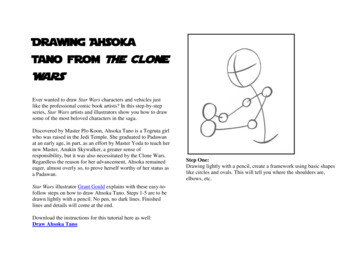
Drawing AhsokaTano from The CloneWarsEver wanted to draw Star Wars characters and vehicles justlike the professional comic book artists? In this step-by-stepseries, Star Wars artists and illustrators show you how to drawsome of the most beloved characters in the saga.Discovered by Master Plo Koon, Ahsoka Tano is a Togruta girlwho was raised in the Jedi Temple. She graduated to Padawanat an early age, in part, as an effort by Master Yoda to teach hernew Master, Anakin Skywalker, a greater sense ofresponsibility, but it was also necessitated by the Clone Wars.Regardless the reason for her advancement, Ahsoka remainedeager, almost overly so, to prove herself worthy of her status asa Padawan.Star Wars illustrator Grant Gould explains with these easy-tofollow steps on how to draw Ahsoka Tano. Steps 1-5 are to bedrawn lightly with a pencil. No pen, no dark lines. Finishedlines and details will come at the end.Download the instructions for this tutorial here as well:Draw Ahsoka TanoStep One:Drawing lightly with a pencil, create a framework using basic shapeslike circles and ovals. This will tell you where the shoulders are,elbows, etc.
Step Two:Now it's time to flesh out your body shapes a bit more. Again,very lightly with your pencil, draw the arms, belt, lightsaberhandle, head and torso.Step Three:Once you have the basic structure of the body in place, you can startadding in details, such as her face and head decorations. Feel free toerase and redraw your lines until they look just right.
Step Four:Take a look at each piece of clothing on Ahsoka, such as hergloves and belt, and fill in the details accordingly. Also be sureto add those final touches to her lightsaber handle.Step Five:Go over your final lines with a pen or marker. Once your ink lines aredry, erase the pencil lines. Or use heavier pencil lines over the lighterones. However you decide to finish your drawing is completely up toyou!
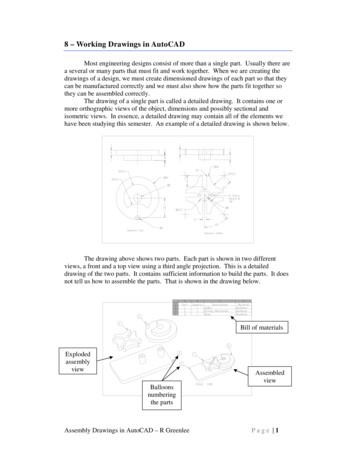
Drawing AnakinStar Wars illustrator Grant Gould explains with these easy-to-followsteps on how to draw Anakin Skywalker from Star Wars: The CloneWars. Steps 1-4 are to be drawn lightly with a pencil. No pen, no darklines. Finished lines and details will come at the end.Clone WarsDownload the instructions for this tutorial here as well:Draw Anakin SkywalkerSkywalker from TheEver wanted to draw Star Wars characters and vehicles justlike the professional comic book artists? In this step-by-stepseries, Star Wars artists and illustrators show you how to drawsome of the most beloved characters in the saga.Step One:Drawing lightly with a pencil, create a framework using basic shapeslike circles and ovals. The key is to start simple and flesh it out as yougo.
Step Two:Draw the head, chest and shoulders of Anakin. Very lightlywith your pencil, create the body and armor outlines over yourframework.Step Three:Now's a good time to draw Anakin's hair, eyebrows, nose, and mouth.And don't be afraid to erase and redraw lines if need be. Practicemakes perfect!
Step Four:Now that you have the framework down and all of Anakin'smajor facial features, you can start adding more details such asthe lines in his hair, the scar on his face, shading on his nose,the indents on his armor, etc. It can be helpful to use imagesfrom The CLone Wars as a reference too.Step Five:Go over your final lines with a pen or marker. Once your ink lines aredry, erase the pencil lines. Or use heavier pencil lines over the lighterones. However you decide to finish your drawing is completely up toyou!
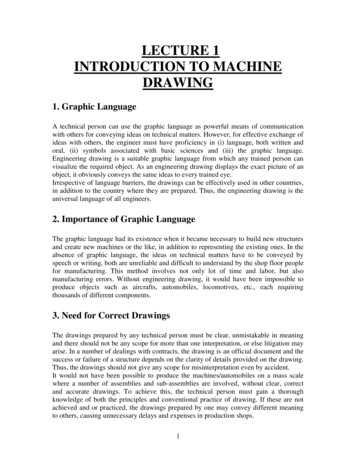
Drawing an ARC Trooper HelmetShareEmailArchivesSeptember 23, 2010Ever wanted to draw Star Wars characters and vehicles just like the professional comic book artists? In this step-by-step series, Star Wars artists and illustrators show you how to draw some ofthe most beloved characters in the saga.Star Wars illustrator Grant Gould explains with these easy-to-follow steps how to draw the ARC trooper helmet from Season 3 of The Clone Wars.Steps 1-4 are drawn lightly with pencil. No pen, no dark lines. Finished lines and details will come at the end.
Step One:Using a pencil, begin with very simple, light strokes. Start with an oval shape and a couple quick, curved lines to show you where the center of the trooper's helmet will be, as well as the visor.Remember, for these early steps, it's best to keep your lines very light. This way you can erase and redraw them if need be.
Step Two:Continue adding in some of the basic shapes of the helmet by drawing two "bumps" along each side where the clone's jaw would be (they should almost look like Twinkies). And you can alsodraw an outline of the fin at the top of the helmet. The fin at this stage looks a lot like a shark fin.
Step Three:Now we want to draw in the visor, which you'll notice is slightly different from the usual clone visors we've seen thus far in The Clone Wars. These are the new ARC troopers, adapting more of anEpisode III appearance, so take note of the shapes here. You can also add in a couple parallel lines above the eye/visor area. Again, make sure your pencil lines are very light. We don't want tomake anything too final yet; you may still want to make a few changes to your sketch.
Step Four:It's time to add in the last batch of basic shapes, as you can see in the example image here. Once these are drawn in, you'll have a good sketch to work with -- if something looks strange or outof place, this is a good place to go in, erase, and redraw it. As we move on to Step 5, it's time to start creating your final image!
Step Five:Now, using bolder pencil lines or a pen, you can use your lighter sketch lines as a guide, and essentially trace what you've created thus far. Having basic shapes and a rough sketch will help giveyou the confidence and skill to create a great looking final drawing. When you're done with your final lines, you can fill in certain areas, too, such as the visor.
Step Six:Now, since this is an ARC trooper, you can go in and add the last details to the helmet, making it stand apart from other troopers. Feel free to use a pencil to lightly shade in areas. If you prefer,you can even give the helmet its own unique markings -- you can design it to look however you like!
Step Seven:And here's a color version that I created digitally in Photoshop. You can use markers or crayons or whatever you like -- it's completely up to you!
Drawing Asajjventress from TheClone Warsseries, Star Wars artists and illustrators show you how to draw some ofthe most beloved characters in the saga.Star Wars illustrator Cynthia Cummens explains with these easy-tofollow steps on how to draw Asajj Ventress from Star Wars: TheClone Wars. Steps 1-4 are to be drawn lightly with a pencil. No pen,no dark lines. Finished lines and details will come at the end.Step One:Start with drawing a few lines to capture the pose of the figure. Drawwith a light hand, not too much pressure. Keep your lines loose andenergetic.Ever wanted to draw Star Wars characters and vehicles justlike the professional comic book artists? In this step-by-step
shapes. You'll erase some of those lines later.Step Two:Using simple shapes, and following the lines you drew in Step1, draw her arms and body. Don't be afraid to draw throughoverlappingStep Three:Start defining and shaping the body contours and add her facialfeatures.
Step Five:Grab your colored pens and start inking! If you want to get fancier, tryusing Copic markers or Microns. Afterwards, erase the pencils linesyou no longer need.Step Four:Lightly sketch in some details of her clothes and face.
Step Six:Color Asajj with colored pens, or professional Copic Markers.You can also scan your inked image and color it in Photoshop,or use watercolors if you like. Have you tried colored pencil?Add some white highlights with white colored pencil, gouacheor white acrylic. Deleter White, often used by comic bookartists, is also very effective for highlights. Experiment with artsupplies until you get the results you like best.Step Seven:Here's the final art with lightsabers! Remember to draw daily. Andwhen possible draw from life -- either at the zoo, in the park, at school,anywhere. Remember, it takes lots of practice to become a skilledartist. Stick with it and you'll yourself transform over time into anamazing artist. Good luck!
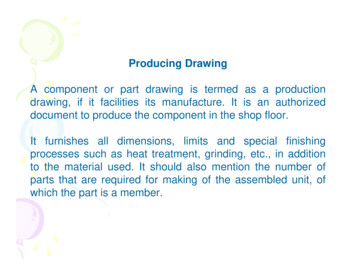
Drawing Battle Droidsfrom The Clone WarsEver wanted to draw Star Wars characters and vehicles just likethe professional comic book artists? In this step-by-step series, StarStep One:Draw lightly with pencil all the basic shapes that make up a battledroid, like the ovals, circles, rectangles, and connecting lines. Thiswill help place where the head, arms, body and back pack will go.This is also where you decide the outline for your pose.Wars artists and illustrators show you how to draw some of themost beloved characters in the saga.Star Wars illustrator Nicole Falk explains with these easy-tofollow steps on how to draw Battle Droids from Star Wars: TheClone Wars. Steps 1-5 are to be drawn lightly with a pencil. Nopen, no dark lines. Finished lines and details will come at the end.
Step Two:Next sketch in the shapes of the battle droid on top of your originaloutline. Battle droids have a long curved head ending in a point;then an "S" curve from the point in the back of the head to themiddle of the head. Drop in one of the antenna-like-ears off theback of his head. The neck is a long pole with an oval in it. Add insome little details to the backpack like the antenna. Form the arms,since they are droids there are some nice easy lines to follow likestraight lines and circles. The hands are just some squares andrectangles.Step Three:Now you can start adding in the lines that create a more detailedand 3-D look. The eyes are just some half circles, as well as the topof his neck. Add in the curved lines to the top of the head abovethe "S" curve and some more curved lines underneath the "S"curve. For the arms, draw in some angled lines off the corners ofthe rectangles and connect them in order to give them a 3-Dappearance. Also add in the thumb with a few more rectangles.
Step Four:You are almost there. Here is where you can add in more details.Add in some shading or maybe a little battle damage. Check outyour toys or some battle droid photos for more ideas on how todetail the battle droid.Step Five:Is the battle droid drawn how you like? Roger, roger. Then you cango over the pencil with some dark pencil or ink. Use a pen, a darkcolored pencil or a fine tip marker. Be careful, stay on those lines,after all your hard work, keep this part clean!
Step Six:Now you can color your battle droid anyway you want. You canuse colored pencils or crayons, watercolors or markers. You caneven color it on the computer. It's completely up to you. Now thatyou can draw a battle droid -- let your imagination go! Draw themhow you want to see them, like I do.
Drawing Cad BaneShareEmailArchivesMarch 20, 2009Ever wanted to draw Star Wars characters and vehicles just like theprofessional comic book artists? In this step-by-step series, StarWars artists and illustrators show you how to draw some of the mostbeloved characters in the saga.Star Wars illustrator Grant Gould explains with these easy-to-followsteps how to draw the ruthless bounty hunter Cad Bane from TheClone Wars animated TV series.
Step One:You want to create a simple framework before anything else, so forStep 1 we'll be drawing only basic shapes. Use lines and circles torepresent Cad Bane's head, knees, elbows, hands, etc.
Step Two:Once your stick figure framework is done, then you can go in and startfleshing out Cad's body shapes a bit more, such as his legs and arms.Do this lightly with your pencil so that if it looks wrong, you can eraseand try again. Use your lines from Step 1 to guide you. Cad Bane hasa wide brim hat, so be sure to draw an oval from his chin to hisforehead that extends far beyond his shoulders to either side.
Step Three:Now that your basic shapes and pose are in place, it's time to lightlypencil in some of the more detailed areas, such as his forearms (hehas forearm gauntlets that look somewhat similar to Boba Fett's), hisside holsters, his face, and so on. Keep your lines loose and light, anddon't be afraid to erase and redraw.
Step Four:It's time to create your final pencil drawing. Just go over the lines andshapes you've already drawn, but this time make it a bit darker. Feelfree to use shading, if you like. The amount of detail that goes intoyour final pencil drawing is completely up to you. Flesh it out untilyou're happy with how it looks.
Step Five:If you want to add pen or marker lines to your drawing -- a processcalled "inking" -- simply go over your pencil lines. When you're happywith how it looks, go over the piece with an eraser and that will get ridof your pencil lines so that only your inked lines remain. Anotheroption is to use a light table (sold at art supply stores) and place ablank sheet over your pencil drawing and then draw on top of that.That way your pencil version stays intact and you can try it again asmuch as you like. You can also make photocopies of your pencildrawing and use those to practice on. Remember it doesn't have to beperfect the first time. Practicing is the key to getting better!
Step Six:If you want, color your drawing as well. Some people like to usecrayons or markers, and some like to color their images digitally. Iscanned my drawing into the computer program Photoshop andcolored it digitally.
Drawing ChewbaccaShareEmailArchivesApril 4, 2011Ever wanted to draw Star Wars characters and vehicles just like theprofessional comic book artists? In this step-by-step series, StarWars artists and illustrators show you how to draw some of the mostbeloved characters in the saga.
Star Wars illustrator Jessica Hickman explains with these easy-tofollow steps how to draw Chewbacca the Wookiee from the Season 3finale of The Clone Wars.Steps 1-4 are drawn lightly with pencil. No pen, no dark lines. Finishedlines and details will come at the end.Step One:First draw shapes for Chewbacca's head, arms and torso. Keep yourpencil lines nice and loose so you can easily erase any mistakes.
Step Two:Next add a little more detail to his face and body. He has small eyesand a round nose. Play around with the placement of his arms and legsuntil you're happy where they are.
Step Three:Now you can add a little more detail! Draw his bandoleer (going downfrom his shoulder, across his chest, to his hip). You can give Chewie alittle smile too.
Step Four:Start adding more detail to his bandolier. Chewbacca has a lot of longfur all over his body. His hands are sometimes hidden by his fur. Don'tforget to draw his toes! You can also make several copies of thisdetailed drawing of Chewbacca and try different colors on his fur andbandolier!
Step Five:I like to color with markers, but you can use anything you want -crayons, colored pencils, or the computer! For this step, I start outwith darker markers for the shadows on his body.
Step Six:Next add in the colors! Chewie's fur is a light brown color with darkerpatches. Wait until the markers are completely dry, then go over it with theink outlines, that way you don't have to worry about the wet markersmaking the ink run. It can be hard to get a nice, smooth line. Practicemakes perfect! There is a lot of detail, so be patient and take your time.When you're done with inking, add some white paint for the final, strong,white highlights -- like the dots in the eyes, for example. Now you're done!Don't forget to sign your drawing before you show it to family and friends!
Drawing CloneCaptain Rex from TheClone WarsEver wanted to draw Star Wars characters and vehicles just likethe professional comic book artists? In this step-by-step series, StarWars artists and illustrators show you how to draw some of themost beloved characters in the saga.Anakin Skywalker's second in command during the Clone Wars,Clone Captain Rex (CC-7567) was a freethinking and aggressivesoldier's-soldier. Gruff, no-nonsense and tough as nails, Rexvoiced his professional opinion to even the highest-ranking Jedi. Incommand of the famed 501st Clone Trooper Battalion, Rex and hismen were assigned to patrol the most lawless and dangeroussectors of the galaxy within the feared Outer Rim.Star Wars illustrator Grant Gould explains with these easy-tofollow steps on how to draw Captain Rex. Steps 1-5 are to bedrawn lightly with a pencil. No pen, no dark lines. Finished linesand details will come at the end.Download the instructions for this tutorial here as well:Draw Clone Captain RexStep One:Drawing lightly with a pencil, create a framework using basicshapes like circles and ovals. This will tell you where the shouldersare, elbows, etc.
Step Two:Now it's time to flesh out your body shapes a bit more. Again, verylightly with your pencil, draw the arms, belt, blasters, head andtorso.Step Three:Once you have the basic structure of the body in place, you canstart adding in details, such as the helmet lines and shoulder plates.Feel free to erase and redraw your lines until they look just right.
Step Four:Continue to add details to Rex's armor, belt and blasters. Be sure todraw his fingers as well. Illustrating hands and figures can betricky. A good way to teach yourself how to draw them moreaccurately is to take digital photos of your own hands in variousposes. You can then use those photos as reference for when you'redrawing.Step Five:Go over your final lines with a pen or marker. Once your ink linesare dry, erase the pencil lines. Or use heavier pencil lines over thelighter ones. However you decide to finish your drawing iscompletely up to you.
Drawing aDraw lightly Steps 1-4. Finished lines and details will come at the end.Customizable CloneTrooperEver wanted to draw Star Wars characters and vehicles justlike the professional comic book artists? In this step-by-stepseries, Star Wars artists and illustrators show you how to drawsome of the most beloved characters in the saga.Star Wars illustrator Grant Gould explains with these easy-tofollow steps how to draw and customize your own clonetrooper. Draw lightly Steps 1-4. Finished lines and details willcome at the end.Step One:It's best to start with simple shapes. Draw an oval for the clone's head,and then add a curved line for his collar area, as well as lines to showwhere his neck will be. Place a big plus sign directly in the middle ofthe oval. This will help you know where the eyes and nose should go.Be sure to draw this step with very light pencil strokes. You don't wantto start using dark lines until you get to the final step.
Step Two:Now that the basic framework is in place, you can startdrawing the shapes of his head. Look at the example to seewhere his cheeks, eyes, nose and mouth should go, as well ashis ears. You can also give more of a definitive outline to hisneck and the ridges of his armor. Be sure to keep your lineslight and loose. Don't be afraid to erase and redraw as much asnecessary to get it looking just the way you want it to.Step Three:Start adding some details, such as his pupils, eyebrows, the linesaround his nose and mouth, and his lips. It's really up to you howmuch detail to add. Just have fun with it and keep your lines light, andthen when you're happy with how it all looks, you can move on to Step4.
Step Four:Now that everything is in place, it's time to finalize yourdrawing and go over your light pencil lines with darker lines.Use a pencil, pen, or marker -- anything you want. Be sure tofill in the black of his neck, as well as his pupils.Step Five:This is where the fun begins! You can design the clone to lookhowever you want. You can give him any hair style, add a scar to hisface, color it in, leave it black and white. It's yours to design, and whenyou're done, you can give him a cool nickname!
Drawing a Clone TrooperEver wanted to draw Star Wars characters and vehicles just like the professional comic book artists? In this step-bystep series, Star Wars artists and illustrators show you how to draw some of the most beloved characters in the saga,as well as new faces and creatures from Star Wars: Episode III Revenge of the Sith (available on DVD Nov. 1). Soget your pencils and paper ready!The Republic clone trooper represents the future of galactic warfare. Being far more advanced than the battle droidarmies. As discovered in Attack of the Clones, the clones were grown from genetic material taken from an extremelyskilled bounty hunter named Jango Fett in the cloning facilities of Tipoca City, on Kamino. Growth acceleration waskey to the clones' development as they were constantly trained in fighting techniques, piloting skills and battlefieldtactics.Clone troopers wore hard white armor, their identical faces concealed behind a t-shaped visor. In the first units,color-coded armor showed rank, with green troopers being sergeants, blue being lieutenants, red being captains, andyellow being commanders. By the end of the war, color-designation came to signify not rank, but individual units,who often became more customized with mission specific gear and armor modifications such as the GalacticMarines, the Shock Troopers, the Attack Battalion and the Star Corps. (As you draw your own clone troopers, youcan decide what their color scheme will be.)During the Clone Wars, the clones fought alongside the Jedi Masters who led them into battle, creating a lifelongbond that only soldiers understand. But in Revenge of the Sith, fans see clone troopers at their deadliest, followingOrder 66 given by the Emperor to exterminate all Jedi from the Jedi Temple and various battlegrounds on planetsscattered throughout the galaxy.Star Wars webstrip illustrator Tom Hodges explains his super-easy steps on how to draw your very own clonetrooper.Step One:Start with the circle. Always start withthe circle when drawing any character -even ones with weird heads.Step Two:On the circle, divide your center of theface/helmet and the eye line guide. Thisis a 3/4 view which is very commonwhen drawing characters. This allowsyou to show both the front and part of theside of the character. At this point, ithelps to throw in a basic shape to the
body to help you along the way further.Step Three:Now start to create more "guides" to yourclone trooper. Bring the center of theface/helmet line further, the clone's"mouth" which is just a basic trianglewithout the bottom line. Put a smallcircle on the side of the large circle ofwhere the ear would be. Add theshoulders and a collar of his armor.Step Four:Start bringing more shapes and detailsinto the piece. The lower lines for thehelmet, the break off of the shoulder andchest armor. And you'll notice another"eye line" slightly under the existing line.Step Five:This is where the fun begins! Now is thetime to add some details such as the visorand "mouth" lines, the "speakers" on thefront of the mask and the shortened "fin"on top of the helmet.Step Six:Start to really take those bits and piecesand put this puzzle together. The helmetdetails, as you can see are just a matter oftaking what you did in Steps 4 and 5 andfilling in the blanks. It is all basic linesand shapes.
Step SevenThe straps on the chest armor have a seriesof lines across that need to be filled in.Work on adding more detail to thehelmet's "mouth" lines. You can alsofigure out various details you need to addby looking at pictures of clones as well asclone action figures. You might also findsmall X's in certain spots over the clone.This is to save you time. If you're going toink the piece in the next step the X's willmake it so you won't have to fill those inwith pencil and you can use your coloredpencils or markers.Step Eight:I use a Rapidograph pen with India Inkand a brush for the larger areas. But youcan use Micron pens, Uni-Ball pens andSharpie Markers -- or anything you'recomfortable with like waterproofmarkers. Erase your lines, and you have acrisp, clean clone trooper!
Step Nine:I did this in Adobe Photoshop, you can do it with crayons, color pencils,markers -- whatever you choose. I went with the 501st "Vader's Legion" motifon this guy. You can just about go with any color scheme you like. Create yourown color scheme for your clone. Make it your own design!
Drawing General GrievousEver wanted to draw Star Wars characters just like the professional comic book artists?In this step-by-step series, Star Wars artists and illustrators show you how to draw someof the most beloved characters in the saga, as well as new faces and creatures from StarWars: Episode III Revenge of the Sith. So get your pencils and paper ready!First introduced in the Star Wars: Clone Wars micro-series, General Grievous is knownfor not only his fighting skills, but also for his collection of lightsabers that he takes astrophies when he defeats his Jedi opponents. Part machine, part alien -- Grievous'appearance strikes fear into hearts of all who cross his path. As the leader of the DroidArmy, Grievous led his troops on many successful missions and ultimately became partof the plot to kidnap Chancellor Palpatine in Revenge of the Sith.Star Wars comic book artist Doug Wheatley explains his easy steps to draw GeneralGrievous with examples below.Steps 1-8 are to be drawn lightly with a pencil. No pen, no dark lines. Finished lines anddetails will come at the end in the last step.
Step One:Draw an oval shape; drawa horizontal line near thebottom of the oval, andthen draw two slightlycurved vertical lines asshown above. Thehorizontal line is where wewill eventually put GeneralGrievous' eyes, so we willcall it the "eye line." Thefirst curved line from leftto right represents the sideof his head so will call itthe side line, the secondcurve line represents thecenter off his head so, wewill call it the center line.Step Two:Next, we draw Grievous'cheeks and the lower partof his face plate. Start nearthe top of the oval on theright hand side. Draw aslightly curved line outfrom the oval and stop justbefore you reach the eyeline. Then draw a linestraight down and thenback toward the bottom ofthe oval. Next draw aslightly curve line downtoward the bottom of thepage and square it off anddo the same thing on theleft side starting your linenear the top of the "sideline." But remember toleave room for his fanglike teeth at the bottom ofhis face plate as shownabove. Now you can addthe teeth!Step Three:Draw two egg-shapedovals with arrows run upGrievous' forehead.Remember the top of theovals should rest justabove the "eye line" asshown above. We can alsoadd his ultrasonicvocabulators, those are thefour bars at the bottom ofthe face plate, next to theteeth.
Step Four:On the left inside of theoval, draw an ellipse asshown above. This iswhere we will draw his earpiece.Step Five:The ear piece! Inside theellipse, draw twocylinders, the first so thatit appears to be coming outof the ellipse. Draw thesecond smaller cylinder sothat it appears to becoming out of the firstcylinder, then draw acurved line so that it capsthe second cylinder.Step Six:Now we must drawGeneral Grievous'transmitting antenna. Drawa triangle like shape so thatit look like it is sitting onthe ear piece. Make sureyou cut a half circle out ofthe triangle where the earpiece is as shown above.At this point our drawingis starting to take shapeand is beginning to looklike General Grievous.
Step Seven:Now we can add the eyesinside the egg shapedovals, on the eye line. Youcan add some wrinklesaround the eyes if youlike! Also, beginning at thetop of the General's head,draw an large oval thatends at his teeth, the drawa smaller oval inside thefirst as shown above. Thisis Grievous' collar. Justunder the antenna, you canadd his neck tubes. Don'tforget the two wires oneither side of his teeth.Step Eight:We are almost finished!Now we can erase theconstruction lines so thatjust the shapes we want arevisible. We can now startto "finish" our drawing.Here, we will add detailslike scratches and dents tohis face plate. We can alsoadd shadows in the eyesand on his head. This willmake Grievous look threedimensional.Step Nine:You've done it! You havejust drawn one of thegreatest bad guys in StarWars history, GeneralGrievous!
Drawing Jabba the HuttEver wanted to draw Star Wars characters and vehicles just like the professional comic book artists? Inthis step-by-step series, Star Wars artists and illustrators show you how to draw some of the mostbeloved characters in the saga.As one of the most notorious crime lords of the Outer Rim Territories, Jabba the Hutt was one of the lastunsightly characters smuggler Han Solo wanted to cross paths with in A New Hope, and Princess Leiawasn't too happy to hang out with his crew in Return of the Jedi either. But Jabba's slug-like leglessbody makes him a fun character to draw. Star Wars illustrator Katie Cook explains with these easy-tofollow steps on how to draw the slimy crime boss Jabba the Hutt.Steps 1-4 are to be drawn lightly with a pencil. No pen, no dark lines. Finished lines and details willcome at the end.Step One:Start by drawing an eggplant shape to provide a frame for Jabba's large body. Add aslug-like tail coming off his side. Jabba doesn't have too much of a form, so makehim pudgy and round.
Step Two:Lightly begin to rough in where his facial and body features will be. Draw two ovalsfor his eyes, two slits for his nose, a wide mouth, little T-rex dinosaur-like arms, and alittle curl to his tail. Draw roll after roll of gooey, green rolls of flesh.Step Three:Now that you have Jabba's basic form and his features sketched, add more folds to hisskin and details to his eyes and face. Refine the lines around the body as you go,erasing some of the earlier lighter lines.
Step Four:Give Jabba some personality by adding s
the professional comic book artists? In this step-by-step series, Star Wars artists and illustrators show you how to draw some of the most beloved characters in the saga. Star Wars illustrator Nicole Falk explains with these easy-to-follow steps on how to draw Battle Droids from Star Wars: T