Transcription
K9-102 & K9-204 ManualModel K9-102 & K9-204FlexShaft Drain CleaningMachines Français – 15 Deutsch – 33
FlexShaft Drain Cleaning MachinesTable of ContentsSafety Symbols. 2General Safety RulesWork Area Safety. 2Electrical Safety. 2Personal Safety. 2Tool Use and Care. 3Service. 3Specific Safety Information. 3FlexShaft Drain Cleaning Machine Safety. 3RIDGID Contact Information. 4Description. 4Specifications. 5Specifications - Acceptable Battery Powered Drills. 5Standard Equipment. 5Pre-Operation Inspection. 5Machine and Work Area Set-up. 6Installing/Adjusting Chain Knocker. 8Operating Instructions. 9Draining the Drum. 12Transportation. 12Storage. 12Maintenance Instructions. 13Cleaning. 13Lubrication. 13Cable Assembly Replacement. 13Troubleshooting. 14Service And Repair. 14Optional Equipment. 14Disposal. 14Lifetime Warranty. Back Cover*Original Instructions - Englishii999-995-158.08 REV. A
Drain Cleaning MachinesModel K9-102 & K9-204FlexShaft Drain CleaningMachinesWARNING!Read this Operator’s Man ualcarefully before using thistool. Failure to understandand follow the contents ofthis manual may result inelectrical shock, fire and/orserious person al injury.
FlexShaft Drain Cleaning MachinesSafety SymbolsIn this operator’s manual and on the product, safety symbols and signal words are used tocommunicate important safety information. This section is provided to improve understanding of these signal words and symbols.This is the safety alert symbol. It is used to alert you to potential personal injury hazards. Obeyall safety messages that follow this symbol to avoid possible injury or death.DANGERDANGER indicates a hazardous situation which, if not avoided, will result in deathor serious injury.WARNINGWARNING indicates a hazardous situation which, if not avoided, could result in deathor serious injury.CAUTIONCAUTION indicates a hazardous situation which, if not avoided, could result in minoror moderate injury.NOTICENOTICE indicates information that relates to the protection of property.This symbol means read the operator’smanual carefully before using the equipment. The operator’s manual contains important information on the safe and proper operation of the equipment.This symbol means always wear safetyglasses with side shields or goggles whileusing this equipment to reduce the riskof eye injury.This symbol indicates the risk of hands,fingers or other body parts being caught,wrapped or crushed in the drain cleaningFlexShaft.General Safety RulesWARNING ead and understand all warnings andRinstructions. Failure to follow all warnings and instructions may result in electric shock, fire, and/or serious injury.SAVE THESE INSTRUCTIONS!Work Area Safety Keep work area clean and well lit. Cluttered or dark areas invite accidents. Do not operate tools in explosive atmospheres, such as in the presence offlammable liquids, gases, or dust. Toolscreate sparks which may ignite the dust orfumes. Keep children and by-standers awaywhile operating tools. Distractions cancause you to lose control. Keep floors dry and free of slipperymaterials such as oil. Slippery floorsinvite accidents.This symbol indicates the risk of the electrical shock.This symbol indicates the risk of fingers orother body parts being caught, wrapped,crushed or struck by the chain knocker.Do not operate tool with the cable end outsideof the drain.This symbol means always wear gloveswhen handling or using this equipment toreduce the risk of infections, burns or otherserious personal injury from the drain contents.Electrical Safety Avoid body contact with earthed orgrounded surfaces such as pipes, radiators, ranges and refrigerators. There isan increased risk of electrical shock if yourbody is earthed or grounded. Do not expose power tools to rain orwet conditions. Water entering a powertool will increase the risk of electricalshock. If operating a power tool in a damplocation is unavoidable, use a groundfault circuit interrupter (GFCI) protectedsupply. Use of a GFCI reduces the risk ofelectric shock.Personal Safety Stay alert, watch what you are doingand use common sense when operating tools. Do not use tools whileyou are tired or under the influence ofdrugs, alcohol, or medication. A mo ment of inattention while operating toolsmay result in serious personal injury. Use personal protective equipment.2999-995-158.08 REV. A
FlexShaft Drain Cleaning MachinesAlways wear eye protection. Protectiveequipment such as dust mask, non-skidsafety shoes, hard hat, or hearing protection used for appropriate conditions willreduce personal injuries. Do not overreach. Keep proper footingand balance at all times. Proper footingand balance enables better control of thetool in unexpected situations.Tool Use and Care Do not force tool. Use the correct toolfor your application. The correct tool willdo the job better and safer at the rate forwhich it is designed. Store idle tools out of the reach of children and do not allow persons unfamiliar with the tool or these instructions tooperate the tool. Tools can be dangerousin the hands of untrained users. Maintain tools. Check for misalignmentor binding of moving parts, breakageof parts and any other condition thatmay affect the tool’s op er ation. If damaged, have the tool repaired before use.Many accidents are caused by poorlymaintained tools. Keep handles dry, clean and free fromoil and grease. Allows for better controlof the tool.Service Have your tool serviced by a qualifiedrepair person using only identical replacement parts. This will ensure thatthe safety of the tool is maintained.Specific SafetyInformationWARNINGThis section contains important safetyinformation that is specific to this tool.Read these precautions carefully before using the FlexShaft Drain CleaningMachine to reduce the risk of electricalshock or other serious injury.SAVE ALL WARNINGSAND INSTRUCTIONS FORFUTURE REFERENCE!Keep this manual with machine for use bythe operator.999-995-158.08 REV. AFlexShaft Drain CleaningMachine Safety Always use safety glasses and glovesin good condition while handling orusing. Use latex or rubber gloves, faceshields, protective clothing, respirators orother appropriate protective equipmentwhen chemicals, bacteria or other toxicor infectious substances are suspected tobe present to reduce the risk of infections,burns or other serious personal injury. Do not use with a corded drill. Operating with a corded drill increases the riskof electrical shock and other injuries. Do not allow the chain knocker/end ofcable to stop turning while drill switchis depressed. This can over-stress thecable and may cause twisting, kinking orbreaking of the cable assembly and mayresult in serious personal injury. Practice good hygiene. Do not eat orsmoke while handling or operating thetool. After handling or operating draincleaning equipment, use hot, soapywater to wash hands and other bodyparts exposed to drain contents. Thiswill help reduce the risk of health hazardsdue to exposure to toxic or infectiousmaterial. Only use the FlexShaft Drain Cleaning Machine for the recommendeddrain sizes. Using the wrong size draincleaner can lead to twisting, kinking orbreaking of the cable and may result inpersonal injury. Keep hand on the cable assemblywhenever the FlexShaft Machine is running. This provides better control of thecable and helps prevent twisting, kinkingand breaking of the cable and reduces therisk of injury. Position machine cable outlet within3' (1 m) of the drain inlet or properlysupport exposed cable assembly whenthe distance exceeds 3' (1 m). Greaterdistances can cause control problems leading to twisting, kinking or breaking of thecable. Twisting, kinking or breaking cablemay cause striking or crushing injuries. One person must control both thecable assembly and cordless drill. Donot lock drill switch in the ON positionduring operation. If the cable stops rotating, the operator must be able to releasethe drill switch to prevent twisting, kinking3
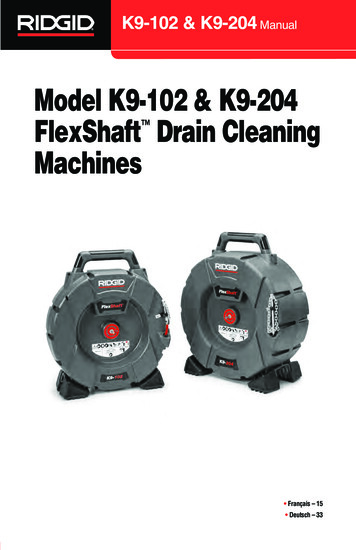
FlexShaft Drain Cleaning Machinesand breaking of the cable and reduce therisk of injury. Do not wear loose clothing or jewelry.Keep your hair and clothing away frommoving parts. Loose clothing, jewelry orhair can be caught in moving parts. Do not operate this machine if operator or machine is standing in water.Operating machine while in water increases the risk of electrical shock. Do not use if there is the risk of contact with other utilities (such as naturalgas or electric) during operation. Visualinspection of the drain with a camera isa good practice. Crossbores, improperlyplaced utilities and damaged drains couldallow the cutter to contact and damage theutility. This could cause electrical shock,gas leaks, fire, explosion or other seriousdamage or injury. Read and understand these instructions, the battery drill instructions andthe instructions for any other equipment used with this tool before operating. Failure to follow all instructions mayresult in property damage and/or seriousinjury.for use on roots and cleaning the pipe wall ofscale. Plain chain knockers are for general use,including grease. FlexShaft Drain Cleanersare well suited to use with inspection camerasduring the drain cleaning process.The FlexShaft Machines are lightweight andcompact for ease of transport.Carry gFeetFigure 1A – RIDGID FlexShaft Drain CleaningMachineFoot(HorizontalUse Position)RIDGID ContactInformationIf you have any question concerning thisRIDGID product:– Contact your local RIDGID distributor.– Visit RIDGID.com to find your localRIDGID contact point.– Contact Ridge Tool Technical ServiceDe part ment at rtctechservices@emer son.com, or in the U.S. and Canada call (800)519-3456.Figure 1B – RIDGID FlexShaft Drain CleaningMachineDescriptionThe RIDGID Model K9-102 and K9-204FlexShaft Drain Cleaning Machines are designed to clean and descale pipes and drainlines as called out in the Specifications.A user supplied battery powered drill is used todrive the FlexShaft Drain Cleaning Machines.The FlexShaft Drain Cleaning Machine cableassembly is manually fed in and out of thedrain. A chain knocker that expands to thepipe inside diameter is used to break up theblockage and clean the walls of the pipe. Chainknockers with carbide cutting tips are available4CableHookChainKnockerCableBushingFigure 1C – Cable End/Chain Knocker999-995-158.08 REV. A
FlexShaft Drain Cleaning MachinesSpecificationsModel.K9-102Drain Capacity (Nom.).1 /4" to 2" (32 – 50 mm)Cable Diameter (without Sheath). /4" (6 mm)Cable Assy. Diameter (with Sheath). /8" (9.5 mm)K9-2042" to 4" (50 – 100 mm)/16" (8mm)/2" (12.7 mm)Cable Assembly Length.50' (15.2 m)Rotational Speed.Maximum 2500 RPMDrill Attachment. /16" Hex (8 mm)Weight (without Drill/Knocker). 24.3 lbs. (11.0 kg)Dimension (without Drill).19.2" 7.5" 22.1"(488 mm 191 mm 562 mm)Operating temperature.20 F to 140 F (-6 C to 60 C)70' (21.3 m)Maximum 2500 RPM/16" Hex (8 mm)37.3 lbs. (16.9 kg)21.1" x 10.8" x 24.2"(536 mm x 274 mm x 615 mm)20 F to 140 F (-6 C to 60 C)1135It is not recommended to clean glass, ceramic,porcelain or similar fixtures with the FlexShaftDrain Cleaners as it may damage the fixture.Do not use corded drills, hammer drills orimpact drivers. Use of an inappropriate drillincreases the risk of equipment damage andpersonal injury.Standard EquipmentRefer to the RIDGID catalog for details onequipment supplied with specific drain cleaningmachine catalog numbers.NOTICE This machine is made to cleandrains. If properly used it will not damage adrain that is in good condition and properlydesigned, constructed and maintained. If thedrain is in poor condition, or has not beenproperly designed, constructed and maintained, the drain cleaning process may not beeffective or could cause damage to the drain.The best way to determine the condition ofa drain before cleaning is through visual inspection with a camera. Improper use of thisdrain cleaning machine can damage the draincleaning machine and the drain. This machinemay not clear all ations - AcceptableBattery Powered DrillsRotational Speed 1800 to 2500 RPMChuck Size 3/8" or greaterClutch. Equipped with torqueadjustmentSwitch Lock Not equipped with5Before each use, inspect your DrainCleaning Machine and correct any problems to reduce the risk of serious injuryfrom electric shock, twisted or brokencables, chemical burns, infections andother causes and prevent Drain CleaningMachine damage.Always wear safety glasses, and otherappropriate protective equipment wheninspecting your Drain Cleaning Machine.1. Clean the machine, including handlesand controls. This aids inspection andhelps prevent the machine or controlfrom slipping from your grip. Clean andmaintain the machine per the maintenance instructions.2. Inspect the machine for: Proper assembly and completeness. Any broken, worn, missing, misalignedor binding parts. Presence and readability of the warninglabel (see Figure 2).RIDGID.com01800 - 2500/minFORFigure 2 – Warning Label999-995-158.08 REV. A5
FlexShaft Drain Cleaning Machines Smooth and free movement of the cable assembly in and out of the machine. Any condition which may prevent safeand normal operation.If any problems are found, do not use thedrain cleaning machine until the problems have been repaired.3. Clean any debris from the cable assembly and chain knockers. Inspect sheathfor wear and damage. There should notbe any cuts, kinks, breaks or excessivewear. Inspect the cable near the chainknocker. Cable assemblies should not bebent or deformed. Cable strands shouldbe tight to one another without separation. Inspect chain knocker for damagedor lost carbide cutting tips (if equipped)and wear of the chain itself. If chain linksare worn more than ¼ through or damaged, replace the chain knocker. Replaceworn and damaged equipment beforeusing drain cleaning machine.Confirm that the chain knocker is properly set up and is secure on the cable.4. Inspect the battery powered drill per itsinstructions. Make sure that the drill is ingood operating condition and the switchcontrols the drill operation. Confirm thatthe drill meets the requirements in theSpecification section and is properly setfor use with the machine.5. Inspect and maintain any other equipment being used per its instructions tomake sure it is functioning properly.1. Check for an appropriate work area.Operate in a clear level, stable, dry location. Do not use the Drain CleaningMachine while standing in water.2. Inspect the drain to be cleaned. If possible, determine the access point(s) to thedrain, the size(s), length(s), and material(s) of the drain, distance to mainlines,the nature of the blockage, presence ofdrain cleaning chemicals or other chemicals, etc.If chemicals are present in the drain, itis important to understand the specificsafety measures required to work aroundthose chemicals. Contact the chemicalmanufacturer for required information.Confirm no other utilities are present inthe drain or area to reduce the risk ofdamage. Visual inspection of the drainwith a camera is a good practice.If needed, remove fixture (water closet,etc.) to allow access to drain. Do not runthe chain knocker in a fixture. This coulddamage the FlexShaft Machine or thefixture.Best drain cleaning results will occur ifwater is flowing during the drain cleaningprocess to wash away debris. For 1 /4”and 1 /2” sink drains, cut away wall pipesare available to allow this. See Figure 3for installation. Place a container to catchany drain contents that may spill.11Machine and Work AreaSet-upWARNINGSet up the Drain Cleaning Machine andwork area according to these procedures to reduce the risk of injury fromelectric shock, fire, machine tipping,twisted or broken cables, chemicalburns, infections and other causes, andprevent machine damage.Always wear safety glasses and otherappropriate protective equipment whensetting up your Drain Cleaning Machine.6Figure 3 – Wall Pipe Installation3. Determine the correct equipment for theapplication. See Specifications. DrainCleaning Machines for other applicationscan be found by consulting the RidgeTool Catalog, online at RIDGID.com.4. Make sure all equipment has been properly inspected.999-995-158.08 REV. A
FlexShaft Drain Cleaning Machines5. If needed, place protective covers in thework area. The drain cleaning processcan be messy.6. Place the Drain Cleaning Machine onthe ground with the drill shaft vertical.Machine should sit squarely and firmlyon the ground. Do not operate with thedrill shaft horizontal. This will reduce therisk of tipping.7. Remove the battery from the drill (seeSpecifications). Securely attach the drillchuck to the hex of the drill shaft (Figure4). Set the battery powered drill torqueadjustment to the maximum setting (donot place in the “drill” setting). Set the drillspeed in the 1800 to 2500 RPM range,and place the direction selector in theFORWARD (FOR) position (see directionmarking on the front housing).DrillShaftFORArrowFigure 5 – Example of Extending Drain Accessto within 3’ of Machine Cable Outlet9. Disconnect the chain knocker from thehook and pull approximately 4’ (1.2 m) ofcable assembly out of the machine.10. Mark the sheath to indicate when thechain knocker is approaching the drainopening when withdrawn. This can bedone with tape. This reduces the risk ofthe chain knockers coming out of thedrain and whipping around. The distancedepends on the configuration of the drain,but should be at least 4’ (1.2 m) from thechain knocker.11. Ensure chain knocker is properly installed(see Installing/Adjusting Chain Knocker).Figure 4 – Attaching Drill To Drill Shaft8. Position the Drain Cleaning Machine sothat the cable outlet is within 3’ (1 m) ofthe drain access. Greater distances fromthe drain access increases the risk ofthe cable assembly twisting or kinking. Ifthe FlexShaft Machine cannot be placedwith the cable outlet within 3’ (1 m) of thedrain access, extend the drain accesswith similar sized pipe and fittings (seeFigure 5). Improper cable assembly support can allow the cable to kink and twistand can damage the cable or injure theoperator. Extending the drain back to theDrain Cleaning Machine also makes iteasier to feed cable assembly into drain.12. Insert chain knocker end at least 1’ (0.3 m)into drain.13. Evaluate the work area and determine ifany barriers are needed to keep bystanders away from the drain cleaning machine and work area. The drain cleaningprocess can be messy, and bystanderscan distract the operator.14. Position the machine for easy accessibility. You must be able to hold and controlthe cable assembly and the drill switch.15. With dry hands, insert the battery intothe drill.Installing/Adjusting ChainKnocker1. Select proper chain knocker for the conditions.999-995-158.08 REV. A7
FlexShaft Drain Cleaning MachinesChain knockers are sized based on collar inside diameter and are designed forspecific cable sizes. ¼” chain knockersare used on ¼” cable, etc. Do not use alarger size chain knocker on a smallercable (for instance /16” on ¼”). See Figure6 and Collar Distance Chart.51 Chain2 Chain3 ChainCarbideCutting TipsFigure 6 – Chain KnockersChain knockers without carbide cuttingtips can be used in common pipe types.These chain knockers work well in greaseand similar blockages.Chain knockers with carbide cutting tipsare used for removing scale from theinside of the pipe and can be used forroots. Carbide cutting tips are used foraggressive cleaning and could damagepipe, especially softer materials (suchas plastics and Orangeburg), thin walledpipe, or if the chain knocker is kept inone position for an extended time.Do not use chain knockers for cleaning inglass, ceramic, porcelain or similar material fixtures or pipes. They could bedamaged.2. Figure 7 shows a schematic of properchain knocker installation and adjustment.There are two key points when installing/adjusting chain knockers.Collar Distance: Set the chain knockercollars the correct distance apart (“CollarDistance”) to allow the chains to spreadan appropriate amount when rotated toclean the pipe walls. Collar Distance varies based on cable size and pipe diam-8eter, and is generally set using a spacermade from sheath (“Collar Spacer”). Ifadditional flexibility is required to navigatea bend, the collar spacer can be removedand the collar distance can be set with atape measure. Operating without a collarspacer makes it more likely for the cableto flip over in use and be damaged. Donot operate carbide cutters without acollar spacer to reduce risk of cabledamage.Exposed Cable: Minimize the amountof exposed cable (cable not covered bysheath). The more exposed cable thereis, the more likely the cable will flip overin use and be damaged. Exposed cableshould be limited to no more than ¼” (6mm), and is set with a bushing made fromsheath (“Knocker Bushing”).Sheath is supplied with the drain cleanerand is available as a service part to allowconfiguration as needed for your specificapplication. Only use RIDGID FlexShaftDrain Cleaner sheath of the correct sizefor the cable. Any time sheath is cut, itshould be cut cleanly and squarely. Donot damage the cable when cutting thesheath.3. Chain knockers are retained to the cablewith set screws that use a supplied 3mm hex key. Loosen set screws and remove chain knocker, spacer and bushingfrom cable.4. Inspect the sheath end for damage orwear. The sheath end should be squareand clean. If needed, the sheath end canbe trimmed slightly.5. If needed, cut a section of sheath to useas the collar spacer to the appropriatesize (See Collar Distance Chart).Collar distance can be modified to yourpreference for the specific pipe/application. As collar distance increases, the diameter of the chains decreases, and viceversa. Improperly set collar distance canreduce the efficiency of pipe cleaning.6. Test fit the chain knocker, knocker bushingand collar spacer on the cable as shownin Figure 7. Chains should be straight – donot assemble with chains twisted. To prevent excessive cable end wear, cable endshould be flush with the end of the collar.999-995-158.08 REV. A
FlexShaft Drain Cleaning MachinesKnockerNominalPipe SizeCable Number Number ofMachine Size of Chains Links/Chain12233K9-102 1/4"K9-204 5/16"7791315Recommended CollarDistance11/4" to 11/2" (32 mm to 38 mm)11/2" to 2" (38 mm to 50 mm)2" (50 mm)3" (75 mm)4" (100 mm)13/4" (44.5 mm)21/2" (63.5 mm)4" (101.6 mm)41/2" (114.3 mm)Collar Distance ChartCarbide Cutting Tip(If Equipped)Knocker BushingCollar SpacerKnocker CollarSheath EndKnocker ChainKnocker CollarCable EndFlush ToCollarCableSheathExposed Cable.25" (6.35 mm)MaximumSet Scew(3 mm HEX)Set Scew(3 mm HEX)Figure 7 – Chain Knocker Installation/AdjustmentCollar DistanceCheck length of exposed cable. To reducethe risk of cable flip over and damage,exposed cable cannot exceed ¼” (6 mm).If needed, cut a knocker bushing fromsheath to limit exposed cable. Alwaysuse a knocker bushing to reduce wearon the sheath end.Do not use with a corded drill. Operating with acorded drill increases the risk of electrical shock.7. With the chain knocker correctly installedon the cable as shown in Figure 7, usethe supplied hex wrench to securelytighten the collar set screws. If the setscrews are not secure, the chain knockercould slip and damage the cable or belost down the drain.Practice good hygiene. Do not eat or smokewhile handling or operating the tool. After handling or operating drain cleaning equipment,use hot, soapy water to wash hands and otherbody parts exposed to drain contents. Thiswill help reduce the risk of health hazards due toexposure to toxic or infectious material.Operation InstructionsWARNINGAlways use safety glasses and gloves in goodcondition while handling or using. Use latex orrubber gloves, face shields, protective clothing,respirators or other appropriate protective equipment when chemicals, bacteria or other toxic orinfectious substances are suspected to be presentto reduce the risk of infections, burns or otherserious personal injury.999-995-158.08 REV. ADo not allow the chain knocker/end of cableto stop turning while drill switch is depressed.This can overstress the cable and may causetwisting, kinking or breaking of the cable assemblyand may result in serious personal injury.Keep hand on the cable assembly wheneverthe FlexShaft Machine is running. This providesbetter control of the cable and helps prevent twisting, kinking and breaking of the cable and reducesthe risk of injury.Position the FlexShaft Machine cable outletwithin 3' (1 m) of the drain inlet or properlysupport exposed cable assembly when thedistance exceeds 3' (1 m). Greater distances cancause control problems leading to twisting, kinkingor breaking of the cable. Twisting, kinking or breaking cable may cause striking or crushing injuries.One person must control both the cable assembly and cordless drill. Do not lock drill switchin the ON position during operation. If the cablestops rotating, the operator must be able to re9
FlexShaft Drain Cleaning Machineslease the drill switch to prevent twisting, kinkingand breaking of the cable and reduce the riskof injury.Follow operating instructions to reduce therisk of injury from twisted or broken cable,cable ends whipping around, machine tipping,chemical burns, infections and other causes.1. Make sure that machine and work area isproperly set-up and that the work area isfree of bystanders and other distractions.2. Pull cable assembly from the machineand feed into drain. At least 1' (0.3 m) ofcable must be in drain so that the chainknocker will not come out of the drain andwhip around when the machine is started.Directly route the cable assembly fromthe machine cable outlet to the drainopening, minimizing exposed cable andchanges in direction. Do not tightly bendthe cable assembly – this can increasethe risk of twisting or breaking.If using a camera to view the drain cleaning process, the camera can be fed inat the same time. Typically the cable assembly and the camera push rod can begripped and advanced/retrieved at thesame time. Keep the camera at least 1.5’( 0.5 m) behind the chain knocker.NOTICE Do not allow the spinning chainknocker to hit the camera head/push rod.It can damage it.3. Assume a proper operating position tohelp maintain control of the cable assembly and drill (see Figure 8): Be sure you can quickly release the drillswitch. Your gloved hand mus
Model K9-102 & K9-204 FlexShaft Drain Cleaning Machines WARNING! Read this Operator’s Manual carefully before using this tool. Failure to understand and follow the contents of this man