Transcription
WILDERNESS SURVIVAL GUIDE1
WILDERNESS SURVIVAL GUIDEWILDERNESSSURVIVALGUIDEPETA STANGE2
WILDERNESS SURVIVAL GUIDETABLE OF CONTENTS1. WHAT TO PACK IN YOUR BACKPACK . 71.1. List of Suggested Items . 72. CUTTING TOOLS. 82.1. Knife . 82.2.Saw, Axe and Wedges . 82.3.Sharpening . 82.4.Knife Handling Tips and Safety . 9. 93. CONSTRUCTING A SHELTER FROM NATURAL MATERIALS . 103.1. Suitable Materials . 103.2.Natural Shelters . 103.3.Setting Up Camp . 103.4.Constructing a Lean-To Shelter . 113.5.Constructing an A-Frame Shelter . 123.6.Constructing a Debris Hut Shelter . 123.7.Other Types of Shelter . 134. HOW TO MAKE A FIRE . 144.1. Building a Fire . 144.2.Igniting a Fire. 144.3.Cooking Tips and Safe Eating . 165. HOW TO FIND, DISTILL, FILTER AND PURIFY WATER . 185.1. Finding Water and Staying Hydrated . 185.2.Solar Water Distillation . 195.3.Water Filtration and Boiling . 205.4.Rock Boiling Water . 206. NATURAL FIBERS . 216.1. Plaiting, Reverse Twisting and Weaving . 213
WILDERNESS SURVIVAL GUIDE6.2.Bark and Resin Harvesting . 246.3.Tying Knots . 257. HOW TO MAKE YOUR OWN TOOLS USING NATURAL RESOURCES. 287.1. Making a Wooden Bowl or Spoon Using Fire . 287.2.Waterproofing and Tanning Items . 287.3.Making a Barbed Spear. 287.4.Making a Torch . 298.FISHING WITH NATURAL RESOURCES . 318.1.Fishing Hooks and Fishing Line. 318.2.Fishing Nets . 318.3.Fishing Traps . 328.4.Stunning Fish . 339. HUNTING AND TRAPPING WITH NATURAL RESOURCES . 349.1. Animal Behavior . 349.2.Identifying Animal Tracks . 349.3.Identifying Animals Scats .359.4.How to Make and Set a Snare. 369.5.Using a Net for Hunting .379.6.Harvesting Bird Eggs .379.7.Sustainable Use of Animal Carcasses . 3810.EDIBLE INSECTS . 3910.1.11.Common Edible Insects and Where to Find Them . 39HYGIENE . 4011.1.Natural Substitutes for Soap. . 4011.2.Waste Disposal . 4011.3.Personal Hygiene . 4112.ORIENTATION AND NAVIGATION . 4212.1.How to Read a Map . 4212.2.How to Find South Without a Compass . 434
WILDERNESS SURVIVAL GUIDE12.3.How to Estimate Distances. 4412.4.Familiarizing Yourself in the Landscape. 4512.5.How to Estimate Daylight Hours . 4513.SAFETY .4713.1.Wilderness First Aid .4713.2.Safe River Crossing .475
WILDERNESS SURVIVAL GUIDEBeing prepared before heading out into the wilderness is crucial. Packing the rightequipment, having a sound understanding of the environment, and practicingsome basic survival skills can make an excursion into the wilderness enjoyable,while still keeping things basic.This survival guide can be used by a wide variety of people. Perhaps you areinterested in foraging for edible plants or harvesting natural materials from thesurrounding landscape, or maybe you would like to decrease your dependency ontechnology and artificial products. You might just want to get back in touch withnature and spend some quality time in the wild. This wilderness survival guideexplores topics such as building a shelter, making a fire, cooking tips, weaving andmaking cordage, tying knots, fishing, hunting, trapping, filtering and collectingwater, hygiene, navigation and safety, all using natural materials directly from theenvironment where possible.This wilderness survival guide describes some of the basic skills that can beemployed, as well as the natural resources that are available in any wildernesssituation in North America. As you practice these skills and become familiar withthe plants and animals in the landscape, your skills and abilities will allow you toturn your foraging day trips into extended camping trips into the wilderness.A key theme in this survival guide is how to use the natural resources around yousustainably. By identifying and choosing the correct materials, your impact on thelandscape can be minimized and future generation will be able to use the sameresources and have the same experiences while in the wilderness.6
WILDERNESS SURVIVAL GUIDE1. WHAT TO PACK IN YOURBACKPACK1.1.LIST OF SUGGESTED ITEMSIt’s important to only carry the bare essentials to reduce your load while in thewilderness. For this reason, a backpack or rucksack is the first item to consider. Itshould be lightweight, waterproof, sturdy and comfortable, preferably with hipstraps to make carrying loads easier.Below is a list of suggested items that you may want to consider including in yourbackpack or rucksack; Spare clothesWork glovesAluminum foilA small, lightweight cooking potFolding sawKnife and sharpenerPlastic trash bags to protect gear or collect rain waterNon-lubricated condoms for water storageRope or cordageA role of duct tapeSleeping bag or thermal blanketEmergency thermal blanketHammock and tarp, tent or mosquito netSnare wireFishing hooks and fishing lineCompass and mapFirst aid kitLighters or flint7
WILDERNESS SURVIVAL GUIDE2. CUTTING TOOLS2.1.KNIFEA high carbon steel blade without a coating can double as an ignition sourcebecause of the sparks it can create when struck. An ideal length is between 4 ½ - 6inches long with a flat edge along the spine. The knife and handle should be a singlepiece of steel for durability. In addition to a large sheath knife, a jackknife or pocketknife is often used for finer carving and skinning animals.2.2.SAW, AXE AND WEDGESIf you plan on building your own shelter, then carrying a folding saw is a greatoption since they are compact and lightweight.Carrying an axe increases the weight of your load, since it also means carryingwedges and a sharpening stone as well, but this option is also versatile since theaxe can double as a hammer.2.3.SHARPENINGSoak the whetstone in water for a few minutes before using it to sharpen cuttingtools. Oil can also be used instead of water, but in a wilderness scenario, water ismore practical since once you have used oil on a whetstone, water can no longer beused.Lay the whetstone on a flat surface, hold the blade at about 10 – 20 angle fromthe whetstone and grind the cutting edge from base (closest to the handle) to tip.Flip the blade and repeat for the other side, again maintaining a 10 – 20 angle.Make sure to perform the same number of strokes on each side of the blade. Steady,even pressure is essential for a perfectly sharpened edge.Use a coarse whetstone (800 grit) for sharpening burs or chips, a mediumwhetstone (1,200 – 1,800 grit) or diamond rod for heavy duty tools, and a finewhetstone (2,000 – 3,000 grit) for refining the sharpened edge. When you havefinished sharpening with the whetstone, use a fine honing stone or honing steel torealign the cutting edge back to center. Finally, use a leather strap (strop) to polishthe steel and apply some oil to protect the finish. Each time you increase the grit,you should double the number of strokes, for example, if you did 10 strokes each8
WILDERNESS SURVIVAL GUIDEside with the fine whetstone, then you should do 20 strokes on the honing stoneand 40 strokes on the strop.2.4.KNIFE HANDLING TIPS AND SAFETYNever hold anything between your thighs while cutting. There is a high chance ofslicing into your groin or femoral arteries which will result in extreme blood lossor even death. One method is to move the wood instead of the knife by setting thespine of the knife against your chest or knee, and gliding the wood along the bladeto shape or shave it. In this way, if something slips, it will be the wood instead ofthe knife.When cutting a green sapling with a knife, bend the sapling to create stress, thenshear or beaver cut with the grain around the circumference of the bend.Remove bark or create tinder with the back of your knife to preserve the cuttingedge.Always dry your knife before sheathing it and oil the blade to prevent it fromrusting. If you have a leather sheath, a good way to maintain both it and the knifeis to soak the sheath in olive oil for 24 hours and allow it to drip dry for a week.Whenever using a knife or saw, ensure the area within two arm's length is clear ofpeople and trip hazards. When handling or cutting rough or thorny materials, wrapsome softer plant material around it to protect your hands.9
WILDERNESS SURVIVAL GUIDE3. CONSTRUCTING A SHELTERFROM NATURAL MATERIALS3.1.SUITABLE MATERIALSA Hammock with a tarp is one of the most adaptable, smallest and lightest sheltersto carry in a forest or woodland environments, but it is also possible to build ashelter from the natural resources around you.When considering which natural materials to use to establish your camp orstructures, target fast-growing, resprouting trees and plants. Avoid cutting downtrees such as pine, cypress, oak, maple, palm, fir and aspen; the stumps will notresprout and the roots will die. Where possible, use sturdy, dead trees andbranches that are already on the ground to construct any structures, as this willrequire the least amount of work and has the least impact on the environment.3.2.NATURAL SHELTERSFinding a natural shelter will depend on the type of environment you are in. It maybe possible to find a cave, but always check for signs of other inhabitants by lookingfor any prints or scats first. Other natural shelters can include rocky outcrops ordense vegetation that provide wind protection. Alternatively, it may be moresuitable to sleep elevated above the ground to avoid biting insects or saturatedground, in which case, an elevated platform or hammock in a tree may bepreferred.3.3.SETTING UP CAMPFinding a suitable location for a campsite will depend on the situation, but in mostcases, you should target sites that; Are close to a clean water source.Have enough suitable wood to build a shelter and fire.Are close to natural resources for foraging, fishing and/or hunting.Are free of hazards such as dangerous branches, dead trees or poisonousplants. Are unlikely to become flooded or collect water during rain events.10
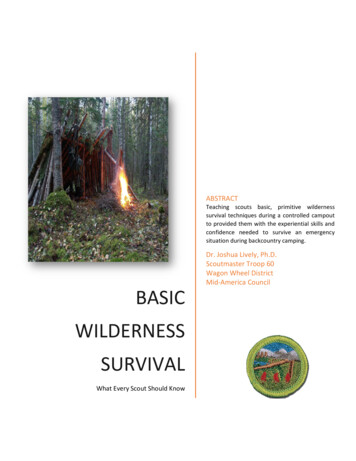
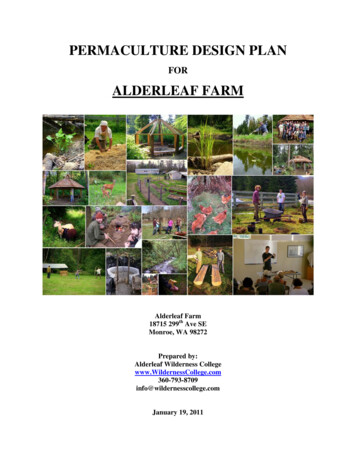
WILDERNESS SURVIVAL GUIDE Are protected by the wind in cold weather or takes advantage of it in hotweather. Camping at the top of a ridge will be windier but will also be slightlywarmer on still nights due to warmer air rising. A low depression will collectcold air during the night, but will also have less wind.3.4.CONSTRUCTING A LEAN-TO SHELTERIn warm weather, a lean-to shelter is the easiest option. It requires a sturdy branchas a ridgepole that is approximately 6 foot (2 m) long and 3 inches (8 cm) thickthat can be horizontally suspended about 3 – 6 feet (1 – 2 m) high in the fork oftwo trees. On one side of the ridgepole, lay smaller branches at a 45 angle fromthe ground to start creating a frame for the shelter. Finally, layer leaves or grassover the entire frame, working from the ground upwards. Slightly overlap eachrow, similar to laying roof shingles and point any foliage downwards to make itmore water resistant. Larger leaves are better for this purpose, but they may needto be secured by covering them with smaller branches. Be sure to cover the entireframe, otherwise any rain that touches the frame will most likely end up drippinginside the shelter.11
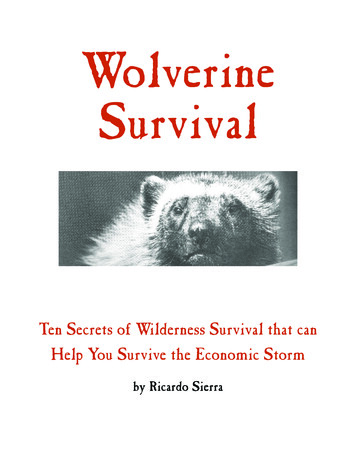
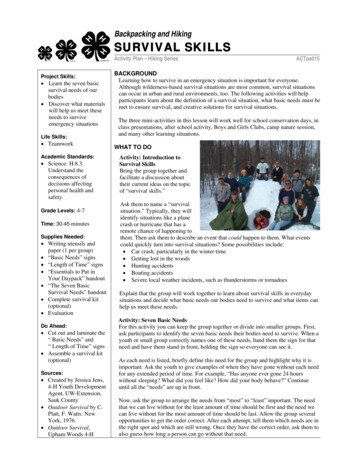
WILDERNESS SURVIVAL GUIDE3.5.CONSTRUCTING AN A-FRAME SHELTERIn cooler or windy weather, an A-frame shelter will be a better option. This is verysimilar to the lean-to shelter, but it’s enclosed on 2 sides instead of just one. Itdoesn’t require the support from 2 trees, but does require some cordage or rope tobuild the A-frame. Again, make sure to cover the entire frame with leaves or grassfrom the ground up to avoid water dripping inside.3.6.CONSTRUCTING A DEBRIS HUT SHELTERIn cold or miserable weather, a debris hut will shelter you the best, since this typeof shelter tapers towards the ground and is enclosed on 3 sides, which will make iteasier to maintain your body heat in this shelter. This shelter only needs to be 3feet (1 m) off the ground and should only be slightly longer than your own height,so a long, sturdy ridgepole can be propped against a tree stump to start buildingthe frame. Smaller branches are arranged on either side of the ridgepole and thenleaves and grass layered on top. Insulate the ground with plenty of leaves, aimingfor a bed of at least 4 inches (10 cm) once it is compressed. Laying an emergencythermal blanket over the bed of leaves with the reflective side up will make an12
WILDERNESS SURVIVAL GUIDEenormous difference in the amount of heat lost to the ground. Once in the hut, youcan close up the opening in front with a backpack.3.7.OTHER TYPES OF SHELTERA snow cave can be dug into the side of a hill to provide shelter. Build a snow bedthat is raised off the floor of the snow cave and smooth the ceiling so that meltingsnow doesn’t drip on you while sleeping.In desert situations, it’s important to conserve energy and water by sleeping duringthe day and being active at night. The simplest desert shelter involves scrappingaway the hot sand to build a long pit to lie down in. When covered with a tarp ordebris, this shelter will create shade with only a small amount of exertion.In swamps and other water-logged areas, it will be necessary to build a raisedplatform off the saturated ground. A mosquito net is essential in swampy areas,otherwise sleeping high in the canopy will reduce the number of biting insects.13
WILDERNESS SURVIVAL GUIDE4. HOW TO MAKE A FIRE4.1.BUILDING A FIREWhen building a campfire, consider the wind direction to avoid smoke blowinginto your shelter. Remove any combustible materials (including the duff layer) ina radius of at least 6 feet (2 m) around the fire. Make sure there are no treesoverhead. Place a ring of rocks around your intended campfire; this will reflect andabsorb the heat of the fire as well as shelter it from the wind and prevent it fromspreading out of control. Scoop out a depression in the middle of the campfire,pushing the dirt towards the ring of rocks. Stack 4 sticks in a square at the base ofthe depression, this will allow oxygen to flow while keeping the tinder raised offthe ground. Next place small twigs and tinder on top of the square in a chaotic orrandom manner. Finally, arrange larger twigs and sticks in a teepee formationaround the bundle of tinder and twigs, making sure to leave plenty of spacebetween the sticks for oxygen to flow through. Ignite the tinder and add some moresmall sticks until the flames rise above the teepee. Once the flames grow tall, largerpieces of fuel can be added carefully so as not to smother the flames.If you want a quick burning, high heat fire then use softwood species such as pine,willow, poplar, alder or cedar. For long lasting coals for cooking, choose hardwoodspecies like ash, birch, walnut, oak and hickory. Only burn dry, old wood from theforest floor. Before leaving a site, your campfire should be cool to the touch toensure no accidental re-ignition.Where possible, collect dry tinder whenever you see it and store it in a water-proofcontainer or wrap it in an oiled cloth. Tinder is best collected from bark with highamounts of flammable resin and oil, such as birch and pine bark. Birch bark caneasily be shredded and fluffed up for excellent tinder. Pine resin tends to gather inthe forks of trunks or towards the base of standing dead trees. Tinder can be madeby rubbing the back of a knife blade against dry wood. A feather stick is anotherform of tinder which can be fashioned by carefully shaving a branch with a knifeblade.4.2.IGNITING A FIREIt’s recommended to carry at least 2 reliable lighters; preferably not refillable ones,since these tend to leak more gas. In colder weather, lighters should be kept closeto the body to keep them warm.14
WILDERNESS SURVIVAL GUIDEIn a survival situation, some types of quartz, chert or flint can all be used to strikeagainst carbon steel to make a spark, but this method works best when trying toignite charred materials, since the temperature of the spark isn’t as high comparedto the sparks from a ferrocerium rod (although the ferrocerium rod can requiremore maintenance). When striking a flint or rod, use a loose-jointed wrist motion.Once the sparks cause the tinder to smolder, lightly blow on it until it bursts intoflames.If you have a sealable tin, you can make your own charred tinder to make ignitingfires easier. Simply place some dry leaves, grass, bark, twigs or cloth into the tin,close the lid tightly and place it in the hot coals for 10 – 15 minutes. Allow the tinto completely cool before opening to prevent the charred materials from igniting.This charred tinder is easily ignited by a few sparks from a flint against the spineof a carbon steel knife.Where possible, practice igniting a fire using a bow drill. This requires finding twopieces of very light, dry wood; one a little thicker than your thumb and about 9inches (23 cm) long to act as the drill, and the other a wider, flatter pieceapproximately ½ inch (1 cm) thick to act as the hearth board. It’s important thatthese two pieces of wood are completely dry but soft – you should be able to scratchthe wood with your nail. Use your knife to create a small indentation on the hearthboard for the drill to sit in. The final component is the bow itself. This should bemade from a sturdy stick, preferably green and approximately 3 feet (90 cm) long(or a rib bone from a large deer or elk). Ideally the bow should have a slight bendin it and must be strong enough to tie a piece of string or cordage to each end tomake a bow. A rock, piece of wood or hard nutshell in the palm can protect yourhand while applying downward pressure to the drill while still allowing it to spin.Ideally, this should have a slight indentation as well, to stop the drill from slippingout. To start, loop the string once around the drill and stand the drill in theindentation in the hearth board. Pace the hearth board on the ground and use yourfoot to secure it so that your hands are free to hold the drill and bow. With a rockor shell in one hand, apply pressure to the top of the drill and slowly begin to pushand pull the bow with the other hand, making sure to use the entire length of thebow to create enough dust and fine fibers. It’s important to slowly create this dustfirst, before attempting to produce friction for ignition – otherwise you create onlyheat without any actual fuel. Once the dust and fibers have started to accumulate,you can increase the speed of the bow to increase the friction. The friction willeventually turn the dust into tiny coals, which can be carefully transferred to atinder bundle or charred material for quick and easy ignition.15
WILDERNESS SURVIVAL GUIDECoals can be transported by wrapping them up in sage leaves; sage leaves tend tosmolder instead of ignite.You can also use a magnifying glass or lens to concentrate the sun's rays onto a drytinder bundle. This method is most effective on sunny days when the sun isoverhead.Burning dried animal dung, coconut husks or dried cattail leaves will help to repelmosquitos, otherwise being elevated 10 - 25 feet off the ground will reduce thenumber of mosquitos.4.3.COOKING TIPS AND SAFE EATINGAlways wait for the flames to die down so that you are only cooking on coals.Alternatively, add a narrow trench to your round fire pit to make a keyhole fire pit.This will allow you to continue to feed the flames of the main fire in the circle, whilegiving you a narrow trench to drag coals into to cook on simultaneously.Boiling meat and making a broth out of it is often the most efficient way to cookmeat while maintaining the nutrients, but smoking meat preserves it so that it canbe stored for longer. Meat smoked overnight will last approximately a week. When16
WILDERNESS SURVIVAL GUIDEsmoking meat, heat and flames should be minimized and using slightly green ordamp hardwood will produce plenty of smoke. In hot, sunny weather, thin stripsof meat can be dried in the sun until the strips are dry and crunchy.The meat from any scavenger animals (for example, buzzards and boars) shouldbe well boiled to remove any parasites, and the crop should be removed from birdswhen processing them for food. Also, do not eat the brain or spinal cord of anyanimal due to the risk of neurological diseases.In general, any fish that is less than 2 inches (5 cm) long can be eaten whole. Allfreshwater fish in North America are edible once cooked.All reptiles are carriers of salmonella on their skin so it’s essential to cook lizard,snake and turtle meat well and wash your hands thoroughly after handling them.Do not eat box turtle as this meat contains toxins that are not destroyed by cooking.Avoid eating plants that emits an almond smell; this is usually a sign of cyanidecompounds. Milky sap is also a sign of toxicity and often seeds inside a pod will notbe edible unless heavily processed. Many three-leafed plants are poisonous andpurple, pink or black tipped grass grains may contain a harmful mold or bacteria.All water plants must be cooked to remove any harmful bacteria.Wrap food in 3 layers of burdock leaves (or any other edible large leaves) and placeon the coals to cook. Crush and leach acorns and other bitter food to make themmore palatable.Use a green stick or branch to skewer food over the fire. A dry, flat rock placed inthe fire or coals is a great way to fry food without a pan.17
WILDERNESS SURVIVAL GUIDE5. HOW TO FIND, DISTILL, FILTERAND PURIFY WATER5.1.FINDING WATER AND STAYING HYDRATEDWhen searching for a water source, often there is a change in vegetation as you getcloser to water; thinner or smaller leaved plants will give way to broader andfleshier leaved plants, or the tree canopy will become thicker and taller. In drierenvironments, a natural line of trees may indicate a watercourse.Digging for water is time consuming and energy intensive, but may be the onlyoption in some dry environments. The best places to dig for water include; In dry river beds, especially in low depressions or near concave riverbanks At the bottom of valleys and gorges, especially at the base of cliffs or rockyoutcrops Under green vegetation in an otherwise dry landscape Behind the first sand dunes at a beachMany tropical plants can provide water. Shake green bamboo and sugarcane; thestems that sound like they have water inside can be bent over and the top sliced offto harvest the water. Banana and plantain trees can be cut down and a bowl formedin the stump to collect the water from the roots for approximately 4 days. Somehanging vines can be sliced at the base and punctured at the top to allow the waterinside to flow downward.Desert plants that can provide water include the pulp from barrel cacti, pricklypears and aloe vera. Use a knife to slice away the prickles.Some tree species such as birch, maple, walnut, hickory and sycamore trees can betapped for drinkable liquid. Bore a small hole on the sunny side of the tree trunkand insert a hollow reed or stick into the hole to allow the liquid to run out. Forbest results, bore the hole through the bark and then 2 – 3 inches further into thewood, preferably either below a fork in the trunk or above a large root ball at abouthead height. Large, old trees will not produce as much liquid as developing ones.Sycamore trees are best tapped from mid-winter, whereas maple, walnut andhickory should be tapped from late winter. Birch trees can be tapped from the startof spring, just before the buds start opening.18
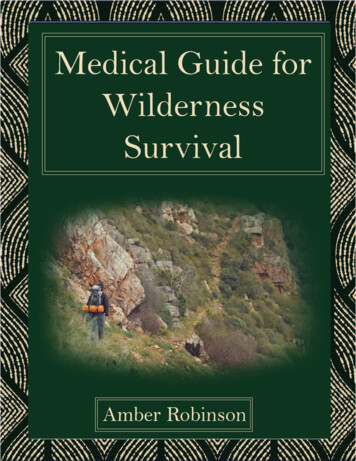
WILDERNESS SURVIVAL GUIDEIf water is scarce, then try to minimize exerting yourself, especially in hot weather.Do not rely on the sensation of thirst to dictate when to drink. This method willresult in drinking only two-thirds of your daily water requirement. Take constantsips of water throughout the day instead. The color of your urine will indicatewhether you are dehydrated or not; the darker the color, the more dehydrated youare.5.2.SOLAR WATER DISTILLATIONFreshly collected rain water can be drunk without any filtration or purificationrequired. Rain water can be collected on large leaves that funnel into a cleancontainer.Water can also be slowly distilled on sunny days from green leafy material ordirty/salty water in 2 ways: Dig a pit and fill with fresh, green, leafy material ordirty water. Place a small collection container in the middle of the pit then coverand seal the top of the whole pit with plastic, making sure to secure the plasticthoroughly. Place a small rock on top of the plastic directly over the container andas the water from the leaves or dirty water evaporates, it will condense on theplastic and trickle down into the container in the middle of the pit. Alternatively,you can tie a plastic bag tightly around some green leaves while they are stillattached to the tree or plant. This water does not require boiling, so can be drunkstraight away.19
WILDERNESS SURVIVAL GUIDE5.3.WATER FILTRATION AND BOILINGIf possible, collect water from clean, flowing streams or rivers then filter and boilthe water for at least 5 minutes. If the water is cloudy, allow the water to settle,then decant and filter it through some fabric before boiling it. Filtered water stillneeds to be boiled to remove any harmful bacteria and viruses.It’s possible to make a water filter by layering fabric, charcoal, sand, grass andgravel in a makeshift funnel to filter water. Filter the water at least 5 times. Watercan also be filtered through cloth, coconut husks or even dried and ground up fruitpeels.The inner bark of Oregon grape (Mahonia aquifolium) was traditionally leftovernight in drinking water to cleanse it. The high concentrations of berberine inthe bark can kill many types of microbes.Water purification tablets are also a reliable way to make filtered water drinkablewhen boiling is not po
WILDERNESS SURVIVAL GUIDE 7 1. WHAT TO PACK IN YOUR BACKPACK 1.1. LIST OF SUGGESTED ITEMS It’s important to only carry the bare essentials to reduce your load while in the wilderness. For this reas