Transcription
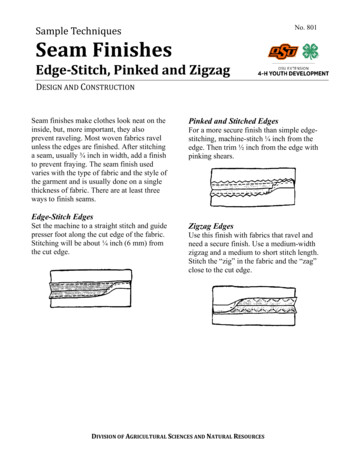
No. 801Sample TechniquesSeam FinishesEdge-Stitch, Pinked and ZigzagDESIGN AND CONSTRUCTIONSeam finishes make clothes look neat on theinside, but, more important, they alsoprevent raveling. Most woven fabrics ravelunless the edges are finished. After stitchinga seam, usually ¾ inch in width, add a finishto prevent fraying. The seam finish usedvaries with the type of fabric and the style ofthe garment and is usually done on a singlethickness of fabric. There are at least threeways to finish seams.Edge-Stitch EdgesSet the machine to a straight stitch and guidepresser foot along the cut edge of the fabric.Stitching will be about ¼ inch (6 mm) fromthe cut edge.Pinked and Stitched EdgesFor a more secure finish than simple edgestitching, machine-stitch ¼ inch from theedge. Then trim ½ inch from the edge withpinking shears.Zigzag EdgesUse this finish with fabrics that ravel andneed a secure finish. Use a medium-widthzigzag and a medium to short stitch length.Stitch the “zig” in the fabric and the “zag”close to the cut edge.DIVISION OF AGRICULTURAL SCIENCES AND NATURAL RESOURCES
NameAgeCountyYears of WorkSEAM FINISH SAMPLESUsing the instructions on the opposite side, attach a sample for each of the seam finishes.Samples should be four-inch squares and overlapped, if necessary. Any fabric may be used, butthe seam finish should be appropriate for the fabric.Do your samples meet the following criteria?Sewn with stitches of the same lengthEven in widthAppropriate for fabricSewn with matching thread or one chosen for decorative colorSmoothEDGE STITCHEDPINKED AND STITCHEDYesNoZIGZAG STITCHEDYear
No. 802Sample TechniquesButtonsDESIGN AND CONSTRUCTIONButtons are both functional and fashionable.Your choice of buttons should depend onyour garment. Be sure to select buttonsbefore matching buttonholes or loops. Thereare two types of buttons. Select the one thatis best-suited to your garment design andfabric. The button types are: Shank buttons, which have metal orplastic shanks instead of holes. Sew-through buttons, which comewith two or four holes in the buttonitself. A shank must be added as thebutton is sewn on the garment.Sew-ThroughMark the button position directly under thebuttonhole. Place the button over the mark.Use a double-knotted thread and hide theknot between the fabric and the button.Bring thread up through a hole, allowing forshank (Use a toothpick or pin between thebutton’s holes.) Go through the second hole,taking thread through fabric. Continuestitching in the same place for six stitches.Remove the toothpick or pin. Pull button tothe top of the threads. Place threaded needlebetween the button and the fabric and windthe thread around the stitches under thebutton four times. Secure the thread.Buttons are sewn on after buttonholes orloops have been made. The threads shouldbe invisible to the eye under the button orbetween fabric layers.ShankBe sure there is enough shank then stitchthrough the fabric and shank six times, usingdouble-knotted threads. If more shank isneeded, leave a little give in the thread.Adapted — “Buttons, Buttonholes and OtherFasteners,” by Nadine Hackle, Florida CooperativeExtension Service.DIVISION OF AGRICULTURAL SCIENCES AND NATURAL RESOURCES
NameAgeCountyYears of WorkBUTTON SAMPLESUsing the instructions on the opposite side, attach samples of a shank button and a sew-throughbutton. Use a four-inch square of fabric.Check your buttons against the following standards:Securely fastened with neat stitchesReinforced with interfacing or another buttonDouble threadHidden knotSEW-THROUGHYesNoSHANKYear
No. 803Sample TechniquesFasteners: Hook & Eye and SnapsDESIGN AND CONSTRUCTIONSnapsSnaps are used to hold together overlappingedges that do not get much strain or pull onthe fabric. Snaps come in two parts – theball and the socket. Sew the ball to theunderside of the fabric overlap and thesocket to the under lap.Sew the ball part first. Use a single knottedthread, hiding the knot between the fabricand the snap. The buttonhole stitch is a moresecure stitch than the overhand stitch. Stitchthrough one hole several times, placingstitches close together. Make sure youpenetrate fabric and interfacing. Take carenot to let stitches show on the outermostlayer of the fabric. Stitch through all fourholes. Knot the thread close to the fabric. Toeasily mark the location for the socket, rub apiece of chalk over the end of the ball. Thenposition the ball over the other part of thegarment and press to mark the socketlocation. Center the socket over the markingand stitch through the socket holes, just asyou stitched through those on the ball.Hooks and EyesHook and eye fasteners are used foropenings such as waistbands, where therewill be greater stress. The fasteners may bemade of thin wire or wider pieces of metal.Use a straight eye when the edges overlapand a round eye when edges only meet.Sew hooks to the underside of the fabricoverlap, using a single knotted thread.Fasten the knot under the hook. Takestitches through fabric and interfacing,taking care not to let stitches show on theoutside. Be sure to fasten the bill of the hookwith a few stitches.Position the hook over the other part of thegarment and place eye directly under thehook. Mark position and stitch around therings of the eye.Adapted from “Buttons, Buttonholes and OtherFasteners, - by Nadine Hackle, Florida CooperativeExtension Service.DIVISION OF AGRICULTURAL SCIENCES AND NATURAL RESOURCES
NameAgeCountyYears of WorkHOOK & EYE and SNAP SAMPLESUsing the instructions on the opposite side, attach a sample of a snap and a sample of a hook andeye. Use four-inch fabric squares.Do your fasteners meet these standards?Appropriate for the garment designSewn on with a single threadSmall, even stitchesStitches do not show on right sideFasteners are secureSNAPYesNoHOOK AND EYEYear
No. 804Sample TechniquesHems: Machine and Catch StitchDESIGN AND CONSTRUCTIONThe fabric and style of the garment or itemdetermine the hem depth. In general, thegreater the flare, the narrower the hem.Hems in sheer fabrics are either verynarrow, so as to be inconspicuous, or verywide, for design and weight.2. Turn up hem the desired depth, makingsure it is even around the entire article.3. Using eight to ten stitches per inch, stitcharound the hem at the desired width.Marking the HemHand Catch-StitchThe most accurate way to mark the hem of agarment is to ask someone to mark aroundthe garment while you are wearing it. Wearthe shoes you will wear with the garmentand a belt, if you will be wearing one. Standwith normal posture, and let the helper movearound you, marking with pins or chalkabout two to three inches apart on the hemfold line. Before hemming make sure allalterations have been made and the garmentis ready to wear.Machine-StitchingMachine-stitched hems are best for knitgarments, lingerie, children’s clothing,sportswear and home decorating items. Theyare not appropriate for full hems.Machine top stitching can provide a securehem and a decorative touch, especially ifdone with a contrasting color thread. Topstitching can be a single row, two rows, ortwo rows with a twin needle. To machinestitch a hem:1. Finish the hem edge by pinking, zigzagor edge stitching.The catch stitch is used for both insidehemming and flat hemming. This stitchprovides some give and works well with knitand stretch fabrics. To hem with a catchstitch:1. Finish the hem edge by pinking, zigzag,or edge stitching.2. Pin up the hem the desired width,making sure it is even.3. Thread a needle with a single threadabout 18 inches long. Secure thread toseam.4. Workfrom leftto right,with theneedlepointingto the left.5. Pick up a single thread over the edge ofthe hem. Cross back over to the hem, andtake another stitch approximately ¼ inchfrom the previous stitch.6. Continue around the entire hem.7. Do not pull stitches too tight or the hemwill pucker.DIVISION OF AGRICULTURAL SCIENCES AND NATURAL RESOURCES
NameAgeCountyYears of WorkMACHINE AND CATCH STITCH SAMPLESUsing the instructions on the opposite side, attach a sample of a machine-stitched hem and asample of a catch-stitched hem. You may use any appropriate fabric. Make samples three inchesby four inches.Do your samples meet these standards?Smooth and inconspicuous on the right sideUniform in widthSuitably finished edgesLoose, not tight, hand stitchesCarefully pressedMACHINE-STITCHED HEMYesNoCATCH-STITCHED HEMYear
No. 805Sample TechniquesBasting StitchesDESIGN AND CONSTRUCTIONUse basting stitches to hold pieces of agarment together as you sew or to mark foldlines and location lines, such as centers,buttonholes, or pockets. Basting can be doneby machine, using long stitches, or by hand,using a single thread. Pin-basting holdsseams and other edges together for machinestitching.Work on the right side of the fabric, slippinga needle through the fold of the fabric ¼inch through the other fabric. Stitchesshould be pulled tight to hold the fabric inplace but not so tight that the fabric puckers.Use this stitch to match plaids and stripes orto hold pockets in place.Even BastingUse stitches that are ⅛- to ¼-inch inlength to hold fabric together for fitting ormachine-stitching.Uneven BastingAlternate short stitches, ½-inch long, andlong stitches, ½-inch or longer, to mark foldor location lines. Place long stitches on theright side.Slip BastingDiagonal BastingTake short, horizontalstitches in a vertical lineto form a long slantingstitch on the right side ofthe fabric. Use this stitchto hold interfacing to thefabric or to keep theedges of the garmentfrom pulling apart.Machine BastingThis is a temporary machine stitch, usuallyremoved after the permanent stitching hasbeen put in. It is the longest stitch yourmachine will make, usually six to eightstitches per inch. Use for fitting or to holdgathers and pleatsDIVISION OF AGRICULTURAL SCIENCES AND NATURAL RESOURCES
NameAgeCountyYears of WorkBASTING SAMPLESUsing the instructions on the opposite side of this page, attach samples of even, uneven andmachine basting stitches. Use four-inch fabric squares, overlapping samples, if necessary.Do your samples meet these standards?Single threadStitches are straight and on the appropriate linesStitches are secured with knotted thread at one endMachine stitches are six to eight stitches per inchMachine stitches have even tensionEVEN BASTINGUNEVEN BASTINGYesNoMACHINE BASTINGYear
Sample TechniquesNo. 806Decorative StitchesMachine and HandDESIGN AND CONSTRUCTIONDecorative stitches add interest to garments,home decorating items, and other articles.These stitches can be made by machine orby hand. There are several hand-stitchingtechniques. Cross-stitch and embroidery aretwo well-known examples. There are manyexcellent commercial publications to helpyou learn these techniques. This sheet willdeal with only two techniques – decorativemachine-stitch and cross-stitch by hand.Decorative Machine-StitchCross-StitchIn counted cross-stitch, stitches are workedon even weave fabric, using embroiderythread and blunt needles. The stitches areformed over an exact number of threadswhich make up the design. There are severalpublications which give complete details forselecting fabrics, thread, needles and othersupplies.The cross-stitch is the basic stitch in countedcross-stitch. The stitch is usually worked inIn decorative machine-stitchery, thread oryarn is applied to the fabric by machine.There are endless possibilities for anydesign. You will need to read theinstructions for forming designs on yourmachine. These designs are usuallyprogrammed, using built-in stitches or cams.Thread is a very important part of decorativestitching. You must use a fine quality thread,because it will be the main feature of yourdesign. Different effects can be produced,depending on the size of your thread. Checkyour machine guide book for suggestions.For best results use a firmly-woven fabricand make a test sample before you beginyour project. Use decorative stitches forborders, to outline designs, to creategeometric designs and for your own freeform designs.horizontal rows. The top half of each crossstitch must always slant in the samedirection. Additional stitches used incounted cross-stitch are the half cross-stitchand backstitch.DIVISION OF AGRICULTURAL SCIENCES AND NATURAL RESOURCES
NameAgeCountyYears of WorkDECORATIVE STITCHES SAMPLESAttach samples of decorative machine-stitching and counted cross-stitch. Finished samplesshould be four-inch squares.Do your samples meet these standards?Suitable fabric is usedAppropriate thread is usedMachine stitching is smooth and evenFabric is not puckered or pulledCross-stitches slant in same directionCross-stitches are even in sizeDECORATIVE MACHINE STITCHYesNoCROSS STITCHYear
No. 807Sample TechniquesCasingsDESIGN AND CONSTRUCTIONA casing is an easy way to finish the sleevesof a shirt or the waistline of a skirt, pants orshorts. Casings can also be used to finish theedges of laundry bags or other homedecorative items. Elastic, rope or cording isused to draw up the item. To make a casing,follow the directions below.1. Press under, zigzag or serge ¼ inchalong the waistline or sleeve edge.2. Stitch the center back seam. If there areonly two seams, as in a laundry bag,stitch the side seams.3. Locate the fold line on the easing. Yourpattern instructions will provide a foldline or say how far to fold the casingback.4. Start your stitching at the casing foldline, and stitch to the end of the seam.Backstitch at the beginning and end ofthe stitching. Leave the center seam orone of the side seams open from the foldline to the cut edge of the casing.5. Press the seam flat; then press the seamopen.6. Machine- or hand-basteeach seam allowance tothe garment, about threeinches down from theupper edge. This keeps the elastic or cordfrom getting caught as you thread it.7. Press the casing under along the foldline. Make sure the entire casing is thesame width.8. Pin the casing, with pins atright angles, to the stitchingline. The unstitched edges ofthe center back wrong orside seam should meet atthe seam.9. Stitch around the lower edge of thecasing, making sure the stitching is auniform distance from the edge of thegarment.10. Stitch around the top ofthe casing, ½ inch fromthe folded edge. This willkeep the elastic fromtwisting.11. Cut a piece of elastic which fitscomfortably around your waist or wrist.Leave an additional ½- to one-inch forsecuring the elastic at the end. If usingrope or cord for a drawstring, use alength about twice the distance aroundthe bag.12. Use a large safety pin or an elastic guideon one end of the elastic or cord/rope.Thread the elastic through the opening.Make sure the elastic does not twist orturn. Do not pull the second end of theelastic into the casing. (Try pinning thesecond end to the garment so you cannotpull it through.)13. Join the ends of the elastic byoverlapping and zigzagging across theends several times. Cut off extra elastic.14. Distribute fullness evenly, if you areusing elastic.15. Close the opening used to insert theelastic by hand-stitching.16. Remove basting stitches.DIVISION OF AGRICULTURAL SCIENCES AND NATURAL RESOURCES
NameAgeCountyYears of WorkCASING SAMPLEUsing the instructions on the opposite side, attach a sample of an elastic casing. You may useany fabric to construct the sample. Use a 12-inch square of fabric for a finished sample that iseight inches around.Does your sample meet these standards?Even widthCasing edge finished to prevent ravelingStitched along both top and bottom edgesElastic smooth and untwisted in the easingYesNoELASTIC CASINGYear
No. 808Sample TechniquesInterfacingsDESIGN AND CONSTRUCTIONMost well-made garments have interfacingbetween the outer fabric and the facing. Youmay not be able to see the interfacing, but itis sometimes crucial to the shape, supportand durability of your garment. Interfacingis most commonly used in the collar, cuffs,lapels, neckline, waistband, hem or edge of agarment (a jacket opening, for example).Many different interfacings are available,but basically there are two types – fusibleand sew-in. A sew-in interfacing is stitchedto the garment fabric; fusible interfacing isbonded with an iron. Fusible interfacingbonds to the fabric, the result of acombination of steam heat and pressure.Fusible interfacing is available as nonwoven, woven, and knit fabric, while sew-ininterfacing comes in non-woven and woven.There are also many different weights ofinterfacing available, from very lightweightto heavyweightHow to Select an InterfacingThere are several things to consider whenselecting an interfacing. The sameinterfacing will not work for every fabric.Here are some points to consider: Type and weight of the fabric – choosean interfacing that is lighter weight thanyour garment fabric. The desired finished appearance – Doyou want a crisp appearance or a softappearance? Purpose of interfacing in the particulararea of the garment – Should theinterfacing reinforce, add shape, or givebody? Care requirements – should be same forinterfacing as for garment. Read the endof the interfacing bolt.How to Apply an InterfacingAlways test the interfacing with fabricbefore applying it to garment pieces. This isespecially important for fusible interfacings.Test fusible on a scrap of the fabric to seehow well it bonds to the fabric, and checkthe appearance on the right side of thefabric.Always preshrink non-fusible interfacing bywashing and drying it the same way youintend to wash and dry your garment.Preshrink fusible interfacing by dipping it inCOOL water and letting it air dry.When placing the pattern pieces on theinterfacing, follow the pattern grain line andany instructions that come with theinterfacing. Always follow interfacinginstructions to achieve the best results. Ifyour pattern does not have separateinterfacing pieces, use the facing, collar orcuff pattern to cut interfacing.Some patterns do not call for interfacing.However, most garments will look betterand last longer if you interface them. Thereare several areas on a garment which shouldbe interfaced – collars, necklines, sleevelessarmholes, patch pockets, cuffs, buttons andbuttonholes, waistbands, and belts.DIVISION OF AGRICULTURAL SCIENCES AND NATURAL RESOURCES
NameAgeCountyYears of WorkINTERACING SAMPLEAttach samples of non-woven, woven, and fusible interfacings. Each sample should be a fourinch square.NON-WOVENWOVENFUSIBLEYear
No. 809Sample TechniquesFacingsDESIGN AND CONSTRUCTIONFacings cover and enclose raw edges, suchas front and back openings, necklines,armholes, or sleeves. They usually do notshow on the outside of the garment. Youwill need to read your pattern guide sheetsfor complete instructions on applyingfacings. Here are some basic steps.1. Apply interfacing to the wrong side ofthe facing. You may find fusible theeasiest to use, but review the sheet oninterfacings, and use the appropriate onefor your fabric.2. If the facing has several sections, stitchthem together, following the patterninstructions. Trim seams, and press open.3. Finish the outer edge of the facing byedge-stitching, zigzag stitching or sergestitching.4. Pin facing to garment, with right sidestogether,matchingpatternmarkings.5. With the facingside up, stitch⅝ inch from the raw edge.6. Cut each seam allowance a differentwidth to reduce bulk. This is called“grading.” Trim the facing seam to ¼inch and the garment seam to ¾ inch.7. If the seam is curved, clip the seam tomake it lie flat after the facing is turnedto the wrong side. Clip only enough tomake the facing lie flat. Do not clip intothe seam.8. Press the seam flat, then press seamallowances toward the facing.9. From the right side, on the interfacing,stitch the seam allowances to the facingwith a straight stitch close to the seamline. This is called “under stitching.”10. Turn facing to the wrong side of thegarment and press.11. Secure the facing to the garment at seamlines by stitching from the right side andsewing through all thicknesses of thefacing and garment. Stitch the full widthof the facing, or machine-tack the facingto the seam allowance from the wrongside.DIVISION OF AGRICULTURAL SCIENCES AND NATURAL RESOURCES
NameAgeCountyYears of WorkFACING SAMPLEUsing the instructions on the opposite side, attach a facing sample. Sample can be a neckline orarmhole facing.Does your sample meet these standards?Facing is interfacedOuter edge is finished to prevent ravelingFacing seam is trimmed and gradedFacing is under stitchedFacing is secured to garment at seamsYesNoFACINGYear
No. 810Sample TechniquesSeam Finishes:Serged, Hairline, French, Clean FinishDESIGN AND CONSTRUCTIONNo one seam finish is suitable for all fabrics.Here are four finishes and their uses.French SeamUse the French method for straight seams insheer and light-weight fabrics. It is a narrowseam in which the seam allowances areenclosed. It should be used only on straightor slightly curved seams.Lay the wrong sides of fabric together, andsew ⅜ inch from the raw edge. Trim close tostitching. With right sides together, pressalong seam line, then sew ¼ inch fromfolded edge, enclosing raw edges. Pressseam to one side.Hairline SeamThe hairline seam is an extremely narrowseam. It is suitable for sheer fabrics and canbe used only on garment areas where there isno strain and the French seam cannot beused.Mark the seam line on the fabric. Cut a pieceof topstitching thread the length of the seam,and lay it on the seam line. Using a short,narrow zigzag stitch, stitch on the seam line,covering the cording. Stitch slowly andevenly. Press seam flat. Trim seamallowances to ⅛ inch from the line ofstitching. Turn right side out and press.Serged Seam AllowancesClean Finish SeamThe clean finish should be used onlightweight fabrics that will be bulky. It isgood for fabrics which may ravel with onlyedge-stitching or pinked edges.Turn under ¼ inch on raw edges of seamsand stitch close to the edge of the fold.You can use conventional seams with sergedseam finish: When you are using bulky fabrics. When you are unsure of fit and may needto alter. When seams must be very flat andpressed open.To serge conventional seams, serge eachedge of the seam allowance and press theseam open.DIVISION OF AGRICULTURAL SCIENCES AND NATURAL RESOURCES
NameAgeCountyYears of WorkSERGED, HAIRLINE, FRENCH, CLEAN SAMPLESUsing the instructions on the opposite side, attach samples for the French seam, clean-finishseam and the serged, or hairline, seam. (You may choose which of the two.) Any fabric may beused, but finish should be appropriate for fabric. Samples should be three-inch squares.Do your seam finishes meet the following criteria?Appropriate for the fabricSewn with stitches of the same lengthEven in widthSmoothSERGED OR HAIRLINEFRENCHYesNoCLEANYear
No. 811Sample TechniquesMachine ButtonholesDESIGN AND CONSTRUCTIONMachine-worked buttonholes are used inmost garments. They should be attractive,well-made, and durable. Machinebuttonholes may be rectangular (a bar tackat each end), oval (both ends rounded), orkeyhole-shaped (one rounded end.)Machine buttonholes can be made withbuilt-in stitches, computerized stitches orYou must be accurate when marking forbuttonholes. Mark on the right side of thegarment. Be sure to mark the beginning andend of the buttonhole.Start with a full bobbin and a sharp needle.Operate your machine smoothly, withoutmany starts and stops. This makes for asmoother buttonhole and fewer problems.Cutting Buttonholesspecial attachments. Check your sewingmachine manual for specific instructions onhow to make buttonholes on your machine.Most patterns have markings to indicatewhere buttonholes should be placed.Remember if you alter the pattern you mustalso alter the placement of the buttonholes.The length of the buttonhole depends on thebutton you are using. To determine thelength, measure both the diameter and thethickness of the button, and add themeasurements together. Odd-shaped buttonsmay require extra length. (Cut a slit equal tothe diameter plus ½ inch in a scrap of fabric.Slip button through and adjust the length, ifnecessary; Make all buttonholes the lengthof the sample.)Always make a test buttonhole, using thesame number of layers of fabric andinterfacings as you will use on the actualgarment. Making buttonholes is usually oneof the last steps in constructing a garment.Cut your buttonhole open carefully, makingsure not to cut any of the buttonhole threads.That will cause the fabric to fray and threadsto unravel. Buttonhole cutters andbuttonhole scissors make it much easier toaccomplish this task.Covered ButtonsCovered buttons are usually used on finetailored garments and special occasiongarments, such as party dresses or weddinggowns. Although a little tedious to make,they can add an elegant touch to an outfit.Covered buttons are also used when youcannot match the color of your fabric and donot want to use a contrasting color.Pre-packaged button forms will give youspecific instructions for covering. Reviewbefore you begin.Covered buttons are not recommended forvery bulky fabrics. Some sheer fabrics mayrequire two layers of fabric in order to coverthe metal form.DIVISION OF AGRICULTURAL SCIENCES AND NATURAL RESOURCES
NameAgeCountyYears of WorkMACHINE BUTTONHOLES AND COVERED BUTTONS SAMPLESAttach a sample of a machine buttonhole and covered button. With your buttonhole, also attachthe button for which it was made. Sew the covered button onto a square of fabric so that thebutton can be buttoned.Does your machine buttonhole meet the following criteria?Buttonhole is straight and on grainStitches are smooth and evenThreads are secured properlyThread matches fabricButtonhole is cut open smoothlyDoes your covered button meet the following criteria?Fabric is appropriate for coveringNo puckers or pleatsBack is securely attachedForm does not show on topMACHINE BUTTONHOLEYesNoYesNoCOVERED BUTTONYear
No. 812Sample TechniquesZippersDESIGN AND CONSTRUCTIONThe two most common types of zipperapplications are lapped and centered. Allzippers should be pre-shrunk before applying toa garment.The zipper opening equals zipper length,plus one inch.Centered ApplicationStep 2 – Place top end of zipper tapeeven with edge of the fabric. Machinebaste openedzipper to oneseamallowance,using regular orzipper foot. Zipper teeth should becentered on seam, as shown inillustration.The centered application is ideal for heavy orpile fabrics, because it reduces bulk in thezipper area. Its symmetrical appearance is bestsuited for center back or front openings. It isalso suggested for design features, such asslashed openings, wrist openings and pleats.Step 1 – The zipper opening equals zipperlength, plus one inch. Stitches the openingclosed withmachine-bastingand presses theseam open.Step 2 – Place thetop end of the zipper tape even with the edge ofthe fabric. Machine-baste opened zipper to oneseam allowance. Zipper teeth should becentered on seam, as shown in illustration.Step 3 – Close zipper. Spread garment flat,right side up. Stitcharound zipper, about¼ inch from seamline.Lapped ApplicationThe lapped application is ideal for light- tomedium-weight fabrics. It completely concealsthe zipper at back or side openings and resultsin reduced gapping at the waistline.Step 1 – Close the opening withmachine-basting and press seam open.Step 3 – Close zipper and turn face up.Top stitchthrough foldnext to zipperteeth, usingzipper foot toleft of needle.Step 4 – Spreadgarment flat, withzipper face down onseam allowance.Hand baste across thebottom and up alongthe zipper. Turn thegarment to the rightside. Stitch along basting, with zipperfoot to the right of the needle. Removebastings.DIVISION OF AGRICULTURAL SCIENCES AND NATURAL RESOURCES
NameAgeCountyYears of WorkCENTERED AND LAPPED ZIPPER SAMPLESUsing instructions from the opposite side attach samples of lapped and centered zippers. Youmay use a shortened zipper, if you wish.Does your zipper sample meet the following criteria?Lines of stitching are straightZipper moves up and down freelyLapped seam and centered seams cover the zipper completelyFabric lies smooth, with no puckersZipper is appropriate for fabricCENTEREDYesNoLAPPEDYear
No. 813Sample TechniquesBlind Hems – Hand andMachineDESIGN AND CONSTRUCTIONThere are many suitable stitches for sewing ahem. If you want a dressier, more professional,appearance, you will probably want to hem yourgarment by hand. If you’re looking for a moredurable hem, machine-stitching may be whatyou need.Hand Blind Stitch HemThe blind stitch is used for flat-hemming andfor hemming inside a fold or between twopieces of fabric. Work from right to left whenblind-stitching. Use a single thread, with oneend knotted. Secure thread in the seam area.Then pick up one thread in the garment. Next,make a stitch through the hem, about ¼ inchaway. Continue around the garment. Be sure notto pull threads too tight or leave them so loosethat the hem catches.Machine Blind-Stitch HemThere are many times when a machinehem is better than a hand-stitched hem.Knit garments, lingerie, children’sclothing, pants, and home decoratingitems all benefit from machinehemming. The blind-hemming stitch isthe most popular machine stitch forchildren’s clothing, pants, and homeitems. It can be either a straight or stretchstitch and is very secure.Read your sewing machine manual tofind the proper machine settings andmake a test sample before you begin onyour project. Make sure you study thecorrect way to fold your hem for blindstitching. To eliminate bulk, do not use afolded edge on the hem. Finish the rawedge before completing the hem.DIVISION OF AGRICULTURAL SCIENCES AND NATURAL RESOURCES
NameAgeCountyYears of WorkHAND AND MACHINE BLIND STITCH SAMPLESUsing the instructions on the opposite side, attach samples of a hand blind-stitched hem and amachine blind-stitched hem. Samples may be of any f
varies with the type of fabric and the style of the garment and is usually done on a single thickness of fabric. There are at least three ways to finish seams. Edge-Stitch Edges . Set the machine to a straight stitch and guide presser foot along the cut edge of the fabric.